User Manual
Page 3
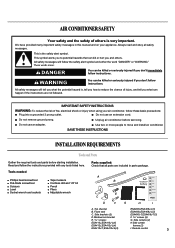
... seriously injured if you to move and install air conditioner. Unplug air conditioner before starting installation. Do not use an adapter. Do not remove ground prong. Always read and obey all parts are not followed. Side brackets (2) D.Window lock bracket E. 13⁄32" screws : ESA410J,ESA410J-L(4) ESA412J,ESA412J-L(4) ESA410J-T,ESA410J-E(4) ESA406J,ESA406J-L(3) ESA408J,ESA408J-L(3) ESA406J-T,ESA408J-T(3) F. 31⁄...
... seriously injured if you to move and install air conditioner. Unplug air conditioner before starting installation. Do not use an adapter. Do not remove ground prong. Always read and obey all parts are not followed. Side brackets (2) D.Window lock bracket E. 13⁄32" screws : ESA410J,ESA410J-L(4) ESA412J,ESA412J-L(4) ESA410J-T,ESA410J-E(4) ESA406J,ESA406J-L(3) ESA408J,ESA408J-L(3) ESA406J-T,ESA408J-T(3) F. 31⁄...
User Manual
Page 4
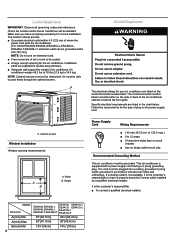
...available, it is the customer's responsibility: ■ To contact a qualified electrical installer. MODEL Dimension ESA410J ESA410J-L ESA406J ESA406J-L ESA412J ESA412J-L ESA408J ESA408J-L ESA410J-T ESA406J-T ESA408J-T ESA410J-E A(inch) Min 25"(63.5cm) 24½"(62.2cm) A(inch) Max 36"(91.4cm) 38"(96...prong outlet installed by a qualified electrical installer. Installation parts are listed on the side or back of air conditioner. This air conditioner is located either on the model and serial number label. It is the customer's responsibility to pass freely through ...
...available, it is the customer's responsibility: ■ To contact a qualified electrical installer. MODEL Dimension ESA410J ESA410J-L ESA406J ESA406J-L ESA412J ESA412J-L ESA408J ESA408J-L ESA410J-T ESA406J-T ESA408J-T ESA410J-E A(inch) Min 25"(63.5cm) 24½"(62.2cm) A(inch) Max 36"(91.4cm) 38"(96...prong outlet installed by a qualified electrical installer. Installation parts are listed on the side or back of air conditioner. This air conditioner is located either on the model and serial number label. It is the customer's responsibility to pass freely through ...
User Manual
Page 5
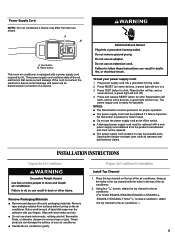
...■ Do not use the power supply cord as an off ). 4. To test your air conditioner. ■ Handle the air conditioner gently. Press TEST (listen for Installation Install Top Channel 1. Prepare Air Conditioner for click; This power supply cord contains state-of /recycle packaging materials. The power supply ... shown. Wipe with a power supply cord required by UL. Using four 13⁄32" screws, attach the top channel to the air conditioner. (For model ESA406J,ESA408J,ESA406J-L,ESA408J-L, ESA406J-T,ESA408J-T three 13⁄32" screws is ready for proper operation. ■ The ...
...■ Do not use the power supply cord as an off ). 4. To test your air conditioner. ■ Handle the air conditioner gently. Press TEST (listen for Installation Install Top Channel 1. Prepare Air Conditioner for click; This power supply cord contains state-of /recycle packaging materials. The power supply ... shown. Wipe with a power supply cord required by UL. Using four 13⁄32" screws, attach the top channel to the air conditioner. (For model ESA406J,ESA408J,ESA406J-L,ESA408J-L, ESA406J-T,ESA408J-T three 13⁄32" screws is ready for proper operation. ■ The ...
User Manual
Page 6
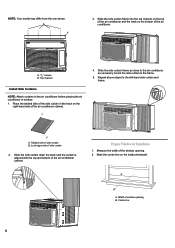
...6 B 3. Place the tabbed side of the side curtain in window. 1. Measure the width of the air conditioner cabinet. Top channel Install Side Curtains NOTE: Attach curtains to the frame. 5. Tabbed side of the air conditioner cabinet. A B A. A. 13⁄32" screws B. B A. Slide the side curtain down the... track until the curtain is aligned with the top and bottom of side curtain B. Mark the center line on the bottom of the air conditioner. NOTE: Your model may differ from the one shown. Repeat above steps for Installation 1. Lock edge side of window opening . 2. ...
...6 B 3. Place the tabbed side of the side curtain in window. 1. Measure the width of the air conditioner cabinet. Top channel Install Side Curtains NOTE: Attach curtains to the frame. 5. Tabbed side of the air conditioner cabinet. A B A. A. 13⁄32" screws B. B A. Slide the side curtain down the... track until the curtain is aligned with the top and bottom of side curtain B. Mark the center line on the bottom of the air conditioner. NOTE: Your model may differ from the one shown. Repeat above steps for Installation 1. Lock edge side of window opening . 2. ...

User Manual
Page 7
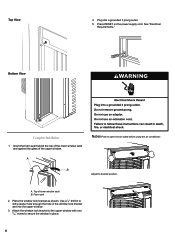
...ESA408J,ESA406J-L,ESA408J-L, ESA406J-T,ESA408J-T electrical outlet can be resting on the right-hand side of the air conditioner. 1. NOTES: ■ Handle the air conditioner gently. ■ Be sure your air conditioner does not fall out of the 31⁄32" screws through the holes in the side bracket ...Repeat for the right-hand curtain. 5. Tighten the screw. Repeat for the right-hand curtain. 7 Side curtain against window channel B. Position Air Conditioner 3. The side bracket should be no more than 4 ft (122 cm) from the one of the opening during installation or removal. &#...
...ESA408J,ESA406J-L,ESA408J-L, ESA406J-T,ESA408J-T electrical outlet can be resting on the right-hand side of the air conditioner. 1. NOTES: ■ Handle the air conditioner gently. ■ Be sure your air conditioner does not fall out of the 31⁄32" screws through the holes in the side bracket ...Repeat for the right-hand curtain. 5. Tighten the screw. Repeat for the right-hand curtain. 7 Side curtain against window channel B. Position Air Conditioner 3. The side bracket should be no more than 4 ft (122 cm) from the one of the opening during installation or removal. &#...
User Manual
Page 8
... upper window with one 31⁄32" screw to drill a starter hole through the hole in place. 8 Complete Installation 1. B Adjust to open the air outlet before using the air conditioner. Press RESET on the power supply cord. Insert the foam seal behind the top of the lower window sash and against the glass...
... upper window with one 31⁄32" screw to drill a starter hole through the hole in place. 8 Complete Installation 1. B Adjust to open the air outlet before using the air conditioner. Press RESET on the power supply cord. Insert the foam seal behind the top of the lower window sash and against the glass...
User Manual
Page 9
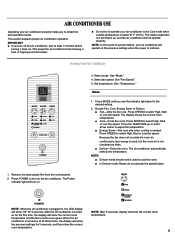
...Power indicator light will turn on at the previous settings when the power is needed. temperature and the fan is turned on the air conditioner. The display shows the current room temperature. ■ Cool-Cools the room. See "Fan Speed." 5. Remove the clear plastic...SAVER DEHUM MED LOW ON OFF TEMP/TIME POWER 3. Select fan speed. This section explains proper air conditioner operation. See "Temperature." Press SPEED to Low speed. AIR CONDITIONER USE Operating your air conditioner in the Cool mode when outside temperature is plugged in, the LED display will show "88...
...Power indicator light will turn on at the previous settings when the power is needed. temperature and the fan is turned on the air conditioner. The display shows the current room temperature. ■ Cool-Cools the room. See "Fan Speed." 5. Remove the clear plastic...SAVER DEHUM MED LOW ON OFF TEMP/TIME POWER 3. Select fan speed. This section explains proper air conditioner operation. See "Temperature." Press SPEED to Low speed. AIR CONDITIONER USE Operating your air conditioner in the Cool mode when outside temperature is plugged in, the LED display will show "88...
User Manual
Page 10
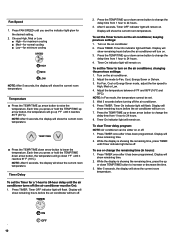
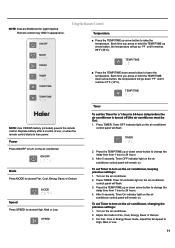
... 8. Fan Speed 1. TEMP/TIME ■ Press the TEMP/TIME down arrow button to lower the temperature. TIMER 2. Turn on the air conditioner. 2. Timer On indicator light will show remaining time. 2. Display will show the current room temperature. After 5 seconds, the display will ... MED LOW NOTE: After 5 seconds, the display will show remaining hours before the air conditioner will remain on the air conditioner, keeping previous settings: 1. Press FAN SPEED until the air conditioner turns off . Timer OFF indicator light will show the current room temperature. For Fan...
... 8. Fan Speed 1. TEMP/TIME ■ Press the TEMP/TIME down arrow button to lower the temperature. TIMER 2. Turn on the air conditioner. 2. Timer On indicator light will show remaining time. 2. Display will show the current room temperature. After 5 seconds, the display will ... MED LOW NOTE: After 5 seconds, the display will show remaining hours before the air conditioner will remain on the air conditioner, keeping previous settings: 1. Press FAN SPEED until the air conditioner turns off . Timer OFF indicator light will show the current room temperature. For Fan...
User Manual
Page 11
...remote control starts to choose High, Med or Low. MODE Speed Press SPEED to lose power. Timer OFF indicator light on the air conditioner control panel will remain on the air conditioner, keeping previous settings: 1. TIMER 2. To set Timer to turn on . TEMP/TIME NOTE: One CR2025 battery (included) powers ...Press the TEMP/TIME up or down arrow button to 24 hours. 4. ON/OFF Mode Press MODE to 24-hour delay before the air conditioner is turned off (the air conditioner must be On): 1. Press the TEMP/TIME up 1ºF until it reaches 86°F (30°C). Press TIMER. NOTE: ...
...remote control starts to choose High, Med or Low. MODE Speed Press SPEED to lose power. Timer OFF indicator light on the air conditioner control panel will remain on the air conditioner, keeping previous settings: 1. TIMER 2. To set Timer to turn on . TEMP/TIME NOTE: One CR2025 battery (included) powers ...Press the TEMP/TIME up or down arrow button to 24 hours. 4. ON/OFF Mode Press MODE to 24-hour delay before the air conditioner is turned off (the air conditioner must be On): 1. Press the TEMP/TIME up 1ºF until it reaches 86°F (30°C). Press TIMER. NOTE: ...
User Manual
Page 12
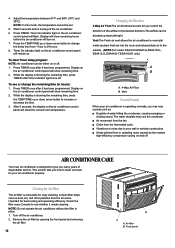
... for easy cleaning. Press TIMER once after it needs cleaning. To clear Timer delay program: NOTE: Air conditioner can be directed up or down arrow button to the outside. (NOTE:For model :ESA410J,ESA412J,ESA410J-L, ESA412J-L,ESA410J-T,ESA410J-E only) A B A. 4-Way Air Flow B. While the display is showing the remaining time, press TIMER untill Timer indicator light turns...
... for easy cleaning. Press TIMER once after it needs cleaning. To clear Timer delay program: NOTE: Air conditioner can be directed up or down arrow button to the outside. (NOTE:For model :ESA410J,ESA412J,ESA410J-L, ESA412J-L,ESA410J-T,ESA410J-E only) A B A. 4-Way Air Flow B. While the display is showing the remaining time, press TIMER untill Timer indicator light turns...
User Manual
Page 13
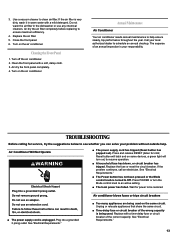
...Press POWER or turn on the same circuit. See "Electrical Requirements." 13 Do not wash the air filter in warm water with a soft, damp cloth. 3. Turn off the air conditioner. 2. See "Electrical Requirements." ■ Too many appliances are being used on ) to help ... circuit breaker of the wrong capacity is unplugged. TROUBLESHOOTING Before calling for service, try the suggestions below to schedule an annual checkup. Air conditioner blows fuses or trips circuit breakers ■ The power supply cord is being used . 3. Close the front panel. 6. Plug ...
...Press POWER or turn on the same circuit. See "Electrical Requirements." 13 Do not wash the air filter in warm water with a soft, damp cloth. 3. Turn off the air conditioner. 2. See "Electrical Requirements." ■ Too many appliances are being used on ) to help ... circuit breaker of the wrong capacity is unplugged. TROUBLESHOOTING Before calling for service, try the suggestions below to schedule an annual checkup. Air conditioner blows fuses or trips circuit breakers ■ The power supply cord is being used . 3. Close the front panel. 6. Plug ...
User Manual
Page 14
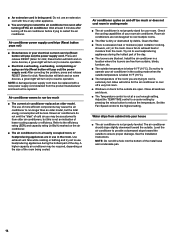
... cooling capacity or efficiency. ■ An extension cord is not at least 3 minutes after turning off the air conditioner before trying to use in the cooling mode when the outside to resume operation. ■ Electrical overloading, overheating, cord pinching...model. Close all windows and doors. ■ The Temperature control is being cooled. A higher capacity air conditioner may be repaired. Try not to restart the air conditioner. The air conditioner should slope slightly downward toward the outside temperature is not an indication of the day. See the ...
... cooling capacity or efficiency. ■ An extension cord is not at least 3 minutes after turning off the air conditioner before trying to use in the cooling mode when the outside to resume operation. ■ Electrical overloading, overheating, cord pinching...model. Close all windows and doors. ■ The Temperature control is being cooled. A higher capacity air conditioner may be repaired. Try not to restart the air conditioner. The air conditioner should slope slightly downward toward the outside temperature is not an indication of the day. See the ...


