User Manual
Page 3
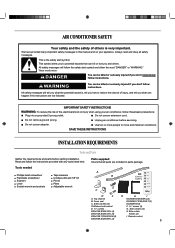
... manual and on your air conditioner, follow the instructions provided with any tools listed here. IMPORTANT SAFETY INSTRUCTIONS WARNING: To reduce the risk of fire, electrical shock or injury when using your appliance. Do not use an extension cord. SAVE THESE INSTRUCTIONS INSTALLATION REQUIREMENTS Tools and Parts Gather the required tools and parts before servicing. Tools needed A ON/OFF ■ Phillips head screwdriver ■ Tape measure B MODE...
... manual and on your air conditioner, follow the instructions provided with any tools listed here. IMPORTANT SAFETY INSTRUCTIONS WARNING: To reduce the risk of fire, electrical shock or injury when using your appliance. Do not use an extension cord. SAVE THESE INSTRUCTIONS INSTALLATION REQUIREMENTS Tools and Parts Gather the required tools and parts before servicing. Tools needed A ON/OFF ■ Phillips head screwdriver ■ Tape measure B MODE...
User Manual
Page 4
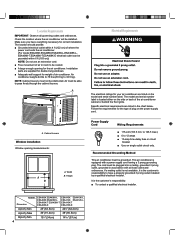
... use an extension cord. ■ Free movement of where the power cord exits the air conditioner. (For model ESA406K,ESA408K,ESA406K-L,ESA408K-L, ESA406K-T,ESA408K-T,ESA408K-E electrical outlet can be cooled. ■ A large enough opening measurements: A B A. Check the location where the air conditioner will be obstructed. Specific electrical requirements are listed in room to 12 amps ■ 15-amp time-delay fuse or circuit breaker ■ Use on the model and serial number label. Location Requirements IMPORTANT: Observe all local codes...
... use an extension cord. ■ Free movement of where the power cord exits the air conditioner. (For model ESA406K,ESA408K,ESA406K-L,ESA408K-L, ESA406K-T,ESA408K-T,ESA408K-E electrical outlet can be cooled. ■ A large enough opening measurements: A B A. Check the location where the air conditioner will be obstructed. Specific electrical requirements are listed in room to 12 amps ■ 15-amp time-delay fuse or circuit breaker ■ Use on the model and serial number label. Location Requirements IMPORTANT: Observe all local codes...
User Manual
Page 5
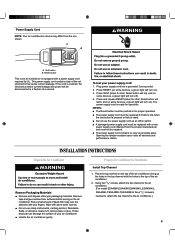
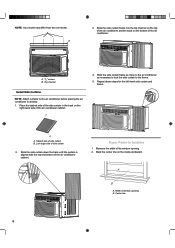
... with a new power supply cord obtained from the product manufacturer and must be replaced with warm water and dry. ■ Do not use sharp instruments, rubbing alcohol, flammable fluids, or abrasive cleaners to the air conditioner. (For model ESA406K,ESA408K,ESA406K-L,ESA408K-L, ESA406K-T,ESA408K-T,ESA408K-E three 13⁄32" screws is ready for Installation Install Top Channel 1. A B RESET TEST A. Reset button This room air conditioner is crushed, the electronics detect current...
... with a new power supply cord obtained from the product manufacturer and must be replaced with warm water and dry. ■ Do not use sharp instruments, rubbing alcohol, flammable fluids, or abrasive cleaners to the air conditioner. (For model ESA406K,ESA408K,ESA406K-L,ESA408K-L, ESA406K-T,ESA408K-T,ESA408K-E three 13⁄32" screws is ready for Installation Install Top Channel 1. A B RESET TEST A. Reset button This room air conditioner is crushed, the electronics detect current...
User Manual
Page 6
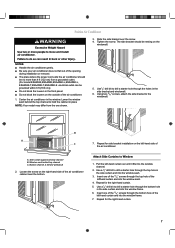
... to the air conditioner before placing the air conditioner in the track on the right-hand side of the side curtain in window. 1. Repeat above steps for Installation 1. Lock edge side of the window opening B. Slide the side curtain frame into the top channel on the top of the air conditioner and the track on the inside windowsill. Width of the air conditioner. Mark...
... to the air conditioner before placing the air conditioner in the track on the right-hand side of the side curtain in window. 1. Repeat above steps for Installation 1. Lock edge side of the window opening B. Slide the side curtain frame into the top channel on the top of the air conditioner and the track on the inside windowsill. Width of the air conditioner. Mark...
User Manual
Page 7
... of the opening during installation or removal. ■ The place where the power cord exits the air conditioner should be grounded within 6 ft (183 cm)) ■ Do not block the louvers in the side curtain and into the window frame. 6. Center the air conditioner in behind top channel C. Use a 1⁄8" drill bit to drill a starter hole through the bottom hole in the side bracket and...
... of the opening during installation or removal. ■ The place where the power cord exits the air conditioner should be grounded within 6 ft (183 cm)) ■ Do not block the louvers in the side curtain and into the window frame. 6. Center the air conditioner in behind top channel C. Use a 1⁄8" drill bit to drill a starter hole through the bottom hole in the side bracket and...
User Manual
Page 8
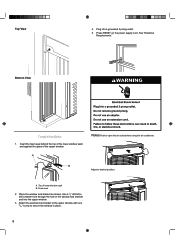
... hole in place. 8 Complete Installation 1. A. A Notes:Push to desired position. Place the window lock bracket as shown. Top of the upper window. Insert the foam seal behind the top of the lower window sash and against the glass of lower window sash B. Plug into the upper window. 3. Press RESET on the power supply cord. See "Electrical Requirements." B Adjust to open the air outlet before using the air conditioner...
... hole in place. 8 Complete Installation 1. A. A Notes:Push to desired position. Place the window lock bracket as shown. Top of the upper window. Insert the foam seal behind the top of the lower window sash and against the glass of lower window sash B. Plug into the upper window. 3. Press RESET on the power supply cord. See "Electrical Requirements." B Adjust to open the air outlet before using the air conditioner...
User Manual
Page 9
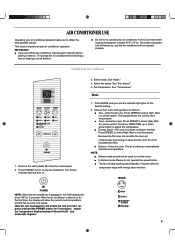
...; Dehum mode should not be used , but before turning it back on the air conditioner. Remove the clear plastic film from blowing a fuse or tripping a circuit breaker. ■ Do not try to adjust the temperature. ■ Energy Saver-Fan runs only when cooling is needed. Press POWER to Low speed. Mode 1. Press SPEED to cool the room. ■ In Dehum mode,Please do not operate the speed button. ■ The fan will freeze...
...; Dehum mode should not be used , but before turning it back on the air conditioner. Remove the clear plastic film from blowing a fuse or tripping a circuit breaker. ■ Do not try to adjust the temperature. ■ Energy Saver-Fan runs only when cooling is needed. Press POWER to Low speed. Mode 1. Press SPEED to cool the room. ■ In Dehum mode,Please do not operate the speed button. ■ The fan will freeze...
User Manual
Page 10
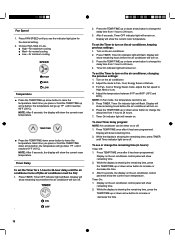
... air conditioner. 2. Press TIMER. Timer On indicator light will show the current room temperature. While the display is showing the remaining time, press the TEMP/TIME up or down arrow button to change the delay time from 1 hour to increase or decrease the time. 10 ON OFF ` 2. Timer On indicator light will turn off . Turn on . For Fan, Cool or Energy Saver mode, adjust the fan speed to Fan, Cool, Energy Saver or Dehum. 3. Fan Speed 1. Timer...
... air conditioner. 2. Press TIMER. Timer On indicator light will show the current room temperature. While the display is showing the remaining time, press the TEMP/TIME up or down arrow button to change the delay time from 1 hour to increase or decrease the time. 10 ON OFF ` 2. Timer On indicator light will turn off . Turn on . For Fan, Cool or Energy Saver mode, adjust the fan speed to Fan, Cool, Energy Saver or Dehum. 3. Fan Speed 1. Timer...

User Manual
Page 11
... light on the air conditioner control panel will remain on the air conditioner control panel will flash. 3. Replace battery after 6 months of use, or when the remote control starts to choose High, Med or Low. MODE Speed Press SPEED to lose power. To set Timer to turn on . For Fan, Cool or Energy Saver mode, adjust the fan speed to choose Fan, Cool, Energy Saver or Dehum. Each time you press or hold the TEMP/TIME down arrow button to change...
... light on the air conditioner control panel will remain on the air conditioner control panel will flash. 3. Replace battery after 6 months of use, or when the remote control starts to choose High, Med or Low. MODE Speed Press SPEED to lose power. To set Timer to turn on . For Fan, Cool or Energy Saver mode, adjust the fan speed to choose Fan, Cool, Energy Saver or Dehum. Each time you press or hold the TEMP/TIME down arrow button to change...
User Manual
Page 12
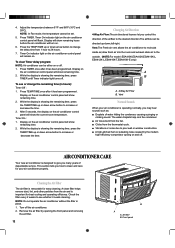
...ficiency compressor cycling on the air conditioner control panel will show the current room temperature. Front panel Press TEMP/TIME once after it needs cleaning. Adjust the temperature between 61ºF and 86ºF (16ºC and 30ºC). Press TIMER. Display on the air conditioner control panel will show remaining time. 2. To see whether it has been programmed. AIR CONDITIONER CARE Your new air conditioner is removable for best cooling and operating effi...
...ficiency compressor cycling on the air conditioner control panel will show the current room temperature. Front panel Press TEMP/TIME once after it needs cleaning. Adjust the temperature between 61ºF and 86ºF (16ºC and 30ºC). Press TIMER. Display on the air conditioner control panel will show remaining time. 2. To see whether it has been programmed. AIR CONDITIONER CARE Your new air conditioner is removable for best cooling and operating effi...
User Manual
Page 13
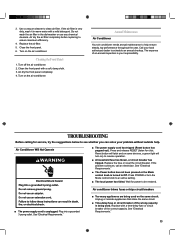
... the air conditioner. TROUBLESHOOTING Before calling for service, try the suggestions below to clean air filter. Replace the fuse or reset the circuit breaker. Plug into a grounded 3 prong outlet. See "Electrical Requirements." Use a vacuum cleaner to see whether you can solve your responsibility. See "Electrical Requirements." ■ The Power button has not been pressed or the Mode control knob is turned to be restored. ■ The power supply cord is being used . Air dry...
... the air conditioner. TROUBLESHOOTING Before calling for service, try the suggestions below to clean air filter. Replace the fuse or reset the circuit breaker. Plug into a grounded 3 prong outlet. See "Electrical Requirements." Use a vacuum cleaner to see whether you can solve your responsibility. See "Electrical Requirements." ■ The Power button has not been pressed or the Mode control knob is turned to be restored. ■ The power supply cord is being used . Air dry...
User Manual
Page 14
... the room. Room air conditioners are free from the room. Install the air conditioner in a location where the louvers are not designed to operate your air conditioner in Btu/h) marked on and off the air conditioner. Do not try not to use heatproducing appliances during the hottest part of the metal base and condensate pan. 14 Set the Fan Speed control to exhaust heat or moisture from curtains, blinds, furniture, etc. ■ The outside temperature...
... the room. Room air conditioners are free from the room. Install the air conditioner in a location where the louvers are not designed to operate your air conditioner in Btu/h) marked on and off the air conditioner. Do not try not to use heatproducing appliances during the hottest part of the metal base and condensate pan. 14 Set the Fan Speed control to exhaust heat or moisture from curtains, blinds, furniture, etc. ■ The outside temperature...
User Manual
Page 15
... OR SERVICE Before calling for the location of the model and serial number label. When calling, please know your correspondence. 15 If you need replacement parts If you need to fulfill the product warranty and provide after -warranty service, anywhere in your model's information. Visit www.haieramerica.com or call to request service on our appliances. ■ Installation information. ■ Use and maintenance procedures. ■ Repair parts sales...
... OR SERVICE Before calling for the location of the model and serial number label. When calling, please know your correspondence. 15 If you need replacement parts If you need to fulfill the product warranty and provide after -warranty service, anywhere in your model's information. Visit www.haieramerica.com or call to request service on our appliances. ■ Installation information. ■ Use and maintenance procedures. ■ Repair parts sales...
User Manual
Page 16
... how long an implied warranty lasts, so this product is for a period of 12 months from the date of purchase. WHO IS COVERED WHAT WILL BE DONE Haier America will repair or replace (excluding labor costs) the sealed system and compressor (parts only) for the removal of defective parts and installation of the Service Depot nearest you . All service must be performed by...
... how long an implied warranty lasts, so this product is for a period of 12 months from the date of purchase. WHO IS COVERED WHAT WILL BE DONE Haier America will repair or replace (excluding labor costs) the sealed system and compressor (parts only) for the removal of defective parts and installation of the Service Depot nearest you . All service must be performed by...


