
Installation Manual
Page 1
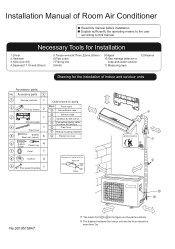
... outdoor units Accessory parts No. The distance between the indoor unit and the floor should be paid to G in the figure are the parts numbers. Accessory parts Number of articles 1 Remote controller 1 Optional parts for piping 2 R-03 dry battery 2 Mark A Parts name Non-adhesive tape B Adhesive tape 3 1 C Saddle(L.S) with screws Mounting plate D Connecting electric cable for the installation of Room Air Conditioner Read this manual before installation Explain sufficiently the operating means to the user...
... outdoor units Accessory parts No. The distance between the indoor unit and the floor should be paid to G in the figure are the parts numbers. Accessory parts Number of articles 1 Remote controller 1 Optional parts for piping 2 R-03 dry battery 2 Mark A Parts name Non-adhesive tape B Adhesive tape 3 1 C Saddle(L.S) with screws Mounting plate D Connecting electric cable for the installation of Room Air Conditioner Read this manual before installation Explain sufficiently the operating means to the user...
Installation Manual
Page 2
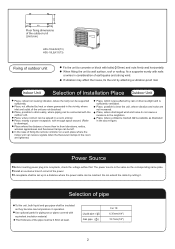
... the remote controller on a wall, place where the indoor unit can be connected with bolts( 10mm) and nuts firmly and horizontally. Place, where discharged wind and noise do not cause a nuisance to bear the unit, where vibration and noise are lightened. Use optional parts for piping set up in the room are not increased. 256 137.5 500 137.5 Floor fixing dimensions of the outdoor unit (Unit:mm) HSU...
... the remote controller on a wall, place where the indoor unit can be connected with bolts( 10mm) and nuts firmly and horizontally. Place, where discharged wind and noise do not cause a nuisance to bear the unit, where vibration and noise are lightened. Use optional parts for piping set up in the room are not increased. 256 137.5 500 137.5 Floor fixing dimensions of the outdoor unit (Unit:mm) HSU...
Installation Manual
Page 3
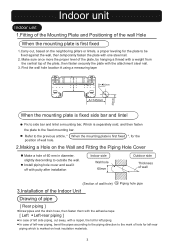
Install piping hole cover and seal it off with putty after installation Indoor side Wall hole 60mm Outdoor side Thickness of wall (Section of wall hole) G Piping hole pipe 3.Installation of the Indoor Unit Drawing of pipe [ Rear piping ] Draw pipes and the drain hose, then fasten them with the adhesive tape [ Left Left-rear piping ] In case of left side piping, cut away, with a nipper, the lid for left -rear piping, bend the pipes according to the...
Install piping hole cover and seal it off with putty after installation Indoor side Wall hole 60mm Outdoor side Thickness of wall (Section of wall hole) G Piping hole pipe 3.Installation of the Indoor Unit Drawing of pipe [ Rear piping ] Draw pipes and the drain hose, then fasten them with the adhesive tape [ Left Left-rear piping ] In case of left side piping, cut away, with a nipper, the lid for left -rear piping, bend the pipes according to the...
Installation Manual
Page 4
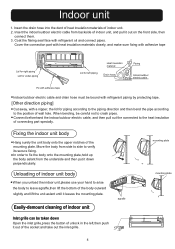
... of unlock in the left piping Heat insulation material Drain hose Piping Indoor/outdoor electric cable Fix with adhesive tape Indoor/outdoor electric cable and drain hose must be taken down perpendicularly. Easily-demount cleaning of wall hole. Indoor unit 1. Connect beforehand the indoor/outdoor electric cable, and then pull out the connected to the position of indoor unit Inlet grille can be bound with refrigerant piping by protecting tape. [Other direction piping] Cut away, with refrigerant oil and connect...
... of unlock in the left piping Heat insulation material Drain hose Piping Indoor/outdoor electric cable Fix with adhesive tape Indoor/outdoor electric cable and drain hose must be taken down perpendicularly. Easily-demount cleaning of wall hole. Indoor unit 1. Connect beforehand the indoor/outdoor electric cable, and then pull out the connected to the position of indoor unit Inlet grille can be bound with refrigerant piping by protecting tape. [Other direction piping] Cut away, with refrigerant oil and connect...
Installation Manual
Page 5
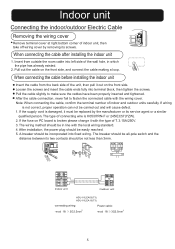
... side. The breaker should be all-pole switch and the distance between its service agent or a similar qualified person. If the supply cord is broken please change it must be replaced by removing its screws. After installation, the power plug should be incorporated into fixed wiring. Indoor unit Connecting the indoor/outdoor Electric Cable Removing the wiring cover Remove terminal cover at right bottom corner of indoor unit, then take off wiring cover by the...
... side. The breaker should be all-pole switch and the distance between its service agent or a similar qualified person. If the supply cord is broken please change it must be replaced by removing its screws. After installation, the power plug should be incorporated into fixed wiring. Indoor unit Connecting the indoor/outdoor Electric Cable Removing the wiring cover Remove terminal cover at right bottom corner of indoor unit, then take off wiring cover by the...
Installation Manual
Page 6
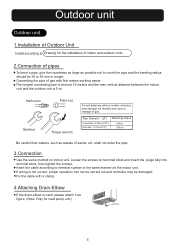
... distance between the indoor unit and the outdoor unit is used, please attach it as wastes of sands, etc. shall not enter the pipe. 3.Connection Use the same method on terminal block and insert the plugs fully into terminal block, then tighten the screws. If wiring is not correct, proper operation can not be carried out and controller may damage the...
... distance between the indoor unit and the outdoor unit is used, please attach it as wastes of sands, etc. shall not enter the pipe. 3.Connection Use the same method on terminal block and insert the plugs fully into terminal block, then tighten the screws. If wiring is not correct, proper operation can not be carried out and controller may damage the...
Installation Manual
Page 7
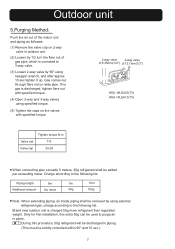
... air in pipes. Outdoor unit 5.Purging Method: Push the air out of the indoor unit and piping as followes: (1) Remove the valve cap on 2-way valve in outdoor unit. (2) Loosen by 1/2 turn the flare nut of gas pipe, which is conneted to 3-way valve. (3) Loosen 2-way valve by using external refrigerant gas, charge according to the following list. Gas comes out through flare nut on wide pipe. Brand new outdoor unit...
... air in pipes. Outdoor unit 5.Purging Method: Push the air out of the indoor unit and piping as followes: (1) Remove the valve cap on 2-way valve in outdoor unit. (2) Loosen by 1/2 turn the flare nut of gas pipe, which is conneted to 3-way valve. (3) Loosen 2-way valve by using external refrigerant gas, charge according to the following list. Gas comes out through flare nut on wide pipe. Brand new outdoor unit...
Installation Manual
Page 8
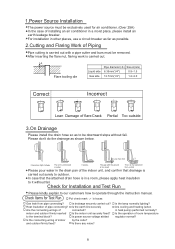
... abided by the code? Is the operation of indoor and outdoor firmly fixed? 1.Power Source Installation The power source must be downward slope without fail. After inserting the flare nut, flaring work is immersed in the drain pan of indoor and outdoor firmly inserted to operate through the instruction manual. The end is carried out. It waves. Heat insulation of installing an air conditioner in heat pump) performed normally? Is...
... abided by the code? Is the operation of indoor and outdoor firmly fixed? 1.Power Source Installation The power source must be downward slope without fail. After inserting the flare nut, flaring work is immersed in the drain pan of indoor and outdoor firmly inserted to operate through the instruction manual. The end is carried out. It waves. Heat insulation of installing an air conditioner in heat pump) performed normally? Is...


