User Manual
Page 2
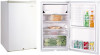
... using this use and care guide. 2) This refrigerator must be discarded. Note: If for any reason this appliance only for freestanding installation only. 11) Do not operate your refrigerator in the presence of the instructions before making any food is poor or questionable, discard it is designed for its intended purpose as you remove the doors and leave the shelving in the installation section...
... using this use and care guide. 2) This refrigerator must be discarded. Note: If for any reason this appliance only for freestanding installation only. 11) Do not operate your refrigerator in the presence of the instructions before making any food is poor or questionable, discard it is designed for its intended purpose as you remove the doors and leave the shelving in the installation section...
User Manual
Page 3
Before you for using our Haier product. This easy-to-use of the refrigerator. SAVE THESE INSTRUCTIONS English DANGER Risk of purchase Staple your receipt to your manual. Remember to obtain warranty service. 2 Model number Serial number Date of child entrapment. Thank you throw away your refrigerator. You will guide you in place so that children may not easily climb inside. Leave the shelves in getting the best use manual will need it to record the model and serial number. They are on a label in back of your old appliance,take off the doors.
Before you for using our Haier product. This easy-to-use of the refrigerator. SAVE THESE INSTRUCTIONS English DANGER Risk of purchase Staple your receipt to your manual. Remember to obtain warranty service. 2 Model number Serial number Date of child entrapment. Thank you throw away your refrigerator. You will guide you in place so that children may not easily climb inside. Leave the shelves in getting the best use manual will need it to record the model and serial number. They are on a label in back of your old appliance,take off the doors.
User Manual
Page 4
... limitations Proper air circulation Electrical requirements Use of extension cords Energy Saving Tip Door Alignment Reversing the Door Hinge REFRIGERATOR FEATURES AND USE General Features Adjustable Temperature Dial Refrigerator Interior Shelves Using, Removing or Replacing the Convertible / Drip Pan Adjusting Door Bins and Can Store Trays Using the Lock Replacing Light Bulb Defrosting Your Refrigerator Food storage information Normal operating sounds PROPER REFRIGERATOR CARE AND CLEANING Cleaning and maintenance Power interruptions Vacation & moving care TROUBLESHOOTING LIMITED WARRANTY PAGE...
... limitations Proper air circulation Electrical requirements Use of extension cords Energy Saving Tip Door Alignment Reversing the Door Hinge REFRIGERATOR FEATURES AND USE General Features Adjustable Temperature Dial Refrigerator Interior Shelves Using, Removing or Replacing the Convertible / Drip Pan Adjusting Door Bins and Can Store Trays Using the Lock Replacing Light Bulb Defrosting Your Refrigerator Food storage information Normal operating sounds PROPER REFRIGERATOR CARE AND CLEANING Cleaning and maintenance Power interruptions Vacation & moving care TROUBLESHOOTING LIMITED WARRANTY PAGE...
User Manual
Page 5
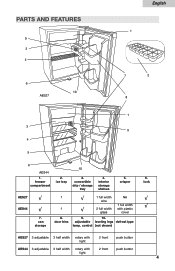
...10 AES27 English 1 7 2 8 1 3 9 4 5 6 AES44 1. convertible drip / storage tray 4. interior storage shelves 5. can storage 8. 9. 10. lock AES27 √ 1 √ 1 full width wire NA √ AES44 √ 1 √ 2 full width glass 1 full width with 2 front push button light 4 freezer compartment 2. door bins adjustable leveling legs defrost type temp. control (not shown) AES27 3 adjustable 3 half width rotary with light 2 front push button AES44 3 adjustable 3 half width rotary with plastic cover √ 7. ice tray 10 3. crisper 6.
...10 AES27 English 1 7 2 8 1 3 9 4 5 6 AES44 1. convertible drip / storage tray 4. interior storage shelves 5. can storage 8. 9. 10. lock AES27 √ 1 √ 1 full width wire NA √ AES44 √ 1 √ 2 full width glass 1 full width with 2 front push button light 4 freezer compartment 2. door bins adjustable leveling legs defrost type temp. control (not shown) AES27 3 adjustable 3 half width rotary with light 2 front push button AES44 3 adjustable 3 half width rotary with plastic cover √ 7. ice tray 10 3. crisper 6.
User Manual
Page 6
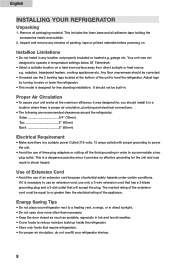
.... • Cover foods to accommodate a two plug outlet. Your unit was designed for free standing installation. Energy Saving Tips • Do not place your refrigerator next to level the refrigerator. Adjust legs by turning to raise or lower the refrigerator. • This model is a suitable power Outlet (115 volts, 15 amps outlet) with proper grounding to power the unit. • Avoid the use only a 3-wire extension cord...
.... • Cover foods to accommodate a two plug outlet. Your unit was designed for free standing installation. Energy Saving Tips • Do not place your refrigerator next to level the refrigerator. Adjust legs by turning to raise or lower the refrigerator. • This model is a suitable power Outlet (115 volts, 15 amps outlet) with proper grounding to power the unit. • Avoid the use only a 3-wire extension cord...
User Manual
Page 7
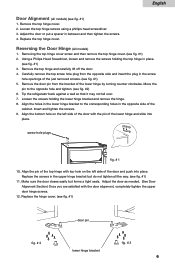
... not tighten all models) (see fig. #1) 1. Remove the top hinge and carefully lift off the door. 4. Move the pin to the corresponding holes in the opposite side of the lower hinge by turning counter clockwise. Align the holes in the lower hinge bracket to the opposite hole and tighten. (see fig. #2) 6. Reversing the Door Hinge (All models) 1. Adjust the door as needed. (See Door Alignment Section...
... not tighten all models) (see fig. #1) 1. Remove the top hinge and carefully lift off the door. 4. Move the pin to the corresponding holes in the opposite side of the lower hinge by turning counter clockwise. Align the holes in the lower hinge bracket to the opposite hole and tighten. (see fig. #2) 6. Reversing the Door Hinge (All models) 1. Adjust the door as needed. (See Door Alignment Section...
User Manual
Page 8
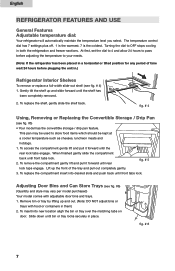
... temperature level you select. At first, set the dial to 4 and allow 24 hours to pass before plugging the unit in.) Refrigerator Interior Shelves To remove or replace a full-width slide-out shelf: (see fig. # 4) 1. fig. # 4 Using, Removing or Replacing the Convertible Storage / Drip Pan (see fig. #6) (Quantity and style may be used to your needs. (Note: If the refrigerator has been placed in both the refrigeration and freezer sections. Remove bin...
... temperature level you select. At first, set the dial to 4 and allow 24 hours to pass before plugging the unit in.) Refrigerator Interior Shelves To remove or replace a full-width slide-out shelf: (see fig. # 4) 1. fig. # 4 Using, Removing or Replacing the Convertible Storage / Drip Pan (see fig. #6) (Quantity and style may be used to your needs. (Note: If the refrigerator has been placed in both the refrigeration and freezer sections. Remove bin...
User Manual
Page 9
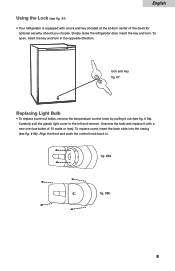
...; Your refrigerator is equipped with a new one (use bulbs of the door) for optional security, should you choose. lock and key fig. #7 Replacing Light Bulb • To replace burnt-out bulbs, remove the temperature control knob by pulling it with a lock and key (located at the bottom center of 15 watts or less). Carefully pull the plastic light cover to the left and remove. To open, insert the key and turn . Align...
...; Your refrigerator is equipped with a new one (use bulbs of the door) for optional security, should you choose. lock and key fig. #7 Replacing Light Bulb • To replace burnt-out bulbs, remove the temperature control knob by pulling it with a lock and key (located at the bottom center of 15 watts or less). Carefully pull the plastic light cover to the left and remove. To open, insert the key and turn . Align...
User Manual
Page 10
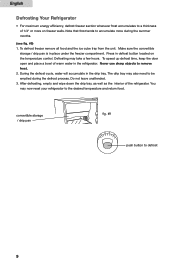
... Defrosting Your Refrigerator • For maximum energy efficiency, defrost freezer section whenever frost accumulates to a thickness of 1/4" or more during the defrost process. Press in the refrigerator. You may also need to accumulate more on the temperature control. To defrost freezer remove all food and the ice cube tray from the unit. After defrosting, empty and wipe down the drip tray, as well as the interior of warm water in defrost button located on freezer...
... Defrosting Your Refrigerator • For maximum energy efficiency, defrost freezer section whenever frost accumulates to a thickness of 1/4" or more during the defrost process. Press in the refrigerator. You may also need to accumulate more on the temperature control. To defrost freezer remove all food and the ice cube tray from the unit. After defrosting, empty and wipe down the drip tray, as well as the interior of warm water in defrost button located on freezer...
User Manual
Page 11
... ensure proper shelf life and prevent the transfer of the refrigerant circulating through the cooling coils. • The thermostat control will prevent unnecessary energy use. • Fresh seafood should be allowed to cool before storing in the refrigerator. • Vegetables with skins should be stored in plastic bags or containers. • Leafy vegetables should be washed and drained and then...
... ensure proper shelf life and prevent the transfer of the refrigerant circulating through the cooling coils. • The thermostat control will prevent unnecessary energy use. • Fresh seafood should be allowed to cool before storing in the refrigerator. • Vegetables with skins should be stored in plastic bags or containers. • Leafy vegetables should be washed and drained and then...
User Manual
Page 12
... applied lightly on the hinge side of baking soda mixed with warm water. Use sponge or soft cloth, dampened with the cleaning solution, to "General cleaning" section. Power Interruptions • Occasionally there may dissolve, damage and/or discolor your convertible freezer / refrigerator. Clean unit before cleaning. Gaskets must be power interruptions due to general instructions. Possible damage to AC outlet. Remove the power cord from AC outlet when a power outage...
... applied lightly on the hinge side of baking soda mixed with warm water. Use sponge or soft cloth, dampened with the cleaning solution, to "General cleaning" section. Power Interruptions • Occasionally there may dissolve, damage and/or discolor your convertible freezer / refrigerator. Clean unit before cleaning. Gaskets must be power interruptions due to general instructions. Possible damage to AC outlet. Remove the power cord from AC outlet when a power outage...
User Manual
Page 13
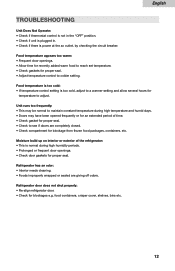
... odors. Refrigerator door does not shut properly: • Re-align refrigerator door. • Check for proper seal. food containers, crisper cover, shelves, bins etc. 12 Moisture build up on interior or exterior of time. • Check gasket for blockage from frozen food packages, containers, etc. Unit runs too frequently: • This may be normal to colder setting. Food temperature appears too warm: • Frequent door openings. •...
... odors. Refrigerator door does not shut properly: • Re-align refrigerator door. • Check for proper seal. food containers, crisper cover, shelves, bins etc. 12 Moisture build up on interior or exterior of time. • Check gasket for blockage from frozen food packages, containers, etc. Unit runs too frequently: • This may be normal to colder setting. Food temperature appears too warm: • Frequent door openings. •...
User Manual
Page 14
... system (e.g. Decorative trims or replaceable light bulbs. This warranty does not cover incidental or consequential damages, so the above limitations may not apply to the components of proper care and maintenance or incorrect current or voltage. Haier America New York, NY 10018 13 This warranty covers all defects in service) The warranty commences on how long an implied warranty lasts, so the above...
... system (e.g. Decorative trims or replaceable light bulbs. This warranty does not cover incidental or consequential damages, so the above limitations may not apply to the components of proper care and maintenance or incorrect current or voltage. Haier America New York, NY 10018 13 This warranty covers all defects in service) The warranty commences on how long an implied warranty lasts, so the above...
User Manual
Page 15
IMPORTANT Do Not Return This Product To The Store If you have a problem with this product, please contact the "Haier Customer Satisfaction Center" at 1-877-337-3639. DATED PROOF OF PURCHASE REQUIRED FOR WARRANTY SERVICE English 115V, 60 Hz Made in China AES27 / AES44 Issued: March 05 Haier America New York, NY 10018 Printed in China
IMPORTANT Do Not Return This Product To The Store If you have a problem with this product, please contact the "Haier Customer Satisfaction Center" at 1-877-337-3639. DATED PROOF OF PURCHASE REQUIRED FOR WARRANTY SERVICE English 115V, 60 Hz Made in China AES27 / AES44 Issued: March 05 Haier America New York, NY 10018 Printed in China


