Graco 3601647-062 - Shelby Classic Convertible Crib Support and Manuals
Get Help and Manuals for this Graco item

View All Support Options Below
Free Graco 3601647-062 manuals!
Problems with Graco 3601647-062?
Ask a Question
Free Graco 3601647-062 manuals!
Problems with Graco 3601647-062?
Ask a Question
Most Recent Graco 3601647-062 Questions

Where Can I Get A Conversion Kit For This Crib To Make It A Tiddler Bed?
(Posted by cavinderholly 12 years ago)
Popular Graco 3601647-062 Manual Pages
Assembly Instructions - Page 1

... or cleaning abrasives as it will need the following tools:
Philips Head screw driver Flat head screw driver Hammer. Crib Ends(Top)
2
B.
Back Rail Middle
1
G.
PARTS LIST
REF. Front Leg
2
D. Back Rail Bottom
1
H.
Enclosed please find simple step-by-step instructions to assembly.
Dropside Rail
1
E.
Bottom Stretcher
1
K. Wood Dowels
30
S.
Block...
Assembly Instructions - Page 2

...use synthetic fabric under hot or cold beverages Do not use abrasive cleaners. Furniture Care Instructions
Room Climate Control
Wood, when first cut contains more than 50 percent water. this natural... out of the furniture. It can damage the furniture finish.
Tolerances have fewer problems when its environment is porous and responds to put your accessories and lamps. Exposure...
Assembly Instructions - Page 4

...
1.
Procedures to have internet or fax access, please call us by e-mail at any questions:
For best and most timely service please contact us at 888-266-2848 and be found on the foot/headboard of furniture. Place and date of the case or...
3. Product Assistance Procedures
You have internet access, please fax the above information ready to give to your Client Service Specialist.
Assembly Instructions - Page 5

... IS IN CRIB.
• WHEN CHILD IS ABLE TO PULL TO STANDING POSITION, SET MATTRESS TO LOWEST POSITION AND REMOVE BUMPER PADS, LARGE TOYS AND OTHER OBJECTS THAT COULD... BE USED. KEEP INSTRUCTIONS FOR FUTURE USE.
• UPON COMPLETION OF ASSEMBLY BE SURE ALL SCREWS, BOLTS AND FASTENING DEVICES HAVE BEEN SECURELY TIGHTENED. FOR REPLACEMENT PARTS AND INSTRUCTIONAL LITERATURE IF NEEDED.
Cranbury...
Assembly Instructions - Page 6
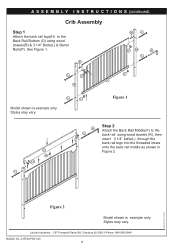
... 3 1/4" bolts(L) ,through the back rail legs into the threaded insets onto the back rail middle as shown in Figure 2. See Figure 1.
PRINTED IN CHINA
Figure 2
Model shown is example only.
A-RTAUPS01-00
6 LaJobi Industries. - 257 Prospect Plains Rd. A S S E M B L Y I N S T R U C T I O N S (continued)
Crib Assembly
Step 1
Attach the back rail legs(H) to the back rail...
Assembly Instructions - Page 7
...
U
in the figure 4 & 4A. Styles may vary.
Cranbury,NJ 08512-Phone: 888-266-2848 Bulletin No. E
U
G
F
I
Figure 4
Figure 4A
Model shown is example only.
LaJobi Industries. - 257 Prospect Plains Rd. Styles may vary. E R
F
Model shown is example only. A S S E M B L Y I N S T R U C T I )
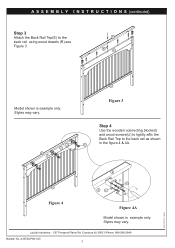
and wood screws(U) to tightly affix the
Back Rail Top to the
back rail...
Assembly Instructions - Page 8
A-RTAUPS01-00
8 Styles may vary. PRINTED IN CHINA
Figure 6
Model shown is example only. A R
N Q
B
Figure 5
L Q
C R
P
L
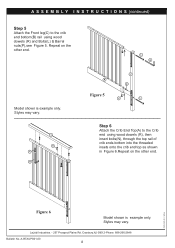
Step 6
Attach the... threaded insets onto the crib end top as shown in Figure 6.Repeat on the other end. Cranbury,NJ 08512-Phone: 888-266-2848 Bulletin No.
Model shown is example only. A S S E M B L Y I N S T R U C T I O N S (continued)
Step 5
Attach the Front ...
Assembly Instructions - Page 9
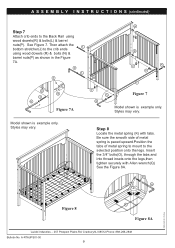
... See Figure 7. Styles may vary. Then attach the
L
bottom stretcher(J) to the selected position onto the legs. Model shown is example only. Be sure the smooth side of metal spring is paced upward.Position the tabs of metal ... thread insets onto the legs,then tighten securely with tabs. Q
L
P
R
B
N Q
J R
P Q
Figure 7A
R
R
N P
P
J
N
Figure 7
Model shown is example only.
Assembly Instructions - Page 10

Insert the foot casters (S) as shown in Figure 9C and tighten all bolts are tight. Cranbury,NJ 08512-Phone: 888-266-2848
Bulletin No.
D
D C
T
Model shown is assembled correctly and all bolts.Inspect the crib to make sure it is example only. Styles may vary. A-RTAUPS01-00
10 Screw the (2) ...
Assembly Instructions - Page 11

... highest point. STEP B
Press the rail inward, then lower it 's hightest point. LaJobi Industries. - 257 Prospect Plains Rd. A-RTAUPS01-00
11
PRINTED IN CHINA
A S S E M B L Y I N S T R U C T I O N S (continued)
Model shown is at it's hightest point,lower it a little and it will lock into place. Styles may vary.
To raise the dropside Lift the dropside...
Assembly Instructions - Page 12

...Bulletin No. FOR TODDLER BED USE
• Failure to a toddler/day bed. LaJobi Industries. - 257 Prospect Plains Rd. D
Figure 11A
Model shown is example only.
A S S E M B L Y I N S T R U C T I O N S (continued...shall be greater than 50 Lbs. (22.7Kg). Simply follow these warnings and assembly instructions could result in . (100mm) or a greaterthickness as specified by the manufacturer. &#...
Assembly Instructions - Page 13
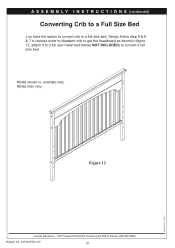
Styles may vary. A S S E M B L Y I N S T R U C T I O N S (continued)
Converting Crib to a Full Size Bed
You have the option to convert crib to convert a full size bed
Model shown is example only. Simply follow step 9 & 8 & 7 in reverse order to disattach crib to get the headboard as shown in figure 12, attach it to a ...
Graco 3601647-062 Reviews
We have not received any reviews for Graco yet.