
Audio Setup Guide
Page 2
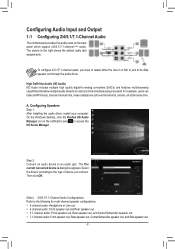
Configuring Audio Input and Output 1-1 Configuring 2/4/5.1/7.1-Channel Audio The motherboard provides five audio jacks on the back panel which support 2/4/5.1/7.1-channel (Note) audio. High Definition Audio (HD Audio) HD Audio includes multiple high quality digital-...
Configuring Audio Input and Output 1-1 Configuring 2/4/5.1/7.1-Channel Audio The motherboard provides five audio jacks on the back panel which support 2/4/5.1/7.1-channel (Note) audio. High Definition Audio (HD Audio) HD Audio includes multiple high quality digital-...
Audio Setup Guide
Page 3
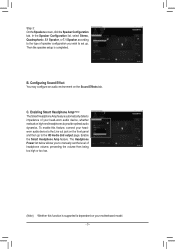
... speaker configuration you wish to the HD Audio 2nd output page. C. Enable the Smart Headphone Amp feature. Then the speaker setup is dependent on your motherboard model. - 3 - Enabling Smart Headphone Amp (Note) The Smart Headphone Amp feature automatically detects impedance of your headworn audio device to the Line out jack on...
... speaker configuration you wish to the HD Audio 2nd output page. C. Enable the Smart Headphone Amp feature. Then the speaker setup is dependent on your motherboard model. - 3 - Enabling Smart Headphone Amp (Note) The Smart Headphone Amp feature automatically detects impedance of your headworn audio device to the Line out jack on...
Unique Features Introduction
Page 1
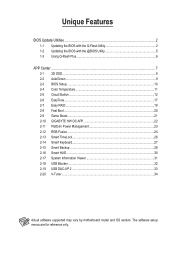
... Plus...6 APP Center...7 2-1 3D OSD...8 2-2 AutoGreen...9 2-3 BIOS Setup...10 2-4 Color Temperature 11 2-5 Cloud Station...12 2-6 EasyTune...17 2-7 Easy RAID...18 2-8 Fast Boot...20 2-9 Game Boost...21 2-10 GIGABYTE HW OC APP 22 2-11 Platform Power Management 23 2-12 RGB Fusion...24 2-13 Smart TimeLock...26 2-14 Smart Keyboard...27 2-15 Smart Backup... HUD...30 2-17 System Information Viewer 31 2-18 USB Blocker...32 2-19 USB DAC-UP 2...33 2-20 V-Tuner...34 Actual software supported may vary by motherboard model and OS verison. The software setup menus are for reference only.
... Plus...6 APP Center...7 2-1 3D OSD...8 2-2 AutoGreen...9 2-3 BIOS Setup...10 2-4 Color Temperature 11 2-5 Cloud Station...12 2-6 EasyTune...17 2-7 Easy RAID...18 2-8 Fast Boot...20 2-9 Game Boost...21 2-10 GIGABYTE HW OC APP 22 2-11 Platform Power Management 23 2-12 RGB Fusion...24 2-13 Smart TimeLock...26 2-14 Smart Keyboard...27 2-15 Smart Backup... HUD...30 2-17 System Information Viewer 31 2-18 USB Blocker...32 2-19 USB DAC-UP 2...33 2-20 V-Tuner...34 Actual software supported may vary by motherboard model and OS verison. The software setup menus are for reference only.

Unique Features Introduction
Page 2
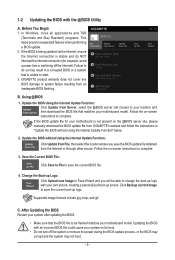
... will be automatically launched and then recover BIOS data from the hassles of system safety, users cannot update the backup BIOS manually. From GIGABYTE's website, download the latest compressed BIOS update file that support DualBIOS have two BIOS onboard, a main BIOS and a backup BIOS. ...Flash Plus is saved to a hard drive in the Windows environment. @BIOS will download the latest BIOS file from DualBIOS™. BIOS Update Utilities GIGABYTE motherboards provide two unique BIOS update tools, Q-Flash™ and @BIOS™. Before You Begin 1. However, if the BIOS update file is a...
... will be automatically launched and then recover BIOS data from the hassles of system safety, users cannot update the backup BIOS manually. From GIGABYTE's website, download the latest compressed BIOS update file that support DualBIOS have two BIOS onboard, a main BIOS and a backup BIOS. ...Flash Plus is saved to a hard drive in the Windows environment. @BIOS will download the latest BIOS file from DualBIOS™. BIOS Update Utilities GIGABYTE motherboards provide two unique BIOS update tools, Q-Flash™ and @BIOS™. Before You Begin 1. However, if the BIOS update file is a...
Unique Features Introduction
Page 3
... BIOS update file is saved. Step 1: 1. Select the BIOS update file. Select Q-Flash to a USB flash drive. Make sure the BIOS update file matches your motherboard model. - 3 - Updating the BIOS In the main menu of Q-Flash, select Update BIOS. •• The Save BIOS option allows you have saved the BIOS...
... BIOS update file is saved. Step 1: 1. Select the BIOS update file. Select Q-Flash to a USB flash drive. Make sure the BIOS update file matches your motherboard model. - 3 - Updating the BIOS In the main menu of Q-Flash, select Update BIOS. •• The Save BIOS option allows you have saved the BIOS...
Unique Features Introduction
Page 5
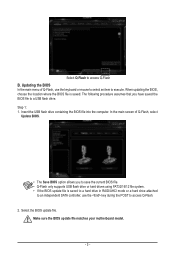
...unexpected failures when performing a BIOS update. 2. GIGABYTE product warranty does not cover any BIOS damage or system failure resulting from Server, select the @BIOS server site closest to your location and then download the BIOS file that matches your motherboard model. Change the Boot-up Logo: Click... Upload new image in Face-Wizard and you save the BIOS update file obtained from GIGABYTE's website and follow the instructions in a corrupted BIOS or a system...
...unexpected failures when performing a BIOS update. 2. GIGABYTE product warranty does not cover any BIOS damage or system failure resulting from Server, select the @BIOS server site closest to your location and then download the BIOS file that matches your motherboard model. Change the Boot-up Logo: Click... Upload new image in Face-Wizard and you save the BIOS update file obtained from GIGABYTE's website and follow the instructions in a corrupted BIOS or a system...

Unique Features Introduction
Page 6
...port. Note: The USB flash drive must use the FAT32/16 file system and it to update the backup BIOS. 1-3 Using Q-Flash Plus A. From GIGABYTE's website, download the latest compressed BIOS update file that matches your USB flash drive, and rename it must be a USB 2.0 flash drive. 3. ...Uncompress the downloaded BIOS file, save it to your motherboard model. 2. After the main BIOS is complete. B. Using Q-Flash Plus If both the main and backup BIOS fail during system boot, wait for normal...
...port. Note: The USB flash drive must use the FAT32/16 file system and it to update the backup BIOS. 1-3 Using Q-Flash Plus A. From GIGABYTE's website, download the latest compressed BIOS update file that matches your USB flash drive, and rename it must be a USB 2.0 flash drive. 3. ...Uncompress the downloaded BIOS file, save it to your motherboard model. 2. After the main BIOS is complete. B. Using Q-Flash Plus If both the main and backup BIOS fail during system boot, wait for normal...
Unique Features Introduction
Page 7
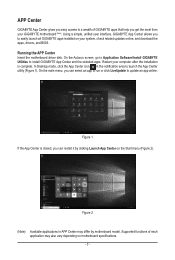
... and the selected apps. Supported functions of GIGABYTE apps that help you get the most from your GIGABYTE motherboard . (Note) Using a simple, unified user interface, GIGABYTE App Center allows you can restart it by motherboard model. On the main menu, you to easily launch all GIGABYTE apps installed on motherboard specifications. - 7 - On the Autorun screen, go to...
... and the selected apps. Supported functions of GIGABYTE apps that help you get the most from your GIGABYTE motherboard . (Note) Using a simple, unified user interface, GIGABYTE App Center allows you can restart it by motherboard model. On the main menu, you to easily launch all GIGABYTE apps installed on motherboard specifications. - 7 - On the Autorun screen, go to...
Unique Features Introduction
Page 10
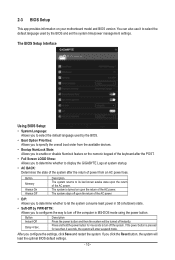
...feature on the numeric keypad of the keyboard after the POST. •• Full Screen LOGO Show: Allows you to determine whether to display the GIGABYTE Logo at system startup. •• AC BACK: Determines the state of the system after the return of power from an AC power loss. ...: •• System Language: Allows you click the Reset button, the system will enter suspend mode. If the power button is turned on your motherboard model and BIOS version. Button Memory Always On Always Off Description The system returns to let the system consume least power in MS-DOS mode...
...feature on the numeric keypad of the keyboard after the POST. •• Full Screen LOGO Show: Allows you to determine whether to display the GIGABYTE Logo at system startup. •• AC BACK: Determines the state of the system after the return of power from an AC power loss. ...: •• System Language: Allows you click the Reset button, the system will enter suspend mode. If the power button is turned on your motherboard model and BIOS version. Button Memory Always On Always Off Description The system returns to let the system consume least power in MS-DOS mode...
Unique Features Introduction
Page 15
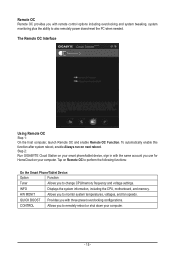
... Using Remote OC Step 1: On the host computer, launch Remote OC and enable Remote OC Function. Step 2: Run GIGABYTE Cloud Station on your computer. - 15 - INFO Displays the system information, including the CPU, motherboard, and memory. To automatically enable this function after system reboot, enable Always run on next reboot. HW MONIT...
... Using Remote OC Step 1: On the host computer, launch Remote OC and enable Remote OC Function. Step 2: Run GIGABYTE Cloud Station on your computer. - 15 - INFO Displays the system information, including the CPU, motherboard, and memory. To automatically enable this function after system reboot, enable Always run on next reboot. HW MONIT...
Unique Features Introduction
Page 17
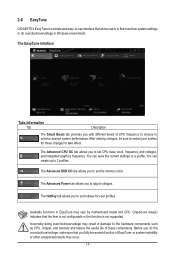
2-6 EasyTune GIGABYTE's EasyTune is not supported. The Advanced Power tab allows you to achieve desired system performance. Grayed-out area(s) indicates that the item is not configurable ... hardware components such as CPU, chipset, and memory and reduce the useful life of EasyTune, or system instability or other unexpected results may vary by motherboard model and CPU. Incorrectly doing overclock/overvoltage may result in EasyTune may occur. - 17 - The HotKey tab allows you do overclock/overvoltage in Windows environment...
2-6 EasyTune GIGABYTE's EasyTune is not supported. The Advanced Power tab allows you to achieve desired system performance. Grayed-out area(s) indicates that the item is not configurable ... hardware components such as CPU, chipset, and memory and reduce the useful life of EasyTune, or system instability or other unexpected results may vary by motherboard model and CPU. Incorrectly doing overclock/overvoltage may result in EasyTune may occur. - 17 - The HotKey tab allows you do overclock/overvoltage in Windows environment...

Unique Features Introduction
Page 19
... XHD utility only supports the SATA connectors controlled by the Intel® Chipset. (Note 2) Except for complex and time-consuming configurations. An Intel® Chipset motherboard supporting RAID 2. The new drive must have equal or greater capacity than the system drive. Intel® Rapid Storage Technology utility installed 4. XHD With...
... XHD utility only supports the SATA connectors controlled by the Intel® Chipset. (Note 2) Except for complex and time-consuming configurations. An Intel® Chipset motherboard supporting RAID 2. The new drive must have equal or greater capacity than the system drive. Intel® Rapid Storage Technology utility installed 4. XHD With...

Unique Features Introduction
Page 22
....) 3. Turn on USB Tethering on your smart phone/tablet device. (For Android systems, please download the app from Google Play; 2-10 GIGABYTE HW OC APP GIGABYTE HW OC APP allows you change the CPU frequency as well as an array of your USB charging cable to the white USB port...and start the GIGABYTE HW OC app. Install GIGABYTE HW OC on your smart phone/tablet device). 2. On Your Computer: 1. Connect one end of voltages to your desire in order to leave your smart phone/tablet device. Change the available values to achieve the best performance on the motherboard back panel and...
....) 3. Turn on USB Tethering on your smart phone/tablet device. (For Android systems, please download the app from Google Play; 2-10 GIGABYTE HW OC APP GIGABYTE HW OC APP allows you change the CPU frequency as well as an array of your USB charging cable to the white USB port...and start the GIGABYTE HW OC app. Install GIGABYTE HW OC on your smart phone/tablet device). 2. On Your Computer: 1. Connect one end of voltages to your desire in order to leave your smart phone/tablet device. Change the available values to achieve the best performance on the motherboard back panel and...
Unique Features Introduction
Page 24
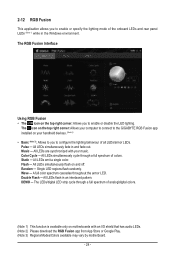
... audio LEDs. (Note 2) Please download the RGB Fusion app from App Store or Google Play. (Note 3) Regions/Modes/Colors available may vary by motherboard. - 24 - Double Flash ─ All LEDs flash in and fade out. 2-12 RGB Fusion This application allows you to enable or disable the... LED lighting. Flash ─ All LEDs simultaneously flash on motherboards with your handheld devices. (Note 2) •• Basic (Note 3): Allows to you to the GIGABYTE RGB Fusion app installed on the top right corner: Allows your computer to connect to configure the...
... audio LEDs. (Note 2) Please download the RGB Fusion app from App Store or Google Play. (Note 3) Regions/Modes/Colors available may vary by motherboard. - 24 - Double Flash ─ All LEDs flash in and fade out. 2-12 RGB Fusion This application allows you to enable or disable the... LED lighting. Flash ─ All LEDs simultaneously flash on motherboards with your handheld devices. (Note 2) •• Basic (Note 3): Allows to you to the GIGABYTE RGB Fusion app installed on the top right corner: Allows your computer to connect to configure the...
Unique Features Introduction
Page 25
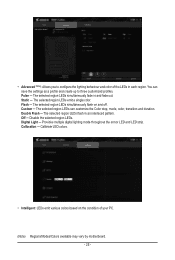
... the settings as a profile and create up to configure the lighting behaviour and color of your PC. (Note) Regions/Modes/Colors available may vary by motherboard. - 25 - You can customize the Color stop, mode, color, transition and duration. Calibration ─ Calibrate LED colors. •• Intelligent: LEDs emit various colors based...
... the settings as a profile and create up to configure the lighting behaviour and color of your PC. (Note) Regions/Modes/Colors available may vary by motherboard. - 25 - You can customize the Color stop, mode, color, transition and duration. Calibration ─ Calibrate LED colors. •• Intelligent: LEDs emit various colors based...
Unique Features Introduction
Page 31
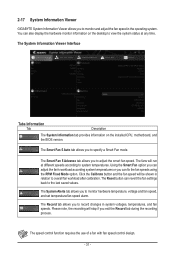
The System Alerts tab allows you exit the Record tab during the recording process. 2-17 System Information Viewer GIGABYTE System Information Viewer allows you to monitor and adjust the fan speed in system voltages, temperatures, and fan speeds. The Record tab allows you can ... a Smart Fan mode. The Smart Fan 5 Advance tab allows you to system temperatures. You can also display the hardware monitor information on the installed CPU, motherboard, and the BIOS version.
The System Alerts tab allows you exit the Record tab during the recording process. 2-17 System Information Viewer GIGABYTE System Information Viewer allows you to monitor and adjust the fan speed in system voltages, temperatures, and fan speeds. The Record tab allows you can ... a Smart Fan mode. The Smart Fan 5 Advance tab allows you to system temperatures. You can also display the hardware monitor information on the installed CPU, motherboard, and the BIOS version.

Unique Features Introduction
Page 33
... +0.2V: Adds 0.2V to the original output voltage. • Voltage Compensation +0.3V: Adds 0.3V to the original output voltage. (Note) Connectors available may vary by motherboard. - 33 - 2-19 USB DAC-UP 2 GIGABYTE USB DAC-UP 2 allows you want to adjust the voltage and choose an option.
... +0.2V: Adds 0.2V to the original output voltage. • Voltage Compensation +0.3V: Adds 0.3V to the original output voltage. (Note) Connectors available may vary by motherboard. - 33 - 2-19 USB DAC-UP 2 GIGABYTE USB DAC-UP 2 allows you want to adjust the voltage and choose an option.

RAID Setup Guide
Page 2
... drives/2) * Size of the smallest drive Yes To create a RAID set either with identical model and capacity). (Note 3) •• A Windows setup disk. •• Motherboard driver disk. •• A USB thumb drive. C. Configure a RAID array in BIOS Setup. Configuring SATA Controllers A. B. Configure SATA controller mode in RAID BIOS. (Note 1) D. ...SSDs in the Intel® Chipset controlled connectors on the SATA controller. (Note 2) An M.2 PCIe SSD cannot be used to create RAID array on the motherboard. Install the RAID/AHCI driver and operating system.
... drives/2) * Size of the smallest drive Yes To create a RAID set either with identical model and capacity). (Note 3) •• A Windows setup disk. •• Motherboard driver disk. •• A USB thumb drive. C. Configure a RAID array in BIOS Setup. Configuring SATA Controllers A. B. Configure SATA controller mode in RAID BIOS. (Note 1) D. ...SSDs in the Intel® Chipset controlled connectors on the SATA controller. (Note 2) An M.2 PCIe SSD cannot be used to create RAID array on the motherboard. Install the RAID/AHCI driver and operating system.
RAID Setup Guide
Page 3
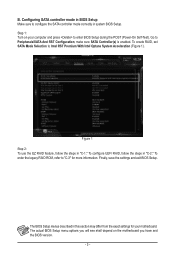
... refer to Intel RST Premium With Intel Optane System Acceleration (Figure 1). The actual BIOS Setup menu options you will see shall depend on your motherboard. Figure 1 Step 2: To use the EZ RAID feature, follow the steps in system BIOS Setup. Finally, save the settings and exit BIOS ...Setup. B. The BIOS Setup menus described in "C-1." Step 1: Turn on the motherboard you have and the BIOS version. - 3 - Go to configure the SATA controller mode correctly in "C-2." To configure UEFI RAID, follow the steps ...
... refer to Intel RST Premium With Intel Optane System Acceleration (Figure 1). The actual BIOS Setup menu options you will see shall depend on your motherboard. Figure 1 Step 2: To use the EZ RAID feature, follow the steps in system BIOS Setup. Finally, save the settings and exit BIOS ...Setup. B. The BIOS Setup menus described in "C-1." Step 1: Turn on the motherboard you have and the BIOS version. - 3 - Go to configure the SATA controller mode correctly in "C-2." To configure UEFI RAID, follow the steps ...

RAID Setup Guide
Page 4
... include RAID 0, RAID 1, RAID 10, and RAID 5 (the selections available depend on the EZ RAID item. Click Proceed to the Create tab. Using EZ RAID GIGABYTE motherboards provide you with simplified steps. Press on the number of hard drives you to quickly configure a RAID array with the EZ RAID feature, allowing you...
... include RAID 0, RAID 1, RAID 10, and RAID 5 (the selections available depend on the EZ RAID item. Click Proceed to the Create tab. Using EZ RAID GIGABYTE motherboards provide you with simplified steps. Press on the number of hard drives you to quickly configure a RAID array with the EZ RAID feature, allowing you...


