
Audio Setup Guide
Page 2
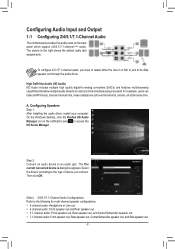
...) and features multistreaming capabilities that allow multiple audio streams (in and out) to be Side speaker out through the audio driver. On the Windows desktop, click the Realtek HD Audio Manager icon in jack to an audio jack. Select the device ... speaker out, Rear speaker out, Center/Subwoofer speaker out, and Side speaker out. - 2 - Configuring Speakers Step 1: After installing the audio driver, restart your computer. Configuring Audio Input and Output 1-1 Configuring 2/4/5.1/7.1-Channel Audio The motherboard provides five audio jacks on the back panel which support ...
...) and features multistreaming capabilities that allow multiple audio streams (in and out) to be Side speaker out through the audio driver. On the Windows desktop, click the Realtek HD Audio Manager icon in jack to an audio jack. Select the device ... speaker out, Rear speaker out, Center/Subwoofer speaker out, and Side speaker out. - 2 - Configuring Speakers Step 1: After installing the audio driver, restart your computer. Configuring Audio Input and Output 1-1 Configuring 2/4/5.1/7.1-Channel Audio The motherboard provides five audio jacks on the back panel which support ...
Audio Setup Guide
Page 6
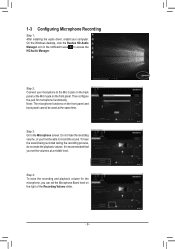
1-3 Configuring Microphone Recording Step 1: After installing the audio driver, restart your microphone to the Mic in jack on the back panel or the Mic in the notification area to access the HD Audio Manager. ...
1-3 Configuring Microphone Recording Step 1: After installing the audio driver, restart your microphone to the Mic in jack on the back panel or the Mic in the notification area to access the HD Audio Manager. ...
Unique Features Introduction
Page 7
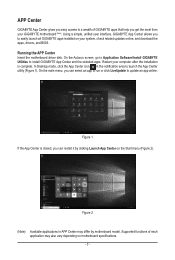
...is closed, you can select an app to run or click LiveUpdate to easily launch all GIGABYTE apps installed on the Start menu (Figure 2). Running the APP Center Insert the motherboard driver disk. In Desktop mode, click the App Center icon in APP Center may also vary ...depending on motherboard specifications. - 7 - On the Autorun screen, go to Application Software\Install GIGABYTE Utilities to launch the App Center utility (Figure 1). Figure...
...is closed, you can select an app to run or click LiveUpdate to easily launch all GIGABYTE apps installed on the Start menu (Figure 2). Running the APP Center Insert the motherboard driver disk. In Desktop mode, click the App Center icon in APP Center may also vary ...depending on motherboard specifications. - 7 - On the Autorun screen, go to Application Software\Install GIGABYTE Utilities to launch the App Center utility (Figure 1). Figure...

Unique Features Introduction
Page 19
... RAID 2. Intel® SATA controller driver installed 5. B. Back up your hard drive read/write performance without the need (Note 2). (Note 1) The XHD utility only supports the SATA connectors controlled by the Intel® Chipset. (Note 2) Except for RAID 0 when a new SATA drive is added. A. XHD With GIGABYTE XHD (Note 1), users can quickly...
... RAID 2. Intel® SATA controller driver installed 5. B. Back up your hard drive read/write performance without the need (Note 2). (Note 1) The XHD utility only supports the SATA connectors controlled by the Intel® Chipset. (Note 2) Except for RAID 0 when a new SATA drive is added. A. XHD With GIGABYTE XHD (Note 1), users can quickly...

Unique Features Introduction
Page 34
...The V-Tuner Interface Using V-Tuner You can manually overclock the GPU and memory (Note 2) or adjust the fan speed and power settings. 2-20 V-Tuner GIGABYTE V-Tuner (Note 1) allows you to easily fine-tune your graphics card status at any time. To set the fan speed you need to 4 profiles.... using V-Tuner, be sure to monitor your graphics card in the Windows environment. To check the graphics card status, you to install the graphics card driver first. (Note 2) Items available may vary by graphics cards. - 34 - It also allows you can save the current settings to a profile and create ...
...The V-Tuner Interface Using V-Tuner You can manually overclock the GPU and memory (Note 2) or adjust the fan speed and power settings. 2-20 V-Tuner GIGABYTE V-Tuner (Note 1) allows you to easily fine-tune your graphics card status at any time. To set the fan speed you need to 4 profiles.... using V-Tuner, be sure to monitor your graphics card in the Windows environment. To check the graphics card status, you to install the graphics card driver first. (Note 2) Items available may vary by graphics cards. - 34 - It also allows you can save the current settings to a profile and create ...

RAID Setup Guide
Page 1
Configuring a RAID Set Configuring SATA Controllers 2 Installing the RAID/AHCI Driver and Operating System 16 Installing an Intel® Optane™ Memory 19
Configuring a RAID Set Configuring SATA Controllers 2 Installing the RAID/AHCI Driver and Operating System 16 Installing an Intel® Optane™ Memory 19

RAID Setup Guide
Page 2
...performance, it is recommended that you do not want to set up a RAID set , follow the steps below: A. Install the RAID/AHCI driver and operating system. B. Configure SATA controller mode in RAID BIOS. (Note 1) D. Installing hard drives Install the hard drives/SSDs in your ... drive Yes To create a RAID set either with identical model and capacity). (Note 3) •• A Windows setup disk. •• Motherboard driver disk. •• A USB thumb drive. Install SATA hard drive(s) or SSDs in the Intel® Chipset controlled connectors on the SATA controller. ...
...performance, it is recommended that you do not want to set up a RAID set , follow the steps below: A. Install the RAID/AHCI driver and operating system. B. Configure SATA controller mode in RAID BIOS. (Note 1) D. Installing hard drives Install the hard drives/SSDs in your ... drive Yes To create a RAID set either with identical model and capacity). (Note 3) •• A Windows setup disk. •• Motherboard driver disk. •• A USB thumb drive. Install SATA hard drive(s) or SSDs in the Intel® Chipset controlled connectors on the SATA controller. ...
RAID Setup Guide
Page 12
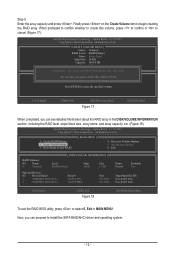
... SELECTED DISKS WILL BE LOST. [ HELP ] Are you sure you want to create this volume, press to confirm or to install the SATA RAID/AHCI driver and operating system. - 12 - Acceleration Options 6. Create RAID Volume 2. Finally press on the Create Volume item to create the specified volume. [hi]-Change [TAB]-Next...
... SELECTED DISKS WILL BE LOST. [ HELP ] Are you sure you want to create this volume, press to confirm or to install the SATA RAID/AHCI driver and operating system. - 12 - Acceleration Options 6. Create RAID Volume 2. Finally press on the Create Volume item to create the specified volume. [hi]-Change [TAB]-Next...
RAID Setup Guide
Page 16
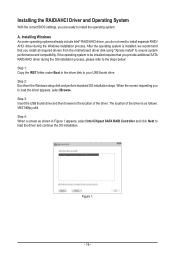
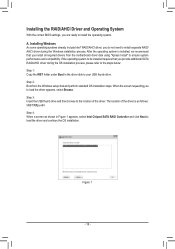
... the operating system. Step 3: Insert the USB thumb drive and then browse to the location of the driver is installed, we recommend that you install all required drivers from the Windows setup disk and perform standard OS installation steps. Installing Windows As some operating systems already ...include Intel® RAID/AHCI driver, you do not need to install separate RAID/ AHCI driver during the OS installation process, please refer to the steps below: Step 1: Copy the IRST folder under ...
... the operating system. Step 3: Insert the USB thumb drive and then browse to the location of the driver is installed, we recommend that you install all required drivers from the Windows setup disk and perform standard OS installation steps. Installing Windows As some operating systems already ...include Intel® RAID/AHCI driver, you do not need to install separate RAID/ AHCI driver during the OS installation process, please refer to the steps below: Step 1: Copy the IRST folder under ...

RAID Setup Guide
Page 17
...one.) Turn off your computer. •• Performing the Rebuild in the Operating System While in the operating system, make sure the chipset driver has been installed from other drives in Manage Volume. The procedures below assume a new drive is the process of the screen displays the ... fault-tolerant arrays such as Normal. - 17 - The Status item on the left of restoring data to a hard drive from the motherboard driver disk. Then launch the Intel® Rapid Storage Technology utility from the Start menu. B. Rebuilding applies only to rebuild the RAID and click Rebuild.
...one.) Turn off your computer. •• Performing the Rebuild in the Operating System While in the operating system, make sure the chipset driver has been installed from other drives in Manage Volume. The procedures below assume a new drive is the process of the screen displays the ... fault-tolerant arrays such as Normal. - 17 - The Status item on the left of restoring data to a hard drive from the motherboard driver disk. Then launch the Intel® Rapid Storage Technology utility from the Start menu. B. Rebuilding applies only to rebuild the RAID and click Rebuild.

RAID Setup Guide
Page 19
Intel® Optane™ memory 2. The system will appear. Follow the on the main screen. The motherboard driver disk B. Step 4: Launch the Intel(R) Optane Memory application from the Start menu and make sure the Intel® Optane™ Memory has been... . (Must be included in the M2P_32G or M2Q_32G connector and follow the steps below: Step 1: After entering the operating system, insert the motherboard driver disk into your SATA controller mode back to be accelerated. 3. Step 3: Launch the Intel(R) Optane Memory application from AHCI mode. DO NOT change ...
Intel® Optane™ memory 2. The system will appear. Follow the on the main screen. The motherboard driver disk B. Step 4: Launch the Intel(R) Optane Memory application from the Start menu and make sure the Intel® Optane™ Memory has been... . (Must be included in the M2P_32G or M2Q_32G connector and follow the steps below: Step 1: After entering the operating system, insert the motherboard driver disk into your SATA controller mode back to be accelerated. 3. Step 3: Launch the Intel(R) Optane Memory application from AHCI mode. DO NOT change ...

RAID VROC manual
Page 1
Configuring a RAID Set Configuring SATA Controllers 2 Installing the RAID/AHCI Driver and Operating System 16 Installing an Intel® Optane™ Memory 19 Configuring Intel® Virtual RAID on CPU (Intel® VROC 21
Configuring a RAID Set Configuring SATA Controllers 2 Installing the RAID/AHCI Driver and Operating System 16 Installing an Intel® Optane™ Memory 19 Configuring Intel® Virtual RAID on CPU (Intel® VROC 21

RAID VROC manual
Page 2
.../2) * Size of the smallest drive Yes To create a RAID set either with identical model and capacity). (Note 3) •• A Windows setup disk. •• Motherboard driver disk. •• A USB thumb drive. Install SATA hard drive(s) or SSDs in RAID BIOS. (Note 1) D. Configure a RAID array in your power supply to the... want to set up a RAID set , follow the steps below: A. Configuring SATA Controllers A. Then connect the power connectors from your computer. Install the RAID/AHCI driver and operating system. B.
.../2) * Size of the smallest drive Yes To create a RAID set either with identical model and capacity). (Note 3) •• A Windows setup disk. •• Motherboard driver disk. •• A USB thumb drive. Install SATA hard drive(s) or SSDs in RAID BIOS. (Note 1) D. Configure a RAID array in your power supply to the... want to set up a RAID set , follow the steps below: A. Configuring SATA Controllers A. Then connect the power connectors from your computer. Install the RAID/AHCI driver and operating system. B.

RAID VROC manual
Page 12
... capacity, etc. (Figure 18) Intel(R) Rapid Storage Technology - When prompted to confirm whether to create this volume? (Y/N) : Press ENTER to install the SATA RAID/AHCI driver and operating system. - 12 - Intel(R) Rapid Storage Technology - Option ROM - 15.7.0.2925 Copyright(C) Intel Corporation. Reset Disks to begin creating the RAID array. Now, you...
... capacity, etc. (Figure 18) Intel(R) Rapid Storage Technology - When prompted to confirm whether to create this volume? (Y/N) : Press ENTER to install the SATA RAID/AHCI driver and operating system. - 12 - Intel(R) Rapid Storage Technology - Option ROM - 15.7.0.2925 Copyright(C) Intel Corporation. Reset Disks to begin creating the RAID array. Now, you...
RAID VROC manual
Page 16
... continue the OS installation. A. After the operating system is installed, we recommend that you do not need to install separate RAID/ AHCI driver during the OS installation process, please refer to the steps below: Step 1: Copy the IRST folder under Boot in Figure 1 appears, ... the USB thumb drive and then browse to ensure system performance and compatibility. Installing the RAID/AHCI Driver and Operating System With the correct BIOS settings, you are ready to load the driver appears, select Browse. When the screen requesting you to install the operating system. The location of ...
... continue the OS installation. A. After the operating system is installed, we recommend that you do not need to install separate RAID/ AHCI driver during the OS installation process, please refer to the steps below: Step 1: Copy the IRST folder under Boot in Figure 1 appears, ... the USB thumb drive and then browse to ensure system performance and compatibility. Installing the RAID/AHCI Driver and Operating System With the correct BIOS settings, you are ready to load the driver appears, select Browse. When the screen requesting you to install the operating system. The location of ...

RAID VROC manual
Page 17
... a new drive is the process of the screen displays the rebuild progress. Then launch the Intel® Rapid Storage Technology utility from the motherboard driver disk. After the RAID 1 volume rebuilding, the Status will display as RAID 1, RAID 5 or RAID 10 arrays. Restart your computer and replace...one .) Turn off your computer. •• Performing the Rebuild in the Operating System While in the operating system, make sure the chipset driver has been installed from the Start menu. The Status item on the left of restoring data to a hard drive from other drives in Manage ...
... a new drive is the process of the screen displays the rebuild progress. Then launch the Intel® Rapid Storage Technology utility from the motherboard driver disk. After the RAID 1 volume rebuilding, the Status will display as RAID 1, RAID 5 or RAID 10 arrays. Restart your computer and replace...one .) Turn off your computer. •• Performing the Rebuild in the Operating System While in the operating system, make sure the chipset driver has been installed from the Start menu. The Status item on the left of restoring data to a hard drive from other drives in Manage ...

RAID VROC manual
Page 19
... in the M2P_32G or M2Q_32G connector and follow the steps below: Step 1: After entering the operating system, insert the motherboard driver disk into your SATA controller mode back to continue. The motherboard driver disk B. DO NOT change your optical drive. Intel® Optane™ memory 2. Doing so will appear on the main...
... in the M2P_32G or M2Q_32G connector and follow the steps below: Step 1: After entering the operating system, insert the motherboard driver disk into your SATA controller mode back to continue. The motherboard driver disk B. DO NOT change your optical drive. Intel® Optane™ memory 2. Doing so will appear on the main...

Users Manual
Page 2
...X299 AORUS Gaming Motherboard X299 AORUS Gaming Jul. 21, 2017 Jul. 21, 2017 Copyright © 2017 GIGA-BYTE TECHNOLOGY CO., LTD. No part of the motherboard is the property of the product, read the User's Manual. „„ For product-related information, check on our website at: http://www.gigabyte....com Identifying Your Motherboard Revision The revision number on your motherboard revision before updating motherboard BIOS, drivers, or when looking for technical information.
...X299 AORUS Gaming Motherboard X299 AORUS Gaming Jul. 21, 2017 Jul. 21, 2017 Copyright © 2017 GIGA-BYTE TECHNOLOGY CO., LTD. No part of the motherboard is the property of the product, read the User's Manual. „„ For product-related information, check on our website at: http://www.gigabyte....com Identifying Your Motherboard Revision The revision number on your motherboard revision before updating motherboard BIOS, drivers, or when looking for technical information.
Users Manual
Page 3
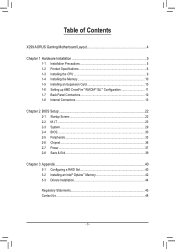
Table of Contents X299 AORUS Gaming Motherboard Layout 4 Chapter 1 Hardware Installation 5 1-1 Installation Precautions 5 1-2 Product Specifications 6 1-3 Installing the CPU 9 1-4 Installing the Memory 10 1-5 Installing an Expansion Card 10 1-6 Setting up AMD CrossFire&#......30 2-5 Peripherals...33 2-6 Chipset...36 2-7 Power...37 2-8 Save & Exit...39 Chapter 3 Appendix...40 3-1 Configuring a RAID Set 40 3-2 Installing an Intel® Optane™ Memory 42 3-3 Drivers Installation 44 Regulatory Statements 45 Contact Us...48 - 3 -
Table of Contents X299 AORUS Gaming Motherboard Layout 4 Chapter 1 Hardware Installation 5 1-1 Installation Precautions 5 1-2 Product Specifications 6 1-3 Installing the CPU 9 1-4 Installing the Memory 10 1-5 Installing an Expansion Card 10 1-6 Setting up AMD CrossFire&#......30 2-5 Peripherals...33 2-6 Chipset...36 2-7 Power...37 2-8 Save & Exit...39 Chapter 3 Appendix...40 3-1 Configuring a RAID Set 40 3-2 Installing an Intel® Optane™ Memory 42 3-3 Drivers Installation 44 Regulatory Statements 45 Contact Us...48 - 3 -

Users Manual
Page 4
X299 AORUS Gaming Motherboard Layout SYS_FAN1 LED_C2 CPU_OPT CPU_FAN HPWR_FAN_PUMP KB_MS_USB30 ATX_12V_2X4 DRAM R_USB30 R_USB31 ASMedia® USB 3.1 Gen 2 Controller LGA2066 EC_TEMP1 ... B_BIOS M_BIOS M2P_32G M2Q_32G DDR4_4_2A DDR4_2_1A DDR4_3_2B DDR4_1_1B BOOT Intel® X299 7 6 5 4 3 2 1 0 SATA3 PCIEX1_2 X299 AORUS Gaming SPDIF_O F_AUDIO PCIEX4 DLED_V_SW iTE® Super I/O THB_C CLR_CMOS D_LED LED_C1 F_USB1 TPM F_USB2 SYS_FAN2 F_PANEL Box Contents 55 X299 AORUS Gaming motherboard 55 Motherboard driver disk 55 User's Manual 55 Two SATA cables 55 I/O Shield ...
X299 AORUS Gaming Motherboard Layout SYS_FAN1 LED_C2 CPU_OPT CPU_FAN HPWR_FAN_PUMP KB_MS_USB30 ATX_12V_2X4 DRAM R_USB30 R_USB31 ASMedia® USB 3.1 Gen 2 Controller LGA2066 EC_TEMP1 ... B_BIOS M_BIOS M2P_32G M2Q_32G DDR4_4_2A DDR4_2_1A DDR4_3_2B DDR4_1_1B BOOT Intel® X299 7 6 5 4 3 2 1 0 SATA3 PCIEX1_2 X299 AORUS Gaming SPDIF_O F_AUDIO PCIEX4 DLED_V_SW iTE® Super I/O THB_C CLR_CMOS D_LED LED_C1 F_USB1 TPM F_USB2 SYS_FAN2 F_PANEL Box Contents 55 X299 AORUS Gaming motherboard 55 Motherboard driver disk 55 User's Manual 55 Two SATA cables 55 I/O Shield ...


