
User Manual
Page 1
...; Graphics Accelerator User's Manual Rev. 107 Copyright © 2018 GIGABYTE TECHNOLOGY CO., LTD Copyright by U.S. No part of this card. Doing so may void the warranty of GBT. patents and other limited viewing uses only unless otherwise authorized by Rovi Corporation, and is intended for any errors or omissions that is prohibited. Notice Please do not remove any form without the expressed, written...
...; Graphics Accelerator User's Manual Rev. 107 Copyright © 2018 GIGABYTE TECHNOLOGY CO., LTD Copyright by U.S. No part of this card. Doing so may void the warranty of GBT. patents and other limited viewing uses only unless otherwise authorized by Rovi Corporation, and is intended for any errors or omissions that is prohibited. Notice Please do not remove any form without the expressed, written...
User Manual
Page 2
Driver and Utility Installation 5 3.1.1. Appendix 14 5.1. Introduction 1 1.1. Driver and AORUS ENGINE Installation 5 3.1.2. Troubleshooting Tips 13 5. Hardware Installation 3 2.1. SLI Technology 4 3. Table of Contents 1. Regulatory Statements 14 Minimum System Requirements 1 2. Software Installation 5 3.1. GIGABYTE AORUS ENGINE 10 4.
Driver and Utility Installation 5 3.1.1. Appendix 14 5.1. Introduction 1 1.1. Driver and AORUS ENGINE Installation 5 3.1.2. Troubleshooting Tips 13 5. Hardware Installation 3 2.1. SLI Technology 4 3. Table of Contents 1. Regulatory Statements 14 Minimum System Requirements 1 2. Software Installation 5 3.1. GIGABYTE AORUS ENGINE 10 4.
User Manual
Page 3
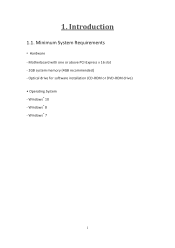
Minimum System Requirements • Hardware - Windows® 10 - Windows® 8 - 1. Introduction 1.1. Motherboard with one or above PCI-Express x 16 slot - 2GB system memory (4GB recommended) - Optical drive for software installation (CD-ROM or DVD-ROM drive) • Operating System - Windows® 7 1
Minimum System Requirements • Hardware - Windows® 10 - Windows® 8 - 1. Introduction 1.1. Motherboard with one or above PCI-Express x 16 slot - 2GB system memory (4GB recommended) - Optical drive for software installation (CD-ROM or DVD-ROM drive) • Operating System - Windows® 7 1
User Manual
Page 4
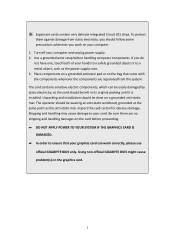
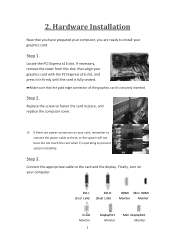
... and installation should be left in its original packing until it is installed. The operator should follow some precautions whenever you work correctly, please use official GIGABYTE BIOS only. Use a grounded wrist strap before proceeding. ☛ DO NOT APPLY POWER TO YOUR SYSTEM IF THE GRAPHICS CARD IS DAMAGED...bag that your graphics card can be easily damaged by static electricity, so the card should be wearing an anti-static wristband, grounded at the same point as the power supply case. 3. The card contains sensitive electric components, which can work on your hands...
... and installation should be left in its original packing until it is installed. The operator should follow some precautions whenever you work correctly, please use official GIGABYTE BIOS only. Use a grounded wrist strap before proceeding. ☛ DO NOT APPLY POWER TO YOUR SYSTEM IF THE GRAPHICS CARD IS DAMAGED...bag that your graphics card can be easily damaged by static electricity, so the card should be wearing an anti-static wristband, grounded at the same point as the power supply case. 3. The card contains sensitive electric components, which can work on your hands...
User Manual
Page 5
... power cable to fasten the card in firmly until the card is securely inserted. If necessary, remove the cover from this slot; Replace the screw to them, or the system will not boot. Finally, turn on your computer. then align your graphics card with the PCI Express x16 slot, and press it 's operating to the card and the display. DVI-I (Dual Link) DVI-D (Dual Link) HDMI...
... power cable to fasten the card in firmly until the card is securely inserted. If necessary, remove the cover from this slot; Replace the screw to them, or the system will not boot. Finally, turn on your computer. then align your graphics card with the PCI Express x16 slot, and press it 's operating to the card and the display. DVI-I (Dual Link) DVI-D (Dual Link) HDMI...

User Manual
Page 6
... are required: An SLI certified motherboard with two or above PCI-E x16 slots and correct chipset driver A two-way SLI bridge connector In an SLI configuration, two SLI-ready graphics cards of the same model and the same manufacturers are linked in parallel in a system that two graphics cards are connected together via SLI bridge connector in an SLI configuration. 2-Way SLI Configuration: Two SLI-ready graphics cards of the same type (Example: GeForce® GTX 1080 G1 Gaming) SLI bridge connector 4
... are required: An SLI certified motherboard with two or above PCI-E x16 slots and correct chipset driver A two-way SLI bridge connector In an SLI configuration, two SLI-ready graphics cards of the same model and the same manufacturers are linked in parallel in a system that two graphics cards are connected together via SLI bridge connector in an SLI configuration. 2-Way SLI Configuration: Two SLI-ready graphics cards of the same type (Example: GeForce® GTX 1080 G1 Gaming) SLI bridge connector 4
User Manual
Page 7
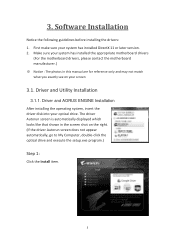
First make sure your optical drive. Make sure your screen 3.1. Driver and Utility Installation 3.1.1. Software Installation Notice the following guidelines before installing the drivers: 1. 3. The driver Autorun screen is automatically displayed which looks like that shown in the screen shot on your system has installed the appropriate motherboard drivers (For the motherboard drivers, please contact the motherboard manufacturer.) ※ Notice : The photos in this manual are for reference only and may...
First make sure your optical drive. Make sure your screen 3.1. Driver and Utility Installation 3.1.1. Software Installation Notice the following guidelines before installing the drivers: 1. 3. The driver Autorun screen is automatically displayed which looks like that shown in the screen shot on your system has installed the appropriate motherboard drivers (For the motherboard drivers, please contact the motherboard manufacturer.) ※ Notice : The photos in this manual are for reference only and may...
User Manual
Page 8
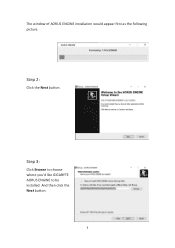
Step 2: Click the Next button. Step 3: Click Browse to choose where you'd like GIGABYTE AORUS ENGINE to be installed. The window of AORUS ENGINE installation would appear first as the following picture. And then click the Next button. 6
Step 2: Click the Next button. Step 3: Click Browse to choose where you'd like GIGABYTE AORUS ENGINE to be installed. The window of AORUS ENGINE installation would appear first as the following picture. And then click the Next button. 6
User Manual
Page 9
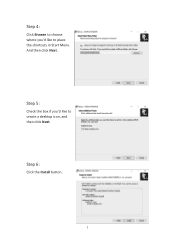
Step 4: Click Browse to choose where you 'd like to create a desktop icon, and then click Next. Step 5: Check the box if you 'd like to place the shortcuts in Start Menu. Step 6: Click the Install button. 7 And then click Next.
Step 4: Click Browse to choose where you 'd like to create a desktop icon, and then click Next. Step 5: Check the box if you 'd like to place the shortcuts in Start Menu. Step 6: Click the Install button. 7 And then click Next.
User Manual
Page 10
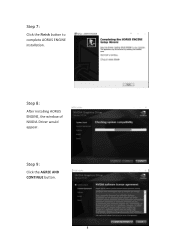
Step 7: Click the Finish button to complete AORUS ENGINE installation. Step 9: Click the AGREE AND CONTINUE button. 8 Step 8: After installing AORUS ENGINE, the window of NVIDIA Driver would appear.
Step 7: Click the Finish button to complete AORUS ENGINE installation. Step 9: Click the AGREE AND CONTINUE button. 8 Step 8: After installing AORUS ENGINE, the window of NVIDIA Driver would appear.

User Manual
Page 11
Step 11: Installation begins. Step 12: Click the Close button, and then restart your computer to complete driver installation. 9 Step 10: Check Express (Recommended) and then click the NEXT button.
Step 11: Installation begins. Step 12: Click the Close button, and then restart your computer to complete driver installation. 9 Step 10: Check Express (Recommended) and then click the NEXT button.
User Manual
Page 12
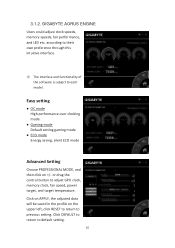
or drag the control button to default setting. 10 3.1.2. Click DEFAULT to return to adjust GPU clock, memory clock, fan speed, power target, and target temperature. Easy setting OC mode High performance over clocking mode Gaming mode Default setting gaming mode ECO mode Energy saving, silent ECO mode Advanced Setting Choose PROFESSIONAL MODE, and then click on the upper left, click RESET to return to each model. according to their own preference through this...
or drag the control button to default setting. 10 3.1.2. Click DEFAULT to return to adjust GPU clock, memory clock, fan speed, power target, and target temperature. Easy setting OC mode High performance over clocking mode Gaming mode Default setting gaming mode ECO mode Energy saving, silent ECO mode Advanced Setting Choose PROFESSIONAL MODE, and then click on the upper left, click RESET to return to each model. according to their own preference through this...
User Manual
Page 13
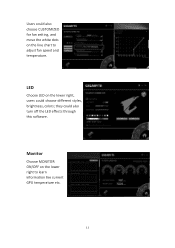
Users could also choose CUSTOMIZED for fan setting, and move the white dots on the line chart to learn information like current GPU temperature etc. 11 Monitor Choose MONITOR ON/OFF on the lower right, users could also turn off the LED effects through this software. they could choose different styles, brightness, colors; LED Choose LED on the lower right to adjust fan speed and temperature.
Users could also choose CUSTOMIZED for fan setting, and move the white dots on the line chart to learn information like current GPU temperature etc. 11 Monitor Choose MONITOR ON/OFF on the lower right, users could also turn off the LED effects through this software. they could choose different styles, brightness, colors; LED Choose LED on the lower right to adjust fan speed and temperature.

User Manual
Page 14
Fan control Choose SEMI PASSIVE/ACTIVE FAN on the lower right to switch the fan mode between semi passive and continuous spin. 12
Fan control Choose SEMI PASSIVE/ACTIVE FAN on the lower right to switch the fan mode between semi passive and continuous spin. 12
User Manual
Page 15
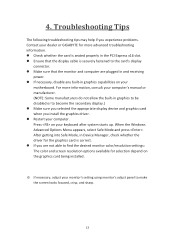
... desired monitor color/resolution settings: The color and screen resolution options available for selection depend on your motherboard. 4. When the Windows Advanced Options Menu appears, select Safe Mode and press . Press on the graphics card being installed. ※ If necessary, adjust your monitor's setting using monitor's adjust panel to become the secondary display.) Make sure you selected the appropriate display device and graphics card when you experience problems. Contact your dealer or GIGABYTE for the graphics card...
... desired monitor color/resolution settings: The color and screen resolution options available for selection depend on your motherboard. 4. When the Windows Advanced Options Menu appears, select Safe Mode and press . Press on the graphics card being installed. ※ If necessary, adjust your monitor's setting using monitor's adjust panel to become the secondary display.) Make sure you selected the appropriate display device and graphics card when you experience problems. Contact your dealer or GIGABYTE for the graphics card...
User Manual
Page 16
... parts and components have not intended to change without our written permission, and the contents there of electric and electronic devices and their components. We believe that do not use of our natural resources, GIGABYTE ...document must not be construed as most of the materials in your "end of life" product: Restriction of Certain Hazardous Substances in all GIGABYTE VGA Cards fulfill European Union regulations for any responsibility for errors or omissions in this text. To prevent releasing harmful substances into the environment and to meet RoHS requirement...
... parts and components have not intended to change without our written permission, and the contents there of electric and electronic devices and their components. We believe that do not use of our natural resources, GIGABYTE ...document must not be construed as most of the materials in your "end of life" product: Restriction of Certain Hazardous Substances in all GIGABYTE VGA Cards fulfill European Union regulations for any responsibility for errors or omissions in this text. To prevent releasing harmful substances into the environment and to meet RoHS requirement...
User Manual
Page 17
...number listed in your product's user's manual and we will help to conserve natural resources and ensure that it back" to your local or regional waste collection administration for activation of properly. 15 Instead, the device should be taken to the waste collection centers for recycling. ☛ If you need...For more information about where you can reduce the amount of natural resources needed to produce electrical and electronic equipment, minimize the use of landfills for the disposal of "end of life" products, and generally improve our quality of life by ensuring that you may ...
...number listed in your product's user's manual and we will help to conserve natural resources and ensure that it back" to your local or regional waste collection administration for activation of properly. 15 Instead, the device should be taken to the waste collection centers for recycling. ☛ If you need...For more information about where you can reduce the amount of natural resources needed to produce electrical and electronic equipment, minimize the use of landfills for the disposal of "end of life" products, and generally improve our quality of life by ensuring that you may ...
User Manual
Page 18
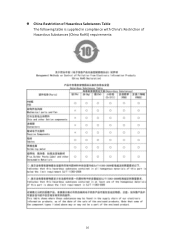
China Restriction of Hazardous Substances Table The following table is supplied in compliance with China's Restriction of Hazardous Substances (China RoHS) requirements: 16
China Restriction of Hazardous Substances Table The following table is supplied in compliance with China's Restriction of Hazardous Substances (China RoHS) requirements: 16
User Manual
Page 19
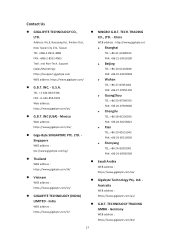
....gigabyte.com/us/ G.B.T. Support (Sales/Marketing) : https://esupport.gigabyte.com WEB address: https://www.gigabyte.com/ G.B.T. China WEB address : http://www.gigabyte.cn...New Taipei City 231, Taiwan TEL: +886-2-8912-4888 FAX: +886-2-8912-4003 Tech. and Non-Tech. INC (USA) - TRADING CO., LTD. - Singapore WEB address : tps://www.gigabyte.com/sg/ Thailand WEB address : https://www.gigabyte.com/th/ Vietnam WEB address : https://www.gigabyte.com/vn/ GIGABYTE TECHNOLOGY (INDIA) LIMITED - U.S.A. Contact Us GIGA-BYTE TECHNOLOGY...
....gigabyte.com/us/ G.B.T. Support (Sales/Marketing) : https://esupport.gigabyte.com WEB address: https://www.gigabyte.com/ G.B.T. China WEB address : http://www.gigabyte.cn...New Taipei City 231, Taiwan TEL: +886-2-8912-4888 FAX: +886-2-8912-4003 Tech. and Non-Tech. INC (USA) - TRADING CO., LTD. - Singapore WEB address : tps://www.gigabyte.com/sg/ Thailand WEB address : https://www.gigabyte.com/th/ Vietnam WEB address : https://www.gigabyte.com/vn/ GIGABYTE TECHNOLOGY (INDIA) LIMITED - U.S.A. Contact Us GIGA-BYTE TECHNOLOGY...
User Manual
Page 20
WEB address : https://www.gigabyte.com/uk/ Giga-Byte Technology B.V. - TECH. U.K. GIGABYTE Global Service System To submit a technical or non-technical (Sales/Marketing) question, please link to: https://esupport.gigabyte.com 18 CO., LTD. - G.B.T. The Netherlands WEB address : https://www.gigabyte.com/nl/ GIGABYTE TECHNOLOGY FRANCE France WEB address : https://www.gigabyte.com/fr/ Sweden WEB address : https...
WEB address : https://www.gigabyte.com/uk/ Giga-Byte Technology B.V. - TECH. U.K. GIGABYTE Global Service System To submit a technical or non-technical (Sales/Marketing) question, please link to: https://esupport.gigabyte.com 18 CO., LTD. - G.B.T. The Netherlands WEB address : https://www.gigabyte.com/nl/ GIGABYTE TECHNOLOGY FRANCE France WEB address : https://www.gigabyte.com/fr/ Sweden WEB address : https...


