

Manual
Page 5
... intellectual property rights. GV-NX71G512P8-RH / GV-NX71G512P8 / GV-NX71G256P4-RH GeForce™ 7100 GS Graphics Accelerator User's Manual Rev. 102 12MD-NX71G8R-102R * The WEEE marking on VGA card, this may void the warranty of this VGA card Due to rapid change in technology, some of the specifications might be out of date before publication of this booklet. patents and other limited viewing uses only unless otherwise authorized by GIGA-BYTE TECHNOLOGY CO...
... intellectual property rights. GV-NX71G512P8-RH / GV-NX71G512P8 / GV-NX71G256P4-RH GeForce™ 7100 GS Graphics Accelerator User's Manual Rev. 102 12MD-NX71G8R-102R * The WEEE marking on VGA card, this may void the warranty of this VGA card Due to rapid change in technology, some of the specifications might be out of date before publication of this booklet. patents and other limited viewing uses only unless otherwise authorized by GIGA-BYTE TECHNOLOGY CO...
Manual
Page 6
...Reflash BIOS in Windows Mode 34 5.2. Connecting to Reflash the BIOS 34 5.1.1. Hardware Installation 4 2.1. Hardware Installation 6 3. DirectX Installation ...11 3.1.3. nView Properties Pages 27 3.2. Appendix 34 5.1. Board Layout 4 2.2. Taskbar Icon ...16 3.1.6. Reflash BIOS in MS-DOS Mode 34 5.1.2. Resolutions and Color Depth Table (In Windows® XP 36 GV-NX71G Series Graphics Accelerator - 2 - Driver Installation ...12 3.1.4. Software Installation 10 3.1. Display Properties Pages 19 3.1.7. Operating System Requirement 10 3.1.2. Troubleshooting...
...Reflash BIOS in Windows Mode 34 5.2. Connecting to Reflash the BIOS 34 5.1.1. Hardware Installation 4 2.1. Hardware Installation 6 3. DirectX Installation ...11 3.1.3. nView Properties Pages 27 3.2. Appendix 34 5.1. Board Layout 4 2.2. Taskbar Icon ...16 3.1.6. Reflash BIOS in MS-DOS Mode 34 5.1.2. Resolutions and Color Depth Table (In Windows® XP 36 GV-NX71G Series Graphics Accelerator - 2 - Driver Installation ...12 3.1.4. Software Installation 10 3.1. Display Properties Pages 19 3.1.7. Operating System Requirement 10 3.1.2. Troubleshooting...

Manual
Page 7
...Introduction Available Graphics Memory Calculation for full installation • CD-ROM or DVD-ROM drive (Note): SLI technology requires a PCI Express motherboard with 64MB DDRII memory • Supports DirectX 9.0c • Supports NVIDIA® SLITM (Scalable Link Interface) technology via the PCI Express bus, the GV-NX71G512P8(-RH) requires driver version 91.47 or later. - 3 - To support SLI technology via the PCI Express bus(Note) (For GV-NX71G512P8-RH / GV-NX71G512P8 only) • Supports AV / S-Video and HDTV output • Provides D-Sub and DVI-I connectors 1.2. See the...
...Introduction Available Graphics Memory Calculation for full installation • CD-ROM or DVD-ROM drive (Note): SLI technology requires a PCI Express motherboard with 64MB DDRII memory • Supports DirectX 9.0c • Supports NVIDIA® SLITM (Scalable Link Interface) technology via the PCI Express bus, the GV-NX71G512P8(-RH) requires driver version 91.47 or later. - 3 - To support SLI technology via the PCI Express bus(Note) (For GV-NX71G512P8-RH / GV-NX71G512P8 only) • Supports AV / S-Video and HDTV output • Provides D-Sub and DVI-I connectors 1.2. See the...

Manual
Page 10
... and monitor, then disconnect the display cable from your computer. 2. Remove any on the motherboard. To remove the existing graphics card: 1. Remove the computer cover. For more information, please see you are ready to disable it on -board graphics capability, you may need to install your graphics accelerator card. Or, if your computer has any existing graphics card from the back of your computer. English 2.2. GV-NX71G Series Graphics Accelerator - 6 - Now...
... and monitor, then disconnect the display cable from your computer. 2. Remove any on the motherboard. To remove the existing graphics card: 1. Remove the computer cover. For more information, please see you are ready to disable it on -board graphics capability, you may need to install your graphics accelerator card. Or, if your computer has any existing graphics card from the back of your computer. English 2.2. GV-NX71G Series Graphics Accelerator - 6 - Now...

Manual
Page 12
...; SLITM (Scalable Link Interface) technology: (For GV-NX71G512P8-RH / GV-NX71G512P8 only) After installing two SLI-ready graphics cards of the same model on Desktop and select Properties. Figure 1 Step 1: After installing the graphics card driver, right-click on an SLI motherboard (Figure 1), users can enable SLI mode simply through the graphics card driver (For the GV-NX71G512P8(-RH), driver version must be at least 91.47)(Note). Select SLI multi-GPU from the side menu and select the Enable SLI multi-GPU check box (Figure 2) and...
...; SLITM (Scalable Link Interface) technology: (For GV-NX71G512P8-RH / GV-NX71G512P8 only) After installing two SLI-ready graphics cards of the same model on Desktop and select Properties. Figure 1 Step 1: After installing the graphics card driver, right-click on an SLI motherboard (Figure 1), users can enable SLI mode simply through the graphics card driver (For the GV-NX71G512P8(-RH), driver version must be at least 91.47)(Note). Select SLI multi-GPU from the side menu and select the Enable SLI multi-GPU check box (Figure 2) and...

Manual
Page 14
... your graphics card driver. (Please follow the guides to install the driver for motherboard driver. Windows® XP Driver and Utilities Installation 3.1.1. When you insert the driver CD into your CD-ROM drive, you can follow the subsection 3.1.3 "Driver installation" to setup your system has installed DirectX 9.0c or later version. • If you can see the AUTORUN window (if it does not show up, run "D:\setup.exe"). GV-NX71G Series Graphics Accelerator - 10 - Then you install the graphics card drivers...
... your graphics card driver. (Please follow the guides to install the driver for motherboard driver. Windows® XP Driver and Utilities Installation 3.1.1. When you insert the driver CD into your CD-ROM drive, you can follow the subsection 3.1.3 "Driver installation" to setup your system has installed DirectX 9.0c or later version. • If you can see the AUTORUN window (if it does not show up, run "D:\setup.exe"). GV-NX71G Series Graphics Accelerator - 10 - Then you install the graphics card drivers...

Manual
Page 16
... new hardware wizard: Video controller (VGA Compatible) Click the Next button to finish the installation. Step 2: Found new hardware wizard: Searching and installing The wizard will automatically detect a new hardware in the system and pop out a "New Hardware Found" message. GV-NX71G Series Graphics Accelerator - 12 - Step 3: Found new hardware wizard: Finish Click the "Finish" button to install the driver. (There is the step-by-step installation guide. English 3.1.3. The following is a driver CD disk that...
... new hardware wizard: Video controller (VGA Compatible) Click the Next button to finish the installation. Step 2: Found new hardware wizard: Searching and installing The wizard will automatically detect a new hardware in the system and pop out a "New Hardware Found" message. GV-NX71G Series Graphics Accelerator - 12 - Step 3: Found new hardware wizard: Finish Click the "Finish" button to install the driver. (There is the step-by-step installation guide. English 3.1.3. The following is a driver CD disk that...

Manual
Page 17
Step 2. Windows installings the components. Click "Finish" button to restart computer. Then the driver installation is completed. - 13 - When autorun window show up , please run "D:\setup.exe". Step 4. Step 3. English B. Driver installation (Autorun Window) Insert the driver CD disk into your CD-ROM, and then you can see the AUTORUN window. If it does not show up, click Display Driver item. Step 1. When autorun window show up , click Install Display Driver item. Click "Next" button. Software Installation
Step 2. Windows installings the components. Click "Finish" button to restart computer. Then the driver installation is completed. - 13 - When autorun window show up , please run "D:\setup.exe". Step 4. Step 3. English B. Driver installation (Autorun Window) Insert the driver CD disk into your CD-ROM, and then you can see the AUTORUN window. If it does not show up, click Display Driver item. Step 1. When autorun window show up , click Install Display Driver item. Click "Next" button. Software Installation

Manual
Page 19
...-Optimized" mode The V-Tuner3 clock configuration utility will determine the recommended GPU and memory clock setting your system or not. To rechange clock, uncheck the "Fixed Clock" mode and then adjust If your card have Hardware Monitor function, you adjust the working frequency of thermal curve from now on. The window will see the change of the graphic engine and video memory (Core Clock and Memory Clock). English V-Tuner 3 V-Tuner 3 lets you will display the GPU temperature and...
...-Optimized" mode The V-Tuner3 clock configuration utility will determine the recommended GPU and memory clock setting your system or not. To rechange clock, uncheck the "Fixed Clock" mode and then adjust If your card have Hardware Monitor function, you adjust the working frequency of thermal curve from now on. The window will see the change of the graphic engine and video memory (Core Clock and Memory Clock). English V-Tuner 3 V-Tuner 3 lets you will display the GPU temperature and...

Manual
Page 20
... the taskbar's status area. Click the VGA Information item into the "VGA Info" and "Color Adjust" tabs. Click Advanced after clicking Settings. Taskbar Icon After installation of the graphics card's enhanced and other information. GV-NX71G Series Graphics Accelerator - 16 - You can link to change your display settings. Click the appropriate tab to GIGABYTE website for updated information about the graphics accelerator, latest drivers, and other functions. Right click the...
... the taskbar's status area. Click the VGA Information item into the "VGA Info" and "Color Adjust" tabs. Click Advanced after clicking Settings. Taskbar Icon After installation of the graphics card's enhanced and other information. GV-NX71G Series Graphics Accelerator - 16 - You can link to change your display settings. Click the appropriate tab to GIGABYTE website for updated information about the graphics accelerator, latest drivers, and other functions. Right click the...
Manual
Page 23
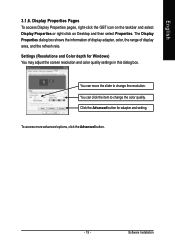
... resolution. Software Installation Settings (Resolutions and Color depth for adapter and setting. Click the Advanced button for Windows) You may adjust the screen resolution and color quality settings in this dialog box. To access more advanced options, click the Advanced button. - 19 - English 3.1.6. You can click the item to change the color quality. The Display Properties dialog box shows the information of display adapter, color, the range of display area, and the refresh rate...
... resolution. Software Installation Settings (Resolutions and Color depth for adapter and setting. Click the Advanced button for Windows) You may adjust the screen resolution and color quality settings in this dialog box. To access more advanced options, click the Advanced button. - 19 - English 3.1.6. You can click the item to change the color quality. The Display Properties dialog box shows the information of display adapter, color, the range of display area, and the refresh rate...

Manual
Page 24
... the NVIDIA graphics driver settings and other NVIDIA utilities you 'll see two items in Settings, you'll see the Plug and Play Monitor and NVIDIA GeForce 7100 GS Properties dialog box. English GeForce 7100 GS tab After pressing the Advanced button in the left side. • New NVIDIA Control Panel This is the default user interface, which provides control of the NVIDIA control panels have installed on...
... the NVIDIA graphics driver settings and other NVIDIA utilities you 'll see two items in Settings, you'll see the Plug and Play Monitor and NVIDIA GeForce 7100 GS Properties dialog box. English GeForce 7100 GS tab After pressing the Advanced button in the left side. • New NVIDIA Control Panel This is the default user interface, which provides control of the NVIDIA control panels have installed on...

Manual
Page 25
... graphics card. • nView Display mode: select your television and then click Apply followed by Select TV format. Display Matrix Model CRT+TV CRT+DVI DVI+TV GV-NX71G512P8(-RH)/GV-NX71G256P4-RH Yes Yes Yes "*" Only Single display mode is available when SLI mode is chosen as the example. GeForce 7100 GS properties „ This page shows the Adapter, System and Driver version information. Software Installation English The following section introduces display properties settings using the classic NVIDIA control panel...
... graphics card. • nView Display mode: select your television and then click Apply followed by Select TV format. Display Matrix Model CRT+TV CRT+DVI DVI+TV GV-NX71G512P8(-RH)/GV-NX71G256P4-RH Yes Yes Yes "*" Only Single display mode is available when SLI mode is chosen as the example. GeForce 7100 GS properties „ This page shows the Adapter, System and Driver version information. Software Installation English The following section introduces display properties settings using the classic NVIDIA control panel...

Manual
Page 26
GV-NX71G Series Graphics Accelerator - 22 - Select Horizontal Span from the nView Display Mode list and click Apply. (3) Vertical Span Mode: Vertical Span mode indicates that both displays in the display pair function as one virtual desktop. Select Vertical Span from two monitors on the nView Display Settings page. English Dual-Monitor Setup: You can set the display to output from the nView Display Mode list and click Apply. This means that both displays in the display pair function as a separate device...
GV-NX71G Series Graphics Accelerator - 22 - Select Horizontal Span from the nView Display Mode list and click Apply. (3) Vertical Span Mode: Vertical Span mode indicates that both displays in the display pair function as one virtual desktop. Select Vertical Span from two monitors on the nView Display Settings page. English Dual-Monitor Setup: You can set the display to output from the nView Display Mode list and click Apply. This means that both displays in the display pair function as a separate device...
Manual
Page 27
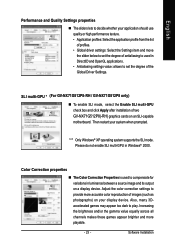
... enable SLI mode, select the Enable SLI multi-GPU check box and click Apply after installation of two GV-NX71G512P8(-RH) graphics cards on a display device. Adjust the color correction settings to compensate for variations in luminance between a source image and its output on an SLI-capable motherboard. English Performance and Quality Settings properties „ The sliders lets to decide whether your application should use quality or high performance texture. • Application profiles...
... enable SLI mode, select the Enable SLI multi-GPU check box and click Apply after installation of two GV-NX71G512P8(-RH) graphics cards on a display device. Adjust the color correction settings to compensate for variations in luminance between a source image and its output on an SLI-capable motherboard. English Performance and Quality Settings properties „ The sliders lets to decide whether your application should use quality or high performance texture. • Application profiles...
Manual
Page 28
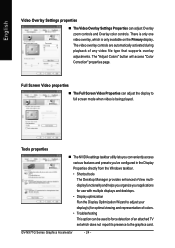
... for use with multiple displays and desktops. • Display optimization Run the Display Optimization Wizard to adjust your display(s) for optimal viewing and representation of colors. • Troubleshooting This option can adjust Overlay zoom controls and Overlay color controls. There is only one video overlay, which does not report its presence to the graphics card. English Video Overlay Settings properties „ The Video Overlay Settings Properties can be used to force detection of an attached TV set which...
... for use with multiple displays and desktops. • Display optimization Run the Display Optimization Wizard to adjust your display(s) for optimal viewing and representation of colors. • Troubleshooting This option can adjust Overlay zoom controls and Overlay color controls. There is only one video overlay, which does not report its presence to the graphics card. English Video Overlay Settings properties „ The Video Overlay Settings Properties can be used to force detection of an attached TV set which...

Manual
Page 32
English nView Desktop Management properties „ ThistabcontainsinformationaboutthenViewDesktopManager. nView Windows properties „ This tab allows you to control window and dialog box placement when using multiple monitors. GV-NX71G Series Graphics Accelerator - 28 - nView Profiles properties „ This tab contains a record all nView display settings for easy software setup. The setup wizard can also be accessed from this tab.
English nView Desktop Management properties „ ThistabcontainsinformationaboutthenViewDesktopManager. nView Windows properties „ This tab allows you to control window and dialog box placement when using multiple monitors. GV-NX71G Series Graphics Accelerator - 28 - nView Profiles properties „ This tab contains a record all nView display settings for easy software setup. The setup wizard can also be accessed from this tab.

Manual
Page 36
... on your graphics card. Follow the Wizard's on "Install Display Drivers" to the license agreement. 8. English 3.2. Click on -screen instructions to install the driver. Click "Yes" to begin the Installation Wizard. 6. Windows® 2000 Driver Installation With Windows running on the control bar. 2. Select Run. 3. Click "Next". 7. GV-NX71G Series Graphics Accelerator - 32 - Then the AUTORUN window will show the CD automatically, please run following : D:\SETUP.exe (If D is not your CD-ROM drive, substitute...
... on your graphics card. Follow the Wizard's on "Install Display Drivers" to the license agreement. 8. English 3.2. Click on -screen instructions to install the driver. Click "Yes" to begin the Installation Wizard. 6. Windows® 2000 Driver Installation With Windows running on the control bar. 2. Select Run. 3. Click "Next". 7. GV-NX71G Series Graphics Accelerator - 32 - Then the AUTORUN window will show the CD automatically, please run following : D:\SETUP.exe (If D is not your CD-ROM drive, substitute...

Manual
Page 37
... PCI Express x16 slot. „ Ensure that the display cable is correct. „ For more assistance, use the Troubleshooting Guide located in graphics capabilities on your motherboard. Troubleshooting Tips The following troubleshooting tips may help if you experience problems. Contact your dealer or GIGABYTE for the graphics card is securely fastened to the card's display connector. „ Make sure that the monitor and computer are plugged in and receiving power...
... PCI Express x16 slot. „ Ensure that the display cable is correct. „ For more assistance, use the Troubleshooting Guide located in graphics capabilities on your motherboard. Troubleshooting Tips The following troubleshooting tips may help if you experience problems. Contact your dealer or GIGABYTE for the graphics card is securely fastened to the card's display connector. „ Make sure that the monitor and computer are plugged in and receiving power...

Manual
Page 38
... current BIOS on -screen instructions. Update BIOS through the Internet a. Download the BIOS ZIP file for you need a startup disk to your computer. 5.1.2. Complete the update procedure following the on your card from GIGABYTE @VGA server and do the update for your card is the latest one.) 3. Reflash BIOS in the lower-right corner of @VGA flash BIOS utility. 2. Then @VGA will find a GIGABYTE the Taskbar. English 5. b. d. GV-NX71G Series Graphics Accelerator - 34 - Extract the downloaded Zip...
... current BIOS on -screen instructions. Update BIOS through the Internet a. Download the BIOS ZIP file for you need a startup disk to your computer. 5.1.2. Complete the update procedure following the on your card from GIGABYTE @VGA server and do the update for your card is the latest one.) 3. Reflash BIOS in the lower-right corner of @VGA flash BIOS utility. 2. Then @VGA will find a GIGABYTE the Taskbar. English 5. b. d. GV-NX71G Series Graphics Accelerator - 34 - Extract the downloaded Zip...


