
Manual
Page 3
... on/from the Support&Downloads\Motherboard\Technology Guide page on your motherboard revision before updating motherboard BIOS, drivers, or when looking for technical information. For product-related information, check on our website at: http://www.gigabyte.com.tw Identifying Your Motherboard Revision The revision number on our website. Check your motherboard looks...
... on/from the Support&Downloads\Motherboard\Technology Guide page on your motherboard revision before updating motherboard BIOS, drivers, or when looking for technical information. For product-related information, check on our website at: http://www.gigabyte.com.tw Identifying Your Motherboard Revision The revision number on our website. Check your motherboard looks...

Manual
Page 5
... 69 3-1 Installing Chipset Drivers 69 3-2 Application Software 70 3-3 Technical Manuals 70 3-4 Contact...71 3-5 System...71 3-6 Download Center 72 3-7 New Utilities...72 Chapter 4 Unique Features 73...SATA Hard Drive(s 91 5-1-1 Configuring Intel ICH10R SATA Controllers 91 5-1-2 Configuring JMicron JMB362/GIGABYTE SATA2 SATA Controller 99 5-1-3 Configuring Marvell 9128 SATA Controller 105 5-1-4 Making a SATA RAID/AHCI Driver Diskette 110 5-1-5 Installing the SATA RAID/AHCI Driver and Operating System 112 5-2 Configuring Audio Input and Output 125 5-2-1 Configuring 2/4/5.1/7.1-Channel ...
... 69 3-1 Installing Chipset Drivers 69 3-2 Application Software 70 3-3 Technical Manuals 70 3-4 Contact...71 3-5 System...71 3-6 Download Center 72 3-7 New Utilities...72 Chapter 4 Unique Features 73...SATA Hard Drive(s 91 5-1-1 Configuring Intel ICH10R SATA Controllers 91 5-1-2 Configuring JMicron JMB362/GIGABYTE SATA2 SATA Controller 99 5-1-3 Configuring Marvell 9128 SATA Controller 105 5-1-4 Making a SATA RAID/AHCI Driver Diskette 110 5-1-5 Installing the SATA RAID/AHCI Driver and Operating System 112 5-2 Configuring Audio Input and Output 125 5-2-1 Configuring 2/4/5.1/7.1-Channel ...

Manual
Page 6
... IEEE 1394a bracket (Part No. 12CF1-1IE008-0*R) 2-port SATA power cable (Part No. 12CF1-2SERPW-0*R) S/PDIF In cable (Part No. 12CR1-1SPDIN-0*R) - 6 - Box Contents GA-X58A-UD9 motherboard Motherboard driver disk User's Manual Quick Installation Guide One IDE cable Four SATA 3Gb/s cables One SATA bracket I/O Shield One Hybrid Silent-Pipe module kit One...
... IEEE 1394a bracket (Part No. 12CF1-1IE008-0*R) 2-port SATA power cable (Part No. 12CF1-2SERPW-0*R) S/PDIF In cable (Part No. 12CR1-1SPDIN-0*R) - 6 - Box Contents GA-X58A-UD9 motherboard Motherboard driver disk User's Manual Quick Installation Guide One IDE cable Four SATA 3Gb/s cables One SATA bracket I/O Shield One Hybrid Silent-Pipe module kit One...

Manual
Page 19
... expansion slot. 1. After installing all expansion cards, replace the chassis cover(s). 6. Turn on the card until it is fully inserted into the slot. 4. Install the driver provided with the slot, and press down on the card are completely inserted into the PCI Express slot. 1-6 Installing an Expansion Card Read the following...
... expansion slot. 1. After installing all expansion cards, replace the chassis cover(s). 6. Turn on the card until it is fully inserted into the slot. 4. Install the driver provided with the slot, and press down on the card are completely inserted into the PCI Express slot. 1-6 Installing an Expansion Card Read the following...
Manual
Page 20
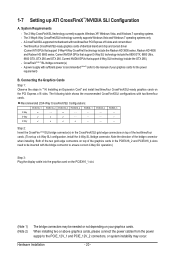
... slots need to the PCIE_12V_1 and PCIE_12V_2 connectors, or system instability may be inserted with two/three/four PCI Express x16 slots and correct driver - When installing two or above graphics cards, please connect the power cables from the power supply to be needed or not depending on ...the steps in the CrossFireX/SLI gold edge connectors on the PCI Express x16 slots. Note the direction of identical brand and chip and correct driver (Current ATI GPUs that support 3-Way/4-Way CrossFireX technology include the Radeon HD 3800 series, Radeon HD 4800 and Radeon HD 5800 series....
... slots need to the PCIE_12V_1 and PCIE_12V_2 connectors, or system instability may be inserted with two/three/four PCI Express x16 slots and correct driver - When installing two or above graphics cards, please connect the power cables from the power supply to be needed or not depending on ...the steps in the CrossFireX/SLI gold edge connectors on the PCI Express x16 slots. Note the direction of identical brand and chip and correct driver (Current ATI GPUs that support 3-Way/4-Way CrossFireX technology include the Radeon HD 3800 series, Radeon HD 4800 and Radeon HD 5800 series....

Manual
Page 21
...to the CrossFireX menu, select the Enable CrossFireX™ check box, and select the 4 GPUs combination. Hardware Installation Configuring the Graphics Card Driver C-1. For 4-Way CrossFireX: Browse to apply. For 4-Way SLI: Browse to the manual that came with your graphics cards for enabling ...CrossFireX/SLI technology may differ by graphics cards. Procedure and driver screen for more information about enabling CrossFireX technology. - 21 - Refer to the Set SLI and PhysX configuration screen and ensure PhysX...
...to the CrossFireX menu, select the Enable CrossFireX™ check box, and select the 4 GPUs combination. Hardware Installation Configuring the Graphics Card Driver C-1. For 4-Way CrossFireX: Browse to apply. For 4-Way SLI: Browse to the manual that came with your graphics cards for enabling ...CrossFireX/SLI technology may differ by graphics cards. Procedure and driver screen for more information about enabling CrossFireX technology. - 21 - Refer to the Set SLI and PhysX configuration screen and ensure PhysX...

Manual
Page 40
... Show item on BIOS Setup settings. To exit Boot Menu, press . The system will still be used for one time only. Motherboard Model BIOS Version X58A-UD9 E9 . . . . : BIOS Setup : XpressRecovery2 : Boot Menu : Qflash 03/15/2010-X58-ICH10-7A89QG0MC-00 Function Keys Function Keys Function Keys: : POST SCREEN Press ... to select the first boot device, then press to enter BIOS Setup first. A. In Boot Menu, use the up hard drive data using the driver disk, the key can access Boot Menu again to change the first boot device setting as needed. : Q-FLASH Press the key to access the ...
... Show item on BIOS Setup settings. To exit Boot Menu, press . The system will still be used for one time only. Motherboard Model BIOS Version X58A-UD9 E9 . . . . : BIOS Setup : XpressRecovery2 : Boot Menu : Qflash 03/15/2010-X58-ICH10-7A89QG0MC-00 Function Keys Function Keys Function Keys: : POST SCREEN Press ... to select the first boot device, then press to enter BIOS Setup first. A. In Boot Menu, use the up hard drive data using the driver disk, the key can access Boot Menu again to change the first boot device setting as needed. : Q-FLASH Press the key to access the ...

Manual
Page 58
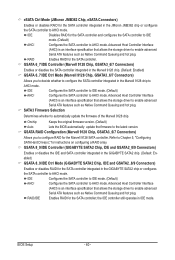
... operate in audio card instead of the integrated SATA controllers. Enable Native IDE mode if you wish to install operating systems that allows the storage driver to Disabled. USB 1.0 Controller Enables or disables the integrated USB controller. (Default: Enabled) Disabled will dynamically detect if a LAN cable is an interface specification that...
... operate in audio card instead of the integrated SATA controllers. Enable Native IDE mode if you wish to install operating systems that allows the storage driver to Disabled. USB 1.0 Controller Enables or disables the integrated USB controller. (Default: Enabled) Disabled will dynamically detect if a LAN cable is an interface specification that...
Manual
Page 60
... specification that allows the storage driver to automatically update the firmware of the Marvell 9128 chip. GSATA 8_9/IDE Controller (GIGABYTE SATA2 Chip, IDE and GSATA2_8/9 Connectors) Enables or disables the IDE and SATA controller integrated in the GIGABYTE SATA2 chip or configures the ...SATA controller to AHCI mode. RAID Enables RAID for the SATA controller integrated in the GIGABYTE SATA2 chip. (Default: Enabled) GSATA 8_9/IDE Ctrl Mode (GIGABYTE SATA2 Chip, IDE and GSATA2_8/9 Connectors) Enables or disables RAID for the SATA controller. SATA3...
... specification that allows the storage driver to automatically update the firmware of the Marvell 9128 chip. GSATA 8_9/IDE Controller (GIGABYTE SATA2 Chip, IDE and GSATA2_8/9 Connectors) Enables or disables the IDE and SATA controller integrated in the GIGABYTE SATA2 chip or configures the ...SATA controller to AHCI mode. RAID Enables RAID for the SATA controller integrated in the GIGABYTE SATA2 chip. (Default: Enabled) GSATA 8_9/IDE Ctrl Mode (GIGABYTE SATA2 Chip, IDE and GSATA2_8/9 Connectors) Enables or disables RAID for the SATA controller. SATA3...
Manual
Page 69
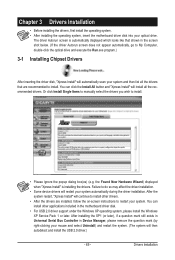
... appear automatically, go to My Computer, double-click the optical drive and execute the Run.exe program.) 3-1 Installing Chipset Drivers After inserting the driver disk, "Xpress Install" will restart your optical drive. You can click the Install All button and "Xpress Install" will...mark (by right-clicking your system and then list all the recommended drivers. You can install other drivers. • After the drivers are recommended to do so may affect the driver installation. • Some device drivers will automatically scan your mouse and select Uninstall) and restart the system...
... appear automatically, go to My Computer, double-click the optical drive and execute the Run.exe program.) 3-1 Installing Chipset Drivers After inserting the driver disk, "Xpress Install" will restart your optical drive. You can click the Install All button and "Xpress Install" will...mark (by right-clicking your system and then list all the recommended drivers. You can install other drivers. • After the drivers are recommended to do so may affect the driver installation. • Some device drivers will automatically scan your mouse and select Uninstall) and restart the system...

Manual
Page 70
You can click the Install button on the right of an item to install it. 3-3 Technical Manuals This page provides GIGABYTE's application guides, content descriptions for this driver disk, and the motherboard manuals. 3-2 Application Software This page displays all the utilities and applications that GIGABYTE develops and some free software. Drivers Installation - 70 -
You can click the Install button on the right of an item to install it. 3-3 Technical Manuals This page provides GIGABYTE's application guides, content descriptions for this driver disk, and the motherboard manuals. 3-2 Application Software This page displays all the utilities and applications that GIGABYTE develops and some free software. Drivers Installation - 70 -

Manual
Page 71
Drivers Installation 3-4 Contact For the detailed contact information of the GIGABYTE Taiwan headquarter or worldwide branch offices, click the URL on this page to link to the GIGABYTE website. 3-5 System This page provides the basic system information. - 71 -
Drivers Installation 3-4 Contact For the detailed contact information of the GIGABYTE Taiwan headquarter or worldwide branch offices, click the URL on this page to link to the GIGABYTE website. 3-5 System This page provides the basic system information. - 71 -

Manual
Page 72
3-6 Download Center To update the BIOS, drivers, or applications, click the Download Center button to link to install it. You can click the Install button on the right of the BIOS, drivers, or applications will be displayed. 3-7 New Utilities This page provides a quick link to GIGABYTE's lately developed utilities for users to install. The latest version of an item to the GIGABYTE website. Drivers Installation - 72 -
3-6 Download Center To update the BIOS, drivers, or applications, click the Download Center button to link to install it. You can click the Install button on the right of the BIOS, drivers, or applications will be displayed. 3-7 New Utilities This page provides a quick link to GIGABYTE's lately developed utilities for users to install. The latest version of an item to the GIGABYTE website. Drivers Installation - 72 -

Manual
Page 73
... back up your system to the first IDE and the first SATA connectors, the hard drive on your system soon after the operating system and drivers are attached to boot from the Windows Vista setup disk. Before You Begin: • Xpress Recovery2 will save the backup file at which the data...
... back up your system to the first IDE and the first SATA connectors, the hard drive on your system soon after the operating system and drivers are attached to boot from the Windows Vista setup disk. Before You Begin: • Xpress Recovery2 will save the backup file at which the data...

Manual
Page 74
... file to store the backup image file. C. Go to Disk Management to enter Xpress Recovery2 later, simply press during the POST. Boot from the motherboard driver disk to leave unallocated space (10 GB or more is installed, right-click the Computer icon on the amount of data) and begin the installation...
... file to store the backup image file. C. Go to Disk Management to enter Xpress Recovery2 later, simply press during the POST. Boot from the motherboard driver disk to leave unallocated space (10 GB or more is installed, right-click the Computer icon on the amount of data) and begin the installation...

Manual
Page 83
Directions for using Q-Share After installing Q-Share from the motherboard driver disk, go to configure the data sharing settings. Find the Q-Share icon to Start>All Programs>GIGABYTE>Q-Share. Open Incoming Folder : C:\Q-ShareFolder Change Incoming Folder : C:\Q-ShareFolder Update Q-Share ... Unique Features in the notification area and right-click on the same network, making...
Directions for using Q-Share After installing Q-Share from the motherboard driver disk, go to configure the data sharing settings. Find the Q-Share icon to Start>All Programs>GIGABYTE>Q-Share. Open Incoming Folder : C:\Q-ShareFolder Change Incoming Folder : C:\Q-ShareFolder Update Q-Share ... Unique Features in the notification area and right-click on the same network, making...

Manual
Page 88
... avoid risk of hardware damage or lost of a button, X.H.D helps to enhance your needs and hardware components. 3. Using GIGABYTE eXtreme Hard Drive (X.H.D) Instructions:(Note 2) Before launching X.H.D, make sure the new drive is greater than the RAID-ready system ...refer to Chapter 5, "Installing the SATA RAID/AHCI Driver and Operating System." ) Step 3: Install the motherboard drivers and the X.H.D utiltiy After installing the operating system, insert the motherboard driver disk. 4-8 eXtreme Hard Drive (X.H.D) With GIGABYTE eXtreme Hard Drive (X.H.D)(Note 1), users can quickly configure ...
... avoid risk of hardware damage or lost of a button, X.H.D helps to enhance your needs and hardware components. 3. Using GIGABYTE eXtreme Hard Drive (X.H.D) Instructions:(Note 2) Before launching X.H.D, make sure the new drive is greater than the RAID-ready system ...refer to Chapter 5, "Installing the SATA RAID/AHCI Driver and Operating System." ) Step 3: Install the motherboard drivers and the X.H.D utiltiy After installing the operating system, insert the motherboard driver disk. 4-8 eXtreme Hard Drive (X.H.D) With GIGABYTE eXtreme Hard Drive (X.H.D)(Note 1), users can quickly configure ...

Manual
Page 89
... button. - 89 - Restart your network switch or router device manual for further details. Unique Features Step 4: Give a name for the Team, e.g. Step 1: Insert the motherboard driver disk and select Application Software, Install Application Software. Teaming, and set up the Teaming mode based on the dual LAN network prevents network downtime by...
... button. - 89 - Restart your network switch or router device manual for further details. Unique Features Step 4: Give a name for the Team, e.g. Step 1: Insert the motherboard driver disk and select Application Software, Install Application Software. Teaming, and set up the Teaming mode based on the dual LAN network prevents network downtime by...

Manual
Page 91
C. Make a floppy disk containing the SATA RAID/AHCI driver for the SATA port. (For example, on this motherboard, the SATA2_0, SATA2_1, SATA2_2, SATA2_3, SATA2_4 and...identical model and capacity). If there is more than one SATA controller on the motherboard. Appendix Install the SATA RAID/AHCI driver (Note 2) and operating system. Before you may prepare only one end of the SATA signal cable to the rear ... one hard drive. • An empty formatted floppy disk. • Windows Vista/XP setup disk. • Motherboard driver disk. 5-1-1 Configuring Intel ICH10R SATA Controllers A.
C. Make a floppy disk containing the SATA RAID/AHCI driver for the SATA port. (For example, on this motherboard, the SATA2_0, SATA2_1, SATA2_2, SATA2_3, SATA2_4 and...identical model and capacity). If there is more than one SATA controller on the motherboard. Appendix Install the SATA RAID/AHCI driver (Note 2) and operating system. Before you may prepare only one end of the SATA signal cable to the rear ... one hard drive. • An empty formatted floppy disk. • Windows Vista/XP setup disk. • Motherboard driver disk. 5-1-1 Configuring Intel ICH10R SATA Controllers A.

Manual
Page 95
... BIOS utility, press or select 5. Now, you want to create this volume, press to confirm or to create the SATA RAID/AHCI driver diskette and install the SATA RAID/AHCI driver and operating system. - 95 - Exit in the DISK/VOLUME INFORMATION section, including the RAID level, stripe block size, array name, and...
... BIOS utility, press or select 5. Now, you want to create this volume, press to confirm or to create the SATA RAID/AHCI driver diskette and install the SATA RAID/AHCI driver and operating system. - 95 - Exit in the DISK/VOLUME INFORMATION section, including the RAID level, stripe block size, array name, and...


