Manual
Page 5
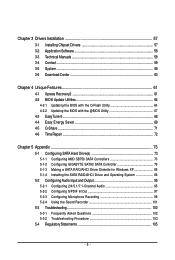
... 6 ...68 4-4 Easy Energy Saver 69 4-5 Q-Share ...71 4-6 Time Repair ...72 Chapter 5 Appendix ...73 5-1 Configuring SATA Hard Drive(s 73 5-1-1 Configuring AMD SB750 SATA Controllers 73 5-1-2 Configuring GIGABYTE SATA2 SATA Controller 79 5-1-3 Making a SATA RAID/AHCI Driver Diskette for Windows XP 85 5-1-4 Installing the SATA RAID/AHCI Driver and Operating System 86 5-2 ConfiguringAudio Input...
... 6 ...68 4-4 Easy Energy Saver 69 4-5 Q-Share ...71 4-6 Time Repair ...72 Chapter 5 Appendix ...73 5-1 Configuring SATA Hard Drive(s 73 5-1-1 Configuring AMD SB750 SATA Controllers 73 5-1-2 Configuring GIGABYTE SATA2 SATA Controller 79 5-1-3 Making a SATA RAID/AHCI Driver Diskette for Windows XP 85 5-1-4 Installing the SATA RAID/AHCI Driver and Operating System 86 5-2 ConfiguringAudio Input...

Manual
Page 7
GA-MA790X-UD3P Motherboard Layout KB_MS CPU_FAN RCA_SPDIF ATX_12V_2X4 ATX R_USB Socket AM2 USB_1394_1 USB_1394 PWR_FAN USB IT8720 LAN AUDIO F_AUDIO PCIEX1_1 RTL8111C PCIEX16_1 PCIEX1_2 CD_IN CODEC PCIEX1_3 SPDIF_IN SPDIF_OUT PCIEX8_1 PCI1 PCI2 COM FDD CI DDR2_1 DDR2_2 DDR2_3 DDR2_4 AMD 790X IDE GA-MA790X-UD3P CLR_CMOS BATTERY AMD SB750 B_BIOS M_BIOS SATA2_4 SATA2_5 SATA2_2 SATA2_3 SATA2_0 SATA2_1 TSB43AB23 GIGABYTE SATA2 GSATA2_0 GSATA2_1 PWR_LED F_USB1 F_PANEL F_1394 F_USB2 SYS_FAN2 SYS_FAN1 - 7 -
GA-MA790X-UD3P Motherboard Layout KB_MS CPU_FAN RCA_SPDIF ATX_12V_2X4 ATX R_USB Socket AM2 USB_1394_1 USB_1394 PWR_FAN USB IT8720 LAN AUDIO F_AUDIO PCIEX1_1 RTL8111C PCIEX16_1 PCIEX1_2 CD_IN CODEC PCIEX1_3 SPDIF_IN SPDIF_OUT PCIEX8_1 PCI1 PCI2 COM FDD CI DDR2_1 DDR2_2 DDR2_3 DDR2_4 AMD 790X IDE GA-MA790X-UD3P CLR_CMOS BATTERY AMD SB750 B_BIOS M_BIOS SATA2_4 SATA2_5 SATA2_2 SATA2_3 SATA2_0 SATA2_1 TSB43AB23 GIGABYTE SATA2 GSATA2_0 GSATA2_1 PWR_LED F_USB1 F_PANEL F_1394 F_USB2 SYS_FAN2 SYS_FAN1 - 7 -

Manual
Page 8
... Switch PCI Express Bus PCI Express Bus x1 x1 x1 x1 PCIe CLK (100 MHz) 3 PCI Express x1 RJ45 RTL8111C LAN 2 SATA 3Gb/s PCI Bus GIGABYTE SATA2 TSB43AB23 AMD 790X AMD SB750 Dual BIOS 6 SATA 3Gb/s ATA-133/100/66/33 IDE Channel 12 USB Ports CODEC LPC BUS IT8720 Floppy COM...
... Switch PCI Express Bus PCI Express Bus x1 x1 x1 x1 PCIe CLK (100 MHz) 3 PCI Express x1 RJ45 RTL8111C LAN 2 SATA 3Gb/s PCI Bus GIGABYTE SATA2 TSB43AB23 AMD 790X AMD SB750 Dual BIOS 6 SATA 3Gb/s ATA-133/100/66/33 IDE Channel 12 USB Ports CODEC LPC BUS IT8720 Floppy COM...
Manual
Page 10
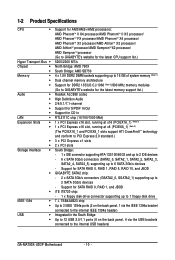
Support for SATA RAID 0, RAID 1, and JBOD iTE IT8720 chip: - 1 x floppy disk drive connector supporting up to the internal USB headers) GA-MA790X-UD3P Motherboard - 10 - TSB43AB23 chip Up to 3 IEEE 1394a ports (2 on the back panel, 1 via the IEEE 1394a bracket connected to the internal IEEE 1394a ...6 x SATA 3Gb/s connectors (SATA2_0, SATA2_1, SATA2_2, SATA2_3, SATA2_4, SATA2_5) supporting up to 2 SATA 3Gb/s devices - Support for SATA RAID 0, RAID 1, RAID 5, RAID 10, and JBOD GIGABYTE SATA2 chip: - 2 x SATA 3Gb/s connectors (GSATA2_0, GSATA2_1) supporting up to 6 SATA 3Gb/s devices -
Support for SATA RAID 0, RAID 1, and JBOD iTE IT8720 chip: - 1 x floppy disk drive connector supporting up to the internal USB headers) GA-MA790X-UD3P Motherboard - 10 - TSB43AB23 chip Up to 3 IEEE 1394a ports (2 on the back panel, 1 via the IEEE 1394a bracket connected to the internal IEEE 1394a ...6 x SATA 3Gb/s connectors (SATA2_0, SATA2_1, SATA2_2, SATA2_3, SATA2_4, SATA2_5) supporting up to 2 SATA 3Gb/s devices - Support for SATA RAID 0, RAID 1, RAID 5, RAID 10, and JBOD GIGABYTE SATA2 chip: - 2 x SATA 3Gb/s connectors (GSATA2_0, GSATA2_1) supporting up to 6 SATA 3Gb/s devices -

Manual
Page 26
... system is in S1 sleep state. Pin No. Definition 1 MPD+ 2 MPD- 3 MPD- 1 System Status LED S0 On S1 Blinking S3/S4/S5 Off GA-MA790X-UD3P Motherboard - 26 - The GIGABYTE SATA2 controller supports RAID 0 and RAID 1. The LED is on the chassis to connect a system power LED on when the system is operating. Each SATA...
... system is in S1 sleep state. Pin No. Definition 1 MPD+ 2 MPD- 3 MPD- 1 System Status LED S0 On S1 Blinking S3/S4/S5 Off GA-MA790X-UD3P Motherboard - 26 - The GIGABYTE SATA2 controller supports RAID 0 and RAID 1. The LED is on the chassis to connect a system power LED on when the system is operating. Each SATA...
Manual
Page 48
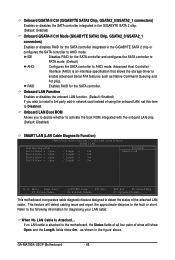
...AHCI mode. IDE Disables RAID for the SATA controller. Refer to the following information for the SATA controller integrated in the GIGABYTE SATA 2 chip or configures the SATA controller to activate the boot ROM integrated with the onboard LAN chip. (Default: ... disables the SATA controller integrated in the GIGABYTE SATA 2 chip. (Default: Enabled) Onboard GSATA-II Ctrl Mode (GIGABYTE SATA2 Chip, GSATA2_0/GSATA2_1 connectors) Enables or disables RAID for diagnosing your LAN cable: When No LAN Cable Is Attached... GA-MA790X-UD3P Motherboard - 48 - Advanced Host Controller ...
...AHCI mode. IDE Disables RAID for the SATA controller. Refer to the following information for the SATA controller integrated in the GIGABYTE SATA 2 chip or configures the SATA controller to activate the boot ROM integrated with the onboard LAN chip. (Default: ... disables the SATA controller integrated in the GIGABYTE SATA 2 chip. (Default: Enabled) Onboard GSATA-II Ctrl Mode (GIGABYTE SATA2 Chip, GSATA2_0/GSATA2_1 connectors) Enables or disables RAID for diagnosing your LAN cable: When No LAN Cable Is Attached... GA-MA790X-UD3P Motherboard - 48 - Advanced Host Controller ...
Manual
Page 79
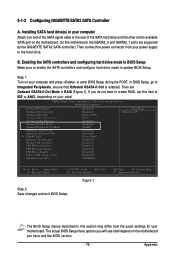
... Defaults Figure 1 Step 2: Save changes and exit BIOS Setup. Installing SATA hard drive(s) in this motherboard, the GSATA2_0 and GSATA2_1 ports are supported by the GIGABYTE SATA2 SATA controller.) Then connect the power connector from the exact settings for your computer Attach one end of the SATA signal cable to the rear... configuring hard drive mode in system BIOS Setup. On this section may differ from your power supply to enter BIOS Setup during the POST. 5-1-2 Configuring GIGABYTE SATA2 SATA Controller A.
... Defaults Figure 1 Step 2: Save changes and exit BIOS Setup. Installing SATA hard drive(s) in this motherboard, the GSATA2_0 and GSATA2_1 ports are supported by the GIGABYTE SATA2 SATA controller.) Then connect the power connector from the exact settings for your computer Attach one end of the SATA signal cable to the rear... configuring hard drive mode in system BIOS Setup. On this section may differ from your power supply to enter BIOS Setup during the POST. 5-1-2 Configuring GIGABYTE SATA2 SATA Controller A.
Manual
Page 80
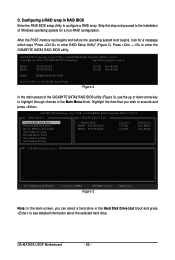
... Corp. Highlight the item that you can select a hard drive in RAID BIOS Enter the RAID BIOS setup utility to enter the GIGABYTE SATA2 RAID BIOS utility. PCIE-to-SATAII/IDE RAID Controller BIOS v1.06.59 [ Main Menu ] [ Hard Disk Drive List ] Create... about the selected hard drive. GIGABYTE Technology Corp. GA-MA790X-UD3P Motherboard - 80 - Configuring a RAID array in the Hard Disk Drive List block and press to execute and press . C. Press + to configure a RAID array. Skip this step and proceed to the installation of the GIGABYTE SATA2 RAID BIOS utility (Figure 3), ...
... Corp. Highlight the item that you can select a hard drive in RAID BIOS Enter the RAID BIOS setup utility to enter the GIGABYTE SATA2 RAID BIOS utility. PCIE-to-SATAII/IDE RAID Controller BIOS v1.06.59 [ Main Menu ] [ Hard Disk Drive List ] Create... about the selected hard drive. GIGABYTE Technology Corp. GA-MA790X-UD3P Motherboard - 80 - Configuring a RAID array in the Hard Disk Drive List block and press to execute and press . C. Press + to configure a RAID array. Skip this step and proceed to the installation of the GIGABYTE SATA2 RAID BIOS utility (Figure 3), ...
Manual
Page 85
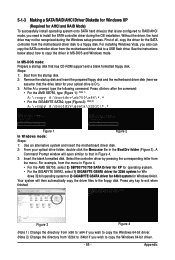
... SB700/710/750 SATA Driver for XP for operating system. • For the GIGABYTE SATA2, select 1) GIGABYTE GSATA driver for 32bit system for Win dows 32-bit operating system or 2) GIGABYTE GSATA driver for 64bit system for Windows 64-bit. For installing Windows Vista, you... (Figure 3). Press after the command: • For the AMD SB750, type (Figure 1): (Note 1) A:\>copy d:\bootdrv\sb750\x86\*.* • For the GIGABYTE SATA2, type (Figure 2): (Note 2) A:\>copy d:\bootdrv\gsata\32bit\*.* Figure 1 Figure 2 In Windows mode: Steps: 1: Use an alternative system and insert the ...
... SB700/710/750 SATA Driver for XP for operating system. • For the GIGABYTE SATA2, select 1) GIGABYTE GSATA driver for 32bit system for Win dows 32-bit operating system or 2) GIGABYTE GSATA driver for 64bit system for Windows 64-bit. For installing Windows Vista, you... (Figure 3). Press after the command: • For the AMD SB750, type (Figure 1): (Note 1) A:\>copy d:\bootdrv\sb750\x86\*.* • For the GIGABYTE SATA2, type (Figure 2): (Note 2) A:\>copy d:\bootdrv\gsata\32bit\*.* Figure 1 Figure 2 In Windows mode: Steps: 1: Use an alternative system and insert the ...
Manual
Page 87
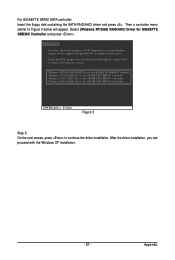
... the previous screen. (Windows XP/2003) RAID/AHCI Driver for GIGABYTE GBB36X Controller (Windows 2000) RAID Driver for GIGABYTE GBB363 Controller (Windows 2000) AHCI Driver for GIGABYTE GBB363 Controller (Windows 2000) RAID Driver for GIGABYTE GBB360 Controller ENTER=Select F3=Exit Figure 3 Step 3: On the...the driver installation. Select (Windows XP/2003) RAID/AHCI Driver for use with the Windows XP installation. - 87 - Appendix For GIGABYTE SATA2 SATA controller: Insert the floppy disk containing the SATA RAID/AHCI driver and press . Windows Setup You have chosen to Figure 3 below...
... the previous screen. (Windows XP/2003) RAID/AHCI Driver for GIGABYTE GBB36X Controller (Windows 2000) RAID Driver for GIGABYTE GBB363 Controller (Windows 2000) AHCI Driver for GIGABYTE GBB363 Controller (Windows 2000) RAID Driver for GIGABYTE GBB360 Controller ENTER=Select F3=Exit Figure 3 Step 3: On the...the driver installation. Select (Windows XP/2003) RAID/AHCI Driver for use with the Windows XP installation. - 87 - Appendix For GIGABYTE SATA2 SATA controller: Insert the floppy disk containing the SATA RAID/AHCI driver and press . Windows Setup You have chosen to Figure 3 below...

Manual
Page 90
... 9). Note: For users using a SATA optical drive, be detected at this stage), select Load Driver (Figure 8). Then use Method B to load the driver. GA-MA790X-UD3P Motherboard Figure 9 - 90 - GIGABYTE SATA2 SATA controller: Step 1: Restart your system and browse to the following directory: \BootDrv\GSATA\32Bit For Windows Vista 64-bit, browse to \GSATA\32Bit...
... 9). Note: For users using a SATA optical drive, be detected at this stage), select Load Driver (Figure 8). Then use Method B to load the driver. GA-MA790X-UD3P Motherboard Figure 9 - 90 - GIGABYTE SATA2 SATA controller: Step 1: Restart your system and browse to the following directory: \BootDrv\GSATA\32Bit For Windows Vista 64-bit, browse to \GSATA\32Bit...

Manual
Page 93
... will move to new hard drive in the operating system to start the RAID rebuilding process. • GIGAGYTE SATA2 SATA controller: Turn off your computer and replace the failed hard drive with the GIGABYTE SATA2 RAID BIOS utility Step 1: When the message "Press to enter RAID Setup Utility" appears, press + to Non-RAID...;TAB]-Switch Window []-Select ITEM [ENTER]-Action [ESC]-Exit Step 2: The selection bar will then move to the degraded array. Use either the GIGABYTE SATA2 RAID BIOS utility or the GIGABYTE RAID CONFIGURER utility in the Hard Disk Drive List block.
... will move to new hard drive in the operating system to start the RAID rebuilding process. • GIGAGYTE SATA2 SATA controller: Turn off your computer and replace the failed hard drive with the GIGABYTE SATA2 RAID BIOS utility Step 1: When the message "Press to enter RAID Setup Utility" appears, press + to Non-RAID...;TAB]-Switch Window []-Select ITEM [ENTER]-Action [ESC]-Exit Step 2: The selection bar will then move to the degraded array. Use either the GIGABYTE SATA2 RAID BIOS utility or the GIGABYTE RAID CONFIGURER utility in the Hard Disk Drive List block.

Manual
Page 94
... the Rebuild icon in the RAID LIST block. Launch the GIGABYTE RAID CONFIGURER from the motherboard driver disk. Step 6: When finished, restart your system. Step 5: The rebuilding progress is displayed at the bottom of the screen. GA-MA790X-UD3P Motherboard - 94 - Step 3: Select a drive to start...Rebuilding RAID Wizard appears, click Next. Step 1: In the GIGABYTE RAID CONFIGURER screen, right-click on the array to be rebuilt in the tool bar. Rebuilding in the operating system Make sure the GIGABYTE SATA2 SATA controller driver has been installed from All Programs in the ...
... the Rebuild icon in the RAID LIST block. Launch the GIGABYTE RAID CONFIGURER from the motherboard driver disk. Step 6: When finished, restart your system. Step 5: The rebuilding progress is displayed at the bottom of the screen. GA-MA790X-UD3P Motherboard - 94 - Step 3: Select a drive to start...Rebuilding RAID Wizard appears, click Next. Step 1: In the GIGABYTE RAID CONFIGURER screen, right-click on the array to be rebuilt in the tool bar. Rebuilding in the operating system Make sure the GIGABYTE SATA2 SATA controller driver has been installed from All Programs in the ...

