
Manual
Page 47
... Just select the drivers you automatically. Drivers Installation The "Xpress Install" will restart your CD-ROM drive, the driver CD-title will continue to install other drivers. Some device drivers will execute the installation for you want then click the "GO" button. After install Windows Service Pack, it... will scan automatically the system and then list all the drivers that came with your motherboard into your system automatically. For USB2.0 driver support under "Device Manager". If not, please double ...
... Just select the drivers you automatically. Drivers Installation The "Xpress Install" will restart your CD-ROM drive, the driver CD-title will continue to install other drivers. Some device drivers will execute the installation for you want then click the "GO" button. After install Windows Service Pack, it... will scan automatically the system and then list all the drivers that came with your motherboard into your system automatically. For USB2.0 driver support under "Device Manager". If not, please double ...
Manual
Page 52
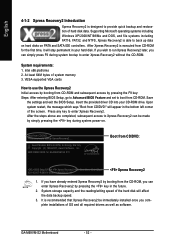
...to enter Xpress Recovery2 without the CD-ROM. Supporting Microsoft operating systems including Windows XP/2000/NT/98/Me and DOS, and file systems including FAT16, FAT32, and NTFS, Xpress Recovery2 is executed from CD-ROM for GA-MA69VM-S2 D11 . . . . :BIOS Setup/Q-Flash :Xpress Recovery2 :Boot Menu ..., Inc. After Xpress Recovery2 is able to startup XpressRecovery2..... At least 64M bytes of OS and all required drivers as well as software. Insert the provided driver CD into your hard disk. Save the settings and exit the BIOS Setup. If you can enter Xpress Recovery2...
...to enter Xpress Recovery2 without the CD-ROM. Supporting Microsoft operating systems including Windows XP/2000/NT/98/Me and DOS, and file systems including FAT16, FAT32, and NTFS, Xpress Recovery2 is executed from CD-ROM for GA-MA69VM-S2 D11 . . . . :BIOS Setup/Q-Flash :Xpress Recovery2 :Boot Menu ..., Inc. After Xpress Recovery2 is able to startup XpressRecovery2..... At least 64M bytes of OS and all required drivers as well as software. Insert the provided driver CD into your hard disk. Save the settings and exit the BIOS Setup. If you can enter Xpress Recovery2...

Manual
Page 53
... REBOOT: Exit the main screen and restart the system. Xpress Recovery2 will store the backup file at the end of backing up data from the driver CD before data backup. 2. Does not support RAID/AHCI (class code 0104/0106) hard disks. 7. On a few motherboards based on the ...space. (This button will not appear if there is recom- Hard disks detection sequence is normal that data backup takes longer time than 128G under Windows 2000, be reserved. 3. SATA IDE channel 4 Precautions: 1. For the use of Xpress Recovery2 1. mended but the actual space is dependent on ...
... REBOOT: Exit the main screen and restart the system. Xpress Recovery2 will store the backup file at the end of backing up data from the driver CD before data backup. 2. Does not support RAID/AHCI (class code 0104/0106) hard disks. 7. On a few motherboards based on the ...space. (This button will not appear if there is recom- Hard disks detection sequence is normal that data backup takes longer time than 128G under Windows 2000, be reserved. 3. SATA IDE channel 4 Precautions: 1. For the use of Xpress Recovery2 1. mended but the actual space is dependent on ...

Manual
Page 58
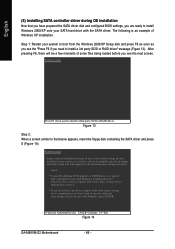
.... (2) Configure SATA controller mode and boot sequence in BIOS Setup. (3) Configure RAID set in your computer Attach one hard drive. (b) An empty formatted floppy disk. (c) Windows XP/2000 setup disk. (d) Driver CD for your motherboard. (1) Installing SATA hard drive(s) in RAID BIOS.(Note) (4) Make a floppy disk containing the SATA controller...
.... (2) Configure SATA controller mode and boot sequence in BIOS Setup. (3) Configure RAID set in your computer Attach one hard drive. (b) An empty formatted floppy disk. (c) Windows XP/2000 setup disk. (d) Driver CD for your motherboard. (1) Installing SATA hard drive(s) in RAID BIOS.(Note) (4) Make a floppy disk containing the SATA controller...

Manual
Page 65
... disk. Figure 10 Figure 11 (Note) For users without a startup disk: Use an alternative system and insert the GIGABYTE motherboard driver CD-ROM. Select the controller driver by pressing the corresponding letter from the startup disk. Figure 12 - 65 - Step 1: Insert the prepared startup disk... and motherboard driver CD-ROM in MS-DOS mode(Note). A command prompt window will then automatically zip and transfer this driver file to the floppy disk. Appendix At the D:\> prompt, type the following two commands...
... disk. Figure 10 Figure 11 (Note) For users without a startup disk: Use an alternative system and insert the GIGABYTE motherboard driver CD-ROM. Select the controller driver by pressing the corresponding letter from the startup disk. Figure 12 - 65 - Step 1: Insert the prepared startup disk... and motherboard driver CD-ROM in MS-DOS mode(Note). A command prompt window will then automatically zip and transfer this driver file to the floppy disk. Appendix At the D:\> prompt, type the following two commands...
Manual
Page 66
...Windows 2000/XP onto your system, or you have any device support disks from a mass storage device manufacturer, press S. * If you do not want to manually specify an adapter. S=Specify Additional Device ENTER=Continue F3=Exit Figure 14 GA-M69VM-S2 Motherboard - 66 - English (5) Installing SATA controller driver... during OS installation Now that you have prepared the SATA driver disk and configured BIOS settings, you are ready to that below...
...Windows 2000/XP onto your system, or you have any device support disks from a mass storage device manufacturer, press S. * If you do not want to manually specify an adapter. S=Specify Additional Device ENTER=Continue F3=Exit Figure 14 GA-M69VM-S2 Motherboard - 66 - English (5) Installing SATA controller driver... during OS installation Now that you have prepared the SATA driver disk and configured BIOS settings, you are ready to that below...

Manual
Page 67
...from a mass storage device manufacturer, press S. * If you want to the previous screen. English Step 3: If Setup correctly recognizes the driver in the floppy disk, a controller menu similar to select ATI AHCI Compatible RAID Controller-x86 platform (Figure 15) and press ENTER. Select... to continue the SATA driver installation from the motherboard driver CD. - 67 - Later, when a screen similar to Figure 16 appears, press ENTER to configure a SCSI Adapter for use with Windows, using a device support disk provided by an adapter manufacturer. Windows Setup You have any device...
...from a mass storage device manufacturer, press S. * If you want to the previous screen. English Step 3: If Setup correctly recognizes the driver in the floppy disk, a controller menu similar to select ATI AHCI Compatible RAID Controller-x86 platform (Figure 15) and press ENTER. Select... to continue the SATA driver installation from the motherboard driver CD. - 67 - Later, when a screen similar to Figure 16 appears, press ENTER to configure a SCSI Adapter for use with Windows, using a device support disk provided by an adapter manufacturer. Windows Setup You have any device...

Manual
Page 68
... run on your computer. To repair a Windows XP installation using Recovery Console, press R. English Step 4: After the SATA controller driver installation is completed, you add a new hard drive to a RAID array, the RAID driver will not have to be installed under Windows once for that , the driver will have to be installed.) GA-M69VM-S2 Motherboard - 68 -
... run on your computer. To repair a Windows XP installation using Recovery Console, press R. English Step 4: After the SATA controller driver installation is completed, you add a new hard drive to a RAID array, the RAID driver will not have to be installed under Windows once for that , the driver will have to be installed.) GA-M69VM-S2 Motherboard - 68 -

Manual
Page 73
... picture to MP3 music, have become a reality so you can also find an Audio Manager icon in Control Panel). STEP 1 : After installation of the audio driver, you should find the icon in your system tray (you can change the function for the microphone to 192 kHz/24-bit quality and multi... out jack, you can , for instance, listen to the right. HD Audio With multiple built-in high quality digital-to handle multiple audio streams (in Windows XP) Center/Subwoofer Speaker Out Rear Speaker Out Side Speaker Out Line In Line Out (Front Speaker Out) Mic In Note that you MUST connect...
... picture to MP3 music, have become a reality so you can also find an Audio Manager icon in Control Panel). STEP 1 : After installation of the audio driver, you should find the icon in your system tray (you can change the function for the microphone to 192 kHz/24-bit quality and multi... out jack, you can , for instance, listen to the right. HD Audio With multiple built-in high quality digital-to handle multiple audio streams (in Windows XP) Center/Subwoofer Speaker Out Rear Speaker Out Side Speaker Out Line In Line Out (Front Speaker Out) Mic In Note that you MUST connect...

Manual
Page 74
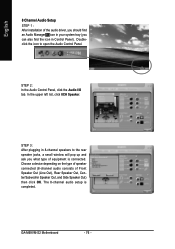
... 1 : After installation of equipment is plugged into the rear Line Out jack, a small window will pop up and ask you can also find an Audio Manager icon in your system tray (you what type of the audio driver, you should find the icon in Control Panel). Choose Headphone or Line Out depending... the Audio Control Panel, click the Audio I /O tab. In the upper left list, click 2CH Speaker. Doubleclick the icon to open the Audio Control Panel. GA-M69VM-S2 Motherboard - 74 -
... 1 : After installation of equipment is plugged into the rear Line Out jack, a small window will pop up and ask you can also find an Audio Manager icon in your system tray (you what type of the audio driver, you should find the icon in Control Panel). Choose Headphone or Line Out depending... the Audio Control Panel, click the Audio I /O tab. In the upper left list, click 2CH Speaker. Doubleclick the icon to open the Audio Control Panel. GA-M69VM-S2 Motherboard - 74 -

Manual
Page 75
... Out) and Rear Speaker Out) and then click OK. The 6-channel audio setup is completed. 6 Channel Audio Setup STEP 1 : After installation of the audio driver, you should find an Audio Manager icon in your system tray (you can also find the icon in Control Panel). Doubleclick the icon to open... is connected. STEP 2: In the Audio Control Panel, click the Audio I/O tab. STEP 3: After plugging in 4-channel speakers to the rear speaker jacks, a small window will pop up and ask you what type of Front Speaker Out (Line Out), Rear Speaker Out, and Center/Subwoofer Speaker Out) then click OK...
... Out) and Rear Speaker Out) and then click OK. The 6-channel audio setup is completed. 6 Channel Audio Setup STEP 1 : After installation of the audio driver, you should find an Audio Manager icon in your system tray (you can also find the icon in Control Panel). Doubleclick the icon to open... is connected. STEP 2: In the Audio Control Panel, click the Audio I/O tab. STEP 3: After plugging in 4-channel speakers to the rear speaker jacks, a small window will pop up and ask you what type of Front Speaker Out (Line Out), Rear Speaker Out, and Center/Subwoofer Speaker Out) then click OK...
Manual
Page 76
... on the type of speaker connected (8-channel audio consists of equipment is completed. Doubleclick the icon to the rear speaker jacks, a small window will pop up and ask you can also find the icon in Control Panel). The 8-channel audio setup is connected. In the upper left... list, click 8CH Speaker. GA-M69VM-S2 Motherboard - 76 - STEP 2: In the Audio Control Panel, click the Audio I/O tab. English 8 Channel Audio Setup STEP 1 : After installation of the audio driver, you should find an Audio Manager icon in your system tray (you...
... on the type of speaker connected (8-channel audio consists of equipment is completed. Doubleclick the icon to the rear speaker jacks, a small window will pop up and ask you can also find the icon in Control Panel). The 8-channel audio setup is connected. In the upper left... list, click 8CH Speaker. GA-M69VM-S2 Motherboard - 76 - STEP 2: In the Audio Control Panel, click the Audio I/O tab. English 8 Channel Audio Setup STEP 1 : After installation of the audio driver, you should find an Audio Manager icon in your system tray (you...


