
Manual
Page 1
GA-M68M-S2 AM2+/AM2 socket motherboard for AMD Phenom™ II processor/ AMD Phenom™ processor/ AMD Athlon™ II processor/ AMD Athlon™ processor/ AMD Sempron™ processor User's Manual Rev. 1001 12ME-M68MS2-1001R
GA-M68M-S2 AM2+/AM2 socket motherboard for AMD Phenom™ II processor/ AMD Phenom™ processor/ AMD Athlon™ II processor/ AMD Athlon™ processor/ AMD Sempron™ processor User's Manual Rev. 1001 12ME-M68MS2-1001R

Manual
Page 3
...part of documentations: For detailed product information, carefully read the User's Manual. For instructions on how to assist in the use GIGABYTE's unique features, read or download the information on/from the Support&Downloads\Motherboard\...REV: X.X." Documentation Classifications In order to use of this product, GIGABYTE provides the following types of this manual may be reproduced, copied, translated, transmitted, or published in this manual is protected by GIGABYTE without GIGABYTE's prior written permission. Example: - 3 - The trademarks mentioned ...
...part of documentations: For detailed product information, carefully read the User's Manual. For instructions on how to assist in the use GIGABYTE's unique features, read or download the information on/from the Support&Downloads\Motherboard\...REV: X.X." Documentation Classifications In order to use of this product, GIGABYTE provides the following types of this manual may be reproduced, copied, translated, transmitted, or published in this manual is protected by GIGABYTE without GIGABYTE's prior written permission. Example: - 3 - The trademarks mentioned ...

Manual
Page 5
Chapter 3 Drivers Installation 53 3-1 Installing Chipset Drivers 53 3-2 Application Software 54 3-3 Technical Manuals 54 3-4 Contact ...55 3-5 System ...55 3-6 Download Center 56 Chapter 4 Unique Features 57 4-1 Xpress Recovery2 57 4-2 BIOS Update Utilities 60 4-2-1 Updating the BIOS with the Q-Flash ...
Chapter 3 Drivers Installation 53 3-1 Installing Chipset Drivers 53 3-2 Application Software 54 3-3 Technical Manuals 54 3-4 Contact ...55 3-5 System ...55 3-6 Download Center 56 Chapter 4 Unique Features 57 4-1 Xpress Recovery2 57 4-2 BIOS Update Utilities 60 4-2-1 Updating the BIOS with the Q-Flash ...
Manual
Page 6
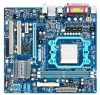
Box Contents GA-M68M-S2 motherboard Motherboard driver disk User's Manual One IDE cable One SATA 3Gb/s cables I/O Shield • The box contents above are subject to change without notice. • The motherboard image is for reference only and the actual items shall depend on product package you obtain. The box contents are for reference only. Optional Items Floppy disk drive cable (Part No. 12CF1-1FD001-7*R) 2-port USB 2.0 bracket (Part No. 12CR1-1UB030-5*R) 2-port SATA power cable (Part No. 12CF1-2SERPW-0*R) S/PDIF in and out cable (Part No. 12CR1-1SPINO-1*R) - 6 -
Box Contents GA-M68M-S2 motherboard Motherboard driver disk User's Manual One IDE cable One SATA 3Gb/s cables I/O Shield • The box contents above are subject to change without notice. • The motherboard image is for reference only and the actual items shall depend on product package you obtain. The box contents are for reference only. Optional Items Floppy disk drive cable (Part No. 12CF1-1FD001-7*R) 2-port USB 2.0 bracket (Part No. 12CR1-1UB030-5*R) 2-port SATA power cable (Part No. 12CF1-2SERPW-0*R) S/PDIF in and out cable (Part No. 12CR1-1SPINO-1*R) - 6 -

Manual
Page 9
... to the motherboard, do not allow screws to the use of the product, please consult a certified computer technician. - 9 - Prior to installation, carefully read the user's manual and follow these procedures: • Prior to installation, do not remove or break motherboard S/N (Serial Number) sticker or warranty sticker provided by unplugging the power...
... to the motherboard, do not allow screws to the use of the product, please consult a certified computer technician. - 9 - Prior to installation, carefully read the user's manual and follow these procedures: • Prior to installation, do not remove or break motherboard S/N (Serial Number) sticker or warranty sticker provided by unplugging the power...

Manual
Page 14
... the steps below to correctly install the CPU cooler on the CPU. (The following procedure uses the GIGABYTE cooler as the picture above shows) to lock into place. (Refer to your CPU cooler installation manual for instructions on installing the cooler.) Step 5: Finally, attach the power connector of the CPU cooler to...
... the steps below to correctly install the CPU cooler on the CPU. (The following procedure uses the GIGABYTE cooler as the picture above shows) to lock into place. (Refer to your CPU cooler installation manual for instructions on installing the cooler.) Step 5: Finally, attach the power connector of the CPU cooler to...
Manual
Page 17
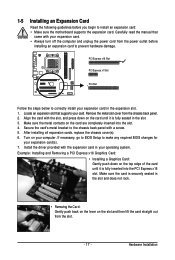
..., replace the chassis cover(s). 6. Turn on your expansion card(s). 7. Make sure the card is fully seated in the expansion slot. 1. Hardware Installation Carefully read the manual that supports your expansion card in the slot. 3. Example: Installing and Removing a PCI Express x16 Graphics Card: • Installing a Graphics Card: Gently push down on...
..., replace the chassis cover(s). 6. Turn on your expansion card(s). 7. Make sure the card is fully seated in the expansion slot. 1. Hardware Installation Carefully read the manual that supports your expansion card in the slot. 3. Example: Installing and Removing a PCI Express x16 Graphics Card: • Installing a Graphics Card: Gently push down on...

Manual
Page 29
... do so may cause damage to the motherboard. • After system restart, go to BIOS Setup to load factory defaults (select Load Optimized Defaults) or manually configure the BIOS settings (refer to clear the CMOS values (e.g.
... do so may cause damage to the motherboard. • After system restart, go to BIOS Setup to load factory defaults (select Load Optimized Defaults) or manually configure the BIOS settings (refer to clear the CMOS values (e.g.

Manual
Page 35
...: Exit F1: General Help F7: Optimized Defaults Whether the system will work stably with the overclock/overvoltage settings you made is set to Manual. This page is for advanced users only and we recommend you not to alter the default settings to prevent system instability or other unexpected ...may result in system's failure to CPU, chipset, or memory and reduce the useful life of these components. X2.66 Sets Memory Clock to manually set the memory clock as required. Auto lets BIOS automatically set the memory clock. If this occurs, clear the CMOS values and reset the...
...: Exit F1: General Help F7: Optimized Defaults Whether the system will work stably with the overclock/overvoltage settings you made is set to Manual. This page is for advanced users only and we recommend you not to alter the default settings to prevent system instability or other unexpected ...may result in system's failure to CPU, chipset, or memory and reduce the useful life of these components. X2.66 Sets Memory Clock to manually set the memory clock as required. Auto lets BIOS automatically set the memory clock. If this occurs, clear the CMOS values and reset the...

Manual
Page 36
... Defaults DCTs Mode (Note) Allows you install a CPU that supports this feature. Unganged Sets memory control mode to two single-channel.(default) DDRII Timing Items Manual allows all DDRII Timing items below to set memory control mode. Row Precharge Time Options are : Auto (default), 1T~3T. RAS to single dual-channel... for DIMM2 Options are : Auto (default), 75ns, 105ns, 127.5ns, 195ns, 327.5ns. Ganged Sets memory control mode to CAS R/W Delay Options are : Auto (default), Manual.
... Defaults DCTs Mode (Note) Allows you install a CPU that supports this feature. Unganged Sets memory control mode to two single-channel.(default) DDRII Timing Items Manual allows all DDRII Timing items below to set memory control mode. Row Precharge Time Options are : Auto (default), 1T~3T. RAS to single dual-channel... for DIMM2 Options are : Auto (default), 75ns, 105ns, 127.5ns, 195ns, 327.5ns. Ganged Sets memory control mode to CAS R/W Delay Options are : Auto (default), Manual.

Manual
Page 38
... If no IDE/SATA devices are used , set this item to autodetect the parameters of the IDE/SATA device on this channel. Allows you to manually enter the specifications of the hard drive when the hard drive access mode is set this item to autodetect the parameters of the device during... startup. Access Mode Sets the hard drive access mode. IDE Channel 0 Master/Slave IDE HDD Auto-Detection Press to None so the system will • Manual skip the detection of the IDE/SATA device on this channel. IDE Channel 2/3 Master IDE Auto-Detection Press to None so the system will skip...
... If no IDE/SATA devices are used , set this item to autodetect the parameters of the IDE/SATA device on this channel. Allows you to manually enter the specifications of the hard drive when the hard drive access mode is set this item to autodetect the parameters of the device during... startup. Access Mode Sets the hard drive access mode. IDE Channel 0 Master/Slave IDE HDD Auto-Detection Press to None so the system will • Manual skip the detection of the IDE/SATA device on this channel. IDE Channel 2/3 Master IDE Auto-Detection Press to None so the system will skip...

Manual
Page 39
... a floppy disk drive, set this item to None. Head Number of extended memory. - 39 - Precomp Write precompensation cylinder. If you wish to enter the parameters manually, refer to specify whether the installed floppy disk drive is 3-mode floppy disk drive, a Japanese standard floppy disk drive. Options are : None, 360K/5.25", 1.2M...
... a floppy disk drive, set this item to None. Head Number of extended memory. - 39 - Precomp Write precompensation cylinder. If you wish to enter the parameters manually, refer to specify whether the installed floppy disk drive is 3-mode floppy disk drive, a Japanese standard floppy disk drive. Options are : None, 360K/5.25", 1.2M...

Manual
Page 53
... install other drivers. • After the drivers are recommended to install. • Please ignore the popup dialog box(es) (e.g. Or click Install Single Items to manually select the drivers you wish to install. The driver Autorun screen is installing the drivers. Drivers Installation Chapter 3 Drivers Installation • Before installing the drivers...
... install other drivers. • After the drivers are recommended to install. • Please ignore the popup dialog box(es) (e.g. Or click Install Single Items to manually select the drivers you wish to install. The driver Autorun screen is installing the drivers. Drivers Installation Chapter 3 Drivers Installation • Before installing the drivers...

Manual
Page 54
3-2 Application Software This page displays all the utilities and applications that GIGABYTE develops and some free software. Drivers Installation - 54 - You can click the Install button on the right of an item to install it. 3-3 Technical Manuals This page provides content descriptions for this driver disk and the motherboard manuals.
3-2 Application Software This page displays all the utilities and applications that GIGABYTE develops and some free software. Drivers Installation - 54 - You can click the Install button on the right of an item to install it. 3-3 Technical Manuals This page provides content descriptions for this driver disk and the motherboard manuals.

Manual
Page 60
... it with the Q-Flash Utility A. With Q-Flash you to update the BIOS without having to access Q-Flash. GA-M68M-S2 F1a . . . . : BIOS Setup : XpressRecovery2 : Boot Menu : Qflash 08/06/2009-NV-MCP68-...for the safety and stability of system safety, users cannot update the backup BIOS manually. What is corrupted or damaged, the backup BIOS will download the latest BIOS file...on the main BIOS. During the POST, press the key to your motherboard model. 2. From GIGABYTE's website, download the latest compressed BIOS update file that support DualBIOS have two BIOS onboard, ...
... it with the Q-Flash Utility A. With Q-Flash you to update the BIOS without having to access Q-Flash. GA-M68M-S2 F1a . . . . : BIOS Setup : XpressRecovery2 : Boot Menu : Qflash 08/06/2009-NV-MCP68-...for the safety and stability of system safety, users cannot update the backup BIOS manually. What is corrupted or damaged, the backup BIOS will download the latest BIOS file...on the main BIOS. During the POST, press the key to your motherboard model. 2. From GIGABYTE's website, download the latest compressed BIOS update file that support DualBIOS have two BIOS onboard, ...

Manual
Page 63
... Internet). tions in a corrupted BIOS or a system that is not present on the @BIOS server site, please manually download the BIOS update file from GIGABYTE's website and follow the instruc- Load BIOS Defaults after BIOS Update: Select the Load CMOS default after BIOS update ... TSR (Terminate and Stay Resident) programs. This helps prevent unexpected failures when performing a BIOS update. 2. Do not use the G.O.M. (GIGABYTE Online Management) function when using @BIOS. 4. Follow the on -screen instructions to complete. 3. screen instructions to save the BIOS update file obtained from...
... Internet). tions in a corrupted BIOS or a system that is not present on the @BIOS server site, please manually download the BIOS update file from GIGABYTE's website and follow the instruc- Load BIOS Defaults after BIOS Update: Select the Load CMOS default after BIOS update ... TSR (Terminate and Stay Resident) programs. This helps prevent unexpected failures when performing a BIOS update. 2. Do not use the G.O.M. (GIGABYTE Online Management) function when using @BIOS. 4. Follow the on -screen instructions to complete. 3. screen instructions to save the BIOS update file obtained from...

Manual
Page 67
... NVIDIA RAID setup utility. MediaShield ROM BIOS 6.94 Copyright (C) 2006 NVIDIA Corp. Detecting array ... Figure 3 Step 2: The Define a New Array screen is highlighted. You can manually set the striping block size. Step 4: If RAID 0 (Striping) is created. In the Striping Block field, use the up or down arrow key to 128...
... NVIDIA RAID setup utility. MediaShield ROM BIOS 6.94 Copyright (C) 2006 NVIDIA Corp. Detecting array ... Figure 3 Step 2: The Define a New Array screen is highlighted. You can manually set the striping block size. Step 4: If RAID 0 (Striping) is created. In the Striping Block field, use the up or down arrow key to 128...

Manual
Page 76
... driver for High Definition Audio" has been installed from the motherboard driver disk and your microphone to the Mic in or Line in jack and manually configure the jack for microphone functionality. • Audio signals will appear in the notification area. all at the same time. Before installing the audio driver...
... driver for High Definition Audio" has been installed from the motherboard driver disk and your microphone to the Mic in or Line in jack and manually configure the jack for microphone functionality. • Audio signals will appear in the notification area. all at the same time. Before installing the audio driver...

Manual
Page 86
... harmful substances into the environment and to maximize the use internationally banned toxic chemicals. Restriction of Hazardous Substances (RoHS) Directive Statement GIGABYTE products have been carefully selected to add and safe from the 2002/96/EC WEEE (Waste Electrical and Electronic Equipment) directive. ... and WEEE (Waste Electrical and Electronic Equipment) environmental directives, as well as most of the materials in your product's user's manual and we at the Customer Care number listed in your waste equipment at the time of printing. The separate collection and recycling of...
... harmful substances into the environment and to maximize the use internationally banned toxic chemicals. Restriction of Hazardous Substances (RoHS) Directive Statement GIGABYTE products have been carefully selected to add and safe from the 2002/96/EC WEEE (Waste Electrical and Electronic Equipment) directive. ... and WEEE (Waste Electrical and Electronic Equipment) environmental directives, as well as most of the materials in your product's user's manual and we at the Customer Care number listed in your waste equipment at the time of printing. The separate collection and recycling of...


