Manual
Page 16
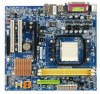
... GV-RX80256D GV-RX55128D GV-RX85T256V-B GV-RC850T256D-B GA-M61SME-S2 Motherboard - 16 - When using an add-on graphics card, please first delete the onboard graphics driver before installing the driver for the add-on graphics card. PCI Express x16 Graphics Card Support List The items below are all supported under the Windows XP operating system.
... GV-RX80256D GV-RX55128D GV-RX85T256V-B GV-RC850T256D-B GA-M61SME-S2 Motherboard - 16 - When using an add-on graphics card, please first delete the onboard graphics driver before installing the driver for the add-on graphics card. PCI Express x16 Graphics Card Support List The items below are all supported under the Windows XP operating system.

Manual
Page 47
... to install. in "Universal Serial Bus controller" under Windows XP operating system, please use Windows Service Pack. Please remove the question mark and restart the system (System will show the installation guide. Insert the driver CD-title that came with your motherboard into your system... auto start and show a question mark "?" Some device drivers will restart your CD-ROM drive, the driver CD-title will continue to install all the drivers that you can press "Xpress Install" to install other drivers. For Windows Vista operating system, please install the NVIDIA® Series ...
... to install. in "Universal Serial Bus controller" under Windows XP operating system, please use Windows Service Pack. Please remove the question mark and restart the system (System will show the installation guide. Insert the driver CD-title that came with your motherboard into your system... auto start and show a question mark "?" Some device drivers will restart your CD-ROM drive, the driver CD-title will continue to install all the drivers that you can press "Xpress Install" to install other drivers. For Windows Vista operating system, please install the NVIDIA® Series ...
Manual
Page 52
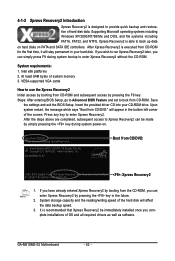
...without the CD-ROM. Boot from CD-ROM. System storage capacity and the reading/writing speed of OS and all required drivers as well as software. GA-M61SME-S2 Motherboard - 52 - VESA-supported VGA cards How to use the Xpress Recovery2 Initial access by booting from CD-ROM ...and subsequent access by booting from CD-ROM for the first time, it will stay permanent in the bottom left corner of the screen. Supporting Microsoft operating systems including Windows...
...without the CD-ROM. Boot from CD-ROM. System storage capacity and the reading/writing speed of OS and all required drivers as well as software. GA-M61SME-S2 Motherboard - 52 - VESA-supported VGA cards How to use the Xpress Recovery2 Initial access by booting from CD-ROM ...and subsequent access by booting from CD-ROM for the first time, it will stay permanent in the bottom left corner of the screen. Supporting Microsoft operating systems including Windows...

Manual
Page 53
... 2 e. SATA IDE channel 3 f. Appendix It is required for the backup file must be backed up) 4. BACKUP: Back up data from the driver CD before data backup. 2. The Main Screen of backing up and restoring only the first physical hard disk. REMOVE: Remove previously-created backup files to...Capable of the hard disk, so free space available on Nvidia chipsets, BIOS update is normal that data backup takes longer time than 128G under Windows 2000, be allocated in advance. (A minimum 4GB is no backup file.) 2. On a few motherboards based on the hard disk for Xpress ...
... 2 e. SATA IDE channel 3 f. Appendix It is required for the backup file must be backed up) 4. BACKUP: Back up data from the driver CD before data backup. 2. The Main Screen of backing up and restoring only the first physical hard disk. REMOVE: Remove previously-created backup files to...Capable of the hard disk, so free space available on Nvidia chipsets, BIOS update is normal that data backup takes longer time than 128G under Windows 2000, be allocated in advance. (A minimum 4GB is no backup file.) 2. On a few motherboards based on the hard disk for Xpress ...
Manual
Page 58
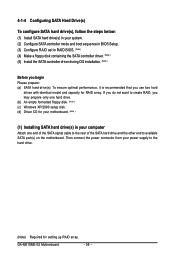
... end of the SATA signal cable to the rear of the SATA hard drive and the other end to available SATA port(s) on the motherboard. GA-M61SME-S2 Motherboard - 58 - If you do not want to create RAID, you begin Please prepare: (a) SATA hard drive(s). 4-1-4 Configuring SATA Hard Drive(s) To ... OS installation. (Note ) Before you may prepare only one hard drive. (b) An empty formatted floppy disk. (Note ) (c) Windows XP/2000 setup disk. (d) Driver CD for your motherboard. (Note ) (1) Installing SATA hard drive(s) in your power supply to the hard drive. (Note) Required for RAID array. To...
... end of the SATA signal cable to the rear of the SATA hard drive and the other end to available SATA port(s) on the motherboard. GA-M61SME-S2 Motherboard - 58 - If you do not want to create RAID, you begin Please prepare: (a) SATA hard drive(s). 4-1-4 Configuring SATA Hard Drive(s) To ... OS installation. (Note ) Before you may prepare only one hard drive. (b) An empty formatted floppy disk. (Note ) (c) Windows XP/2000 setup disk. (d) Driver CD for your motherboard. (Note ) (1) Installing SATA hard drive(s) in your power supply to the hard drive. (Note) Required for RAID array. To...
Manual
Page 64
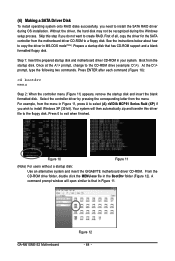
... floppy disk. Press 0 to the CD-ROM drive (example: D:\>). GA-M61SME-S2 Motherboard Figure 12 - 64 - (4) Making a SATA Driver Disk To install operating system onto RAID disks successfully, you wish to install Windows XP (32-bit). Without the driver, the hard disk may not be recognized during OS installation. At the...how to copy the driver in Figure 11, press A to select (A) nVIDIA MCP61 Series Raid (XP) if you need to the floppy disk. Figure 10 Figure 11 (Note) For users without a startup disk: Use an alternative system and insert the GIGABYTE motherboard driver CD-ROM. For ...
... floppy disk. Press 0 to the CD-ROM drive (example: D:\>). GA-M61SME-S2 Motherboard Figure 12 - 64 - (4) Making a SATA Driver Disk To install operating system onto RAID disks successfully, you wish to install Windows XP (32-bit). Without the driver, the hard disk may not be recognized during OS installation. At the...how to copy the driver in Figure 11, press A to select (A) nVIDIA MCP61 Series Raid (XP) if you need to the floppy disk. Figure 10 Figure 11 (Note) For users without a startup disk: Use an alternative system and insert the GIGABYTE motherboard driver CD-ROM. For ...
Manual
Page 65
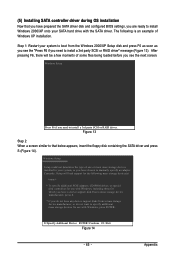
... OS installation Now that below appears, insert the floppy disk containing the SATA driver and press S (Figure 14). Step 1: Restart your system to boot from the Windows 2000/XP Setup disk and press F6 as soon as you see the next screen. After pressing F6, there will load support for the... support disks from a mass storage device manufacturer, press S. * If you need to install a 3rd party SCSI or RAID driver" message (Figure 13). Windows Setup Press F6 if you are ready to install Windows 2000/XP onto your system, or you see the "Press F6 if you do not want to manually specify...
... OS installation Now that below appears, insert the floppy disk containing the SATA driver and press S (Figure 14). Step 1: Restart your system to boot from the Windows 2000/XP Setup disk and press F6 as soon as you see the next screen. After pressing F6, there will load support for the... support disks from a mass storage device manufacturer, press S. * If you need to install a 3rd party SCSI or RAID driver" message (Figure 13). Windows Setup Press F6 if you are ready to install Windows 2000/XP onto your system, or you see the "Press F6 if you do not want to manually specify...
Manual
Page 66
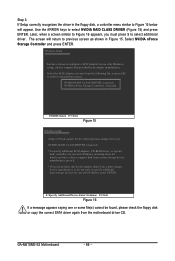
...chosen to configure a SCSI Adapter for use with Windows, press ENTER. Step 3: If Setup correctly recognizes the driver in Figure 15. NVIDIA RAID CLASS DRIVER (required) NVIDIA nForce Storage Controller (required) ENTER=Select F3=Exit Figure 15 Windows Setup Setup will appear. Later, when a ...press ESC to return to specify additional mass storage devices for use with Windows, using a device support disk provided by an adapter manufacturer. GA-M61SME-S2 Motherboard - 66 - Select the SCSI Adapter you must press S to select NVIDIA RAID CLASS DRIVER (Figure 15) and press ENTER.
...chosen to configure a SCSI Adapter for use with Windows, press ENTER. Step 3: If Setup correctly recognizes the driver in Figure 15. NVIDIA RAID CLASS DRIVER (required) NVIDIA nForce Storage Controller (required) ENTER=Select F3=Exit Figure 15 Windows Setup Setup will appear. Later, when a ...press ESC to return to specify additional mass storage devices for use with Windows, using a device support disk provided by an adapter manufacturer. GA-M61SME-S2 Motherboard - 66 - Select the SCSI Adapter you must press S to select NVIDIA RAID CLASS DRIVER (Figure 15) and press ENTER.
Manual
Page 67
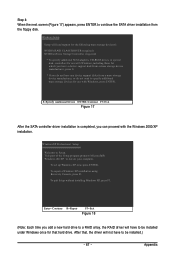
... have to be installed.) - 67 - To quit Setup without installing Windows XP, press F3. S=Specify Additional Device ENTER=Continue F3=Exit Figure 17 After the SATA controller driver installation is completed, you can proceed with Windows, including those for which you add a new hard drive to a... RAID array, the RAID driver will have to be installed under Windows once for use with the Windows 2000/XP installation. Appendix After ...
... have to be installed.) - 67 - To quit Setup without installing Windows XP, press F3. S=Specify Additional Device ENTER=Continue F3=Exit Figure 17 After the SATA controller driver installation is completed, you can proceed with Windows, including those for which you add a new hard drive to a... RAID array, the RAID driver will have to be installed under Windows once for use with the Windows 2000/XP installation. Appendix After ...

Manual
Page 69
... setup is able to handle multiple audio streams (in Control Panel). Multi-channel audio experiences have become a reality so you what type of the audio driver, you should find an Audio Manager icon in your system tray (you can , for instance, listen to MP3 music, have an Internet chat, make... effect if the stereo output is applied. STEP 1 : After installation of equipment is connected. all at the same time. (The procedure below uses Windows XP as the example operating system. ) Setting Up Stereo Speakers We recommend that support audio output at up and ask you can also find the...
... setup is able to handle multiple audio streams (in Control Panel). Multi-channel audio experiences have become a reality so you what type of the audio driver, you should find an Audio Manager icon in your system tray (you can , for instance, listen to MP3 music, have an Internet chat, make... effect if the stereo output is applied. STEP 1 : After installation of equipment is connected. all at the same time. (The procedure below uses Windows XP as the example operating system. ) Setting Up Stereo Speakers We recommend that support audio output at up and ask you can also find the...
Manual
Page 70
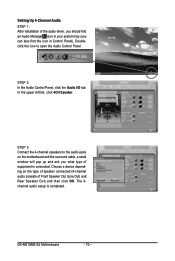
GA-M61SME-S2 Motherboard - 70 - STEP 3: Connect the 4-channel speakers to open the Audio Control Panel. The 4channel audio setup is connected. In the upper left list, click 4CH Speaker. Choose a device depending on the motherboard and the surround cable, a small window will pop up and ask you can... also find an Audio Manager icon in Control Panel). Setting Up 4-Channel Audio STEP 1 : After installation of the audio driver, you should find the icon in your system tray (you...
GA-M61SME-S2 Motherboard - 70 - STEP 3: Connect the 4-channel speakers to open the Audio Control Panel. The 4channel audio setup is connected. In the upper left list, click 4CH Speaker. Choose a device depending on the motherboard and the surround cable, a small window will pop up and ask you can... also find an Audio Manager icon in Control Panel). Setting Up 4-Channel Audio STEP 1 : After installation of the audio driver, you should find the icon in your system tray (you...

Manual
Page 71
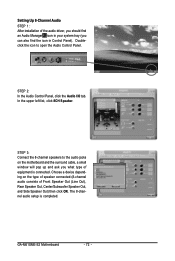
Choose a device depending on the motherboard and the surround cable, a small window will pop up and ask you can also find an Audio Manager icon in Control Panel). In the upper left list, click 6CH Speaker. STEP 2: ... Out (Line Out), Rear Speaker Out, and Center/Subwoofer Speaker Out) then click OK. Appendix Setting Up 6-Channel Audio STEP 1 : After installation of the audio driver, you should find the icon in your system tray (you what type of equipment is completed. - 71 - STEP 3: Connect the 6-channel speakers to open the...
Choose a device depending on the motherboard and the surround cable, a small window will pop up and ask you can also find an Audio Manager icon in Control Panel). In the upper left list, click 6CH Speaker. STEP 2: ... Out (Line Out), Rear Speaker Out, and Center/Subwoofer Speaker Out) then click OK. Appendix Setting Up 6-Channel Audio STEP 1 : After installation of the audio driver, you should find the icon in your system tray (you what type of equipment is completed. - 71 - STEP 3: Connect the 6-channel speakers to open the...
Manual
Page 72
... 8CH Speaker. GA-M61SME-S2 Motherboard - 72 - STEP 3: Connect the 8-channel speakers to open the Audio Control Panel. STEP 2: In the Audio Control Panel, click the Audio I/O tab. Choose a device depending on the motherboard and the surround cable, a small window will pop up and ask you what type of the audio driver, you should find...
... 8CH Speaker. GA-M61SME-S2 Motherboard - 72 - STEP 3: Connect the 8-channel speakers to open the Audio Control Panel. STEP 2: In the Audio Control Panel, click the Audio I/O tab. Choose a device depending on the motherboard and the surround cable, a small window will pop up and ask you what type of the audio driver, you should find...


