
User Manual
Page 5
Channel Audio Function Introduction 79 4-2 Troubleshooting 83 - 5 - Chapter 3 Drivers Installation 47 3-1 Install Chipset Drivers 47 3-2 SoftwareApplication 48 3-3 Software Information 48 3-4 Hardware Information 49 3-5 Contact Us ...49 Chapter 4 Appendix 51 4-1 Unique Software Utilities 51 4-1-1 EasyTune 5 Introduction 52 4-1-2 Xpress Recovery2 Introduction 53 4-1-3 Flash BIOS Method Introduction 55 4-1-4 Configuring SATA Hard Drive(s 64 4-1-5 2- / 4- / 6- / 8-
Channel Audio Function Introduction 79 4-2 Troubleshooting 83 - 5 - Chapter 3 Drivers Installation 47 3-1 Install Chipset Drivers 47 3-2 SoftwareApplication 48 3-3 Software Information 48 3-4 Hardware Information 49 3-5 Contact Us ...49 Chapter 4 Appendix 51 4-1 Unique Software Utilities 51 4-1-1 EasyTune 5 Introduction 52 4-1-2 Xpress Recovery2 Introduction 53 4-1-3 Flash BIOS Method Introduction 55 4-1-4 Configuring SATA Hard Drive(s 64 4-1-5 2- / 4- / 6- / 8-

User Manual
Page 76
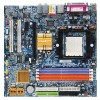
Solutions 1: Use the NVRAID tool (nForce Driver Version 5.xx) to convert the boot volume to enter system BIOS ...Conductor Cable IDE2 Conductor Cable Serial-ATA-II 1 On-Chip USB USB Keyboard Support USB Mouse Support Onboard Audio Function Onboard LAN Function Onboard LAN Boot ROM Onboard 1394 Function Onboard Serial Port 1 Onboard Serial Port 2 ...Item Help Menu Level : Move Enter: Select F5: Previous Values +/-/PU/PD: Value F10: Save F6: Fail-Safe Defaults GA-K8N51GMF(-RH) Motherboard Figure 22 - 76 - There are the detailed step-by-step instructions: Step 1: Install Windows 2000 onto a ...
Solutions 1: Use the NVRAID tool (nForce Driver Version 5.xx) to convert the boot volume to enter system BIOS ...Conductor Cable IDE2 Conductor Cable Serial-ATA-II 1 On-Chip USB USB Keyboard Support USB Mouse Support Onboard Audio Function Onboard LAN Function Onboard LAN Boot ROM Onboard 1394 Function Onboard Serial Port 1 Onboard Serial Port 2 ...Item Help Menu Level : Move Enter: Select F5: Previous Values +/-/PU/PD: Value F10: Save F6: Fail-Safe Defaults GA-K8N51GMF(-RH) Motherboard Figure 22 - 76 - There are the detailed step-by-step instructions: Step 1: Install Windows 2000 onto a ...
User Manual
Page 79
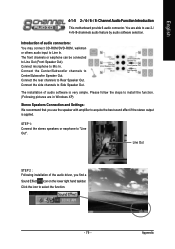
...Please follow the steps to install the function. (Following pictures are able to select the function. - 79 - Channel Audio Function Introduction This motherboard provide 6 audio connector. Appendix English 4-1-5 2- / 4- / 6- / 8- You are in Windows XP) Stereo Speakers Connection and ...installation of audio connectors: You may connect CD-ROM/DVD-ROM, walkman or others audio input to Center/Subwoofer Speaker Out. Connect the Center/Subwoofer channels to Line In. Introduction of the audio driver, you use 2-/ 4-/6-/8-channnels audio feature by audio software selection....
...Please follow the steps to install the function. (Following pictures are able to select the function. - 79 - Channel Audio Function Introduction This motherboard provide 6 audio connector. Appendix English 4-1-5 2- / 4- / 6- / 8- You are in Windows XP) Stereo Speakers Connection and ...installation of audio connectors: You may connect CD-ROM/DVD-ROM, walkman or others audio input to Center/Subwoofer Speaker Out. Connect the Center/Subwoofer channels to Line In. Introduction of the audio driver, you use 2-/ 4-/6-/8-channnels audio feature by audio software selection....
User Manual
Page 80
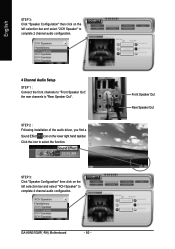
GA-K8N51GMF(-RH) Motherboard - 80 - Click the icon to select the function. STEP 3: Click "Speaker Configuration" then click on the left selection bar and select "4CH Speaker" to complete 4 channel audio configuration. Front Speaker Out Rear Speaker Out English STEP 3: Click "Speaker Configuration... and select "2CH Speaker" to complete 2 channel audio configuration. 4 Channel Audio Setup STEP 1 : Connect the front channels to "Front Speaker Out", the rear channels to "Rear Speaker Out". STEP 2 : Following installation of the audio driver, you find a Sound Effect icon on the lower...
GA-K8N51GMF(-RH) Motherboard - 80 - Click the icon to select the function. STEP 3: Click "Speaker Configuration" then click on the left selection bar and select "4CH Speaker" to complete 4 channel audio configuration. Front Speaker Out Rear Speaker Out English STEP 3: Click "Speaker Configuration... and select "2CH Speaker" to complete 2 channel audio configuration. 4 Channel Audio Setup STEP 1 : Connect the front channels to "Front Speaker Out", the rear channels to "Rear Speaker Out". STEP 2 : Following installation of the audio driver, you find a Sound Effect icon on the lower...

User Manual
Page 81
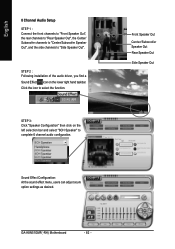
STEP 2 : Following installation of the audio driver, you find a Sound Effect icon on the left selection bar and select "6CH Speaker" to complete 6 channel audio configuration. Appendix English 6 Channel Audio Setup STEP 1 : Connect the front channels to "Front Speaker Out", the rear channels to "Rear Speaker Out", and the Center/Subwoofer channels to select the function. Click the icon to "Center/Subwoofer Speaker Out". Front Speaker Out Center/Subwoofer Speaker Out Rear Speaker Out - 81 - STEP 3: Click "Speaker Configuration" then click on the lower right hand taskbar.
STEP 2 : Following installation of the audio driver, you find a Sound Effect icon on the left selection bar and select "6CH Speaker" to complete 6 channel audio configuration. Appendix English 6 Channel Audio Setup STEP 1 : Connect the front channels to "Front Speaker Out", the rear channels to "Rear Speaker Out", and the Center/Subwoofer channels to select the function. Click the icon to "Center/Subwoofer Speaker Out". Front Speaker Out Center/Subwoofer Speaker Out Rear Speaker Out - 81 - STEP 3: Click "Speaker Configuration" then click on the lower right hand taskbar.
User Manual
Page 82
...the lower right hand taskbar. Front Speaker Out Center/Subwoofer Speaker Out Rear Speaker Out Side Speaker Out GA-K8N51GMF(-RH) Motherboard - 82 - STEP 2 : Following installation of the audio driver, you find a Sound Effect icon on the left selection bar and select "6CH Speaker" to ...select the function. Click the icon to complete 6 channel audio configuration. Sound Effect Configuration: At the sound effect menu, users ...
...the lower right hand taskbar. Front Speaker Out Center/Subwoofer Speaker Out Rear Speaker Out Side Speaker Out GA-K8N51GMF(-RH) Motherboard - 82 - STEP 2 : Following installation of the audio driver, you find a Sound Effect icon on the left selection bar and select "6CH Speaker" to ...select the function. Click the icon to complete 6 channel audio configuration. Sound Effect Configuration: At the sound effect menu, users ...


