
User Manual
Page 5
Channel Audio Function Introduction 79 4-2 Troubleshooting 83 - 5 - Chapter 3 Drivers Installation 47 3-1 Install Chipset Drivers 47 3-2 SoftwareApplication 48 3-3 Software Information 48 3-4 Hardware Information 49 3-5 Contact Us ...49 Chapter 4 Appendix 51 4-1 Unique Software Utilities 51 4-1-1 EasyTune 5 Introduction 52 4-1-2 Xpress Recovery2 Introduction 53 4-1-3 Flash BIOS Method Introduction 55 4-1-4 Configuring SATA Hard Drive(s 64 4-1-5 2- / 4- / 6- / 8-
Channel Audio Function Introduction 79 4-2 Troubleshooting 83 - 5 - Chapter 3 Drivers Installation 47 3-1 Install Chipset Drivers 47 3-2 SoftwareApplication 48 3-3 Software Information 48 3-4 Hardware Information 49 3-5 Contact Us ...49 Chapter 4 Appendix 51 4-1 Unique Software Utilities 51 4-1-1 EasyTune 5 Introduction 52 4-1-2 Xpress Recovery2 Introduction 53 4-1-3 Flash BIOS Method Introduction 55 4-1-4 Configuring SATA Hard Drive(s 64 4-1-5 2- / 4- / 6- / 8-

User Manual
Page 76
...Chip IDE Channel1 IDE1 Conductor Cable IDE2 Conductor Cable Serial-ATA-II 1 On-Chip USB USB Keyboard Support USB Mouse Support Onboard Audio Function Onboard LAN Function Onboard LAN Boot ROM Onboard 1394 Function Onboard Serial Port 1 Onboard Serial Port 2 Onboard Parallel Port Parallel ... F5: Previous Values +/-/PU/PD: Value F10: Save F6: Fail-Safe Defaults GA-K8N51GMF(-RH) Motherboard Figure 22 - 76 - Here are two solutions to a bootable RAID volume. Solutions 1: Use the NVRAID tool (nForce Driver Version 5.xx) to convert the boot volume to enter system BIOS Setup during POST...
...Chip IDE Channel1 IDE1 Conductor Cable IDE2 Conductor Cable Serial-ATA-II 1 On-Chip USB USB Keyboard Support USB Mouse Support Onboard Audio Function Onboard LAN Function Onboard LAN Boot ROM Onboard 1394 Function Onboard Serial Port 1 Onboard Serial Port 2 Onboard Parallel Port Parallel ... F5: Previous Values +/-/PU/PD: Value F10: Save F6: Fail-Safe Defaults GA-K8N51GMF(-RH) Motherboard Figure 22 - 76 - Here are two solutions to a bootable RAID volume. Solutions 1: Use the NVRAID tool (nForce Driver Version 5.xx) to convert the boot volume to enter system BIOS Setup during POST...
User Manual
Page 79
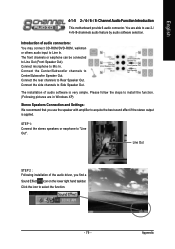
Introduction of the audio driver, you use 2-/ 4-/6-/8-channnels audio feature by audio software selection. Connect the Center/Subwoofer channels to "Line Out". You are in Windows XP) Stereo Speakers Connection and Settings: We recommend that you find a ... Side Speaker Out. Line In Line Out (Front Speaker Out) Mic In Center/Subwoofer Speaker Out Rear Speaker Out Side Speaker Out The installation of audio software is applied. Please follow the steps to install the function. (Following pictures are able to use the speaker with amplifier to Mic In. Click...
Introduction of the audio driver, you use 2-/ 4-/6-/8-channnels audio feature by audio software selection. Connect the Center/Subwoofer channels to "Line Out". You are in Windows XP) Stereo Speakers Connection and Settings: We recommend that you find a ... Side Speaker Out. Line In Line Out (Front Speaker Out) Mic In Center/Subwoofer Speaker Out Rear Speaker Out Side Speaker Out The installation of audio software is applied. Please follow the steps to install the function. (Following pictures are able to use the speaker with amplifier to Mic In. Click...
User Manual
Page 80
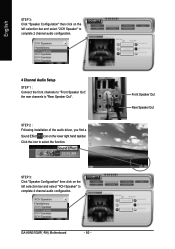
... the left selection bar and select "4CH Speaker" to complete 4 channel audio configuration. GA-K8N51GMF(-RH) Motherboard - 80 - Front Speaker Out Rear Speaker Out STEP 3: Click "Speaker Configuration" then click on the lower right hand taskbar. STEP 2 : Following installation of the audio driver, you find a Sound Effect icon on the left selection bar and select...
... the left selection bar and select "4CH Speaker" to complete 4 channel audio configuration. GA-K8N51GMF(-RH) Motherboard - 80 - Front Speaker Out Rear Speaker Out STEP 3: Click "Speaker Configuration" then click on the lower right hand taskbar. STEP 2 : Following installation of the audio driver, you find a Sound Effect icon on the left selection bar and select...

User Manual
Page 81
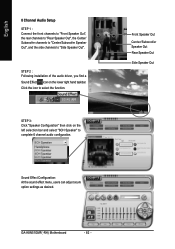
Click the icon to "Center/Subwoofer Speaker Out". Front Speaker Out Center/Subwoofer Speaker Out Rear Speaker Out - 81 - Appendix STEP 3: Click "Speaker Configuration" then click on the lower right hand taskbar. English 6 Channel Audio Setup STEP 1 : Connect the front channels to "Front Speaker Out", the rear channels to "Rear Speaker Out", and the Center/Subwoofer channels to select the function. STEP 2 : Following installation of the audio driver, you find a Sound Effect icon on the left selection bar and select "6CH Speaker" to complete 6 channel audio configuration.
Click the icon to "Center/Subwoofer Speaker Out". Front Speaker Out Center/Subwoofer Speaker Out Rear Speaker Out - 81 - Appendix STEP 3: Click "Speaker Configuration" then click on the lower right hand taskbar. English 6 Channel Audio Setup STEP 1 : Connect the front channels to "Front Speaker Out", the rear channels to "Rear Speaker Out", and the Center/Subwoofer channels to select the function. STEP 2 : Following installation of the audio driver, you find a Sound Effect icon on the left selection bar and select "6CH Speaker" to complete 6 channel audio configuration.
User Manual
Page 82
... Speaker Out". STEP 2 : Following installation of the audio driver, you find a Sound Effect icon on the left selection bar and select "6CH Speaker" to complete 6 channel audio configuration. Front Speaker Out Center/Subwoofer Speaker Out Rear Speaker Out Side Speaker Out GA-K8N51GMF(-RH) Motherboard - 82 - English 8 Channel Audio Setup STEP 1 : Connect the front channels to...
... Speaker Out". STEP 2 : Following installation of the audio driver, you find a Sound Effect icon on the left selection bar and select "6CH Speaker" to complete 6 channel audio configuration. Front Speaker Out Center/Subwoofer Speaker Out Rear Speaker Out Side Speaker Out GA-K8N51GMF(-RH) Motherboard - 82 - English 8 Channel Audio Setup STEP 1 : Connect the front channels to...


