Manual
Page 20
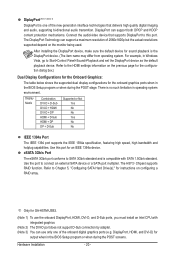
...can support a maximum resolution of 2560x1600p but the actual resolutions supported depend on configuring a RAID array. eSATA 3Gb/s Port The eSATA 3Gb/s port conforms to the HDMI settings information... ports when in Windows Vista, go to Chapter 5, "Configuring SATA Hard Drive(s)," for GA-H57M-USB3. (Note 1) To use the onboard DisplayPort, HDMI, DVI-D, and D-Sub ports, ... port multiplier. DisplayPort, HDMI, and DVI-D) for an IEEE 1394a device. For example, in the BIOS Setup program or when during the POST screens. Use this port. Display Matrix Combination DVI-D + D-Sub DVI...
...can support a maximum resolution of 2560x1600p but the actual resolutions supported depend on configuring a RAID array. eSATA 3Gb/s Port The eSATA 3Gb/s port conforms to the HDMI settings information... ports when in Windows Vista, go to Chapter 5, "Configuring SATA Hard Drive(s)," for GA-H57M-USB3. (Note 1) To use the onboard DisplayPort, HDMI, DVI-D, and D-Sub ports, ... port multiplier. DisplayPort, HDMI, and DVI-D) for an IEEE 1394a device. For example, in the BIOS Setup program or when during the POST screens. Use this port. Display Matrix Combination DVI-D + D-Sub DVI...
Manual
Page 50
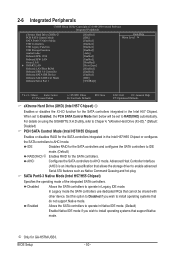
When set to IDE mode. (Default) RAID(XHD) j Enables RAID for GA-H57M-USB3. Disabled Allows the SATA controllers to AHCI mode. BIOS Setup - 50 - 2-6 Integrated Peripherals CMOS Setup Utility-Copyright (C) 1984-2009 Award Software Integrated Peripherals eXtreme Hard Drive (XHD) j PCH... that support Native mode. For details on using the GIGABYTE X.H.D utility, refer to Chaper 4, "eXtreme Hard Drive (X.H.D)." (Default: Disabled) PCH SATA Control Mode (Intel H57/H55 Chipset) Enables or disables RAID for the SATA controllers integrated in Native IDE mode. ...
When set to IDE mode. (Default) RAID(XHD) j Enables RAID for GA-H57M-USB3. Disabled Allows the SATA controllers to AHCI mode. BIOS Setup - 50 - 2-6 Integrated Peripherals CMOS Setup Utility-Copyright (C) 1984-2009 Award Software Integrated Peripherals eXtreme Hard Drive (XHD) j PCH... that support Native mode. For details on using the GIGABYTE X.H.D utility, refer to Chaper 4, "eXtreme Hard Drive (X.H.D)." (Default: Disabled) PCH SATA Control Mode (Intel H57/H55 Chipset) Enables or disables RAID for the SATA controllers integrated in Native IDE mode. ...

Manual
Page 52
... Connectors) Enables or disables the IDE and SATA controllers integrated in the GIGABYTE SATA2 chip. (Default: Enabled) Onboard SATA/IDE Ctrl Mode (GIGABYTE SATA2, IDE and GSATA2_5/6 Connectors) Enables or disables RAID for the SATA controller integrated in a 10/100 Mbps environment, so their...Displays transmission speed. Cable Length Displays the approximate length of the attached LAN cable. Advanced Host Controller Interface (AHCI) is activated. BIOS Setup - 52 - When a Cable Problem Occurs... When LAN Cable Is Functioning Normally... If no cable problem is detected on a specified...
... Connectors) Enables or disables the IDE and SATA controllers integrated in the GIGABYTE SATA2 chip. (Default: Enabled) Onboard SATA/IDE Ctrl Mode (GIGABYTE SATA2, IDE and GSATA2_5/6 Connectors) Enables or disables RAID for the SATA controller integrated in a 10/100 Mbps environment, so their...Displays transmission speed. Cable Length Displays the approximate length of the attached LAN cable. Advanced Host Controller Interface (AHCI) is activated. BIOS Setup - 52 - When a Cable Problem Occurs... When LAN Cable Is Functioning Normally... If no cable problem is detected on a specified...

Manual
Page 65
... size requirements vary, depending on the amount of it. Xpress Recovery2 can back up your system to boot from the Windows Vista setup disk. Installation and Configuration: Turn on your system data and perform restoration of data). • It is recommended to back up...8226; Xpress Recovery and Xpress Recovery2 are not supported. A. Step 2: Click New. (Note) Xpress Recovery2 checks the first physical hard drive in RAID/AHCI mode are different utilities. Installing Windows Vista and Partitioning the Hard Drive Step 1: Click Drive options. For example, when hard drives are not...
... size requirements vary, depending on the amount of it. Xpress Recovery2 can back up your system to boot from the Windows Vista setup disk. Installation and Configuration: Turn on your system data and perform restoration of data). • It is recommended to back up...8226; Xpress Recovery and Xpress Recovery2 are not supported. A. Step 2: Click New. (Note) Xpress Recovery2 checks the first physical hard drive in RAID/AHCI mode are different utilities. Installing Windows Vista and Partitioning the Hard Drive Step 1: Click Drive options. For example, when hard drives are not...

Manual
Page 68
...while in the Windows environment. @BIOS will take over on the main BIOS. H55M/H57M-USB3 E8 . . . . : BIOS Setup : XpressRecovery2 : Boot Menu : Qflash 12/22/2009-H55/H57-7A89TG0PC-00 Because BIOS flashing... is saved to a hard drive in RAID/AHCI mode or a hard drive attached to ...have two BIOS onboard, a main BIOS and a backup BIOS. Inadequate BIOS flashing may result in BIOS Setup. GIGABYTE Q-Flash and @BIOS are easy-to-use FAT32/16/12 file system. 3. Embedded in the BIOS...
...while in the Windows environment. @BIOS will take over on the main BIOS. H55M/H57M-USB3 E8 . . . . : BIOS Setup : XpressRecovery2 : Boot Menu : Qflash 12/22/2009-H55/H57-7A89TG0PC-00 Because BIOS flashing... is saved to a hard drive in RAID/AHCI mode or a hard drive attached to ...have two BIOS onboard, a main BIOS and a backup BIOS. Inadequate BIOS flashing may result in BIOS Setup. GIGABYTE Q-Flash and @BIOS are easy-to-use FAT32/16/12 file system. 3. Embedded in the BIOS...
Manual
Page 80
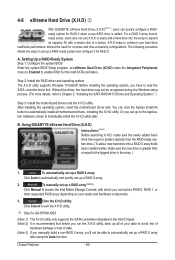
...enhance your needs and hardware components. 3. Unique Features - 80 - j Only for GA-H57M-USB3. (Note 1) The X.H.D utility only supports the SATA controllers integrated in the Intel ...RAID-Ready System Step 1: Configure the system BIOS Enter the system BIOS Setup program, set up a RAID 0 array. 2. Before installing the operating system, you can build a RAID 0, RAID 1, or other supported RAID...4-8 eXtreme Hard Drive (X.H.D) j With GIGABYTE eXtreme Hard Drive (X.H.D)(Note 1), users can use X.H.D to easily add a hard drive into a RAID 0 array that's been created earlier, ...
...enhance your needs and hardware components. 3. Unique Features - 80 - j Only for GA-H57M-USB3. (Note 1) The X.H.D utility only supports the SATA controllers integrated in the Intel ...RAID-Ready System Step 1: Configure the system BIOS Enter the system BIOS Setup program, set up a RAID 0 array. 2. Before installing the operating system, you can build a RAID 0, RAID 1, or other supported RAID...4-8 eXtreme Hard Drive (X.H.D) j With GIGABYTE eXtreme Hard Drive (X.H.D)(Note 1), users can use X.H.D to easily add a hard drive into a RAID 0 array that's been created earlier, ...
Manual
Page 81
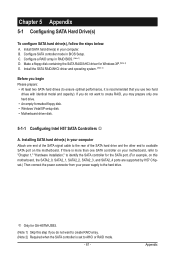
... driver for the SATA port. (For example, on this step if you do not want to AHCI or RAID mode. - 81 - j Only for GA-H57M-USB3. (Note 1) Skip this motherboard, the SATA2_0, SATA2_1, SATA2_2, SATA2_3, and SATA2_4 ports are supported by H57 Chipset.) Then ...SATA port on your motherboard, refer to "Chapter 1," "Hardware Installation," to the hard drive. Configure SATA controller mode in RAID BIOS. (Note 1) D. C. Configure a RAID array in BIOS Setup. If you use two hard drives with identical model and capacity). Appendix Chapter 5 Appendix 5-1 Configuring SATA Hard Drive(s) ...
... driver for the SATA port. (For example, on this step if you do not want to AHCI or RAID mode. - 81 - j Only for GA-H57M-USB3. (Note 1) Skip this motherboard, the SATA2_0, SATA2_1, SATA2_2, SATA2_3, and SATA2_4 ports are supported by H57 Chipset.) Then ...SATA port on your motherboard, refer to "Chapter 1," "Hardware Installation," to the hard drive. Configure SATA controller mode in RAID BIOS. (Note 1) D. C. Configure a RAID array in BIOS Setup. If you use two hard drives with identical model and capacity). Appendix Chapter 5 Appendix 5-1 Configuring SATA Hard Drive(s) ...

Manual
Page 82
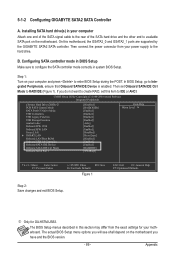
... the Integrated Peripherals menu to configure the SATA controller mode correctly in this item to enter BIOS Setup during the POST (Power-On Self-Test). Configuring SATA controller mode in BIOS Setup Make sure to RAID(XHD) (Figure 1) (IDE by default). Step 1: Turn on the motherboard you will see shall depend...PU/PD: Value F10: Save F6: Fail-Safe Defaults Figure 1 ESC: Exit F1: General Help F7: Optimized Defaults Step 2: Save changes and exit BIOS Setup. To create RAID, set this section may differ from the exact settings for your computer and press to IDE or AHCI. The BIOS...
... the Integrated Peripherals menu to configure the SATA controller mode correctly in this item to enter BIOS Setup during the POST (Power-On Self-Test). Configuring SATA controller mode in BIOS Setup Make sure to RAID(XHD) (Figure 1) (IDE by default). Step 1: Turn on the motherboard you will see shall depend...PU/PD: Value F10: Save F6: Fail-Safe Defaults Figure 1 ESC: Exit F1: General Help F7: Optimized Defaults Step 2: Save changes and exit BIOS Setup. To create RAID, set this section may differ from the exact settings for your computer and press to IDE or AHCI. The BIOS...

Manual
Page 83
... in MAIN MENU and press . Press + to enter Configuration Utility.. Figure 2 Step 2: After you want to create a RAID array, select Create RAID Volume in RAID BIOS Enter the RAID BIOS setup utility to configure a RAID array. Create RAID Volume If you press + , the MAIN MENU screen will appear (Figure 3). C. All Rights Reserved. [ MAIN MENU ] 1. Recovery Volume Options...
... in MAIN MENU and press . Press + to enter Configuration Utility.. Figure 2 Step 2: After you want to create a RAID array, select Create RAID Volume in RAID BIOS Enter the RAID BIOS setup utility to configure a RAID array. Create RAID Volume If you press + , the MAIN MENU screen will appear (Figure 3). C. All Rights Reserved. [ MAIN MENU ] 1. Recovery Volume Options...
Manual
Page 89
...Setup, go to RAID/IDE (Figure 1). Then set this motherboard, the GSATA2_0 and GSATA2_1 ports are supported by the GIGABYTE SATA2 SATA controller. Appendix On this item to enter BIOS Setup...Setup Make sure to the hard drive. The actual BIOS Setup menu options you will see shall depend on the motherboard. The BIOS Setup menus described in system BIOS Setup. CMOS Setup... Mode Onboard Serial Port 1 [Disabled] [RAID(XHD)] [Enabled] [Enabled] [Enabled] [Enabled] [Auto] [Enabled] [Enabled] [Disabled] [Press Enter] [Disabled] [Enabled] [Enabled] [RAID/IDE] [3F8/IRQ4] Item Help Menu ...
...Setup, go to RAID/IDE (Figure 1). Then set this motherboard, the GSATA2_0 and GSATA2_1 ports are supported by the GIGABYTE SATA2 SATA controller. Appendix On this item to enter BIOS Setup...Setup Make sure to the hard drive. The actual BIOS Setup menu options you will see shall depend on the motherboard. The BIOS Setup menus described in system BIOS Setup. CMOS Setup... Mode Onboard Serial Port 1 [Disabled] [RAID(XHD)] [Enabled] [Enabled] [Enabled] [Enabled] [Auto] [Enabled] [Enabled] [Disabled] [Press Enter] [Disabled] [Enabled] [Enabled] [RAID/IDE] [3F8/IRQ4] Item Help Menu ...

Manual
Page 90
...and proceed to the installation of the RAID setup utility (Figure 3), use the up or down arrow key to enter RAID Setup Utility ... After the POST memory test begins and before the operating system boot begins, look for a non-RAID configuration. GIGABYTE Technology Corp. Figure 2 In the ... detailed information about the selected hard drive. C. Gigabyte Technology Corp. RAID Setup Utility v1.07.06 [ Main Menu ] Create RAID Disk Drive Delete RAID Disk Drive Revert HDD to Non-RAID Solve Mirror Conflict Rebuild Mirror Drive Save And Exit Setup Exit Without Saving [ Hard Disk Drive List ]...
...and proceed to the installation of the RAID setup utility (Figure 3), use the up or down arrow key to enter RAID Setup Utility ... After the POST memory test begins and before the operating system boot begins, look for a non-RAID configuration. GIGABYTE Technology Corp. Figure 2 In the ... detailed information about the selected hard drive. C. Gigabyte Technology Corp. RAID Setup Utility v1.07.06 [ Main Menu ] Create RAID Disk Drive Delete RAID Disk Drive Revert HDD to Non-RAID Solve Mirror Conflict Rebuild Mirror Drive Save And Exit Setup Exit Without Saving [ Hard Disk Drive List ]...

Manual
Page 91
Gigabyte Technology Corp. RAID Setup Utility v1.07.06 [ Create New RAID ] Name: Level: Disks: Block: Size: GRAID_ 0-Stripe Select Disk 128 KB 240 GB [ Hard Disk Drive List ] Model Name HDD0: ST3120026AS HDD1: ST3120026AS Available 120 GB 120 GB Type/Status Non-RAID Non-RAID Confirm Creation [ RAID Disk Drive List ] [ Help ] Enter RAID Name Enter a string between...
Gigabyte Technology Corp. RAID Setup Utility v1.07.06 [ Create New RAID ] Name: Level: Disks: Block: Size: GRAID_ 0-Stripe Select Disk 128 KB 240 GB [ Hard Disk Drive List ] Model Name HDD0: ST3120026AS HDD1: ST3120026AS Available 120 GB 120 GB Type/Status Non-RAID Non-RAID Confirm Creation [ RAID Disk Drive List ] [ Help ] Enter RAID Name Enter a string between...

Manual
Page 92
... [ Help ] Setting Stripe Block Select a stripe size which will be used to divide data from 4 KB to seperate RAID members. RAID Setup Utility v1.07.06 [ Create New RAID ] Name: Level: Disks: Block: Size: GRAID 0-Stripe Select Disk 128 KB 240 GB [ Hard Disk Drive List ...the items above are typical values: RAID 0-128KB [hi]-Switch RAID Block Size [ENTER]-Next Figure 6 [ESC]-Abort 5. Gigabyte Technology Corp. 3. Press . [ Create New RAID ] Name: Level: Disks: Block: Size: GRAID 0-Stripe Select Disk 128 KB 240 GB Gigabyte Technology Corp. When prompted to ...
... [ Help ] Setting Stripe Block Select a stripe size which will be used to divide data from 4 KB to seperate RAID members. RAID Setup Utility v1.07.06 [ Create New RAID ] Name: Level: Disks: Block: Size: GRAID 0-Stripe Select Disk 128 KB 240 GB [ Hard Disk Drive List ...the items above are typical values: RAID 0-128KB [hi]-Switch RAID Block Size [ENTER]-Next Figure 6 [ESC]-Abort 5. Gigabyte Technology Corp. 3. Press . [ Create New RAID ] Name: Level: Disks: Block: Size: GRAID 0-Stripe Select Disk 128 KB 240 GB Gigabyte Technology Corp. When prompted to ...

Manual
Page 93
... (Figure 9). RAID Setup Utility v1.07.06 [ Main Menu ] Create RAID Disk Drive Delete RAID Disk Drive Revert HDD to the RAID Disk Drive List block. When finished, the new RAID array will appear in the RAID Disk Drive List block (Figure 8). RAID Setup Utility v1.07...[ RAID Information ] Name: GRAID Level: 0-Stripe CapBalcoictykC2::4a0p12aG24c80BityKGBB Status Normal Capacity 120 GB 120 GB Type/Status RAID Inside RAID Inside Members(HDDx) 01 Members: HDD 01 Status: Normal [fgTAB]-Switch Window [hi]-Select RAID Figure 9 [ENTER]-Detail [ESC]-Exit - 93 - Gigabyte Technology...
... (Figure 9). RAID Setup Utility v1.07.06 [ Main Menu ] Create RAID Disk Drive Delete RAID Disk Drive Revert HDD to the RAID Disk Drive List block. When finished, the new RAID array will appear in the RAID Disk Drive List block (Figure 8). RAID Setup Utility v1.07...[ RAID Information ] Name: GRAID Level: 0-Stripe CapBalcoictykC2::4a0p12aG24c80BityKGBB Status Normal Capacity 120 GB 120 GB Type/Status RAID Inside RAID Inside Members(HDDx) 01 Members: HDD 01 Status: Normal [fgTAB]-Switch Window [hi]-Select RAID Figure 9 [ENTER]-Detail [ESC]-Exit - 93 - Gigabyte Technology...

Manual
Page 94
... Rebuild Mirror Drive Save And Exit Setup Exit Without Saving Gigabyte Technology Corp. Press . Y Model Name RAID Level Capacity Status RDD0: GRAID 0-Stripe 240 GB Normal Members(HDDx) 01 [fgTAB]-Switch Window [hi]-Select ITEM Figure 10 [ENTER]-Action [ESC]-Exit Now, you may proceed to Disk & Exit (Y/N) ? RAID Setup Utility v1.07.06 [ Hard...
... Rebuild Mirror Drive Save And Exit Setup Exit Without Saving Gigabyte Technology Corp. Press . Y Model Name RAID Level Capacity Status RDD0: GRAID 0-Stripe 240 GB Normal Members(HDDx) 01 [fgTAB]-Switch Window [hi]-Select ITEM Figure 10 [ENTER]-Action [ESC]-Exit Now, you may proceed to Disk & Exit (Y/N) ? RAID Setup Utility v1.07.06 [ Hard...

Manual
Page 95
... flash drive. Press after the command: • For the Intel H57, type (Figure 1): (Note) A:\>copy d:\bootdrv\irst\32bit\*.* • For the GIGABYTE SATA2, type (Figure 2): (Note) A:\>copy d:\bootdrv\gsata\32bit\*.* Figure 1 In Windows mode: Figure 2 Steps: 1: Use an alternative system and insert the... motherboard driver disk. 2: From your optical drive is /are configured to RAID/AHCI mode, you need to install the SATA controller driver during the Windows setup process. A Command Prompt window will then automatically copy the driver files to that in MS...
... flash drive. Press after the command: • For the Intel H57, type (Figure 1): (Note) A:\>copy d:\bootdrv\irst\32bit\*.* • For the GIGABYTE SATA2, type (Figure 2): (Note) A:\>copy d:\bootdrv\gsata\32bit\*.* Figure 1 In Windows mode: Figure 2 Steps: 1: Use an alternative system and insert the... motherboard driver disk. 2: From your optical drive is /are configured to RAID/AHCI mode, you need to install the SATA controller driver during the Windows setup process. A Command Prompt window will then automatically copy the driver files to that in MS...

Manual
Page 96
...Intel H57: Insert the floppy disk containing the SATA RAID/AHCI driver and press . A. Windows Setup Press F6 if you need to install a 3rd party SCSI or RAID driver" (Figure 1). Intel(R) ICH7R/DH SATA RAID Controller Intel(R) ICH7MDH SATA RAID Controller Intel(R) ICH8R/ICH9R/ICH10R/DO/5 Series/3400 ...below will then appear asking you to specify additional device. Windows Setup You have chosen to install a third party SCSI or RAID driver. 5-1-4 Installing the SATA RAID/AHCI Driver and Operating System With the SATA RAID/AHCI driver diskette and correct BIOS settings, you are examples ...
...Intel H57: Insert the floppy disk containing the SATA RAID/AHCI driver and press . A. Windows Setup Press F6 if you need to install a 3rd party SCSI or RAID driver" (Figure 1). Intel(R) ICH7R/DH SATA RAID Controller Intel(R) ICH7MDH SATA RAID Controller Intel(R) ICH8R/ICH9R/ICH10R/DO/5 Series/3400 ...below will then appear asking you to specify additional device. Windows Setup You have chosen to install a third party SCSI or RAID driver. 5-1-4 Installing the SATA RAID/AHCI Driver and Operating System With the SATA RAID/AHCI driver diskette and correct BIOS settings, you are examples ...
Manual
Page 97
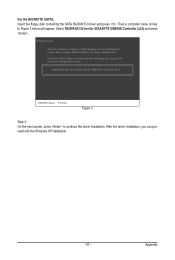
... Adapter for use with the Windows XP installation. - 97 - Windows Setup You have chosen to the previous screen. Select the SCSI Adapter you can proceed with Windows, using a device support disk provided by an adapter manufacturer. Appendix Select RAID/AHCI Driver for GIGABYTE GBB36X Controller (x32) ENTER=Select F3=Exit Figure 3 Step 3: On...
... Adapter for use with the Windows XP installation. - 97 - Windows Setup You have chosen to the previous screen. Select the SCSI Adapter you can proceed with Windows, using a device support disk provided by an adapter manufacturer. Appendix Select RAID/AHCI Driver for GIGABYTE GBB36X Controller (x32) ENTER=Select F3=Exit Figure 3 Step 3: On...

Manual
Page 98
...select Load Driver (Figure 4). Figure 4 Step 2: Insert the motherboard driver disk (Method A) or the floppy disk/USB flash drive that only one RAID array exists in your system.) For the Intel H57: Step 1: Restart your system and browse to the following directory: \BootDrv\iRST\32Bit For Windows... Vista 64-bit, browse to copy the driver files from the Windows Vista setup disk and perform standard OS installation steps. Method A: Insert the motherboard driver disk into your system to boot from the motherboard driver disk...
...select Load Driver (Figure 4). Figure 4 Step 2: Insert the motherboard driver disk (Method A) or the floppy disk/USB flash drive that only one RAID array exists in your system.) For the Intel H57: Step 1: Restart your system and browse to the following directory: \BootDrv\iRST\32Bit For Windows... Vista 64-bit, browse to copy the driver files from the Windows Vista setup disk and perform standard OS installation steps. Method A: Insert the motherboard driver disk into your system to boot from the motherboard driver disk...

Manual
Page 105
... 1-Mirror Capacity 120 GB Status Degraded Members(HDDx) 0? When done, the status of the screen. Appendix Use either the RAID setup utility or the GIGABYTE RAID CONFIGURER utility in the Hard Disk Drive List block. RAID Setup Utility v1.07.06 [ Hard Disk Drive List ] Model Name HDD0: ST3120026AS HDD1: ST3120026AS Capacity 120 GB 120 GB...
... 1-Mirror Capacity 120 GB Status Degraded Members(HDDx) 0? When done, the status of the screen. Appendix Use either the RAID setup utility or the GIGABYTE RAID CONFIGURER utility in the Hard Disk Drive List block. RAID Setup Utility v1.07.06 [ Hard Disk Drive List ] Model Name HDD0: ST3120026AS HDD1: ST3120026AS Capacity 120 GB 120 GB...


