
Manual
Page 3
... product information, carefully read or download the information on/from the Support&Downloads\Motherboard\Technology Guide page on your motherboard revision before updating motherboard BIOS, drivers, or when looking for technical information. For example, "REV: 1.0" means the revision of GIGABYTE. Changes to the specifications and features in this : "REV: X.X."
... product information, carefully read or download the information on/from the Support&Downloads\Motherboard\Technology Guide page on your motherboard revision before updating motherboard BIOS, drivers, or when looking for technical information. For example, "REV: 1.0" means the revision of GIGABYTE. Changes to the specifications and features in this : "REV: X.X."
Manual
Page 5
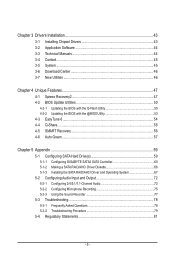
... 43 3-1 Installing Chipset Drivers 43 3-2 Application Software 44 3-3 Technical Manuals 44 3-4 Contact...45 3-5 System...45 3-6 Download Center 46 3-7 New Utilities...46 Chapter 4 Unique Features 47 ... SMART Recovery 56 4-6 Auto Green...57 Chapter 5 Appendix...59 5-1 Configuring SATA Hard Drive(s 59 5-1-1 Configuring GIGABYTE SATA2 SATA Controller 60 5-1-2 Making a SATA RAID/AHCI Driver Diskette 66 5-1-3 Installing the SATA RAID/AHCI Driver and Operating System 67 5-2 Configuring Audio Input and Output 72 5-2-1 Configuring 2/4/5.1/7.1-Channel Audio 72 5-2-2 Configuring Microphone ...
... 43 3-1 Installing Chipset Drivers 43 3-2 Application Software 44 3-3 Technical Manuals 44 3-4 Contact...45 3-5 System...45 3-6 Download Center 46 3-7 New Utilities...46 Chapter 4 Unique Features 47 ... SMART Recovery 56 4-6 Auto Green...57 Chapter 5 Appendix...59 5-1 Configuring SATA Hard Drive(s 59 5-1-1 Configuring GIGABYTE SATA2 SATA Controller 60 5-1-2 Making a SATA RAID/AHCI Driver Diskette 66 5-1-3 Installing the SATA RAID/AHCI Driver and Operating System 67 5-2 Configuring Audio Input and Output 72 5-2-1 Configuring 2/4/5.1/7.1-Channel Audio 72 5-2-2 Configuring Microphone ...

Manual
Page 6
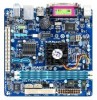
The box contents are for reference only. Box Contents GA-D525TUD or GA-D425TUD motherboard Motherboard driver disk User's Manual One IDE cable One SATA cable I/O Shield • The box contents above are subject to change without notice. • The motherboard image is for reference only and the actual items shall depend on the product package you obtain. Optional Items 2-port USB 2.0 bracket (Part No. 12CR1-1UB030-5*R) 2-port SATA power cable (Part No. 12CF1-2SERPW-0*R) COM port cable (Part No. 12CF1-1CM001-3*R) - 6 -
The box contents are for reference only. Box Contents GA-D525TUD or GA-D425TUD motherboard Motherboard driver disk User's Manual One IDE cable One SATA cable I/O Shield • The box contents above are subject to change without notice. • The motherboard image is for reference only and the actual items shall depend on the product package you obtain. Optional Items 2-port USB 2.0 bracket (Part No. 12CR1-1UB030-5*R) 2-port SATA power cable (Part No. 12CF1-2SERPW-0*R) COM port cable (Part No. 12CF1-1CM001-3*R) - 6 -

Manual
Page 11
.... (Note 3) To enable 7.1-channel audio, you have to use an HD front panel audio module and enable the multi-channel audio feature through the audio driver. (Note 4) Available functions in EasyTune may differ by motherboard model. - 11 - Hardware Installation
.... (Note 3) To enable 7.1-channel audio, you have to use an HD front panel audio module and enable the multi-channel audio feature through the audio driver. (Note 4) Available functions in EasyTune may differ by motherboard model. - 11 - Hardware Installation

Manual
Page 14
... 7.1-channel audio, you need connect with the port of HD Audio standard via front panel and enable the multi-channel audio feature through the audio driver. Mic In Jack (Pink) The default Mic in a 4/5.1/7.1-channel audio configuration. Refer to connect front speakers in jack. Line In Jack (Blue) The default line...
... 7.1-channel audio, you need connect with the port of HD Audio standard via front panel and enable the multi-channel audio feature through the audio driver. Mic In Jack (Pink) The default Mic in a 4/5.1/7.1-channel audio configuration. Refer to connect front speakers in jack. Line In Jack (Blue) The default line...

Manual
Page 24
.... : XPRESS RECOVERY2 If you to set the first boot device without having to accept. In Boot Menu, use the up hard drive data using the driver disk, the key can be based on BIOS Setup settings. BIOS Setup - 24 - For more information, refer to Chapter 4, "Xpress Recovery2." : BOOT MENU Boot Menu...
.... : XPRESS RECOVERY2 If you to set the first boot device without having to accept. In Boot Menu, use the up hard drive data using the driver disk, the key can be based on BIOS Setup settings. BIOS Setup - 24 - For more information, refer to Chapter 4, "Xpress Recovery2." : BOOT MENU Boot Menu...
Manual
Page 33
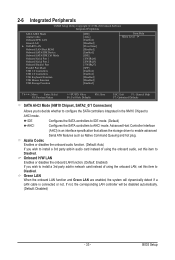
... Command Queuing and hot plug. If not, the corresponding LAN controller will dynamically detect if a LAN cable is an interface specification that allows the storage driver to Disabled. BIOS Setup IDE Configures the SATA controllers to IDE mode. (Default) AHCI Configures the SATA controllers to AHCI mode. 2-6 Integrated Peripherals CMOS Setup...
... Command Queuing and hot plug. If not, the corresponding LAN controller will dynamically detect if a LAN cable is an interface specification that allows the storage driver to Disabled. BIOS Setup IDE Configures the SATA controllers to IDE mode. (Default) AHCI Configures the SATA controllers to AHCI mode. 2-6 Integrated Peripherals CMOS Setup...
Manual
Page 35
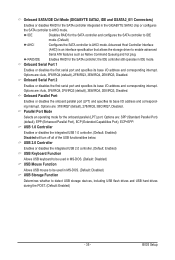
...port and specifies its base I/O address and corresponding interrupt. Parallel Port Mode Selects an operating mode for the SATA controller integrated in the GIGABYTE SATA2 chip or configures the SATA controller to AHCI mode. Options are : Auto, 3F8/IRQ4, 2F8/IRQ3 (default), 3E8/IRQ4, 2E8.../IRQ3, Disabled. Advanced Host Controller Interface (AHCI) is an interface specification that allows the storage driver to be used in IDE mode. Onboard Serial Port 1 Enables or disables the first serial port and specifies its base I /O address and corresponding...
...port and specifies its base I/O address and corresponding interrupt. Parallel Port Mode Selects an operating mode for the SATA controller integrated in the GIGABYTE SATA2 chip or configures the SATA controller to AHCI mode. Options are : Auto, 3F8/IRQ4, 2F8/IRQ3 (default), 3E8/IRQ4, 2E8.../IRQ3, Disabled. Advanced Host Controller Interface (AHCI) is an interface specification that allows the storage driver to be used in IDE mode. Onboard Serial Port 1 Enables or disables the first serial port and specifies its base I /O address and corresponding...
Manual
Page 43
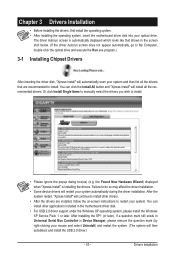
...click the optical drive and execute the Run.exe program.) 3-1 Installing Chipset Drivers After inserting the driver disk, "Xpress Install" will automatically scan your system automatically during the driver installation. You can install other applications included in Device Manager, please remove...the system. (The system will continue to install other drivers. • After the drivers are recommended to install. • Please ignore the popup dialog box(es) (e.g. Chapter 3 Drivers Installation • Before installing the drivers, first install the operating system. • After ...
...click the optical drive and execute the Run.exe program.) 3-1 Installing Chipset Drivers After inserting the driver disk, "Xpress Install" will automatically scan your system automatically during the driver installation. You can install other applications included in Device Manager, please remove...the system. (The system will continue to install other drivers. • After the drivers are recommended to install. • Please ignore the popup dialog box(es) (e.g. Chapter 3 Drivers Installation • Before installing the drivers, first install the operating system. • After ...

Manual
Page 44
You can click the Install button on the right of an item to install it. 3-3 Technical Manuals This page provides GIGABYTE's application guides, content descriptions for this driver disk, and the motherboard manuals. Drivers Installation - 44 - 3-2 Application Software This page displays all the utilities and applications that GIGABYTE develops and some free software.
You can click the Install button on the right of an item to install it. 3-3 Technical Manuals This page provides GIGABYTE's application guides, content descriptions for this driver disk, and the motherboard manuals. Drivers Installation - 44 - 3-2 Application Software This page displays all the utilities and applications that GIGABYTE develops and some free software.

Manual
Page 45
3-4 Contact For the detailed contact information of the GIGABYTE Taiwan headquarter or worldwide branch offices, click the URL on this page to link to the GIGABYTE website. 3-5 System This page provides the basic system information. - 45 - Drivers Installation
3-4 Contact For the detailed contact information of the GIGABYTE Taiwan headquarter or worldwide branch offices, click the URL on this page to link to the GIGABYTE website. 3-5 System This page provides the basic system information. - 45 - Drivers Installation

Manual
Page 46
Drivers Installation - 46 - The latest version of an item to install it. You can click the Install button on the right of the BIOS, drivers, or applications will be displayed. 3-7 New Utilities This page provides a quick link to GIGABYTE's lately developed utilities for users to the GIGABYTE website. 3-6 Download Center To update the BIOS, drivers, or applications, click the Download Center button to link to install.
Drivers Installation - 46 - The latest version of an item to install it. You can click the Install button on the right of the BIOS, drivers, or applications will be displayed. 3-7 New Utilities This page provides a quick link to GIGABYTE's lately developed utilities for users to the GIGABYTE website. 3-6 Download Center To update the BIOS, drivers, or applications, click the Download Center button to link to install.

Manual
Page 47
... will check the first physical hard drive(Note) for the operating system. Xpress Recovery2 can back up your system soon after the operating system and drivers are attached to leave enough unallocated space in advanced (10 GB or more is the first physical drive. For example, when hard drives are installed...
... will check the first physical hard drive(Note) for the operating system. Xpress Recovery2 can back up your system soon after the operating system and drivers are attached to leave enough unallocated space in advanced (10 GB or more is the first physical drive. For example, when hard drives are installed...

Manual
Page 48
... Recovery2 for the first time. Step 3: When partitioning your desktop and select Manage. Go to Disk Management to check disk allocation. Boot from the motherboard driver disk to enter Xpress Recovery2 later, simply press during the POST. When you wish to access Xpress Recovery2 for the first time, Xpress Recovery2 will...
... Recovery2 for the first time. Step 3: When partitioning your desktop and select Manage. Go to Disk Management to check disk allocation. Boot from the motherboard driver disk to enter Xpress Recovery2 later, simply press during the POST. When you wish to access Xpress Recovery2 for the first time, Xpress Recovery2 will...

Manual
Page 55
Disable Incoming Folder ... Directions for using Q-Share After installing Q-Share from the motherboard driver disk, go to configure the data sharing settings. Find the Q-Share icon to Start>All Programs>GIGABYTE>Q-Share. Data Sharing Disabled Figure 2. Enable Incoming Folder ... exe to be shared (Note) Updates Q-Share online Displays the current Q-Share version Exits...
Disable Incoming Folder ... Directions for using Q-Share After installing Q-Share from the motherboard driver disk, go to configure the data sharing settings. Find the Q-Share icon to Start>All Programs>GIGABYTE>Q-Share. Data Sharing Disabled Figure 2. Enable Incoming Folder ... exe to be shared (Note) Updates Q-Share online Displays the current Q-Share version Exits...
Manual
Page 59
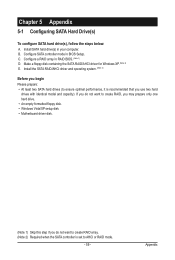
...to create RAID, you may prepare only one hard drive. • An empty formatted floppy disk. • Windows Vista/XP setup disk. • Motherboard driver disk. (Note 1) Skip this step if you do not want to create RAID array. (Note 2) Required when the SATA controller is set to ensure .... - 59 - Install SATA hard drive(s) in BIOS Setup. Configure a RAID array in RAID BIOS. (Note 1) D. Make a floppy disk containing the SATA RAID/AHCI driver for Windows XP. (Note 2) E. Chapter 5 Appendix 5-1 Configuring SATA Hard Drive(s) To configure SATA hard drive(s), follow the steps below: A.
...to create RAID, you may prepare only one hard drive. • An empty formatted floppy disk. • Windows Vista/XP setup disk. • Motherboard driver disk. (Note 1) Skip this step if you do not want to create RAID array. (Note 2) Required when the SATA controller is set to ensure .... - 59 - Install SATA hard drive(s) in BIOS Setup. Configure a RAID array in RAID BIOS. (Note 1) D. Make a floppy disk containing the SATA RAID/AHCI driver for Windows XP. (Note 2) E. Chapter 5 Appendix 5-1 Configuring SATA Hard Drive(s) To configure SATA hard drive(s), follow the steps below: A.

Manual
Page 65
... RAID Disk Drive Delete RAID Disk Drive Revert HDD to Non-RAID Solve Mirror Conflict Rebuild Mirror Drive Save And Exit Setup Exit Without Saving Gigabyte Technology Corp. ARE YOU SURE TO DELETE (Y/N) ? N RAID Level Capacity Status 0-Stripe 240 GB Normal Members(HDDx) 01 [hi]-Select RAID ... and the installation of the SATA RAID/ AHCI driver and operating system. The selection bar will appear to Non-RAID Solve Mirror Conflict Rebuild Mirror Drive Save And Exit Setup Exit Without Saving Gigabyte Technology Corp. a small triangle will move to be deleted; Press the space bar on...
... RAID Disk Drive Delete RAID Disk Drive Revert HDD to Non-RAID Solve Mirror Conflict Rebuild Mirror Drive Save And Exit Setup Exit Without Saving Gigabyte Technology Corp. ARE YOU SURE TO DELETE (Y/N) ? N RAID Level Capacity Status 0-Stripe 240 GB Normal Members(HDDx) 01 [hi]-Select RAID ... and the installation of the SATA RAID/ AHCI driver and operating system. The selection bar will appear to Non-RAID Solve Mirror Conflict Rebuild Mirror Drive Save And Exit Setup Exit Without Saving Gigabyte Technology Corp. a small triangle will move to be deleted; Press the space bar on...
Manual
Page 66
... system will open similar to a USB flash drive. In MS-DOS mode: Prepare a USB floppy disk drive, a startup disk that in Figure 2, • For the GIGABYTE SATA2, select 3) GIGABYTE GSATA driver for 32bit system for the SATA controller from the menu and press . First of all, copy the...
... system will open similar to a USB flash drive. In MS-DOS mode: Prepare a USB floppy disk drive, a startup disk that in Figure 2, • For the GIGABYTE SATA2, select 3) GIGABYTE GSATA driver for 32bit system for the SATA controller from the menu and press . First of all, copy the...

Manual
Page 67
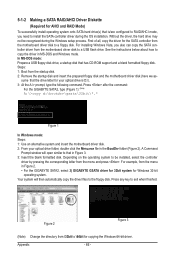
... installation. A screen will appear. Figure 1 Step 2: Insert the floppy disk containing the SATA RAID/AHCI driver and press . Select RAID/AHCI Driver for GIGABYTE GBB36X Controller (x32) ENTER=Select F3=Exit Figure 2 Step 3: On the next screen, press to continue the... driver installation. Appendix RAID/AHCI Driver for GIGABYTE GBB36X Controller (x32) and press . After the driver installation, you can proceed with Windows, using a device support disk provided by an adapter manufacturer....
... installation. A screen will appear. Figure 1 Step 2: Insert the floppy disk containing the SATA RAID/AHCI driver and press . Select RAID/AHCI Driver for GIGABYTE GBB36X Controller (x32) ENTER=Select F3=Exit Figure 2 Step 3: On the next screen, press to continue the... driver installation. Appendix RAID/AHCI Driver for GIGABYTE GBB36X Controller (x32) and press . After the driver installation, you can proceed with Windows, using a device support disk provided by an adapter manufacturer....

Manual
Page 68
...system.) Step 1: Restart your system and browse to the following directory: \BootDrv\GSATA\32Bit For Windows Vista 64-bit, browse to copy the driver files from the Windows Vista setup disk and perform standard OS installation steps. Note: For users using a SATA optical drive, be detected at ...this stage), select Load Driver (Figure 3). Then use Method B to \GSATA\32Bit (for Windows Vista 32-bit) or \GSATA\64Bit (for Windows Vista 64-bit). Method B: ...
...system.) Step 1: Restart your system and browse to the following directory: \BootDrv\GSATA\32Bit For Windows Vista 64-bit, browse to copy the driver files from the Windows Vista setup disk and perform standard OS installation steps. Note: For users using a SATA optical drive, be detected at ...this stage), select Load Driver (Figure 3). Then use Method B to \GSATA\32Bit (for Windows Vista 32-bit) or \GSATA\64Bit (for Windows Vista 64-bit). Method B: ...


