Gigabyte GA-9IVDTH Support and Manuals
Get Help and Manuals for this Gigabyte item
View All Support Options Below
Free Gigabyte GA-9IVDTH manuals!
Problems with Gigabyte GA-9IVDTH?
Ask a Question
Free Gigabyte GA-9IVDTH manuals!
Problems with Gigabyte GA-9IVDTH?
Ask a Question
Popular Gigabyte GA-9IVDTH Manual Pages
User Manual - Page 1

RD
2. BIOS
3. Testing
4. PM
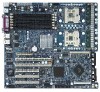
Dual XeonTM (Nocona)Processor Motherboard Rev. 1001 GA-9IVDTH Dual XeonTM (Nocona/Irwindale)
Processor Motherboard
USER'S MANUAL
Name
Sign
1.
User Manual - Page 2
...Content
Item Checklist 4 WARNING 4 Chapter 1 Introduction 5
Features Summary 5 GA-9IVDTH Motherboard Layout 7 Chapter 2 Hardware Installation Process 9 Step 1: Install the Central Processing Unit (CPU 10
Step 1-2:CPU Heat Sink Installation 11
Step 2: Install memory modules 13
2-1: DDR DIMM Slot Population 14
Step 3: Install expansion cards 16 Step 4: Connect ribbon cables, cabinet wires...
User Manual - Page 4
...Be careful, don't let the screw contact any printed circuit write or parts on the bag that are separated from the system. 5. To protect...the inside. 2. English
GA-9IVDTH Motherboard
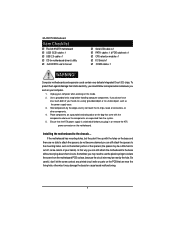
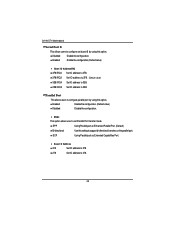
Item Checklist
The GA-9IVDTH motherboard U320 SCSI cable x 1 USB 2.0 cable x 1 CD for motherboard driver & utility GA-9IVDTH user's manual
Serial ATA cable x 2 PATA cable x 1 & FDD cable set x 1 CPU retention module...
User Manual - Page 6
English
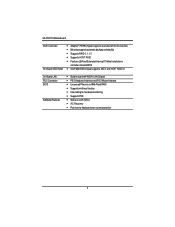
GA-9IVDTH Motherboard
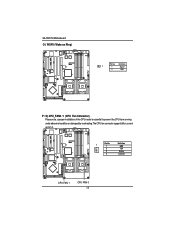
SCSI Controller On-Board SATA RAID
y Adaptec® 7902W chipset supports dual ultra 320 SCSI channels y Mirroring supports automatic background rebuilds y Supports RAID 0 ,1, 10 y Supports HOST RAID y Features LBA and Extended Interrupt 13 drive translation in
controller onboard BIOS y Intel® 6300ESB chipset supports SATA and HOST RAID 0,1
On-Board LAN PS/2 ...
User Manual - Page 9
... Process
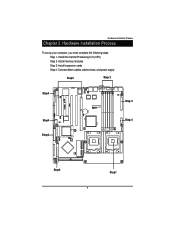
Chapter 2 Hardware Installation Process
To set up your computer, you must complete the following steps: Step 1- Install memory modules Step 3- Install expansion cards Step 4- Connect ribbon cables, cabinet wires, and power supply
Step3
Step 2
Step4
㕳㕨
㖃㖀㕻㕡
㕴㕥㕠
㖃㖇&#...
User Manual - Page 25
...
P / Q) CPU_FAN0 /1 (CPU Fan Connector)
Please note, a proper installation of the CPU cooler is essential to 1A .
㕴㕥㕠
...㖃㖀㕻㕡
㖃㕾
Pin No.
English
GA-9IVDTH Motherboard O ) WOR1 (Wake on Ring)
㖃㖀㕻....The CPU fan connector supports Max.
User Manual - Page 28
English
GA-9IVDTH Motherboard
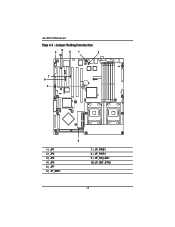
Step 4-3 : Jumper Setting Introduction
9 3
8
1
2
10
㕳㕨
㕴㕥㕠
㖃㖇㕡
㕡
㖀㕳㕹㕦
㖃㖀㕻㕡
㖇㕿㖂㕡
7 㖃㕾
6
4
&#...
User Manual - Page 34
...Setup. GA-9IVDTH Motherboard
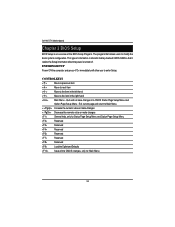
Chapter 3 BIOS Setup
BIOS Setup is turned off. ENTERINGSETUP Power ON the computer and press immediately will allow you to Main Menu
Increase the numeric value or make changes
Decrease the numeric value or make changes
General help, only for Status Page Setup... Menu and Option Page Setup Menu
Reserved
Reserved
Reserved
...
User Manual - Page 36

PhoenixBIOS Setup Utility
Main
Advanced
Security
Server Boot
Exit
System Time:
[00:13:12]
Item Specific Help
System Date:
[01/01/2005]
Lagecy Disktte A
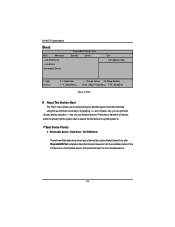
[1.44MB 31/2]... Phoenix BIOS Setup Utility, the Main Menu (Figure 1) will appear on the 24-hour military time clock.
Set the System Time (HH:MM:SS)
System Date Set the System Date. GA-9IVDTH Motherboard
Main
Once you set the date....
User Manual - Page 48
GA-9IVDTH Motherboard
Serial Port B
This allows users to configure serial prot B by using this setting to support bi-directional transfers on the parallel port... Disable the configuration.
Enabled
Enable the configuration (Default value)
Base I /O Address
378
Set IO address to 378
278
Set IO address to configure parallel port by using this option. Parallel Port
This allows users to...
User Manual - Page 56
... and by using the up and down arrow keys. Specifies the boot sequence from after PhoenixBIOS Post completed. GA-9IVDTH Motherboard
Boot
Main
Advanced
+ CD-ROM Drive
+ Hard Drive
Removable Device
PhoenixBIOS Setup Utility
Security
Server Boot
Exit Item Specific Help
F1: Help Esc: Exit
KL: Select Item IJ: Select Menu
+ -: Change Values F5...
User Manual - Page 61
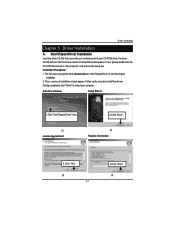
... Procedures: 1. The CD auto run program starts, Double click on "Intel ChipsetDriver" to restart your CD-ROM driver, the driver CD-title will auto start the chipset
installation. 2. Auto Run windows
Setup Wizard
1.Click "Intel Chipset Driver" item.
2.Click "Next".
(1) License Aggremment
(2) Readme Information
3.Click "Yes".
(3) 61
4.Click "Next". (4) Follow up the wizards to...
User Manual - Page 63
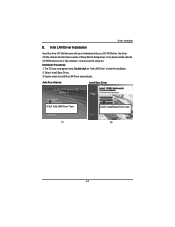
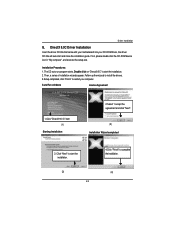
... stasts to start and show a series of Setup Wizard dialog boxes. Installation Procedures: 1. Select "Install Base Driver. 3. The CD auto run program starts, Double click on "Intel LAN Driver" to install the LAN Driver automatically. Intel LAN Driver Installation
Insert the driver CD-title that came with your motherboard into your CD-ROM driver, the driver CD-title will auto start the...
User Manual - Page 64

... computer", and execute the setup.exe. Follow up the wizards to install the drivers. 4.Setup completed, click "Finish" to enter Intel Pro Network
Connections Installation program. 2.
The CD auto run program starts, Double click on "Intel LAN Driver" to restart your CD-ROM driver, the driver CD-title will auto start and show the installation guide. If not, please double...
User Manual - Page 69
... wizards to install the drivers. 3.Setup completed, click "Finish" to restart your CD-ROM driver, the driver CD-title will auto start and show the installation guide. Auto Run windows
License Agreement
1.Click "DirectX 9.0 C" item (1)
Starting Installaiton
2.Select "I accept the agreement and click "Next".
(2) Installaiton Wizard completed
3.
Then, a series of installation wizards appear...
Gigabyte GA-9IVDTH Reviews
We have not received any reviews for Gigabyte yet.