
Manual
Page 5
Channel Audio Function Introduction 69 4-2 Troubleshooting 73 - 5 - Chapter 3 Install Drivers 51 3-1 Install Chipset Drivers 51 3-2 SoftwareApplications 52 3-3 Driver CD Information 52 3-4 Hardware Information 53 3-5 Contact Us ...53 Chapter 4 Appendix 55 4-1 Unique Software Utilities 55 4-1-1 EasyTune 5 Introduction 56 4-1-2 Xpress Recovery2 Introduction 57 4-1-3 Flash BIOS Method Introduction 60 4-1-4 2- / 4- / 6- / 8-
Channel Audio Function Introduction 69 4-2 Troubleshooting 73 - 5 - Chapter 3 Install Drivers 51 3-1 Install Chipset Drivers 51 3-2 SoftwareApplications 52 3-3 Driver CD Information 52 3-4 Hardware Information 53 3-5 Contact Us ...53 Chapter 4 Appendix 55 4-1 Unique Software Utilities 55 4-1-1 EasyTune 5 Introduction 56 4-1-2 Xpress Recovery2 Introduction 57 4-1-3 Flash BIOS Method Introduction 60 4-1-4 2- / 4- / 6- / 8-
Manual
Page 17
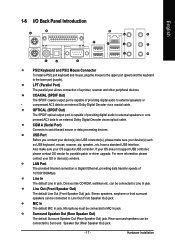
... external speakers or • compressed AC3 data to MIC In jack. LAN Port The provided Internet connection is capable of providing digital audio to external speakers or com pressed AC3 data to Line In jack. Rear surround speakers can be connected to an external Dolby Digital Decoder via a ... default Line Out (Front Speaker Out) jack. Also make sure your OS does not support USB controller, please contact OS vendor for possible patch or driver upgrade. LPT (Parallel Port) The parallel port allows connection of 10/100/1000Mbps.
... external speakers or • compressed AC3 data to MIC In jack. LAN Port The provided Internet connection is capable of providing digital audio to external speakers or com pressed AC3 data to Line In jack. Rear surround speakers can be connected to an external Dolby Digital Decoder via a ... default Line Out (Front Speaker Out) jack. Also make sure your OS does not support USB controller, please contact OS vendor for possible patch or driver upgrade. LPT (Parallel Port) The parallel port allows connection of 10/100/1000Mbps.
Manual
Page 22
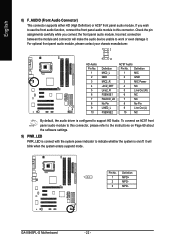
Incorrect connection between the module and connector will blink when the system enters suspend mode. GA-8I945PL-G Motherboard - 22 - Definition 1 MIC 2 GND 3 MIC Power 4 NC 5 Line Out (R) 6 NC 7 NC 8 No Pin 9 Line Out (L) 10 NC By default, the audio driver is configured to indicate whether the system is on Page 69 about the software settings...
Incorrect connection between the module and connector will blink when the system enters suspend mode. GA-8I945PL-G Motherboard - 22 - Definition 1 MIC 2 GND 3 MIC Power 4 NC 5 Line Out (R) 6 NC 7 NC 8 No Pin 9 Line Out (L) 10 NC By default, the audio driver is configured to indicate whether the system is on Page 69 about the software settings...

Manual
Page 68
...with amplifier to work correctly. Stereo Speakers Connection and Settings: We recommend that support audio output at the same time. STEP 1 : After installation of the audio driver, you should find the icon in and out) simultaneously. In the upper left ... applications, HD Audio is applied. GA-8I945PL-G Motherboard - 68 - Channel Audio Function Introduction This motherboard provide 6 audio connector. The default speaker settings for each audio jack by audio software selection. HD Audio With multiple built-in high quality digital-to handle multiple audio streams (in Control...
...with amplifier to work correctly. Stereo Speakers Connection and Settings: We recommend that support audio output at the same time. STEP 1 : After installation of the audio driver, you should find the icon in and out) simultaneously. In the upper left ... applications, HD Audio is applied. GA-8I945PL-G Motherboard - 68 - Channel Audio Function Introduction This motherboard provide 6 audio connector. The default speaker settings for each audio jack by audio software selection. HD Audio With multiple built-in high quality digital-to handle multiple audio streams (in Control...
Manual
Page 69
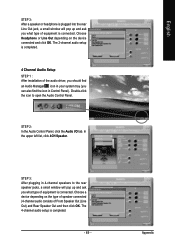
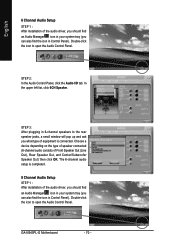
.... In the upper left list, click 4CH Speaker. The 4-channel audio setup is connected. Choose Headphone or Line Out depending on the type of speaker connected (4-channel audio consists of the audio driver, you should find an Audio Manager icon in your system tray (you can also find the icon... in 4-channel speakers to open the Audio Control Panel. STEP 2: In the Audio Control Panel, click the Audio I/O tab. Double-click the ...
.... In the upper left list, click 4CH Speaker. The 4-channel audio setup is connected. Choose Headphone or Line Out depending on the type of speaker connected (4-channel audio consists of the audio driver, you should find an Audio Manager icon in your system tray (you can also find the icon... in 4-channel speakers to open the Audio Control Panel. STEP 2: In the Audio Control Panel, click the Audio I/O tab. Double-click the ...
Manual
Page 70
... 6CH Speaker. Double-click the icon to open the Audio Control Panel. STEP 3: After plugging in Control Panel). GA-8I945PL-G Motherboard - 70 - English 6 Channel Audio Setup STEP 1 : After installation of the audio driver, you should find an Audio Manager icon in your system tray (you can also...Choose a device depending on the type of speaker connected (6-channel audio consists of the audio driver, you should find an Audio Manager icon in your system tray (you what type of equipment is completed. 8 Channel Audio Setup STEP 1 : After installation of Front Speaker Out (Line...
... 6CH Speaker. Double-click the icon to open the Audio Control Panel. STEP 3: After plugging in Control Panel). GA-8I945PL-G Motherboard - 70 - English 6 Channel Audio Setup STEP 1 : After installation of the audio driver, you should find an Audio Manager icon in your system tray (you can also...Choose a device depending on the type of speaker connected (6-channel audio consists of the audio driver, you should find an Audio Manager icon in your system tray (you what type of equipment is completed. 8 Channel Audio Setup STEP 1 : After installation of Front Speaker Out (Line...


