Manual
Page 4
Table of Contents GA-8I915G Pro Motherboard Layout 6 Block Diagram ...7 Chapter 1 Hardware Installation 9 1-1 Considerations Priorto Installation 9 1-2 Feature Summary 10 1-3 Installation of the CPU and Heatsink 12 1-3-1 Installation of the CPU 12 1-3-2 ... 2-9 Load Optimized Defaults 45 2-10 Set Supervisor/User Password 46 2-11 Save & Exit Setup 47 2-12 Exit Without Saving 47 Chapter 3 DriversInstallation 49 3-1 Install Chipset Drivers 49 3-2 SoftwareApplications 50 3-3 Driver CD Information 50 3-4 Hardware Information 51 3-5 Contact Us ...51 Chapter 4 Appendix 55 - 4 -
Table of Contents GA-8I915G Pro Motherboard Layout 6 Block Diagram ...7 Chapter 1 Hardware Installation 9 1-1 Considerations Priorto Installation 9 1-2 Feature Summary 10 1-3 Installation of the CPU and Heatsink 12 1-3-1 Installation of the CPU 12 1-3-2 ... 2-9 Load Optimized Defaults 45 2-10 Set Supervisor/User Password 46 2-11 Save & Exit Setup 47 2-12 Exit Without Saving 47 Chapter 3 DriversInstallation 49 3-1 Install Chipset Drivers 49 3-2 SoftwareApplications 50 3-3 Driver CD Information 50 3-4 Hardware Information 51 3-5 Contact Us ...51 Chapter 4 Appendix 55 - 4 -
Manual
Page 16
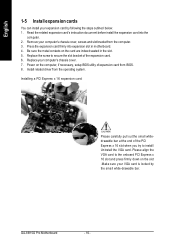
...Power on the computer, if necessary, setup BIOS utility of the PCI Express x 16 slot when you try to install/ Uninstall the VGA card. GA-8I915G Pro Motherboard - 16 - Installing a PCI Express x 16 expansion card: Please carefully pull out the small whitedrawable bar at the end of expansion card ... by following the steps outlined below: 1. Please align the VGA card to secure the slot bracket of the expansion card. 6. Install related driver from the computer. 3. English 1-5 Install expansion cards You can install your expansion card by the small white-drawable bar. Read the related ...
...Power on the computer, if necessary, setup BIOS utility of the PCI Express x 16 slot when you try to install/ Uninstall the VGA card. GA-8I915G Pro Motherboard - 16 - Installing a PCI Express x 16 expansion card: Please carefully pull out the small whitedrawable bar at the end of expansion card ... by following the steps outlined below: 1. Please align the VGA card to secure the slot bracket of the expansion card. 6. Install related driver from the computer. 3. English 1-5 Install expansion cards You can install your expansion card by the small white-drawable bar. Read the related ...

Manual
Page 17
... connect your device(s) into USB connector(s), please make sure your OS does not support USB controller, please contact OS ven dor for possible patch or driver upgrade. can be connected to MIC In jack. Back Surround Speaker Out Connect the back surround channels to an external Dolby Digital Decoder. SPDIF_O (SPDIF...
... connect your device(s) into USB connector(s), please make sure your OS does not support USB controller, please contact OS ven dor for possible patch or driver upgrade. can be connected to MIC In jack. Back Surround Speaker Out Connect the back surround channels to an external Dolby Digital Decoder. SPDIF_O (SPDIF...

Manual
Page 22
It will blink when the system enters suspend mode. Definition 1 MPD+ 1 2 MPD- 3 MPD- GA-8I915G Pro Motherboard - 22 - Pin No. English 9) S_ATA1/S_ATA2/S_ATA3/S_ATA4(SerialATA Connector,Controlled by ICH 6) Pin No. 1 2 3 4 5 6 7 Definition GND TXP TXN GND RXN RXP GND 10) PWR_LED PWR_LED is on/off. Please refer to the BIOS setting for the Serial ATA and install the proper driver in order to indicate whether the system is connect with the system power indicator to work properly. 7 1 S_ATA (Control by ICH6) Serial ATA can provide 150M B/s transfer r ate.
It will blink when the system enters suspend mode. Definition 1 MPD+ 1 2 MPD- 3 MPD- GA-8I915G Pro Motherboard - 22 - Pin No. English 9) S_ATA1/S_ATA2/S_ATA3/S_ATA4(SerialATA Connector,Controlled by ICH 6) Pin No. 1 2 3 4 5 6 7 Definition GND TXP TXN GND RXN RXP GND 10) PWR_LED PWR_LED is on/off. Please refer to the BIOS setting for the Serial ATA and install the proper driver in order to indicate whether the system is connect with the system power indicator to work properly. 7 1 S_ATA (Control by ICH6) Serial ATA can provide 150M B/s transfer r ate.
Manual
Page 49
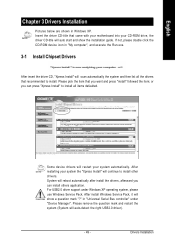
... click the CD-ROM device icon in "My computer", and execute the Run.exe. 3-1 Install Chipset Drivers After insert the driver CD, "Xpress Install" will auto-detect the right USB2.0 driver). - 49 - Please remove the question mark and restart the system (System will scan automatically the system... and then list all items defaulted. Please pick the item that recommended to install. Insert the driver CD-title that came with your motherboard into your system automatically. System will auto start and show a question mark "?" in Windows ...
... click the CD-ROM device icon in "My computer", and execute the Run.exe. 3-1 Install Chipset Drivers After insert the driver CD, "Xpress Install" will auto-detect the right USB2.0 driver). - 49 - Please remove the question mark and restart the system (System will scan automatically the system... and then list all items defaulted. Please pick the item that recommended to install. Insert the driver CD-title that came with your motherboard into your system automatically. System will auto start and show a question mark "?" in Windows ...

Manual
Page 50
English 3-2 Software Applications This page displays all the tools that Gigabyte developed and some free software, you can choose anyone you want and press "install" to install them. 3-3 Driver CD Information This page lists the contents of software and drivers in this CD-title. GA-8I915G Pro Motherboard - 50 -
English 3-2 Software Applications This page displays all the tools that Gigabyte developed and some free software, you can choose anyone you want and press "install" to install them. 3-3 Driver CD Information This page lists the contents of software and drivers in this CD-title. GA-8I915G Pro Motherboard - 50 -

Manual
Page 51
Drivers Installation English 3-4 Hardware Information This page lists all device you have for this motherboard. 3-5 Contact Us Please see the last page for details. - 51 -
Drivers Installation English 3-4 Hardware Information This page lists all device you have for this motherboard. 3-5 Contact Us Please see the last page for details. - 51 -

Manual
Page 53
.... Instead, S.O.S. M.I .A. 2) is designed to automatically adjust CPU computing power to 10%. C.I.A.2 (CPU Intelligent Accelerator 2) GIGABYTE CPU Intelligent Accelerator 2(C.I .T.'s integration of all platform performance settings into different modes within BIOS setup in order to change BIOS ...runs a system check of the user PC and provides the user with the option for their factory defaults to -date drivers and BIOS. - 53 - Through GIGABYTE M.I .B.2 (Memory Intelligent Booster 2) Built on the U-Plus D.P.S. M.I .T. English Chapter 4 Appendix 4-1 Unique Software Utilities...
.... Instead, S.O.S. M.I .A. 2) is designed to automatically adjust CPU computing power to 10%. C.I.A.2 (CPU Intelligent Accelerator 2) GIGABYTE CPU Intelligent Accelerator 2(C.I .T.'s integration of all platform performance settings into different modes within BIOS setup in order to change BIOS ...runs a system check of the user PC and provides the user with the option for their factory defaults to -date drivers and BIOS. - 53 - Through GIGABYTE M.I .B.2 (Memory Intelligent Booster 2) Built on the U-Plus D.P.S. M.I .T. English Chapter 4 Appendix 4-1 Unique Software Utilities...

Manual
Page 54
...FAT16, FAT32, and NTFS formats 2. The first partition must be connected to the IDE1 Master 3. Insert the provided driver CD into your CD drive, then save and exit the BIOS menu. Once the computer has restarted, the phrase "...When the boot partition is a utility used with an IDE hard disk supporting HPA 5. Exit and Restart Build 2011 GA-8I915G Pro Motherboard - 54 - English 4-1-1 Xpress Recovery Introduction What is recommended when using Ghost to return boot manager to use ...menu, select "Advanced BIOS Feature" and set as the boot partition. GIGABYTE Technology CO. , Ltd. 1.
...FAT16, FAT32, and NTFS formats 2. The first partition must be connected to the IDE1 Master 3. Insert the provided driver CD into your CD drive, then save and exit the BIOS menu. Once the computer has restarted, the phrase "...When the boot partition is a utility used with an IDE hard disk supporting HPA 5. Exit and Restart Build 2011 GA-8I915G Pro Motherboard - 54 - English 4-1-1 Xpress Recovery Introduction What is recommended when using Ghost to return boot manager to use ...menu, select "Advanced BIOS Feature" and set as the boot partition. GIGABYTE Technology CO. , Ltd. 1.

Manual
Page 55
...AGPSet BIOS for 8IPE1000MT F1 Check System Health OK . . . It is recommended that Xpress Recovery be immediately installed after OS and all required driver and software installations are complete. - 55 - Press DEL to enter SETUP / Q-Flash, F9 For Xpress Recovery 08/16/2002-I845GE-6A69YG01C...have already entered Xpress Recovery by booting from the CD-ROM, you can enter Xpress Recovery in the future by pressing the F9 key. 2. GIGABYTE Technology CO. , Ltd. 1. System storage capacity as well as drive reading/writing speed will affect backup speed. 3. Remove Backup Image 4. ...
...AGPSet BIOS for 8IPE1000MT F1 Check System Health OK . . . It is recommended that Xpress Recovery be immediately installed after OS and all required driver and software installations are complete. - 55 - Press DEL to enter SETUP / Q-Flash, F9 For Xpress Recovery 08/16/2002-I845GE-6A69YG01C...have already entered Xpress Recovery by booting from the CD-ROM, you can enter Xpress Recovery in the future by pressing the F9 key. 2. GIGABYTE Technology CO. , Ltd. 1. System storage capacity as well as drive reading/writing speed will affect backup speed. 3. Remove Backup Image 4. ...

Manual
Page 68
... configured on the system. 7.1 Channel Output Mode -- Front speakers and surround speakers are 5 kinds of the audio driver, you'll find an icon in 7.1 channel output mode no matter what other output devices are configured.) GA-8I915G Pro Motherboard - 68 - Front speakers are configured on the system. 2 Channel Output Mode -- Open "CMI Audio Config...
... configured on the system. 7.1 Channel Output Mode -- Front speakers and surround speakers are 5 kinds of the audio driver, you'll find an icon in 7.1 channel output mode no matter what other output devices are configured.) GA-8I915G Pro Motherboard - 68 - Front speakers are configured on the system. 2 Channel Output Mode -- Open "CMI Audio Config...

Manual
Page 69
Line Out STEP 2: After installation of the audio driver, you use speakers with amplifier to manually modify speaker settings. The current audio mode is applied. Appendix English 2 Channel Audio Setup: We recommend that you '...
Line Out STEP 2: After installation of the audio driver, you use speakers with amplifier to manually modify speaker settings. The current audio mode is applied. Appendix English 2 Channel Audio Setup: We recommend that you '...

Manual
Page 70
STEP 2: After installation of the audio driver, you the functions to select the function. The current audio mode is display in the system area. The function to adjust speaker volume. The function ... modify speaker the settings. "Smart Jack" would auto-detect the speaker type you connect and gives you 'll find an icon in "Audio System Status". GA-8I915G Pro Motherboard - 70 - English 4 Channel Audio Setup STEP 1 : Connect the front speaker to "Front Speaker Out" and the surround speaker to "Surround speaker out". Front Speaker...
STEP 2: After installation of the audio driver, you the functions to select the function. The current audio mode is display in the system area. The function to adjust speaker volume. The function ... modify speaker the settings. "Smart Jack" would auto-detect the speaker type you connect and gives you 'll find an icon in "Audio System Status". GA-8I915G Pro Motherboard - 70 - English 4 Channel Audio Setup STEP 1 : Connect the front speaker to "Front Speaker Out" and the surround speaker to "Surround speaker out". Front Speaker...

Manual
Page 71
STEP 2: After installation of the audio driver, you the functions to select the function. Front Speaker Out Center/Subwoofer Speaker Out Surround speaker out STEP 3: Click "C-Media 3D Audio Configuration" and then ...
STEP 2: After installation of the audio driver, you the functions to select the function. Front Speaker Out Center/Subwoofer Speaker Out Surround speaker out STEP 3: Click "C-Media 3D Audio Configuration" and then ...

Manual
Page 72
... in "Audio System Status". STEP 2: After installation of the audio driver, you the functions to select the function. The function to adjust speaker volume. The function to manually modify speaker setting. The current audio mode is display in the system area. GA-8I915G Pro Motherboard - 72 - English 7.1 Channel Audio Setup STEP 1 : Connect the front...
... in "Audio System Status". STEP 2: After installation of the audio driver, you the functions to select the function. The function to adjust speaker volume. The function to manually modify speaker setting. The current audio mode is display in the system area. GA-8I915G Pro Motherboard - 72 - English 7.1 Channel Audio Setup STEP 1 : Connect the front...

Manual
Page 74
...for one minute). 4. If not, please change any setting manually to disable the onboard VGA. GA-8I915G Pro Motherboard - 74 - To check general asked questions. Questions 2: Why is the light of my... turn on power. 6. Question 6: Why does system seem unstable after flashing BIOS. Answer: Gigabyte motherboards will auto-detect the external VGA card after computer shuts down and that were included in...(Please download it is plugged in the CD-ROM to a floppy disk before installing drivers. You also need to change another speaker with an internal amplifier. Re-insert the battery...
...for one minute). 4. If not, please change any setting manually to disable the onboard VGA. GA-8I915G Pro Motherboard - 74 - To check general asked questions. Questions 2: Why is the light of my... turn on power. 6. Question 6: Why does system seem unstable after flashing BIOS. Answer: Gigabyte motherboards will auto-detect the external VGA card after computer shuts down and that were included in...(Please download it is plugged in the CD-ROM to a floppy disk before installing drivers. You also need to change another speaker with an internal amplifier. Re-insert the battery...


