
Manual
Page 16
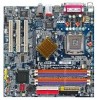
... USB controller, please contact OS ven dor for possible patch or driver upgrade. LAN Port The provided Internetconnection is Gigabit Ethernet, providing data transfer speeds of a printer, scanner and other peripheral devices. You can be connected to MIC In jack. GA-8I865GVM(F)-775 Motherboard - 16 - VGA Port M onitor can be connected to Line In...
... USB controller, please contact OS ven dor for possible patch or driver upgrade. LAN Port The provided Internetconnection is Gigabit Ethernet, providing data transfer speeds of a printer, scanner and other peripheral devices. You can be connected to MIC In jack. GA-8I865GVM(F)-775 Motherboard - 16 - VGA Port M onitor can be connected to Line In...
Manual
Page 20
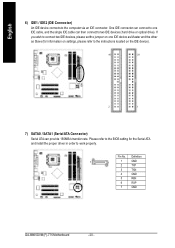
... proper driver in order to connect two IDE devices, please set the jumper on the IDE device). 40 39 2 1 7) SATA0 / SATA1 (SerialATA Connector) Serial ATA can provide 150MB/s transfer rate. One IDE connector can then connect to the computer via an IDE connector. Definition 7 1 1 GND 2 TXP 3 TXN 4 GND 5 RXN 6 RXP 7 GND GA-8I865GVM(F)-775...
... proper driver in order to connect two IDE devices, please set the jumper on the IDE device). 40 39 2 1 7) SATA0 / SATA1 (SerialATA Connector) Serial ATA can provide 150MB/s transfer rate. One IDE connector can then connect to the computer via an IDE connector. Definition 7 1 1 GND 2 TXP 3 TXN 4 GND 5 RXN 6 RXP 7 GND GA-8I865GVM(F)-775...
Manual
Page 46
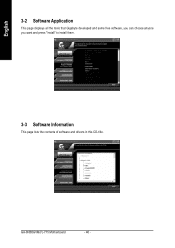
GA-8I865GVM(F)-775 Motherboard - 46 - English 3-2 Software Application This page displays all the tools that Gigabyte developed and some free software, you can choose anyone you want and press "install" to install them. 3-3 Software Information This page lists the contents of software and drivers in this CD-title.
GA-8I865GVM(F)-775 Motherboard - 46 - English 3-2 Software Application This page displays all the tools that Gigabyte developed and some free software, you can choose anyone you want and press "install" to install them. 3-3 Software Information This page lists the contents of software and drivers in this CD-title.
Manual
Page 50
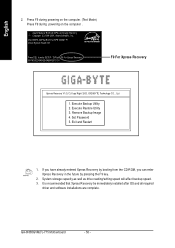
... Recovery be immediately installed after OS and all required driver and software installations are complete. Remove Backup Image 4. Execute Backup Utility 2. Press F9 during powering on the computer. (Text Mode) Press F9 during powering on the computer . Execute Restore Utility 3. GA-8I865GVM(F)-775 Motherboard - 50 - GIGABYTE Technology CO. , Ltd. 1. English 2. Press DEL to enter SETUP...
... Recovery be immediately installed after OS and all required driver and software installations are complete. Remove Backup Image 4. Execute Backup Utility 2. Press F9 during powering on the computer. (Text Mode) Press F9 during powering on the computer . Execute Restore Utility 3. GA-8I865GVM(F)-775 Motherboard - 50 - GIGABYTE Technology CO. , Ltd. 1. English 2. Press DEL to enter SETUP...

Manual
Page 62
...Line Out (Front Speaker Out) Mic In STEP 3: On the "Preferences" menu, click the "Listening Environment" tab. You will find a multi-driver icon on the lower right of the screen. Right-click the icon to "Line In". In the "Speaker Setup" box, click "Multi-drive" and...Front Speakers to "Line Out", the Rear Speakers to select "SoundMAX Control Panel" or "Preferences". This completes the 4-channel audio configuration. GA-8I865GVM(F)-775 Motherboard - 62 - STEP 2 : After you install the audio driver, you will find the "SoundMAX Control Panel" icon in the status area on the SoundMAX menu.
...Line Out (Front Speaker Out) Mic In STEP 3: On the "Preferences" menu, click the "Listening Environment" tab. You will find a multi-driver icon on the lower right of the screen. Right-click the icon to "Line In". In the "Speaker Setup" box, click "Multi-drive" and...Front Speakers to "Line Out", the Rear Speakers to select "SoundMAX Control Panel" or "Preferences". This completes the 4-channel audio configuration. GA-8I865GVM(F)-775 Motherboard - 62 - STEP 2 : After you install the audio driver, you will find the "SoundMAX Control Panel" icon in the status area on the SoundMAX menu.


