Manual
Page 3
... the product, read the Quick Installation Guide included with the product. For detailed product information, carefully read the User's Manual. Disclaimer Information in this manual is protected by any means without prior notice. Check your motherboard looks like this product, GIGABYTE provides the following types of documentations: For quick set-up of...
... the product, read the Quick Installation Guide included with the product. For detailed product information, carefully read the User's Manual. Disclaimer Information in this manual is protected by any means without prior notice. Check your motherboard looks like this product, GIGABYTE provides the following types of documentations: For quick set-up of...
Manual
Page 6
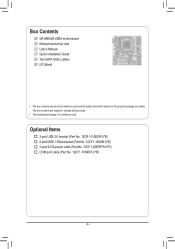
The box contents are for reference only. Optional Items 2-port USB 2.0 bracket (Part No. 12CR1-1UB030-5*R) 2-port IEEE 1394a bracket (Part No. 12CF1-1IE008-0*R) 2-port SATA power cable (Part No. 12CF1-2SERPW-0*R) COM port cable (Part No. 12CF1-1CM001-3*R) - 6 - Box Contents GA-880GM-USB3 motherboard Motherboard driver disk User's Manual Quick Installation Guide Two SATA 3Gb/s cables I/O Shield • The box contents above are subject to change without notice. • The motherboard image is for reference only and the actual items shall depend on the product package you obtain.
The box contents are for reference only. Optional Items 2-port USB 2.0 bracket (Part No. 12CR1-1UB030-5*R) 2-port IEEE 1394a bracket (Part No. 12CF1-1IE008-0*R) 2-port SATA power cable (Part No. 12CF1-2SERPW-0*R) COM port cable (Part No. 12CF1-1CM001-3*R) - 6 - Box Contents GA-880GM-USB3 motherboard Motherboard driver disk User's Manual Quick Installation Guide Two SATA 3Gb/s cables I/O Shield • The box contents above are subject to change without notice. • The motherboard image is for reference only and the actual items shall depend on the product package you obtain.
Manual
Page 9
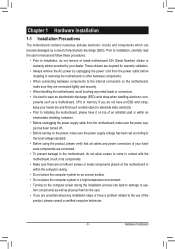
...can become damaged as a result of the product, please consult a certified computer technician. - 9 - ponents such as physical harm to the user. • If you do not have an ESD wrist strap, keep your hardware components are connected tightly and securely. • When handling the... do not remove or break motherboard S/N (Serial Number) sticker or warranty sticker provided by your dealer. Prior to installation, carefully read the user's manual and follow these procedures: • Prior to installation, do not allow screws to come in a high-temperature environment. • Turning on ...
...can become damaged as a result of the product, please consult a certified computer technician. - 9 - ponents such as physical harm to the user. • If you do not have an ESD wrist strap, keep your hardware components are connected tightly and securely. • When handling the... do not remove or break motherboard S/N (Serial Number) sticker or warranty sticker provided by your dealer. Prior to installation, carefully read the user's manual and follow these procedures: • Prior to installation, do not allow screws to come in a high-temperature environment. • Turning on ...
Manual
Page 44
...this function. CPU Core 0 is fixed. Auto lets the BIOS automatically configure this setting depending on the CPU being used). (Default) Manual Allows you to determine whether to move it up or down on the list. Make sure the operating system to exit this feature. Virtualization... operating system from your computer and its power consumption. (Default) Disabled Disables this item, set the password(s) under the Set Supervisor/User Password item in independent partitions. EFI CD/DVD Boot Option Set this item to run multiple operating systems and applications in the BIOS ...
...this function. CPU Core 0 is fixed. Auto lets the BIOS automatically configure this setting depending on the CPU being used). (Default) Manual Allows you to determine whether to move it up or down on the list. Make sure the operating system to exit this feature. Virtualization... operating system from your computer and its power consumption. (Default) Disabled Disables this item, set the password(s) under the Set Supervisor/User Password item in independent partitions. EFI CD/DVD Boot Option Set this item to run multiple operating systems and applications in the BIOS ...
Manual
Page 64
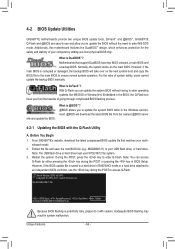
... will download the latest BIOS file from the hassles of system safety, users cannot update the backup BIOS manually. Unique Features - 64 - Additionally, this motherboard features the DualBIOS™...BIOS and a backup BIOS. 4-2 BIOS Update Utilities GIGABYTE motherboards provide two unique BIOS update tools, Q-Flash™ and @BIOS™. GIGABYTE Q-Flash and @BIOS are easy-to-use the ...the BIOS. Note: The USB flash drive or hard drive must use FAT32/16/12 file system. 3. GA-880GM-USB3 DE . . . . : BIOS Setup : XpressRecovery2 : Boot Menu : Qflash 02/15/2011-RS880-SB710...
... will download the latest BIOS file from the hassles of system safety, users cannot update the backup BIOS manually. Unique Features - 64 - Additionally, this motherboard features the DualBIOS™...BIOS and a backup BIOS. 4-2 BIOS Update Utilities GIGABYTE motherboards provide two unique BIOS update tools, Q-Flash™ and @BIOS™. GIGABYTE Q-Flash and @BIOS are easy-to-use the ...the BIOS. Note: The USB flash drive or hard drive must use FAT32/16/12 file system. 3. GA-880GM-USB3 DE . . . . : BIOS Setup : XpressRecovery2 : Boot Menu : Qflash 02/15/2011-RS880-SB710...
Manual
Page 85
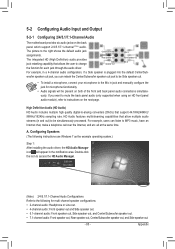
...following for each jack through the audio driver. A. The integrated HD (High Definition) audio provides jack retasking capability that allows the user to the following instructions use Windows 7 as the example operating system.) Step 1: After installing the audio driver, the HD Audio ...microphone, connect your microphone to the Mic in and out) to -analog converters (DACs) that allow multiple audio streams (in jack and manually configure the jack for microphone functionality. • Audio signals will appear in a 4-channel audio configuration, if a Side speaker is plugged into...
...following for each jack through the audio driver. A. The integrated HD (High Definition) audio provides jack retasking capability that allows the user to the following instructions use Windows 7 as the example operating system.) Step 1: After installing the audio driver, the HD Audio ...microphone, connect your microphone to the Mic in and out) to -analog converters (DACs) that allow multiple audio streams (in jack and manually configure the jack for microphone functionality. • Audio signals will appear in a 4-channel audio configuration, if a Side speaker is plugged into...


