Manual
Page 5
... Green...73 Chapter 5 Appendix...75 5-1 Configuring SATA Hard Drive(s 75 5-1-1 Configuring AMD SB850 SATA Controller 75 5-1-2 Configuring GIGABYTE SATA2/JMicron JMB362 SATA Controller 81 5-1-3 Making a SATA RAID/AHCI Driver Diskette 87 5-1-4 Installing the SATA RAID/AHCI Driver and Operating System 89 5-2 Configuring Audio Input and Output 98 5-2-1 Configuring 2/4/5.1/7.1-Channel Audio 98 5-2-2 Configuring S/PDIF...
... Green...73 Chapter 5 Appendix...75 5-1 Configuring SATA Hard Drive(s 75 5-1-1 Configuring AMD SB850 SATA Controller 75 5-1-2 Configuring GIGABYTE SATA2/JMicron JMB362 SATA Controller 81 5-1-3 Making a SATA RAID/AHCI Driver Diskette 87 5-1-4 Installing the SATA RAID/AHCI Driver and Operating System 89 5-2 Configuring Audio Input and Output 98 5-2-1 Configuring 2/4/5.1/7.1-Channel Audio 98 5-2-2 Configuring S/PDIF...
Manual
Page 10
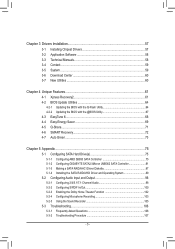
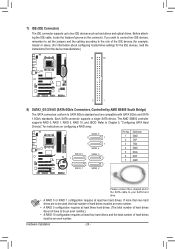
... JBOD JMicron JMB362 chip: - 2 x eSATA 3Gb/s connectors on the back panel supporting up to 2 SATA 3Gb/s devices - Support for SATA RAID 0, RAID 1, RAID 5, RAID 10, and JBOD GIGABYTE SATA2 chip: - 1 x IDE connector supporting ATA-133/100/66/33 and up to 2 IDE devices - 2 x SATA 3Gb/s connectors (GSATA2_6, GSATA2_7) supporting up to 2 SATA 3Gb...
... JBOD JMicron JMB362 chip: - 2 x eSATA 3Gb/s connectors on the back panel supporting up to 2 SATA 3Gb/s devices - Support for SATA RAID 0, RAID 1, RAID 5, RAID 10, and JBOD GIGABYTE SATA2 chip: - 1 x IDE connector supporting ATA-133/100/66/33 and up to 2 IDE devices - 2 x SATA 3Gb/s connectors (GSATA2_6, GSATA2_7) supporting up to 2 SATA 3Gb...
Manual
Page 19
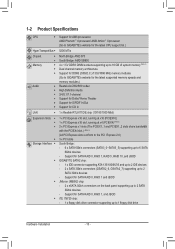
... straight out from the motherboard. • When removing the cable, pull it side to side to Chapter 5, "Configuring SATA Hard Drive(s)," for instructions on configuring a RAID array. Hardware Installation Before using this port to an external audio system that supports digital coaxial audio. PS/2 Keyboard or PS/2 Mouse Port Use this...
... straight out from the motherboard. • When removing the cable, pull it side to side to Chapter 5, "Configuring SATA Hard Drive(s)," for instructions on configuring a RAID array. Hardware Installation Before using this port to an external audio system that supports digital coaxial audio. PS/2 Keyboard or PS/2 Mouse Port Use this...
Manual
Page 24
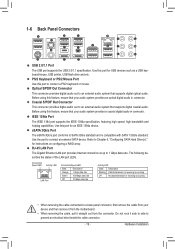
... at least three hard drives. (The total number of hard drives must be an even number.) • A RAID 10 configuration requires at least two hard drives. SATA3_5 1 7 1 7 SATA3_4 SATA3_0 1 SATA3_3 7 1 SATA3_1...RXP GND Please connect the L-shaped end of the SATA cable to your SATA hard drive. • A RAID 0 or RAID 1 configuration requires at least four hard drives and the total number of hard drives does not have to .... The AMD SB850 controller supports RAID 0, RAID 1, RAID 5, RAID 10, and JBOD. Each SATA connector supports a single SATA device. Hardware Installation - 24 -
... at least three hard drives. (The total number of hard drives must be an even number.) • A RAID 10 configuration requires at least two hard drives. SATA3_5 1 7 1 7 SATA3_4 SATA3_0 1 SATA3_3 7 1 SATA3_1...RXP GND Please connect the L-shaped end of the SATA cable to your SATA hard drive. • A RAID 0 or RAID 1 configuration requires at least four hard drives and the total number of hard drives does not have to .... The AMD SB850 controller supports RAID 0, RAID 1, RAID 5, RAID 10, and JBOD. Each SATA connector supports a single SATA device. Hardware Installation - 24 -

Manual
Page 25
...Danger of the battery (the positive side should face up). • Used batteries must be accurate or may clear the CMOS values by GIGABYTE SATA2) The SATA connectors conform to SATA 3Gb/s standard and are not able to a low level, or the CMOS values may not...25 - G.QBOFM GSATA2_6 7 1 7 1 GSATA2_7 Pin No. 1 2 3 4 5 6 7 Definition GND TXP TXN GND RXN RXP GND A RAID 0 or RAID 1 configuration requires at least two hard drives. The GIGABYTE SATA2 supports RAID 0 and RAID 1. Refer to your computer and unplug the power cord. 2. Plug in the power cord and restart your computer. •...
...Danger of the battery (the positive side should face up). • Used batteries must be accurate or may clear the CMOS values by GIGABYTE SATA2) The SATA connectors conform to SATA 3Gb/s standard and are not able to a low level, or the CMOS values may not...25 - G.QBOFM GSATA2_6 7 1 7 1 GSATA2_7 Pin No. 1 2 3 4 5 6 7 Definition GND TXP TXN GND RXN RXP GND A RAID 0 or RAID 1 configuration requires at least two hard drives. The GIGABYTE SATA2 supports RAID 0 and RAID 1. Refer to your computer and unplug the power cord. 2. Plug in the power cord and restart your computer. •...
Manual
Page 45
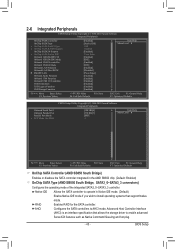
... SATA Type x OnChip SATA Port4/5 Type x OnChip SATA RAID5 Support OnChip SATA3.0 Suuport x OnChip SATA Port as Native Command Queuing and hot plug. - 45 - RAID Enables RAID for the SATA controller. Native IDE Allows the SATA controller to operate in the AMD SB850 chip. (Default: Enabled) OnChip SATA Type (AMD SB850 South...
... SATA Type x OnChip SATA Port4/5 Type x OnChip SATA RAID5 Support OnChip SATA3.0 Suuport x OnChip SATA Port as Native Command Queuing and hot plug. - 45 - RAID Enables RAID for the SATA controller. Native IDE Allows the SATA controller to operate in the AMD SB850 chip. (Default: Enabled) OnChip SATA Type (AMD SB850 South...
Manual
Page 46
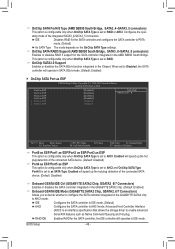
... only when OnChip SATA Type is set to AHCI and OnChip SATA Type Port4/5 is set to RAID or AHCI. ating mode of the connected SATA device. (Default: Disabled) Onboard GSATA/IDE Ctrl (GIGABYTE SATA2 Chip, GSATA2_6/7 Connectors) Enables or disables the SATA controller integrated in the...Serial ATA features such as Native Command Queuing and hot plug. the IDE controller still operates in the Chipset. BIOS Setup - 46 - RAID/IDE Enables RAID for the SATA controller integrated in SATA 3Gb/s mode. (Default: Enabled) OnChip SATA Port as ESP CMOS Setup Utility-Copyright (C)...
... only when OnChip SATA Type is set to AHCI and OnChip SATA Type Port4/5 is set to RAID or AHCI. ating mode of the connected SATA device. (Default: Disabled) Onboard GSATA/IDE Ctrl (GIGABYTE SATA2 Chip, GSATA2_6/7 Connectors) Enables or disables the SATA controller integrated in the...Serial ATA features such as Native Command Queuing and hot plug. the IDE controller still operates in the Chipset. BIOS Setup - 46 - RAID/IDE Enables RAID for the SATA controller integrated in SATA 3Gb/s mode. (Default: Enabled) OnChip SATA Port as ESP CMOS Setup Utility-Copyright (C)...
Manual
Page 47
... diagnosing your LAN cable: When No LAN Cable Is Attached... Refer to enable advanced Serial ATA features such as shown in the figure above. RAID Enables RAID for the SATA controller and configures the SATA controller to IDE mode. (Default) AHCI Configures the SATA controller to the fault or short. Cable Length... Mbps hub, the following information for the SATA controller integrated in the JMicron JMB362 chip or configures the SATA controller to AHCI mode. IDE Disables RAID for the SATA controller. If no LAN cable is activated. - 47 -
... diagnosing your LAN cable: When No LAN Cable Is Attached... Refer to enable advanced Serial ATA features such as shown in the figure above. RAID Enables RAID for the SATA controller and configures the SATA controller to IDE mode. (Default) AHCI Configures the SATA controller to the fault or short. Cable Length... Mbps hub, the following information for the SATA controller integrated in the JMicron JMB362 chip or configures the SATA controller to AHCI mode. IDE Disables RAID for the SATA controller. If no LAN cable is activated. - 47 -

Manual
Page 61
... graphics card • Windows XP with Xpress Recovery cannot be restored using Xpress Recovery2. • USB hard drives are not supported. • Hard drives in RAID/AHCI mode are attached to restore it. For example, a backup file created with SP1 or later, Windows Vista • Xpress Recovery and Xpress Recovery2 are...
... graphics card • Windows XP with Xpress Recovery cannot be restored using Xpress Recovery2. • USB hard drives are not supported. • Hard drives in RAID/AHCI mode are attached to restore it. For example, a backup file created with SP1 or later, Windows Vista • Xpress Recovery and Xpress Recovery2 are...
Manual
Page 64
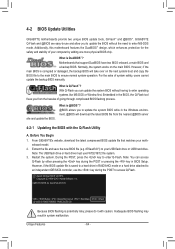
...the hassles of going through complicated BIOS flashing process. 4-2 BIOS Update Utilities GIGABYTE motherboards provide two unique BIOS update tools, Q-Flash™ and @BIOS™. Additionally, this motherboard features the DualBIOS™ design, which enhances protection for GA-870A-UD3 D1 . . . . : BIOS Setup : XpressRecovery2 : Boot Menu ...During the POST, press the key to your computer by either pressing the key during the POST or pressing the key in RAID/AHCI mode or a hard drive attached to update the system BIOS while in the BIOS, the Q-Flash tool frees you can...
...the hassles of going through complicated BIOS flashing process. 4-2 BIOS Update Utilities GIGABYTE motherboards provide two unique BIOS update tools, Q-Flash™ and @BIOS™. Additionally, this motherboard features the DualBIOS™ design, which enhances protection for GA-870A-UD3 D1 . . . . : BIOS Setup : XpressRecovery2 : Boot Menu ...During the POST, press the key to your computer by either pressing the key during the POST or pressing the key in RAID/AHCI mode or a hard drive attached to update the system BIOS while in the BIOS, the Q-Flash tool frees you can...
Manual
Page 65
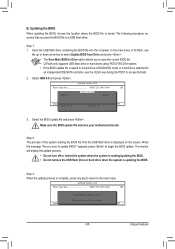
... supports USB flash drive or hard drives using FAT32/16/12 file system. • If the BIOS update file is saved to a hard drive in RAID/AHCI mode or a hard drive attached to an independent IDE/SATA controller, use the up or down arrow key to select Update BIOS from the...
... supports USB flash drive or hard drives using FAT32/16/12 file system. • If the BIOS update file is saved to a hard drive in RAID/AHCI mode or a hard drive attached to an independent IDE/SATA controller, use the up or down arrow key to select Update BIOS from the...
Manual
Page 75
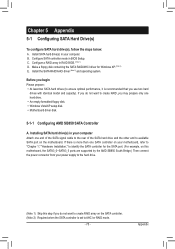
...Appendix 5-1 Configuring SATA Hard Drive(s) To configure SATA hard drive(s), follow the steps below: A. Configure a RAID array in BIOS Setup. Appendix If you do not want to create RAID, you begin Please prepare: • At least two SATA hard drives (to identify the SATA controller for...Skip this step if you use two hard drives with identical model and capacity). Configure SATA controller mode in RAID BIOS. (Note 1) D. Make a floppy disk containing the SATA RAID/AHCI driver for the SATA port. (For example, on this motherboard, the SATA3_0~SATA3_5 ports are supported ...
...Appendix 5-1 Configuring SATA Hard Drive(s) To configure SATA hard drive(s), follow the steps below: A. Configure a RAID array in BIOS Setup. Appendix If you do not want to create RAID, you begin Please prepare: • At least two SATA hard drives (to identify the SATA controller for...Skip this step if you use two hard drives with identical model and capacity). Configure SATA controller mode in RAID BIOS. (Note 1) D. Make a floppy disk containing the SATA RAID/AHCI driver for the SATA port. (For example, on this motherboard, the SATA3_0~SATA3_5 ports are supported ...

Manual
Page 76
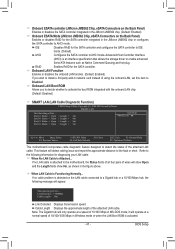
... Boot ROM } SMART LAN Onboard Audio Function Onboard 1394 Function Onboard USB 3.0 Controller USB Controllers USB Legacy Function USB Storage Function Onboard Serial Port 1 [Enabled] [RAID] [As SATA Type] [Enabled] [Enabled] [Enabled] [IDE] [Enabled] [IDE] [Enabled] [Disabled] [Press Enter] [Enabled] [Enabled] [Enabled] [... the BIOS version. To enable support for the SATA3_4/5 connectors, set OnChip SATA Type to RAID and set OnChip SATA RAID5 Support to RAID. To enable RAID for RAID 5, set OnChip SATA Port4/5 Type to enter BIOS Setup during the POST (Power-On Self...
... Boot ROM } SMART LAN Onboard Audio Function Onboard 1394 Function Onboard USB 3.0 Controller USB Controllers USB Legacy Function USB Storage Function Onboard Serial Port 1 [Enabled] [RAID] [As SATA Type] [Enabled] [Enabled] [Enabled] [IDE] [Enabled] [IDE] [Enabled] [Disabled] [Press Enter] [Enabled] [Enabled] [Enabled] [... the BIOS version. To enable support for the SATA3_4/5 connectors, set OnChip SATA Type to RAID and set OnChip SATA RAID5 Support to RAID. To enable RAID for RAID 5, set OnChip SATA Port4/5 Type to enter BIOS Setup during the POST (Power-On Self...
Manual
Page 77
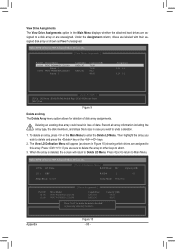
...the View Drive Assignments window. Appendix Press + to enter RAID Option ROM Utility... Press to enter the RAID BIOS setup utility. To view controller settings, press to configure a RAID array. C. Configuring RAID set in RAID BIOS Enter the RAID BIOS setup utility to enter the Controller Configuration window. ...the installation of Windows operating system for a message which says "Press to enter RAID Option ROM Utility" (Figure 2). No Array is the first option screen when you enter the BIOS RAID Setup utility. (Figure 3). Step 1: After the POST memory test begins and ...
...the View Drive Assignments window. Appendix Press + to enter RAID Option ROM Utility... Press to enter the RAID BIOS setup utility. To view controller settings, press to configure a RAID array. C. Configuring RAID set in RAID BIOS Enter the RAID BIOS setup utility to enter the Controller Configuration window. ...the installation of Windows operating system for a message which says "Press to enter RAID Option ROM Utility" (Figure 2). No Array is the first option screen when you enter the BIOS RAID Setup utility. (Figure 3). Step 1: After the POST memory test begins and ...

Manual
Page 78
... down arrow key to move to an item for further configuration (Figure 5). LD No LD Name LD 1 Logical Drive 1 [ LD Define Menu ] RAID Mode Drv RAID 0 0 Stripe Block: 64 KB Gigabyte Boundary: ON Fast Init: ON Cache Mode: WriteThru Port:ID 01:00 02:00 [ Drives Assignments ] Drive Model WDC WD800JD-22LSA0 WDC...
... down arrow key to move to an item for further configuration (Figure 5). LD No LD Name LD 1 Logical Drive 1 [ LD Define Menu ] RAID Mode Drv RAID 0 0 Stripe Block: 64 KB Gigabyte Boundary: ON Fast Init: ON Cache Mode: WriteThru Port:ID 01:00 02:00 [ Drives Assignments ] Drive Model WDC WD800JD-22LSA0 WDC...
Manual
Page 79
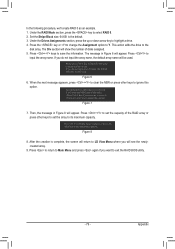
...KB is complete, the screen will be used . When the next message appears, press + to clear the MBR or press other keys to exit the RAID BIOS utility. - 79 - Appendix Press the key or to change the Assignment option to the disk array. This action adds the drive to Y. ... or press any key to use maximum capacity... The message in Figure 8 will show the number of the RAID array or press other key to exit. In the following procedure, we'll create RAID 0 as an example. 1. Figure 8 8. After the creation is the default. 3. Press + keys to LD View Menu...
...KB is complete, the screen will be used . When the next message appears, press + to clear the MBR or press other keys to exit the RAID BIOS utility. - 79 - Appendix Press the key or to change the Assignment option to the disk array. This action adds the drive to Y. ... or press any key to use maximum capacity... The message in Figure 8 will show the number of the RAID array or press other key to exit. In the following procedure, we'll create RAID 0 as an example. 1. Figure 8 8. After the creation is the default. 3. Press + keys to LD View Menu...
Manual
Page 80
... or shown as shown in case you wish to enter the Delete LD Menu. LD No LD Name [ View LD Defination Menu ] RAID Mode Drv Capacity(GB) LD 1 GBT RAID 0 2 80 Stripe Block: 64 KB Cache Mode: WriteThru Port:ID 01:00 02:00 [ Drives Assignments ] Drive Model WDC WD800JD-22LSA0 WDC...
... or shown as shown in case you wish to enter the Delete LD Menu. LD No LD Name [ View LD Defination Menu ] RAID Mode Drv Capacity(GB) LD 1 GBT RAID 0 2 80 Stripe Block: 64 KB Cache Mode: WriteThru Port:ID 01:00 02:00 [ Drives Assignments ] Drive Model WDC WD800JD-22LSA0 WDC...
Manual
Page 81
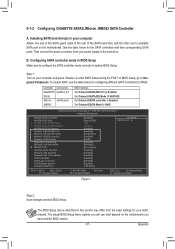
...Defaults Figure 1 Step 2: Save changes and exit BIOS Setup. Controller Connectors GIGABYTE GSATA2_6/7 SATA2 JMicron eSATA ports JMB362 BIOS Settings Set Onboard GSATA/IDE Ctrl to Enabled Set Onboard GSATA/IDE Mode to RAID/IDE Set Onboard ESATA controller to Enabled Set Onboard ESATA Mode to Integrated ... you will see the table below for your power supply to enter BIOS Setup during the POST. To enable RAID, see shall depend on the motherboard. 5-1-2 Configuring GIGABYTE SATA2/JMicron JMB362 SATA Controller A. Configuring SATA controller mode in system BIOS Setup.
...Defaults Figure 1 Step 2: Save changes and exit BIOS Setup. Controller Connectors GIGABYTE GSATA2_6/7 SATA2 JMicron eSATA ports JMB362 BIOS Settings Set Onboard GSATA/IDE Ctrl to Enabled Set Onboard GSATA/IDE Mode to RAID/IDE Set Onboard ESATA controller to Enabled Set Onboard ESATA Mode to Integrated ... you will see the table below for your power supply to enter BIOS Setup during the POST. To enable RAID, see shall depend on the motherboard. 5-1-2 Configuring GIGABYTE SATA2/JMicron JMB362 SATA Controller A. Configuring SATA controller mode in system BIOS Setup.
Manual
Page 82
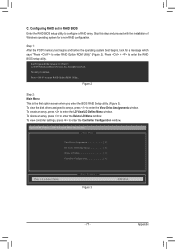
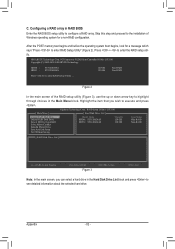
...(C) 2005-2009 GIGABYTE Technology. GIGABYTE Technology Corp. PCI Express to configure a RAID array. HDD0 : HDD1 : ST3120026AS ST3120026AS 120 GB 120 GB Non-RAID Non-RAID Press to enter the RAID setup utility. Gigabyte Technology Corp. Appendix - 82 - Press + to enter RAID Setup Utility ...... Figure 2 In the main screen of the RAID setup utility (Figure 3), use the up...
...(C) 2005-2009 GIGABYTE Technology. GIGABYTE Technology Corp. PCI Express to configure a RAID array. HDD0 : HDD1 : ST3120026AS ST3120026AS 120 GB 120 GB Non-RAID Non-RAID Press to enter the RAID setup utility. Gigabyte Technology Corp. Appendix - 82 - Press + to enter RAID Setup Utility ...... Figure 2 In the main screen of the RAID setup utility (Figure 3), use the up...
Manual
Page 83
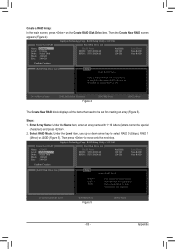
...: Under the Level item, use up or down arrow key to move onto the next step. Gigabyte Technology Corp. Steps: 1. Gigabyte Technology Corp. RAID Setup Utility v1.07.16G [ Create New RAID ] Name: Level: Disks: Block: Size: GRAID_ 0-Stripe Select Disk 128 KB 240 GB [ Hard Disk Drive List ] Model Name HDD0: ST3120026AS HDD1...
...: Under the Level item, use up or down arrow key to move onto the next step. Gigabyte Technology Corp. Steps: 1. Gigabyte Technology Corp. RAID Setup Utility v1.07.16G [ Create New RAID ] Name: Level: Disks: Block: Size: GRAID_ 0-Stripe Select Disk 128 KB 240 GB [ Hard Disk Drive List ] Model Name HDD0: ST3120026AS HDD1...


