
User Guide
Page 4
..., Hg, Cr+6, PBDE, PBB, DEHP, BBP, DBP and DIBP). European Union (EU) Community Waste Electrical & Electronic Equipment (WEEE) Directive Statement GIGABYTE will fulfill the national laws as interpreted from the 2012/19/ EU WEEE (Waste Electrical and Electronic Equipment) (recast) directive. This class B digital ...the receiver is connected. • Consult the dealer or an experienced radio/TV technician for radio noise emissions from digital apparatus set out in the Radio Interference Regulations of the Canadian Department of the Directives. The parts and components have not intended to ...
..., Hg, Cr+6, PBDE, PBB, DEHP, BBP, DBP and DIBP). European Union (EU) Community Waste Electrical & Electronic Equipment (WEEE) Directive Statement GIGABYTE will fulfill the national laws as interpreted from the 2012/19/ EU WEEE (Waste Electrical and Electronic Equipment) (recast) directive. This class B digital ...the receiver is connected. • Consult the dealer or an experienced radio/TV technician for radio noise emissions from digital apparatus set out in the Radio Interference Regulations of the Canadian Department of the Directives. The parts and components have not intended to ...
User Guide
Page 10
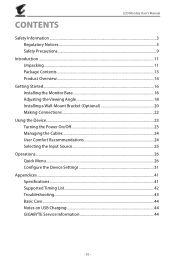
... Power On/Off 23 Managing the Cables...24 User Comfort Recommendations 24 Selecting the Input Source 25 Operations...26 Quick Menu...26 Configure the Device Settings 31 Appendices...41 Specifications...41 Supported Timing List 42 Troubleshooting...43 Basic Care...44 Notes on USB Charging 44...
... Power On/Off 23 Managing the Cables...24 User Comfort Recommendations 24 Selecting the Input Source 25 Operations...26 Quick Menu...26 Configure the Device Settings 31 Appendices...41 Specifications...41 Supported Timing List 42 Troubleshooting...43 Basic Care...44 Notes on USB Charging 44...

User Guide
Page 23
Press the Control button to a power outlet. 3. The Power LED will light in the Settings menu. Connect one end of the power cable to the AC IN jack at the rear of the the power cable to turn off the ..., you turn off the monitor. Refer to turn on the monitor. Note: When the Main menu appears on the monitor, please check the LED Indicator setting in white, indicating the monitor is ready to page 38. Connect other end of the monitor. 2. LCD Monitor User's Manual USING THE DEVICE Turning the...
Press the Control button to a power outlet. 3. The Power LED will light in the Settings menu. Connect one end of the power cable to the AC IN jack at the rear of the the power cable to turn off the ..., you turn off the monitor. Refer to turn on the monitor. Note: When the Main menu appears on the monitor, please check the LED Indicator setting in white, indicating the monitor is ready to page 38. Connect other end of the monitor. 2. LCD Monitor User's Manual USING THE DEVICE Turning the...

User Guide
Page 26
OPERATIONS LCD Monitor User's Manual Quick Menu Hot Key By default, the Control button has been assigned with the specific function. Move the Control button up ( menu. Note: To change the preset hot key function, refer to enter the Black Equalizer 2.0 Black Equalizer 2.0 0 Adjust Exit - 26 - To access the hot key function, do the following: • Move the Control button up /down ( ) to adjust the setting and press the Control button to confirm. ) to the "Quick Switch" section on page 38.
OPERATIONS LCD Monitor User's Manual Quick Menu Hot Key By default, the Control button has been assigned with the specific function. Move the Control button up ( menu. Note: To change the preset hot key function, refer to enter the Black Equalizer 2.0 Black Equalizer 2.0 0 Adjust Exit - 26 - To access the hot key function, do the following: • Move the Control button up /down ( ) to adjust the setting and press the Control button to confirm. ) to the "Quick Switch" section on page 38.
User Guide
Page 28
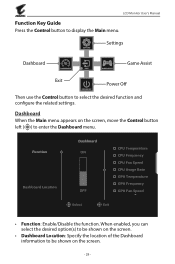
SETTING Settings Dashboard DASHBOARD EXIT GAME ASSIST Game Assist Exit POWER OFF Power Off Then use the Control button to display the Main menu. Dashboard When the ... ( ) to enter the Dashboard menu. LCD Monitor User's Manual Function Key Guide Press the Control button to select the desired function and configure the related settings.
SETTING Settings Dashboard DASHBOARD EXIT GAME ASSIST Game Assist Exit POWER OFF Power Off Then use the Control button to display the Main menu. Dashboard When the ... ( ) to enter the Dashboard menu. LCD Monitor User's Manual Function Key Guide Press the Control button to select the desired function and configure the related settings.
User Guide
Page 30
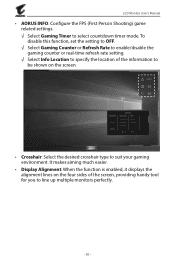
...; AORUS INFO: Configure the FPS (First Person Shooting) game related settings. √√ Select Gaming Timer to suit your gaming environment. To disable this function, set the setting to OFF. √√ Select Gaming Counter or Refresh Rate to enable/disable the gaming counter or real-time refresh rate setting....it displays the alignment lines on the four sides of the information to be shown on the screen. 01:57 00 60 AORUS INFO Crosshair Display Alignment GameAssist Gaming Timer OFF Gaming Counter Count Up Refresh Rate Count Down Info Location Select Exit • Crosshair...
...; AORUS INFO: Configure the FPS (First Person Shooting) game related settings. √√ Select Gaming Timer to suit your gaming environment. To disable this function, set the setting to OFF. √√ Select Gaming Counter or Refresh Rate to enable/disable the gaming counter or real-time refresh rate setting....it displays the alignment lines on the four sides of the information to be shown on the screen. 01:57 00 60 AORUS INFO Crosshair Display Alignment GameAssist Gaming Timer OFF Gaming Counter Count Up Refresh Rate Count Down Info Location Select Exit • Crosshair...
User Guide
Page 31
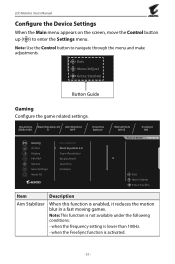
... available under the following conditions: - Note: This function is enabled, it reduces the motion blur in a fast moving games. when the frequency setting is activated. - 31 - when the FreeSync function is lower than 100Hz. - Exit Move/Adjust Enter/Confirm Button Guide Gaming Configure... the game related settings. Balance 60 HZ ON r er 2.0 tion e LCD Monitor User's Manual Picture Mode Standard Configure the Device Settings When the Main menu appears on the screen, move the Control button up ( ) ...
... available under the following conditions: - Note: This function is enabled, it reduces the motion blur in a fast moving games. when the frequency setting is activated. - 31 - when the FreeSync function is lower than 100Hz. - Exit Move/Adjust Enter/Confirm Button Guide Gaming Configure... the game related settings. Balance 60 HZ ON r er 2.0 tion e LCD Monitor User's Manual Picture Mode Standard Configure the Device Settings When the Main menu appears on the screen, move the Control button up ( ) ...
User Guide
Page 33
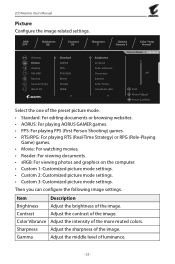
...• sRGB: For viewing photos and graphics on the computer. • Custom 1: Customized picture mode settings. • Custom 2: Customized picture mode settings. • Custom 3: Customized picture mode settings. Contrast Adjust the contrast of luminance. - 33 - Gamma Adjust the middle level of the image....Gamma Color Temp. LCD Monitor User's Manual Picture Configure the image related settings. HDR OFF Brightness 80 Contrast 50 Gaming Picture Display PIP/PBP System Save Settings Reset All Standard AORUS FPS RTS/RPG Movie Reader sRGB Sharpness 5 Gamma Gamma 3 Color Temp...
...• sRGB: For viewing photos and graphics on the computer. • Custom 1: Customized picture mode settings. • Custom 2: Customized picture mode settings. • Custom 3: Customized picture mode settings. Contrast Adjust the contrast of luminance. - 33 - Gamma Adjust the middle level of the image....Gamma Color Temp. LCD Monitor User's Manual Picture Configure the image related settings. HDR OFF Brightness 80 Contrast 50 Gaming Picture Display PIP/PBP System Save Settings Reset All Standard AORUS FPS RTS/RPG Movie Reader sRGB Sharpness 5 Gamma Gamma 3 Color Temp...

User Guide
Page 34
... level, the more blue light will appear on the left window and the adjusted image with the new settings will be reduced. Reset Picture Reset all Picture settings to achieve the optimum contrast. LCD Monitor User's Manual Item Description Color Temperature Select the color temperature. ... Contrast Adjust the black level of the selected mode with TUV Low Blue Light Certification. Note: Level 10 is compliance with its default settings will appear on the right window. Note: Select User Define to customize the color temperature by adjusting the red (R), green (G), or ...
... level, the more blue light will appear on the left window and the adjusted image with the new settings will be reduced. Reset Picture Reset all Picture settings to achieve the optimum contrast. LCD Monitor User's Manual Item Description Color Temperature Select the color temperature. ... Contrast Adjust the black level of the selected mode with TUV Low Blue Light Certification. Note: Level 10 is compliance with its default settings will appear on the right window. Note: Select User Define to customize the color temperature by adjusting the red (R), green (G), or ...
User Guide
Page 35
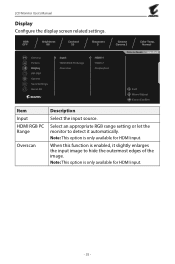
...All Input HDMI RGB PC Range Overscan Sharpness 5 HDMI 1 HDMI 2 DisplayPort Gamma Gamma 3 Color Temp. Select an appropriate RGB range setting or let the monitor to hide the outermost edges of the image. When this function is only available for HDMI input. Note: This... option is enabled, it slightly enlarges the input image to detect it automatically. LCD Monitor User's Manual Display Configure the display screen related settings. Normal Picture Mode Standard Exit Move/Adjust Enter/Confirm Item Input HDMI RGB PC Range Overscan Description Select the input source.
...All Input HDMI RGB PC Range Overscan Sharpness 5 HDMI 1 HDMI 2 DisplayPort Gamma Gamma 3 Color Temp. Select an appropriate RGB range setting or let the monitor to hide the outermost edges of the image. When this function is only available for HDMI input. Note: This... option is enabled, it slightly enlarges the input image to detect it automatically. LCD Monitor User's Manual Display Configure the display screen related settings. Normal Picture Mode Standard Exit Move/Adjust Enter/Confirm Item Input HDMI RGB PC Range Overscan Description Select the input source.

User Guide
Page 36
...: Swap the two windows. • Audio Switch: Select which audio source you want to hear the sound from . PIP/PBP Configure the multi-picture related settings. PIP Split the screen into 2 parts (main window and inset window). • Source: Change the input source for the right window. • PBP Size: Adjust... Disable the PIP/PBP function. LCD Monitor User's Manual HDR OFF Brightness 80 Contrast 50 Gaming OFF Picture PIP Display PBP PIP/PBP System Save Settings Reset All Sharpness 5 Gamma Gamma 3 Color Temp.
...: Swap the two windows. • Audio Switch: Select which audio source you want to hear the sound from . PIP/PBP Configure the multi-picture related settings. PIP Split the screen into 2 parts (main window and inset window). • Source: Change the input source for the right window. • PBP Size: Adjust... Disable the PIP/PBP function. LCD Monitor User's Manual HDR OFF Brightness 80 Contrast 50 Gaming OFF Picture PIP Display PBP PIP/PBP System Save Settings Reset All Sharpness 5 Gamma Gamma 3 Color Temp.

User Guide
Page 37
...enabled, you can select the preset LED color and effect to be displayed on the screen, select Yes to unlock OSD. Configure the headphone settings. • Volume: Adjust the volume level. • Mute: Enable/Disable the mute function. When the message appears on the rear of...Lock: When this function is allowed. HDR OFF Brightness 80 Contrast 50 Gaming Picture Display PIP/PBP System Save Settings Reset All Language RGB LED Headphone OSD Setting Quick Switch Other Settings Sharpness 5 English Deutsch Français Gamma Gamma 3 Color Temp. Configure the on-screen display (OSD) menu...
...enabled, you can select the preset LED color and effect to be displayed on the screen, select Yes to unlock OSD. Configure the headphone settings. • Volume: Adjust the volume level. • Mute: Enable/Disable the mute function. When the message appears on the rear of...Lock: When this function is allowed. HDR OFF Brightness 80 Contrast 50 Gaming Picture Display PIP/PBP System Save Settings Reset All Language RGB LED Headphone OSD Setting Quick Switch Other Settings Sharpness 5 English Deutsch Français Gamma Gamma 3 Color Temp. Configure the on-screen display (OSD) menu...

User Guide
Page 38
... as below: DD Up ( ): Black Equalizer 2.0 DD Down ( ): Picture Mode DD Right ( ): Input DD Left ( ): Volume Other Settings • Resolution Notice: When this function is enabled, the recommended resolution message will appear on the screen when the monitor switches to another input source.... • Input Auto Switch: When this function is enabled, it automatically switches to ON. The default setting of the hot keys. Available options: Aim Stabilizer, Black Equalizer 2.0, Low Blue Light, Volume, Input, Contrast, Brightness, and Picture Mode. DD...
... as below: DD Up ( ): Black Equalizer 2.0 DD Down ( ): Picture Mode DD Right ( ): Input DD Left ( ): Volume Other Settings • Resolution Notice: When this function is enabled, the recommended resolution message will appear on the screen when the monitor switches to another input source.... • Input Auto Switch: When this function is enabled, it automatically switches to ON. The default setting of the hot keys. Available options: Aim Stabilizer, Black Equalizer 2.0, Low Blue Light, Volume, Input, Contrast, Brightness, and Picture Mode. DD...
User Guide
Page 39
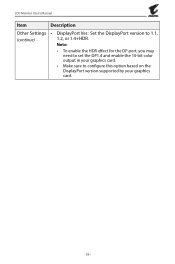
LCD Monitor User's Manual Item Description Other Settings • DisplayPort Ver.: Set the DisplayPort version to 1.1, (continue) 1.2, or 1.4+HDR. Note: • To enable the HDR effect for the DP port, you may need to set the DP1.4 and enable the 10-bit color output in your graphics card. • Make sure to configure this option based on the DisplayPort version supported by your graphics card. - 39 -
LCD Monitor User's Manual Item Description Other Settings • DisplayPort Ver.: Set the DisplayPort version to 1.1, (continue) 1.2, or 1.4+HDR. Note: • To enable the HDR effect for the DP port, you may need to set the DP1.4 and enable the 10-bit color output in your graphics card. • Make sure to configure this option based on the DisplayPort version supported by your graphics card. - 39 -
User Guide
Page 40
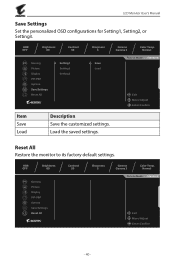
... OSD configurations for Setting1, Setting2, or Setting3. HDR OFF Brightness 80 Contrast 50 Gaming Picture Display PIP/PBP System Save Settings Reset All Setting1 Setting2 Setting3 Sharpness 5 Save Load Gamma Gamma 3 Color Temp. Normal Picture Mode Standard Exit Move/Adjust Enter.../Confirm - 40 - HDR OFF Brightness 80 Gaming Picture Display PIP/PBP System Save Settings Reset All Contrast 50 Sharpness 5 Gamma Gamma 3 Color Temp. Normal Picture Mode Standard Exit Move/Adjust Enter/Confirm Item Save...
... OSD configurations for Setting1, Setting2, or Setting3. HDR OFF Brightness 80 Contrast 50 Gaming Picture Display PIP/PBP System Save Settings Reset All Setting1 Setting2 Setting3 Sharpness 5 Save Load Gamma Gamma 3 Color Temp. Normal Picture Mode Standard Exit Move/Adjust Enter.../Confirm - 40 - HDR OFF Brightness 80 Gaming Picture Display PIP/PBP System Save Settings Reset All Contrast 50 Sharpness 5 Gamma Gamma 3 Color Temp. Normal Picture Mode Standard Exit Move/Adjust Enter/Confirm Item Save...
User Guide
Page 43
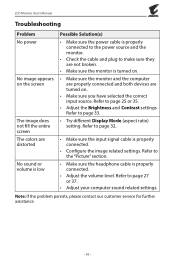
... problem persists, please contact our customer service for further assistance. - 43 - Refer to page 27 or 37. • Adjust your computer sound related settings. Refer to page 32. • Make sure the input signal cable is properly connected. • Adjust the volume level. Refer to page 25 or...the power source and the monitor. • Check the cable and plug to page 33. • Try different Display Mode (aspect ratio) setting. LCD Monitor User's Manual Troubleshooting Problem No power No image appears on the screen The image does not fill the entire screen The colors are...
... problem persists, please contact our customer service for further assistance. - 43 - Refer to page 27 or 37. • Adjust your computer sound related settings. Refer to page 32. • Make sure the input signal cable is properly connected. • Adjust the volume level. Refer to page 25 or...the power source and the monitor. • Check the cable and plug to page 33. • Try different Display Mode (aspect ratio) setting. LCD Monitor User's Manual Troubleshooting Problem No power No image appears on the screen The image does not fill the entire screen The colors are...