
User Guide
Page 3
... B digital device, pursuant to Part 15 of the FCC Rules, Subpart B, Unintentional Radiators. This equipment generates, uses and can be determined by turning the equipment off and on, the user is encouraged to try to correct the interference by one or more of Conformity 47 CFR § 2.1077 Compliance Information Product Name: LCD monitor Trade Name: GIGABYTE Model Number: AORUS FI27Q-P Responsible...
... B digital device, pursuant to Part 15 of the FCC Rules, Subpart B, Unintentional Radiators. This equipment generates, uses and can be determined by turning the equipment off and on, the user is encouraged to try to correct the interference by one or more of Conformity 47 CFR § 2.1077 Compliance Information Product Name: LCD monitor Trade Name: GIGABYTE Model Number: AORUS FI27Q-P Responsible...

User Guide
Page 9
... reached by children. • Before connecting the monitor to the power outlet, make sure that the voltage rating of the power cable is compatible with the power specification in the country where you are located. • The power cord plug must be scratched, avoid touching the surface with any hard or sharp object. • Use a soft lint-free cloth instead of a tissue to disassemble or repair the monitor yourself. - 9 -
... reached by children. • Before connecting the monitor to the power outlet, make sure that the voltage rating of the power cable is compatible with the power specification in the country where you are located. • The power cord plug must be scratched, avoid touching the surface with any hard or sharp object. • Use a soft lint-free cloth instead of a tissue to disassemble or repair the monitor yourself. - 9 -
User Guide
Page 10
......14 Getting Started...16 Installing the Monitor Base 16 Adjusting the Viewing Angle 18 Installing a Wall-Mount Bracket (Optional 20 Making Connections...22 Using the Device...23 Turning the Power On/Off 23 Managing the Cables...24 User Comfort Recommendations 24 Selecting the Input Source 25 Operations...26 Quick Menu...26 Configure the Device Settings 31 Appendices...41 Specifications...41 Supported Timing List 42 Troubleshooting...43 Basic Care...44 Notes on USB Charging 44 GIGABYTE Service Information...
......14 Getting Started...16 Installing the Monitor Base 16 Adjusting the Viewing Angle 18 Installing a Wall-Mount Bracket (Optional 20 Making Connections...22 Using the Device...23 Turning the Power On/Off 23 Managing the Cables...24 User Comfort Recommendations 24 Selecting the Input Source 25 Operations...26 Quick Menu...26 Configure the Device Settings 31 Appendices...41 Specifications...41 Supported Timing List 42 Troubleshooting...43 Basic Care...44 Notes on USB Charging 44 GIGABYTE Service Information...

User Guide
Page 13
Monitor Monitor Base Stand Power Cable HDMI Cable USB Cable DP Cable Warranty Card Cable Holder Multilingual Installation Guide AORUS FI27Q-P Quick Start Guide Warranty Card Note: Please keep the packaging box and packing materials for future transportation of them is missing, please contact your packaging box. LCD Monitor User's Manual Package Contents The following items come with your local dealer. If any of the monitor. - 13 -
Monitor Monitor Base Stand Power Cable HDMI Cable USB Cable DP Cable Warranty Card Cable Holder Multilingual Installation Guide AORUS FI27Q-P Quick Start Guide Warranty Card Note: Please keep the packaging box and packing materials for future transportation of them is missing, please contact your packaging box. LCD Monitor User's Manual Package Contents The following items come with your local dealer. If any of the monitor. - 13 -

User Guide
Page 16
Align and slide the hooks of the screen. 3. Then attach the base onto the stand. - 16 - Place the monitor on the rear of the stand into the mounting slots on the lower EPS foam, with the standoff underneath the stand. Align the monitor base with the screen facing down. 2. LCD Monitor User's Manual GETTING STARTED Installing the Monitor Base 1.
Align and slide the hooks of the screen. 3. Then attach the base onto the stand. - 16 - Place the monitor on the rear of the stand into the mounting slots on the lower EPS foam, with the standoff underneath the stand. Align the monitor base with the screen facing down. 2. LCD Monitor User's Manual GETTING STARTED Installing the Monitor Base 1.

User Guide
Page 19
LCD Monitor User's Manual Changing the Screen Orientation 1. Rotate the monitor (90˚ clockwise) to the highest position (130mm). 130 mm 2. Raise the screen to portrait orientation. 90° - 19 -
LCD Monitor User's Manual Changing the Screen Orientation 1. Rotate the monitor (90˚ clockwise) to the highest position (130mm). 130 mm 2. Raise the screen to portrait orientation. 90° - 19 -

User Guide
Page 20
Pull down . 2. Then remove the stand. - 20 - Place the monitor on the lower EPS foam, with the screen facing down the stand slightly to detach the stand from the monitor. 3. LCD Monitor User's Manual Installing a Wall-Mount Bracket (Optional) Use only the 100 x 100 mm wall mount kit recommended by the manufacturer. 1. Push the locking clips inward to disengage the hooks.
Pull down . 2. Then remove the stand. - 20 - Place the monitor on the lower EPS foam, with the screen facing down the stand slightly to detach the stand from the monitor. 3. LCD Monitor User's Manual Installing a Wall-Mount Bracket (Optional) Use only the 100 x 100 mm wall mount kit recommended by the manufacturer. 1. Push the locking clips inward to disengage the hooks.

User Guide
Page 23
... power cable to a power outlet. 3. Connect other end of the monitor. 2. The Power LED will light in the Settings menu. Note: If the Power LED remains off after you can also turn off the monitor. Note: When the Main menu appears on the monitor. Refer to page 28. - 23 - LCD Monitor User's Manual USING THE DEVICE Turning the Power On/Off Power On 1. Power Off Press the Control button for 2 seconds to turn on the monitor, please check the LED Indicator setting...
... power cable to a power outlet. 3. Connect other end of the monitor. 2. The Power LED will light in the Settings menu. Note: If the Power LED remains off after you can also turn off the monitor. Note: When the Main menu appears on the monitor. Refer to page 28. - 23 - LCD Monitor User's Manual USING THE DEVICE Turning the Power On/Off Power On 1. Power Off Press the Control button for 2 seconds to turn on the monitor, please check the LED Indicator setting...
User Guide
Page 31
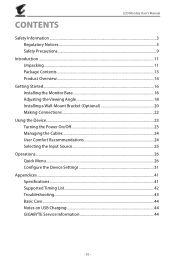
... under the following conditions: - Exit Move/Adjust Enter/Confirm Button Guide Gaming Configure the game related settings. Note: This function is activated. - 31 - Note: Use the Control button to enter t0he Settings menu. Balance 60 HZ ON r er 2.0 tion e LCD Monitor User's Manual Picture Mode Standard Configure the Device Settings When the Main menu appears on the screen, move the Control button up ( ) to navigate through the menu and make adjustments.
... under the following conditions: - Exit Move/Adjust Enter/Confirm Button Guide Gaming Configure the game related settings. Note: This function is activated. - 31 - Note: Use the Control button to enter t0he Settings menu. Balance 60 HZ ON r er 2.0 tion e LCD Monitor User's Manual Picture Mode Standard Configure the Device Settings When the Main menu appears on the screen, move the Control button up ( ) to navigate through the menu and make adjustments.
User Guide
Page 33
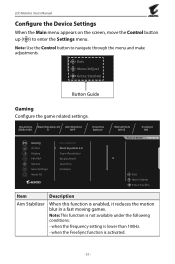
LCD Monitor User's Manual Picture Configure the image related settings. Then you can configure the following image settings. Contrast Adjust the contrast of the image. Normal Brightness Contrast Color Vibrance Sharpness Gamma Color Temp. Sharpness Adjust the sharpness of the image. HDR OFF Brightness 80 Contrast 50 Gaming Picture Display PIP/PBP System Save Settings Reset All Standard AORUS FPS RTS/RPG Movie Reader sRGB Sharpness 5 Gamma Gamma 3 Color Temp. Gamma Adjust the middle level of the preset picture mode. • Standard...
LCD Monitor User's Manual Picture Configure the image related settings. Then you can configure the following image settings. Contrast Adjust the contrast of the image. Normal Brightness Contrast Color Vibrance Sharpness Gamma Color Temp. Sharpness Adjust the sharpness of the image. HDR OFF Brightness 80 Contrast 50 Gaming Picture Display PIP/PBP System Save Settings Reset All Standard AORUS FPS RTS/RPG Movie Reader sRGB Sharpness 5 Gamma Gamma 3 Color Temp. Gamma Adjust the middle level of the preset picture mode. • Standard...

User Guide
Page 34
Reset Picture Reset all Picture settings to achieve the optimum contrast. Dynamic Contrast Adjust the black level of the image to the default settings. - 34 - Low Blue Light Reduce the amount of the selected mode with its default settings will be reduced. It is optimized setting. LCD Monitor User's Manual Item Description Color Temperature Select the color temperature. Senseye Demo Split the screen in half (2 windows). Note: Level 10 is compliance with the new settings will appear on the...
Reset Picture Reset all Picture settings to achieve the optimum contrast. Dynamic Contrast Adjust the black level of the image to the default settings. - 34 - Low Blue Light Reduce the amount of the selected mode with its default settings will be reduced. It is optimized setting. LCD Monitor User's Manual Item Description Color Temperature Select the color temperature. Senseye Demo Split the screen in half (2 windows). Note: Level 10 is compliance with the new settings will appear on the...
User Guide
Page 35
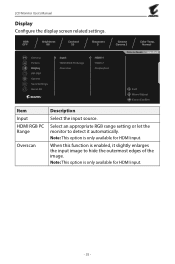
... for HDMI input. LCD Monitor User's Manual Display Configure the display screen related settings. Note: This option is enabled, it slightly enlarges the input image to detect it automatically. HDR OFF Brightness 80 Contrast 50 Gaming Picture Display PIP/PBP System Save Settings Reset All Input HDMI RGB PC Range Overscan Sharpness 5 HDMI 1 HDMI 2 DisplayPort Gamma Gamma 3 Color Temp. Select an appropriate RGB range setting or let the monitor to hide the outermost edges of the image. Normal Picture Mode Standard Exit Move/Adjust...
... for HDMI input. LCD Monitor User's Manual Display Configure the display screen related settings. Note: This option is enabled, it slightly enlarges the input image to detect it automatically. HDR OFF Brightness 80 Contrast 50 Gaming Picture Display PIP/PBP System Save Settings Reset All Input HDMI RGB PC Range Overscan Sharpness 5 HDMI 1 HDMI 2 DisplayPort Gamma Gamma 3 Color Temp. Select an appropriate RGB range setting or let the monitor to hide the outermost edges of the image. Normal Picture Mode Standard Exit Move/Adjust...

User Guide
Page 36
... inset window position. • Display Switch: Swap the two windows. • Audio Switch: Select which audio source you want to hear the sound from . PIP/PBP Configure the multi-picture related settings. Normal Picture Mode Standard Exit Move/Adjust Enter/Confirm Item Description OFF Disable the PIP/PBP function. Note: PIP/PBP is not compatible with HDR and FreeSync functions. - 36 - LCD Monitor User's Manual HDR OFF Brightness 80 Contrast 50...
... inset window position. • Display Switch: Swap the two windows. • Audio Switch: Select which audio source you want to hear the sound from . PIP/PBP Configure the multi-picture related settings. Normal Picture Mode Standard Exit Move/Adjust Enter/Confirm Item Description OFF Disable the PIP/PBP function. Note: PIP/PBP is not compatible with HDR and FreeSync functions. - 36 - LCD Monitor User's Manual HDR OFF Brightness 80 Contrast 50...

User Guide
Page 37
..., select Yes to unlock OSD. HDR OFF Brightness 80 Contrast 50 Gaming Picture Display PIP/PBP System Save Settings Reset All Language RGB LED Headphone OSD Setting Quick Switch Other Settings Sharpness 5 English Deutsch Français Gamma Gamma 3 Color Temp. LCD Monitor User's Manual System Configure the system related settings. Normal Picture Mode Standard Exit Move/Adjust Enter/Confirm Item Language RGB LED Headphone OSD Settings Description Select an available language for the OSD menu. Configure the headphone settings. • Volume: Adjust the volume level. •...
..., select Yes to unlock OSD. HDR OFF Brightness 80 Contrast 50 Gaming Picture Display PIP/PBP System Save Settings Reset All Language RGB LED Headphone OSD Setting Quick Switch Other Settings Sharpness 5 English Deutsch Français Gamma Gamma 3 Color Temp. LCD Monitor User's Manual System Configure the system related settings. Normal Picture Mode Standard Exit Move/Adjust Enter/Confirm Item Language RGB LED Headphone OSD Settings Description Select an available language for the OSD menu. Configure the headphone settings. • Volume: Adjust the volume level. •...

User Guide
Page 38
... power supply is enabled, it automatically switches to ON. LCD Monitor User's Manual Item Quick Switch Description Assign the function of time. • LED Indicator: By default, the LED indicator is set to an available input source. • Auto Power OFF: When this function is switched off, the Power LED will automatically turn off after a certain amount of the hot keys. Available options: Aim Stabilizer, Black Equalizer 2.0, Low Blue Light, Volume, Input, Contrast, Brightness, and Picture Mode. DD Friendly: The Power LED lights...
... power supply is enabled, it automatically switches to ON. LCD Monitor User's Manual Item Quick Switch Description Assign the function of time. • LED Indicator: By default, the LED indicator is set to an available input source. • Auto Power OFF: When this function is switched off, the Power LED will automatically turn off after a certain amount of the hot keys. Available options: Aim Stabilizer, Black Equalizer 2.0, Low Blue Light, Volume, Input, Contrast, Brightness, and Picture Mode. DD Friendly: The Power LED lights...
User Guide
Page 39
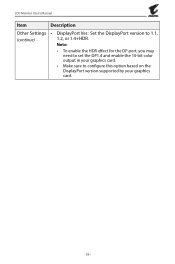
LCD Monitor User's Manual Item Description Other Settings • DisplayPort Ver.: Set the DisplayPort version to 1.1, (continue) 1.2, or 1.4+HDR. Note: • To enable the HDR effect for the DP port, you may need to set the DP1.4 and enable the 10-bit color output in your graphics card. • Make sure to configure this option based on the DisplayPort version supported by your graphics card. - 39 -
LCD Monitor User's Manual Item Description Other Settings • DisplayPort Ver.: Set the DisplayPort version to 1.1, (continue) 1.2, or 1.4+HDR. Note: • To enable the HDR effect for the DP port, you may need to set the DP1.4 and enable the 10-bit color output in your graphics card. • Make sure to configure this option based on the DisplayPort version supported by your graphics card. - 39 -
User Guide
Page 40
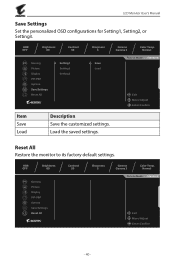
HDR OFF Brightness 80 Gaming Picture Display PIP/PBP System Save Settings Reset All Contrast 50 Sharpness 5 Gamma Gamma 3 Color Temp. HDR OFF Brightness 80 Contrast 50 Gaming Picture Display PIP/PBP System Save Settings Reset All Setting1 Setting2 Setting3 Sharpness 5 Save Load Gamma Gamma 3 Color Temp. Load the saved settings. Normal Picture Mode Standard Exit Move/Adjust Enter/Confirm - 40 - Reset All Restore the monitor to its factory default settings. LCD Monitor User's Manual Save Settings Set the personalized OSD configurations for Setting1...
HDR OFF Brightness 80 Gaming Picture Display PIP/PBP System Save Settings Reset All Contrast 50 Sharpness 5 Gamma Gamma 3 Color Temp. HDR OFF Brightness 80 Contrast 50 Gaming Picture Display PIP/PBP System Save Settings Reset All Setting1 Setting2 Setting3 Sharpness 5 Save Load Gamma Gamma 3 Color Temp. Load the saved settings. Normal Picture Mode Standard Exit Move/Adjust Enter/Confirm - 40 - Reset All Restore the monitor to its factory default settings. LCD Monitor User's Manual Save Settings Set the personalized OSD configurations for Setting1...

User Guide
Page 41
LCD Monitor User's Manual APPENDICES Specifications Item Specifications Panel Size 27-inch Aspect Ratio 16:9 Resolution 2560 x 1440 Refresh Rate 165Hz LED Life 30000 hours (min.) Pixel Pitch 0.233 x 0.233 Response Time 1ms (MPRT) Brightness 350nits (typ.) / 280nits (min.) Contrast Ratio 1000:1 (typ.) Dynamic Contrast Ratio 12M:1 (typ.) Color Depth 1.073G Active Display Area 596.736(H) x 335.664(V) Viewing Angle 178°(H) / 178°(V) Frequency 48~165Hz (gaming mode) Input/Output Terminals 2x HDMI 2.0 1x...
LCD Monitor User's Manual APPENDICES Specifications Item Specifications Panel Size 27-inch Aspect Ratio 16:9 Resolution 2560 x 1440 Refresh Rate 165Hz LED Life 30000 hours (min.) Pixel Pitch 0.233 x 0.233 Response Time 1ms (MPRT) Brightness 350nits (typ.) / 280nits (min.) Contrast Ratio 1000:1 (typ.) Dynamic Contrast Ratio 12M:1 (typ.) Color Depth 1.073G Active Display Area 596.736(H) x 335.664(V) Viewing Angle 178°(H) / 178°(V) Frequency 48~165Hz (gaming mode) Input/Output Terminals 2x HDMI 2.0 1x...
User Guide
Page 43
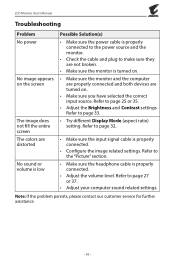
... devices are turned on. • Make sure you have selected the correct input source. LCD Monitor User's Manual Troubleshooting Problem No power No image appears on the screen The image does not fill the entire screen The colors are distorted No sound or volume is low Possible Solution(s) • Make sure the power cable is properly connected to the power source and the monitor. • Check the cable and plug to page 25 or 35. • Adjust the Brightness and Contrast settings.
... devices are turned on. • Make sure you have selected the correct input source. LCD Monitor User's Manual Troubleshooting Problem No power No image appears on the screen The image does not fill the entire screen The colors are distorted No sound or volume is low Possible Solution(s) • Make sure the power cable is properly connected to the power source and the monitor. • Check the cable and plug to page 25 or 35. • Adjust the Brightness and Contrast settings.

User Guide
Page 44
LCD Monitor User's Manual Basic Care When the screen becomes dirty, do the following devices are not compatible with BC 1.2 of CDP mode. Note: • Make sure that the cloth is connected to remove any residual dust. • Spray or apply the cleaning fluid onto a soft cloth. When the Hub is damp, but not wet. • When wiping, avoid applying excessive pressure...
LCD Monitor User's Manual Basic Care When the screen becomes dirty, do the following devices are not compatible with BC 1.2 of CDP mode. Note: • Make sure that the cloth is connected to remove any residual dust. • Spray or apply the cleaning fluid onto a soft cloth. When the Hub is damp, but not wet. • When wiping, avoid applying excessive pressure...

