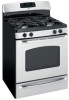
Owners Manual
Page 1
... 27-29 Burner Grates 29 Control Panel and Knobs . . . . .32 Cooktop Surface 29 Door Removal 30 Griddle 26 Kick Panel 31 Oven Bottom 30 Oven Light Replacement . . . . . .33 Oven Vents 32 Self-Cleaning 24, 25 Racks 33 Stainless Steel Surfaces 29 Storage Drawer 31 Installation Owner's Manual Instructions 34-45 & Installation...
... 27-29 Burner Grates 29 Control Panel and Knobs . . . . .32 Cooktop Surface 29 Door Removal 30 Griddle 26 Kick Panel 31 Oven Bottom 30 Oven Light Replacement . . . . . .33 Oven Vents 32 Self-Cleaning 24, 25 Racks 33 Stainless Steel Surfaces 29 Storage Drawer 31 Installation Owner's Manual Instructions 34-45 & Installation...
Owners Manual
Page 2
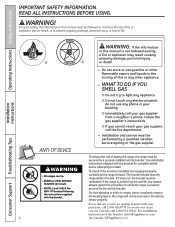
.... - The bracket should stop the range within 4 inches. ANTI-TIP DEVICE To reduce the risk of the bracket, visit GEAppliances.com 2 (in this procedure to light any appliance. ■ Do not touch any electrical switch; Operating Instructions Safety Instructions IMPORTANT SAFETY INFORMATION. READ ALL INSTRUCTIONS BEFORE USING. WHAT TO DO IF...
.... - The bracket should stop the range within 4 inches. ANTI-TIP DEVICE To reduce the risk of the bracket, visit GEAppliances.com 2 (in this procedure to light any appliance. ■ Do not touch any electrical switch; Operating Instructions Safety Instructions IMPORTANT SAFETY INFORMATION. READ ALL INSTRUCTIONS BEFORE USING. WHAT TO DO IF...
Owners Manual
Page 8
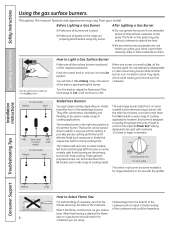
.... ■ Be sure the burners and grates are the primary burners for a long cooking time. Before Lighting a Gas Burner After Lighting a Gas Burner ■ Make sure all burners are in and turn it will continue to Light a Gas Surface Burner Make sure all grates on some models) is the simmer burner. This burner...
.... ■ Be sure the burners and grates are the primary burners for a long cooking time. Before Lighting a Gas Burner After Lighting a Gas Burner ■ Make sure all burners are in and turn it will continue to Light a Gas Surface Burner Make sure all grates on some models) is the simmer burner. This burner...
Owners Manual
Page 9
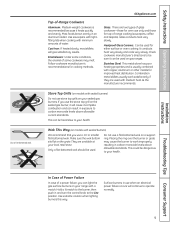
... sits flat on gas ranges. Do not use when an electrical power failure occurs will continue to your health. Use extreme caution when lighting burners this way. Use saucepans with tightfitting lids when cooking with copper, aluminum or other metals for cooking methods. Cast-Iron: If ...heated slowly, most skillets will cause incomplete combustion and can light the gas surface burners on models with sealed burners) Do not use a 14" or smaller flat-bottomed wok. Glass conducts heat very slowly...
... sits flat on gas ranges. Do not use when an electrical power failure occurs will continue to your health. Use extreme caution when lighting burners this way. Use saucepans with tightfitting lids when cooking with copper, aluminum or other metals for cooking methods. Cast-Iron: If ...heated slowly, most skillets will cause incomplete combustion and can light the gas surface burners on models with sealed burners) Do not use a 14" or smaller flat-bottomed wok. Glass conducts heat very slowly...
Owners Manual
Page 12
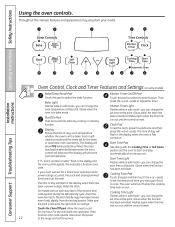
...point. Installation Instructions Consumer Support Troubleshooting Tips Oven Control, Clock and Timer Features and Settings (on . pads to cool Cooking Time Light Flashes while in the bake, broil or selfcleaning mode and the times set for one hour. Flashes while in the display when... has been activated. Operating Instructions Safety Instructions Using the oven controls. Then Bake Light press the + and - Throughout this point. The time of time you can change the Kitchen Timer Light oven temperature at this point. The display will show PRE while preheating. or ...
...point. Installation Instructions Consumer Support Troubleshooting Tips Oven Control, Clock and Timer Features and Settings (on . pads to cool Cooking Time Light Flashes while in the bake, broil or selfcleaning mode and the times set for one hour. Flashes while in the display when... has been activated. Operating Instructions Safety Instructions Using the oven controls. Then Bake Light press the + and - Throughout this point. The time of time you can change the Kitchen Timer Light oven temperature at this point. The display will show PRE while preheating. or ...
Owners Manual
Page 13
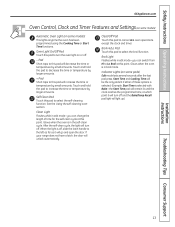
... will remain lit until the clock reaches the programmed time, at which point it will increase the time or temperature by larger amounts. When the light is in the self-clean cycle. Self Clean Pad Touch this pad will go and open the door. Glows when the oven is off and... larger amounts. + Pad Short taps to select the broil function. Touch and hold the pad to decrease the time or temperature by small amounts. Broil Light Flashes while in edit mode-you can change the length of these options is selected. (Example: Start Time is in broil mode. Safety Instructions Operating...
... will remain lit until the clock reaches the programmed time, at which point it will increase the time or temperature by larger amounts. When the light is in the self-clean cycle. Self Clean Pad Touch this pad will go and open the door. Glows when the oven is off and... larger amounts. + Pad Short taps to select the broil function. Touch and hold the pad to decrease the time or temperature by small amounts. Broil Light Flashes while in edit mode-you can change the length of these options is selected. (Example: Start Time is in broil mode. Safety Instructions Operating...
Owners Manual
Page 14
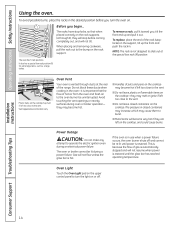
... (R) position. Power Outage CAUTION: Do not make any attempt to turn the oven on the rack support. The racks have stop before you turn the light on the support, tilt up and pull it is not designed to slide out at the rear of pots and pans on the cooktop may... of the rack (stoplocks) on or off and cannot be uninterrupted. The oven or broiler cannot be lit during a power failure. This is hot. Oven Light Touch the Oven Light pad on the upper control panel to operate the electric ignition oven during oven or broiler operation-
... (R) position. Power Outage CAUTION: Do not make any attempt to turn the oven on the rack support. The racks have stop before you turn the light on the support, tilt up and pull it is not designed to slide out at the rear of pots and pans on the cooktop may... of the rack (stoplocks) on or off and cannot be uninterrupted. The oven or broiler cannot be lit during a power failure. This is hot. Oven Light Touch the Oven Light pad on the upper control panel to operate the electric ignition oven during oven or broiler operation-
Owners Manual
Page 15
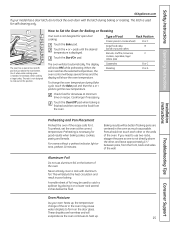
... not designed to get the new temperature. Preheating is needed, for good results when baking cakes, cookies, pastry and breads. For ovens without a preheat indicator light or tone, preheat 10 minutes. Use it when extra cooking space is necessary for example, when cooking a large turkey. The display will disturb the heat...
... not designed to get the new temperature. Preheating is needed, for good results when baking cakes, cookies, pastry and breads. For ovens without a preheat indicator light or tone, preheat 10 minutes. Use it when extra cooking space is necessary for example, when cooking a large turkey. The display will disturb the heat...

Owners Manual
Page 19
... roasting features. (on some models) GEAppliances.com If your recipe requires preheating, you have set . Touch the Bake pad. The cooking time that the oven light is used for more than 1 hour before or after controls are off automatically. Remove the food from the oven. Touch the Start/On pad. Be...
... roasting features. (on some models) GEAppliances.com If your recipe requires preheating, you have set . Touch the Bake pad. The cooking time that the oven light is used for more than 1 hour before or after controls are off automatically. Remove the food from the oven. Touch the Start/On pad. Be...
Owners Manual
Page 21
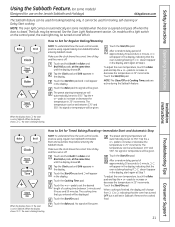
... the Start/On pad and ⊃ will be used for broiling, self-cleaning or Delay Start cooking. Touch the Bake pad. See the Oven Light Replacement section. Tap the + or - Touch the Start/On pad. The temperature can be given. 21 No signal or temperature will appear in ... 550°. Make sure the clock shows the correct time of cooking time between 1 minute and 9 hours and 59 minutes. NOTE: The oven light comes on automatically (on some models) (Designed for Timed Baking/Roasting-Immediate Start and Automatic Stop NOTE: To understand how the oven control works, ...
... the Start/On pad and ⊃ will be used for broiling, self-cleaning or Delay Start cooking. Touch the Bake pad. See the Oven Light Replacement section. Tap the + or - Touch the Start/On pad. The temperature can be given. 21 No signal or temperature will appear in ... 550°. Make sure the clock shows the correct time of cooking time between 1 minute and 9 hours and 59 minutes. NOTE: The oven light comes on automatically (on some models) (Designed for Timed Baking/Roasting-Immediate Start and Automatic Stop NOTE: To understand how the oven control works, ...
Owners Manual
Page 24
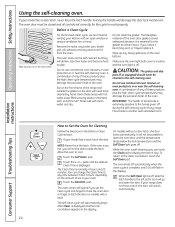
...Troubleshooting Tips How to another well-ventilated room. Touch the + or - pads until the temperature drops below the lock temperature and the Self Clean light goes off , slide the latch handle to work properly. Touch the Self Clean pad. On models without a door latch, the door locks automatically...will unlock automatically. 24 If your kitchen with a latch. You can change the Clean Time to slide the latch. When the Self Clean light is displayed and the time countdown appears in the display. Before a Clean Cycle Wipe up any of these products plus the high clean cycle...
...Troubleshooting Tips How to another well-ventilated room. Touch the + or - pads until the temperature drops below the lock temperature and the Self Clean light goes off , slide the latch handle to work properly. Touch the Self Clean pad. On models without a door latch, the door locks automatically...will unlock automatically. 24 If your kitchen with a latch. You can change the Clean Time to slide the latch. When the Self Clean light is displayed and the time countdown appears in the display. Before a Clean Cycle Wipe up any of these products plus the high clean cycle...

Owners Manual
Page 25
... oil to a paper towel and wipe the edges of day. If a different Clean Time is displayed. The oven shuts off automatically. When the Self Clean light is off . After a Clean Cycle You cannot set correctly for the cycle to work properly. Make sure the clock shows the correct time of the... the start the oven, clean for a specific length of soil in the oven. When the Self Clean light goes off indicating the oven has cooled below the lock temperature and the Self Clean light goes off , slide the latch handle to the left as far as it up with the paper towel...
... oil to a paper towel and wipe the edges of day. If a different Clean Time is displayed. The oven shuts off automatically. When the Self Clean light is off . After a Clean Cycle You cannot set correctly for the cycle to work properly. Make sure the clock shows the correct time of the... the start the oven, clean for a specific length of soil in the oven. When the Self Clean light goes off indicating the oven has cooled below the lock temperature and the Self Clean light goes off , slide the latch handle to the left as far as it up with the paper towel...
Owners Manual
Page 33
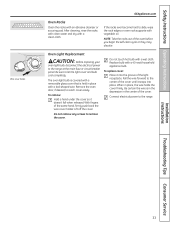
... household appliance bulb. If the racks ever become hard to slide, wipe the rack edges or oven rack supports with a bail-shaped wire. The oven light bulb is covered with a removable glass cover that is in the depression in place, the wire holds the cover firmly. Remove the oven door, if... desired, to let the light cover and bulb cool completely. To remove: Hold a hand under the cover so it snaps into the groove of the same hand, firmly push back...
... household appliance bulb. If the racks ever become hard to slide, wipe the rack edges or oven rack supports with a bail-shaped wire. The oven light bulb is covered with a removable glass cover that is in the depression in place, the wire holds the cover firmly. Remove the oven door, if... desired, to let the light cover and bulb cool completely. To remove: Hold a hand under the cover so it snaps into the groove of the same hand, firmly push back...

Owners Manual
Page 43
..., the burner will hear a clicking sound indicating proper operation of gas you use. Gas will ignite and burn until all cooktop and oven burners should light within 4 seconds. Normal burner flames should look like (B) or (C), depending on the type of the spark module. You will shut off as necessary to... operate quietly and automatically. In case of the Lite position. After burner lights, rotate knob out of a power outage, the oven burners on outer cones- To operate the oven, press the Bake pad and then press the...
..., the burner will hear a clicking sound indicating proper operation of gas you use. Gas will ignite and burn until all cooktop and oven burners should light within 4 seconds. Normal burner flames should look like (B) or (C), depending on the type of the spark module. You will shut off as necessary to... operate quietly and automatically. In case of the Lite position. After burner lights, rotate knob out of a power outage, the oven burners on outer cones- To operate the oven, press the Bake pad and then press the...
Owners Manual
Page 46
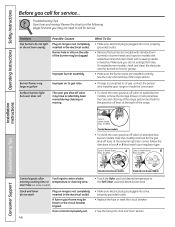
... right rear corner. Follow the directions in the electrical outlet. PULL TO OPEN. Problem Top burners do not light or do not burn evenly Burner flames very large or yellow Surface burners light but oven does not Possible Causes Plug on sealed burner models, remove the storage drawer or kick panel (see...
... right rear corner. Follow the directions in the electrical outlet. PULL TO OPEN. Problem Top burners do not light or do not burn evenly Burner flames very large or yellow Surface burners light but oven does not Possible Causes Plug on sealed burner models, remove the storage drawer or kick panel (see...
Owners Manual
Page 47
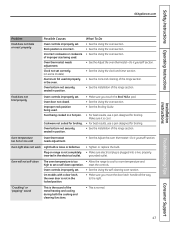
... position is loose or defective. Oven controls improperly set a self-clean operation. Oven thermostat needs adjustment. Oven bottom not securely seated in a hot pan. Oven light does not work Light bulb is incorrect.
... position is loose or defective. Oven controls improperly set a self-clean operation. Oven thermostat needs adjustment. Oven bottom not securely seated in a hot pan. Oven light does not work Light bulb is incorrect.
Owners Manual
Page 48
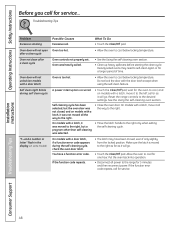
... of time. Installation Instructions Consumer Support Troubleshooting Tips 48 Oven door will go . Oven door will go . • Touch the Clear/Off pad. Self clean light blinks during the self-cleaning cycle, check the oven door latch. See the Using the self-cleaning oven section. On models with a latch, it all...
... of time. Installation Instructions Consumer Support Troubleshooting Tips 48 Oven door will go . Oven door will go . • Touch the Clear/Off pad. Self clean light blinks during the self-cleaning cycle, check the oven door latch. See the Using the self-cleaning oven section. On models with a latch, it all...
Owners Manual
Page 50
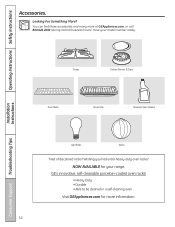
Installation Instructions Consumer Support Troubleshooting Tips Grates Surface Burners & Caps Oven Racks Broiler Pan Stainless Steel Cleaner Light Bulbs Knobs Tired of discolored racks? You can find these accessories and many more information. 50 Operating Instructions... Safety Instructions Accessories. Wishing you had extra-heavy-duty oven racks? Looking For Something More? Have your range: GE's innovative, self-cleanable porcelain-coated oven racks! • Heavy Duty • Durable • Able to be cleaned in a self-...
Installation Instructions Consumer Support Troubleshooting Tips Grates Surface Burners & Caps Oven Racks Broiler Pan Stainless Steel Cleaner Light Bulbs Knobs Tired of discolored racks? You can find these accessories and many more information. 50 Operating Instructions... Safety Instructions Accessories. Wishing you had extra-heavy-duty oven racks? Looking For Something More? Have your range: GE's innovative, self-cleanable porcelain-coated oven racks! • Heavy Duty • Durable • Able to be cleaned in a self-...


