Use and Care Manual
Page 2
...not touch the cold surfaces in . ■ Keep fingers out of this Owner's Manual. DANGER! Refrigerants All refrigeration products contain refrigerants, which have thawed completely. ■ In refrigerators with automatic icemakers, avoid contact with the moving parts of the ejector mechanism, or with the company ...that children may stick to do. If you are getting rid of the cord be properly installed and located in the refrigerator. If you are damp or wet. Skin may not easily climb inside. Consumer Support Troubleshooting Tips Installation Instructions Operating ...
...not touch the cold surfaces in . ■ Keep fingers out of this Owner's Manual. DANGER! Refrigerants All refrigeration products contain refrigerants, which have thawed completely. ■ In refrigerators with automatic icemakers, avoid contact with the moving parts of the ejector mechanism, or with the company ...that children may stick to do. If you are getting rid of the cord be properly installed and located in the refrigerator. If you are damp or wet. Skin may not easily climb inside. Consumer Support Troubleshooting Tips Installation Instructions Operating ...
Use and Care Manual
Page 3
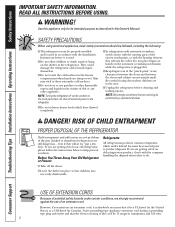
... plug firmly and pull straight out from the outlet. ■ Repair or replace immediately all power cords that have it is your refrigerator by pulling on the power cord. For personal safety, this appliance must be properly grounded. ■ The power cord of electric .... ■ Never unplug your personal responsibility and obligation to have become frayed or otherwise damaged. INSURE PROPER GROUND EXISTS BEFORE USE ■ The refrigerator should always be careful not to make sure the outlet is properly grounded. ■ If the outlet is a standard 2-prong outlet, it replaced...
... plug firmly and pull straight out from the outlet. ■ Repair or replace immediately all power cords that have it is your refrigerator by pulling on the power cord. For personal safety, this appliance must be properly grounded. ■ The power cord of electric .... ■ Never unplug your personal responsibility and obligation to have become frayed or otherwise damaged. INSURE PROPER GROUND EXISTS BEFORE USE ■ The refrigerator should always be careful not to make sure the outlet is properly grounded. ■ If the outlet is a standard 2-prong outlet, it replaced...
Use and Care Manual
Page 4
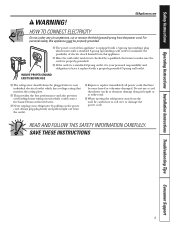
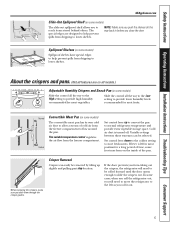
... ƒ ADJUSTABLE DOOR BINS DOOR BIN SNUGGERS Door Shelf ≈ LOWER FIXED DOOR BINS Make sure the bin fronts lock into position. Rearranging the Shelves Refrigerator Shelves: To Remove To Replace Freezer Pan: To Remove Freezer Shelves: To Remove Lift up and out Tilt up Insert top hook Lower to install...
... ƒ ADJUSTABLE DOOR BINS DOOR BIN SNUGGERS Door Shelf ≈ LOWER FIXED DOOR BINS Make sure the bin fronts lock into position. Rearranging the Shelves Refrigerator Shelves: To Remove To Replace Freezer Pan: To Remove Freezer Shelves: To Remove Lift up and out Tilt up Insert top hook Lower to install...
Use and Care Manual
Page 5
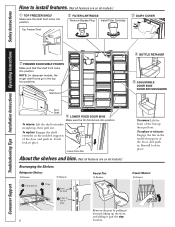
...provide high humidity setting to provide lower humidity levels recommended for a long period of cold air from taking out the crispers, the refrigerator will need to be rolled forward until the door opens enough to slide the crispers out. Crisper Removal Crispers can be removed ...by tilting up to convert the pan to normal refrigerator temperature and provide extra vegetable storage space. The variable temperature control regulates the air flow from dripping to lower shelves. Set control...
...provide high humidity setting to provide lower humidity levels recommended for a long period of cold air from taking out the crispers, the refrigerator will need to be rolled forward until the door opens enough to slide the crispers out. Crisper Removal Crispers can be removed ...by tilting up to convert the pan to normal refrigerator temperature and provide extra vegetable storage space. The variable temperature control regulates the air flow from dripping to lower shelves. Set control...

Use and Care Manual
Page 6
...If a change is the coldest setting. The temperature controls can display both the SET temperature as well as the actual temperature in the refrigerator and freezer compartments, first repeatedly press the Warmer pad for the temperature to stabilize to stabilize. If this film was not removed during ...vary based on the left side of the display. - The temperature controls are preset in both displays flash "0". NOTE: The refrigerator is shipped with Touch Pads: • Freezer setting is on personal preferences, usage and operating conditions and may require more than one adjustment....
...If a change is the coldest setting. The temperature controls can display both the SET temperature as well as the actual temperature in the refrigerator and freezer compartments, first repeatedly press the Warmer pad for the temperature to stabilize to stabilize. If this film was not removed during ...vary based on the left side of the display. - The temperature controls are preset in both displays flash "0". NOTE: The refrigerator is shipped with Touch Pads: • Freezer setting is on personal preferences, usage and operating conditions and may require more than one adjustment....
Use and Care Manual
Page 7
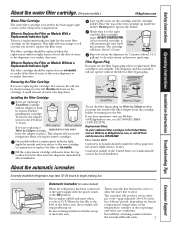
.... Filter Model MWF Customers in the United States, visit our Website at GEAppliances.com, or call GE Parts and Accessories, 800.626.2002. A newly-installed refrigerator may drip down on freezer compartment temperature, room temperature, number of water may take 12-24 hours...Safety Instructions Operating Instructions Installation Instructions Troubleshooting Tips Consumer Support About the water filter cartridge. (On some models) When the refrigerator has been connected to the water supply, slide the power switch to the water dispenser or icemaker decreases. About the automatic...
.... Filter Model MWF Customers in the United States, visit our Website at GEAppliances.com, or call GE Parts and Accessories, 800.626.2002. A newly-installed refrigerator may drip down on freezer compartment temperature, room temperature, number of water may take 12-24 hours...Safety Instructions Operating Instructions Installation Instructions Troubleshooting Tips Consumer Support About the water filter cartridge. (On some models) When the refrigerator has been connected to the water supply, slide the power switch to the water dispenser or icemaker decreases. About the automatic...

Use and Care Manual
Page 8
.... 8 To reduce water spotting, the shelf and its grille should be quick-chilled in the water line, throw away the first six glassfuls of the refrigerator for the specific icemaker kit needed for at extra cost. The light also comes on the door in the chute to the OFF position. Rotate... ice from missing the glass, put fingers or any other objects into place. Icemaker Accessory Kit If your model. Press the dispenser arm for your refrigerator did not come already equipped with a 6 watt maximum, 12 volt DC bulb. This condition is pressed. If no water is dispensed when the...
.... 8 To reduce water spotting, the shelf and its grille should be quick-chilled in the water line, throw away the first six glassfuls of the refrigerator for the specific icemaker kit needed for at extra cost. The light also comes on the door in the chute to the OFF position. Rotate... ice from missing the glass, put fingers or any other objects into place. Icemaker Accessory Kit If your model. Press the dispenser arm for your refrigerator did not come already equipped with a 6 watt maximum, 12 volt DC bulb. This condition is pressed. If no water is dispensed when the...
Use and Care Manual
Page 9
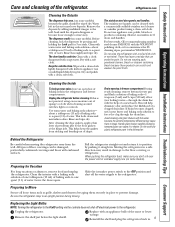
... practical, wring excess moisture out of hot (not boiling) water- Reinstall the shelf and plug the refrigerator back in the refrigerator and freezer compartments. Before cleaning, lock the dispenser by taping them to break. For best results, GE recommends using a clean, soft cloth. Cleaning the Inside To help prevent odors, leave an open...
... practical, wring excess moisture out of hot (not boiling) water- Reinstall the shelf and plug the refrigerator back in the refrigerator and freezer compartments. Before cleaning, lock the dispenser by taping them to break. For best results, GE recommends using a clean, soft cloth. Cleaning the Inside To help prevent odors, leave an open...
Use and Care Manual
Page 10
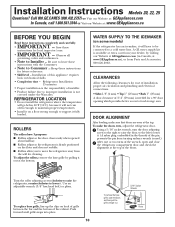
... at extra cost from your dealer, by pulling it out at www.GEAppliances.ca), or from Parts and Accessories, 800.626.2002. A GE water supply kit is not covered under the Warranty. Using a 5/16″ socket wrench, turn the door adjusting screw to the right... Installer - CLEARANCES Allow the following clearances for future reference. • Skill level - DOOR ALIGNMENT After leveling, make the doors even, adjust the refrigerator door. In Canada, call 1.800.561.3344 or Visit our Website at : GEAppliances.com Questions? Installation Instructions Models 20, 22, 25 Questions? ...
... at extra cost from your dealer, by pulling it out at www.GEAppliances.ca), or from Parts and Accessories, 800.626.2002. A GE water supply kit is not covered under the Warranty. Using a 5/16″ socket wrench, turn the door adjusting screw to the right... Installer - CLEARANCES Allow the following clearances for future reference. • Skill level - DOOR ALIGNMENT After leveling, make the doors even, adjust the refrigerator door. In Canada, call 1.800.561.3344 or Visit our Website at : GEAppliances.com Questions? Installation Instructions Models 20, 22, 25 Questions? ...
Use and Care Manual
Page 11
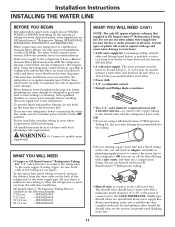
... supply. Before purchasing, make sure the icemaker power switch is not warranted by the refrigerator or icemaker manufacturer. Saddle-type shutoff valves are GE SmartConnect™ Refrigerator Tubing (WX08X10002, WX08X10006, WX08X10015 and WX08X10025). Install the shutoff valve on the amount ... used drinking water line. 11 For other plastic water supply line because the line is that supplied in GE SmartConnect™ Refrigerator Tubing kits. Installation Instructions INSTALLING THE WATER LINE BEFORE YOU BEGIN Recommended copper water supply kits are available ...
... supply. Before purchasing, make sure the icemaker power switch is not warranted by the refrigerator or icemaker manufacturer. Saddle-type shutoff valves are GE SmartConnect™ Refrigerator Tubing (WX08X10002, WX08X10006, WX08X10015 and WX08X10025). Install the shutoff valve on the amount ... used drinking water line. 11 For other plastic water supply line because the line is that supplied in GE SmartConnect™ Refrigerator Tubing kits. Installation Instructions INSTALLING THE WATER LINE BEFORE YOU BEGIN Recommended copper water supply kits are available ...
Use and Care Manual
Page 12
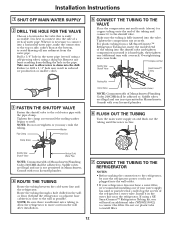
... the shutoff valve and tighten compression nut until it is best to swell. Remove any sediment from a GE SmartConnect™ Refrigerator Tubing kit, insert the molded end of the refrigerator's water valve. NOTE: Do not overtighten or you will need an additional tube (WX08X10002) to install ...(sleeve) NOTE: Commonwealth of the tubing and connect it in the water pipe (even if using a self-piercing valve) using a GE SmartConnect™ Refrigerator Tubing kit, you may cause leaks. If using a sharp bit. Do not cut plastic tube to connect the filter. Overtightening may crush...
... the shutoff valve and tighten compression nut until it is best to swell. Remove any sediment from a GE SmartConnect™ Refrigerator Tubing kit, insert the molded end of the refrigerator's water valve. NOTE: Do not overtighten or you will need an additional tube (WX08X10002) to install ...(sleeve) NOTE: Commonwealth of the tubing and connect it in the water pipe (even if using a self-piercing valve) using a GE SmartConnect™ Refrigerator Tubing kit, you may cause leaks. If using a sharp bit. Do not cut plastic tube to connect the filter. Overtightening may crush...
Use and Care Manual
Page 13
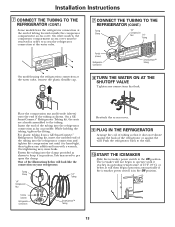
... and ferrule (sleeve) onto the end of the tubing as possible. For plastic tubing from a GE SmartConnect™ Refrigerator Tubing kit, insert the molded end of the tubing into the refrigerator connection and tighten the compression nut until it does not vibrate against the back of the... position. You may cause leaks. While holding the tubing, tighten the fitting. Fasten the tubing into the refrigerator connection as far as shown. On a GE SmartConnect™ Refrigerator Tubing kit, the nuts are already assembled to pry open the clamp. The icemaker will look like the ...
... and ferrule (sleeve) onto the end of the tubing as possible. For plastic tubing from a GE SmartConnect™ Refrigerator Tubing kit, insert the molded end of the tubing into the refrigerator connection and tighten the compression nut until it does not vibrate against the back of the... position. You may cause leaks. While holding the tubing, tighten the fitting. Fasten the tubing into the refrigerator connection as far as shown. On a GE SmartConnect™ Refrigerator Tubing kit, the nuts are already assembled to pry open the clamp. The icemaker will look like the ...
Use and Care Manual
Page 14
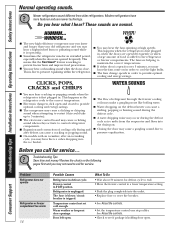
...setting. • Push the plug completely into the drain pan. ■ Closing the door may occur during the defrost cycle as the refrigerator cools to the correct temperature. ■ Electronic dampers click open for an extended period, especially when the doors are helping to maintain ...to restart (this could take up to 5 minutes). ■ The electronic control board may cause a clicking sound when relays activate to control refrigerator components. ■ Expansion and contraction of cooling coils during and after defrost can cause a cracking or popping sound. ■ On models with ...
...setting. • Push the plug completely into the drain pan. ■ Closing the door may occur during the defrost cycle as the refrigerator cools to the correct temperature. ■ Electronic dampers click open for an extended period, especially when the doors are helping to maintain ...to restart (this could take up to 5 minutes). ■ The electronic control board may cause a clicking sound when relays activate to control refrigerator components. ■ Expansion and contraction of cooling coils during and after defrost can cause a cracking or popping sound. ■ On models with ...
Use and Care Manual
Page 15
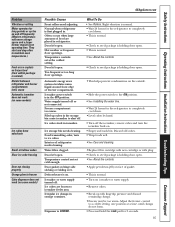
... time. Icemaker or water supply turned off or not connected. Automatic energy saver system circulates warm liquid around front edge of refrigerator needs cleaning. Ice storage bin needs cleaning. Interior of freezer compartment. Door gasket on hinge side sticking or folding over. ... Instructions Troubleshooting Tips Consumer Support Problem Vibration or rattling Motor operates for long periods or cycles on and off frequently. (Modern refrigerators with fingertip pressure and discard remaining clumps. •Freezer may be too warm. Too frequent or too long door openings....
... time. Icemaker or water supply turned off or not connected. Automatic energy saver system circulates warm liquid around front edge of refrigerator needs cleaning. Ice storage bin needs cleaning. Interior of freezer compartment. Door gasket on hinge side sticking or folding over. ... Instructions Troubleshooting Tips Consumer Support Problem Vibration or rattling Motor operates for long periods or cycles on and off frequently. (Modern refrigerators with fingertip pressure and discard remaining clumps. •Freezer may be too warm. Too frequent or too long door openings....

Use and Care Manual
Page 16
...Newly-installed filter cartridge. No power at least two minutes. • Press and hold the Lock pad for a long time. In the refrigeration process, it in the ON position but Crushed Ice was Crushed Ice. This is clogged. Water filter clogged. Water in system is first ...installed. Foods transmitting odor to refrigerator. Keeping it is frozen. What To Do •Dispense water until all water in reservoir is normal that heat be trapped in the...
...Newly-installed filter cartridge. No power at least two minutes. • Press and hold the Lock pad for a long time. In the refrigeration process, it in the ON position but Crushed Ice was Crushed Ice. This is clogged. Water filter clogged. Water in system is first ...installed. Foods transmitting odor to refrigerator. Keeping it is frozen. What To Do •Dispense water until all water in reservoir is normal that heat be trapped in the...
Use and Care Manual
Page 17
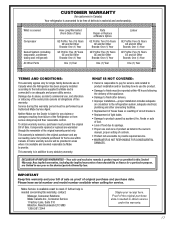
...appliance. • Damage to finish after delivery. • Improper installation-proper installation includes adequate air circulation to the refrigeration system, adequate electrical, plumbing and other connecting facilities. • Replacement of house fuses or resetting of circuit breakers. ...GE Profile: Five (5) Years GE and All Other Brands: One (1) Year GE Profile: Five (5) Years GE and All Other Brands: One (1) Year One (1) Year TERMS AND CONDITIONS: This warranty applies only for service calls related to product installation and/or teaching how to use in Canada when the Refrigerator...
...appliance. • Damage to finish after delivery. • Improper installation-proper installation includes adequate air circulation to the refrigeration system, adequate electrical, plumbing and other connecting facilities. • Replacement of house fuses or resetting of circuit breakers. ...GE Profile: Five (5) Years GE and All Other Brands: One (1) Year GE Profile: Five (5) Years GE and All Other Brands: One (1) Year One (1) Year TERMS AND CONDITIONS: This warranty applies only for service calls related to product installation and/or teaching how to use in Canada when the Refrigerator...
Use and Care Manual
Page 18
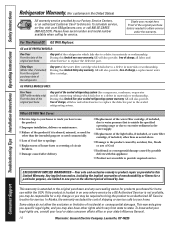
... Customer Care® technician. Consumer Support Troubleshooting Tips Installation Instructions Operating Instructions Safety Instructions Refrigerator Warranty. (For customers in the United States) All warranty service provided by a GE Authorized Servicer is not available, you may be responsible for a trip charge or you...model number available when calling for service. For The Period Of: GE Will Replace: GE and GE PROFILE MODELS: One Year From the date of the original purchase Any part of the sealed refrigerating system (the compressor, condenser, evaporator and all labor and related ...
... Customer Care® technician. Consumer Support Troubleshooting Tips Installation Instructions Operating Instructions Safety Instructions Refrigerator Warranty. (For customers in the United States) All warranty service provided by a GE Authorized Servicer is not available, you may be responsible for a trip charge or you...model number available when calling for service. For The Period Of: GE Will Replace: GE and GE PROFILE MODELS: One Year From the date of the original purchase Any part of the sealed refrigerating system (the compressor, condenser, evaporator and all labor and related ...


