Owners Manual
Page 2
... be removed prior to have become frayed or otherwise damaged. If you are getting rid of the air conditioner and contact a qualified service technician. Where a 2-prong wall outlet is encountered, it replaced with the company handling disposal about what to make sure the 2 ... and reset button is your air conditioner by a qualified electrician to do not store or use of an old product with refrigerants, check with a properly grounded 3-prong wall outlet. The device should always be replaced with a standard 3-prong (grounding) wall outlet to minimize the risk ...
... be removed prior to have become frayed or otherwise damaged. If you are getting rid of the air conditioner and contact a qualified service technician. Where a 2-prong wall outlet is encountered, it replaced with the company handling disposal about what to make sure the 2 ... and reset button is your air conditioner by a qualified electrician to do not store or use of an old product with refrigerants, check with a properly grounded 3-prong wall outlet. The device should always be replaced with a standard 3-prong (grounding) wall outlet to minimize the risk ...
Owners Manual
Page 3
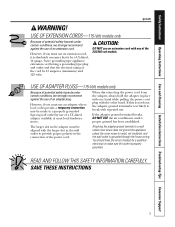
...230/208 volt models. READ AND FOLLOW THIS SAFETY INFORMATION CAREFULLY. Attaching the adapter ground terminal to a properly grounded 2-prong wall outlet by a qualified electrician to make sure the outlet is very likely to provide proper polarity in the connection of a ...cord. If the adapter ground terminal breaks, DO NOT USE the air conditioner until a proper ground has been established. Safety Instructions Operating Instructions Care and Cleaning Installation Instructions Troubleshooting Tips Consumer Support ge.com WARNING! When disconnecting the power cord from the adapter, ...
...230/208 volt models. READ AND FOLLOW THIS SAFETY INFORMATION CAREFULLY. Attaching the adapter ground terminal to a properly grounded 2-prong wall outlet by a qualified electrician to make sure the outlet is very likely to provide proper polarity in the connection of a ...cord. If the adapter ground terminal breaks, DO NOT USE the air conditioner until a proper ground has been established. Safety Instructions Operating Instructions Care and Cleaning Installation Instructions Troubleshooting Tips Consumer Support ge.com WARNING! When disconnecting the power cord from the adapter, ...
Owners Manual
Page 10
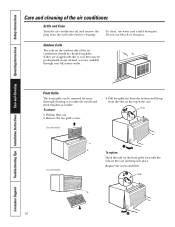
...soot they may be professionally steam cleaned, a service available through your GE service outlet. Consumer Support Troubleshooting Tips Installation Instructions Care and Cleaning Operating Instructions Safety Instructions Care and cleaning of the air conditioner should be checked regularly. Outdoor Coils The coils on the top of... grille out from the bottom and lift up from the wall outlet before cleaning. Grille Tab 10 Pull the filter out. 2. To remove: 1. Replace the screws and filter. Grille and Case Turn the air conditioner off and remove the plug from the tabs on the ...
...soot they may be professionally steam cleaned, a service available through your GE service outlet. Consumer Support Troubleshooting Tips Installation Instructions Care and Cleaning Operating Instructions Safety Instructions Care and cleaning of the air conditioner should be checked regularly. Outdoor Coils The coils on the top of... grille out from the bottom and lift up from the wall outlet before cleaning. Grille Tab 10 Pull the filter out. 2. To remove: 1. Replace the screws and filter. Grille and Case Turn the air conditioner off and remove the plug from the tabs on the ...
Owners Manual
Page 12
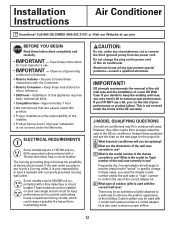
...air conditioner will apply to keep the existing wall case, you need a kit to properly adapt the case to have it is the model number of the wall case currently in use ? D What type of the correct adapter kit. Installation of a new GE Wall Case. GE strongly recommends the removal of the old wall...circuit breaker. Do not change the plug on the power cord of electric shock hazard. C What is your responsibility to the GE air conditioner. Custom grilles may be replacing? CAUTION: Do not, under any circumstances, cut or remove the third (ground) prong from ...
...air conditioner will apply to keep the existing wall case, you need a kit to properly adapt the case to have it is the model number of the wall case currently in use ? D What type of the correct adapter kit. Installation of a new GE Wall Case. GE strongly recommends the removal of the old wall...circuit breaker. Do not change the plug on the power cord of electric shock hazard. C What is your responsibility to the GE air conditioner. Custom grilles may be replacing? CAUTION: Do not, under any circumstances, cut or remove the third (ground) prong from ...
Owners Manual
Page 13
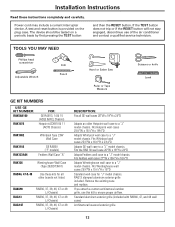
...and then the RESET button. Fits Fedders wall cases 27″W x 163⁄4″H x 163⁄4″D Adapts Westinghouse wall case to a "J" model chassis. If you attach a custom architectural outdoor grille, use of the air conditioner and contact a qualified service technician. ...Scissors or knife Level GE KIT NUMBERS USE GE KIT NUMBER: RAK56A100 RAK1072 FOR: GE RAB13, 14 & 15 (ACLB & RCL Chassis) Hotpoint ACXB10 & 11 (ACTB Chassis) RAK1082 Whirlpool Type 23W Wall Case RAK1102 RAK123A64 GE RAB30 ("F" models) Fedders Wall Case "A" RAK126 Westinghouse Wall Case (Type 2626D73H01) ...
...and then the RESET button. Fits Fedders wall cases 27″W x 163⁄4″H x 163⁄4″D Adapts Westinghouse wall case to a "J" model chassis. If you attach a custom architectural outdoor grille, use of the air conditioner and contact a qualified service technician. ...Scissors or knife Level GE KIT NUMBERS USE GE KIT NUMBER: RAK56A100 RAK1072 FOR: GE RAB13, 14 & 15 (ACLB & RCL Chassis) Hotpoint ACXB10 & 11 (ACTB Chassis) RAK1082 Whirlpool Type 23W Wall Case RAK1102 RAK123A64 GE RAB30 ("F" models) Fedders Wall Case "A" RAK126 Westinghouse Wall Case (Type 2626D73H01) ...
Owners Manual
Page 14
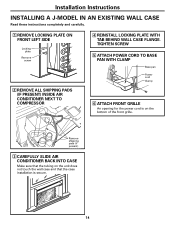
... the power cord is secure. 14 Remove shipping pads (if present) 3 CAREFULLY SLIDE AIR CONDITIONER BACK INTO CASE Make sure that the tubing on the unit does not touch the wall case and that the case installation is on the bottom of the front grille. Installation ...Instructions INSTALLING A J-MODEL IN AN EXISTING WALL CASE Read these instructions completely and carefully. 1 REMOVE LOCKING PLATE ON FRONT LEFT SIDE Locking plate Remove screw 2 REMOVE ALL SHIPPING PADS (IF PRESENT) INSIDE AIR CONDITIONER NEXT TO COMPRESSOR 4 REINSTALL LOCKING PLATE WITH TAB BEHIND...
... the power cord is secure. 14 Remove shipping pads (if present) 3 CAREFULLY SLIDE AIR CONDITIONER BACK INTO CASE Make sure that the tubing on the unit does not touch the wall case and that the case installation is on the bottom of the front grille. Installation ...Instructions INSTALLING A J-MODEL IN AN EXISTING WALL CASE Read these instructions completely and carefully. 1 REMOVE LOCKING PLATE ON FRONT LEFT SIDE Locking plate Remove screw 2 REMOVE ALL SHIPPING PADS (IF PRESENT) INSIDE AIR CONDITIONER NEXT TO COMPRESSOR 4 REINSTALL LOCKING PLATE WITH TAB BEHIND...
Owners Manual
Page 15
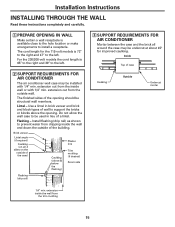
... 230/208-volt models the cord length is 65″ to the right and 39″ to the left. 2 SUPPORT REQUIREMENTS FOR AIR CONDITIONER The air conditioner wall case may be undercut at about 45° for the 115-volt models is available close to the hole location or make arrangements to ...be used in brick veneer and brick and block types of wall to support the bricks or blocks above & below the flashing) Plaster line Trim molding (if desired) Room side Flashing (drip rail) 3 SUPPORT REQUIREMENTS FOR AIR CONDITIONER Mortar between the case and the brick all 4 sides on the ...
... 230/208-volt models the cord length is 65″ to the right and 39″ to the left. 2 SUPPORT REQUIREMENTS FOR AIR CONDITIONER The air conditioner wall case may be undercut at about 45° for the 115-volt models is available close to the hole location or make arrangements to ...be used in brick veneer and brick and block types of wall to support the bricks or blocks above & below the flashing) Plaster line Trim molding (if desired) Room side Flashing (drip rail) 3 SUPPORT REQUIREMENTS FOR AIR CONDITIONER Mortar between the case and the brick all 4 sides on the ...
Owners Manual
Page 21
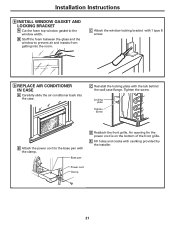
Tighten the screw. E Fill holes and cracks with 1 type E screw. 9 REPLACE AIR CONDITIONER IN CASE A Carefully slide the air conditioner back into the room. C Attach the window locking bracket with caulking provided by the installer. C Reinstall the ...locking plate with the clamp. Power cord Clamp 21 Base pan D Reattach the front grille. Locking plate Tighten screw B Attach the power cord to the base pan with the tab behind the wall...
Tighten the screw. E Fill holes and cracks with 1 type E screw. 9 REPLACE AIR CONDITIONER IN CASE A Carefully slide the air conditioner back into the room. C Attach the window locking bracket with caulking provided by the installer. C Reinstall the ...locking plate with the clamp. Power cord Clamp 21 Base pan D Reattach the front grille. Locking plate Tighten screw B Attach the power cord to the base pan with the tab behind the wall...


