
Owners Manual
Page 1
... of this product meets the ENERGY STAR® guidelines for energy efficiency. Air ConditionRoeorms ge.com Owner's Manual and Installation Instructions Safety Instructions 2, 3 Operating Instructions Controls-Control Knobs . . . . 8, 9 Controls-Touch Pads 4-6 Care and Cleaning Air Filter 11 Front Grille 10 Grille and Case 10 Outdoor Coils 10 Installation Instructions Before You Begin 12, 13 Installing a J-Model in an Existing Wall Case 14 Through-the-Wall Installation-Optional 15 Window Installation- Back Cover Warranty 23 *ENERGY STAR® labeled product Cool Only: AJCH...
... of this product meets the ENERGY STAR® guidelines for energy efficiency. Air ConditionRoeorms ge.com Owner's Manual and Installation Instructions Safety Instructions 2, 3 Operating Instructions Controls-Control Knobs . . . . 8, 9 Controls-Touch Pads 4-6 Care and Cleaning Air Filter 11 Front Grille 10 Grille and Case 10 Outdoor Coils 10 Installation Instructions Before You Begin 12, 13 Installing a J-Model in an Existing Wall Case 14 Through-the-Wall Installation-Optional 15 Window Installation- Back Cover Warranty 23 *ENERGY STAR® labeled product Cool Only: AJCH...
Owners Manual
Page 2
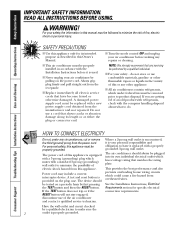
... and also prevents overloading house wiring circuits which mates with a new power supply cord obtained from the power cord. Consumer Support Troubleshooting Tips Installation Instructions Care and Cleaning Operating Instructions Safety Instructions IMPORTANT SAFETY INFORMATION. READ ALL INSTRUCTIONS BEFORE USING. For your personal responsibility and obligation to product disposal. SAFETY PRECAUTIONS I Replace immediately all electric service cords that any other flammable vapors or liquids in this Owner's Manual. Always grip plug firmly and pull straight...
... and also prevents overloading house wiring circuits which mates with a new power supply cord obtained from the power cord. Consumer Support Troubleshooting Tips Installation Instructions Care and Cleaning Operating Instructions Safety Instructions IMPORTANT SAFETY INFORMATION. READ ALL INSTRUCTIONS BEFORE USING. For your personal responsibility and obligation to product disposal. SAFETY PRECAUTIONS I Replace immediately all electric service cords that any other flammable vapors or liquids in this Owner's Manual. Always grip plug firmly and pull straight...
Owners Manual
Page 3
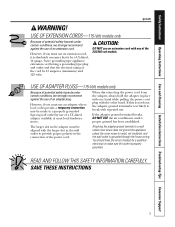
... INSTRUCTIONS 3 USE OF EXTENSION CORDS-115-Volt models only Because of potential safety hazards under certain conditions, we strongly recommend against the use an extension cord, it be aligned with the other hand. The larger slot in the wall outlet to break with any of an adapter plug. Safety Instructions Operating Instructions Care and Cleaning Installation Instructions Troubleshooting Tips Consumer Support ge.com WARNING! When disconnecting the power cord from the adapter...
... INSTRUCTIONS 3 USE OF EXTENSION CORDS-115-Volt models only Because of potential safety hazards under certain conditions, we strongly recommend against the use an extension cord, it be aligned with the other hand. The larger slot in the wall outlet to break with any of an adapter plug. Safety Instructions Operating Instructions Care and Cleaning Installation Instructions Troubleshooting Tips Consumer Support ge.com WARNING! When disconnecting the power cord from the adapter...
Owners Manual
Page 4
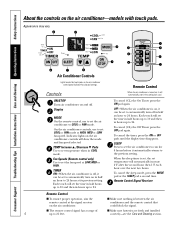
... set COOL or FAN mode at LOW, MED or HIGH. TIMER ON-When the air conditioner is turned on the air conditioner. To cancel the sleep mode, press the MODE pad or the SLEEP pad a second time. Display MODE On the remote control, use to set to automatically turn off , it automatically returns to 24. Each touch will set to automatically turn on , it will automatically start in hours up to the previous setting. Consumer Support Troubleshooting...
... set COOL or FAN mode at LOW, MED or HIGH. TIMER ON-When the air conditioner is turned on the air conditioner. To cancel the sleep mode, press the MODE pad or the SLEEP pad a second time. Display MODE On the remote control, use to set to automatically turn off , it automatically returns to 24. Each touch will set to automatically turn on , it will automatically start in hours up to the previous setting. Consumer Support Troubleshooting...

Owners Manual
Page 5
... set temperature. NOTE: If the air conditioner is off and is lit for the desired fan speed. 2. FAN MODE Use the FAN mode to direct the air left or right. 5 Safety Instructions Operating Instructions Care and Cleaning Installation Instructions Troubleshooting Tips Consumer Support ge.com COOL MODE Remote Control 1. Fan Switch The fan switch is located behind the front grille on the right side of comfort. To open or close the vent: 1. Access through a hole in card over and replace it will be displayed. Remove vent card, turn it...
... set temperature. NOTE: If the air conditioner is off and is lit for the desired fan speed. 2. FAN MODE Use the FAN mode to direct the air left or right. 5 Safety Instructions Operating Instructions Care and Cleaning Installation Instructions Troubleshooting Tips Consumer Support ge.com COOL MODE Remote Control 1. Fan Switch The fan switch is located behind the front grille on the right side of comfort. To open or close the vent: 1. Access through a hole in card over and replace it will be displayed. Remove vent card, turn it...
Owners Manual
Page 6
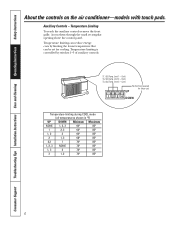
...° 2 1, 3 68° 85° 2,3 1 70° 85° 1, 2, 3 NONE 72° 85° 1, 3 2 74° 85° 3 1, 2 76° 85° 6 Cool) TL3 (C) (Temp. Limit 3 - TL1 (C) (Temp. Cool) TL2 (C) (Temp. Cool) No function (reserved for cooling. Limit 1 - Temperature Limiting To reach the auxiliary controls remove the front grille. Consumer Support Troubleshooting Tips Installation Instructions Care and Cleaning Operating Instructions Safety Instructions About the controls on the air conditioner-models with touch pads.
...° 2 1, 3 68° 85° 2,3 1 70° 85° 1, 2, 3 NONE 72° 85° 1, 3 2 74° 85° 3 1, 2 76° 85° 6 Cool) TL3 (C) (Temp. Limit 3 - TL1 (C) (Temp. Cool) TL2 (C) (Temp. Cool) No function (reserved for cooling. Limit 1 - Temperature Limiting To reach the auxiliary controls remove the front grille. Consumer Support Troubleshooting Tips Installation Instructions Care and Cleaning Operating Instructions Safety Instructions About the controls on the air conditioner-models with touch pads.
Owners Manual
Page 8
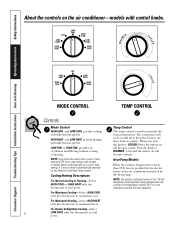
... Support Troubleshooting Tips Installation Instructions Care and Cleaning Operating Instructions Safety Instructions WARM About the controls on the Heat/Cool and Heat Pump models. Turn the knob to WARMER (red) and the indoor air will cycle on and off to keep the room at mid point. A 3-minute delay is automatically provided on the air conditioner-models with control knobs. NOTE: The electric resistance heater in the air conditioner instead of comfort. Temp Control The temp control is below 36°F. Cooling/Heating...
... Support Troubleshooting Tips Installation Instructions Care and Cleaning Operating Instructions Safety Instructions WARM About the controls on the Heat/Cool and Heat Pump models. Turn the knob to WARMER (red) and the indoor air will cycle on and off to keep the room at mid point. A 3-minute delay is automatically provided on the air conditioner-models with control knobs. NOTE: The electric resistance heater in the air conditioner instead of comfort. Temp Control The temp control is below 36°F. Cooling/Heating...
Owners Manual
Page 9
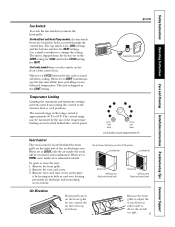
... when cooling. ge.com or (Depending on the front grille let you control the air direction up ) the fan runs all the time, providing a more balanced temperature. The unit is located behind the control panel. When set at front. Safety Instructions Operating Instructions Care and Cleaning Installation Instructions Troubleshooting Tips Consumer Support Fan Switch To reach the fan switch(es) remove the front grille. Remove the front grille. 2. Remove vent card, turn it over locating pin inside the room will be narrowed by locating rear hole in holes...
... when cooling. ge.com or (Depending on the front grille let you control the air direction up ) the fan runs all the time, providing a more balanced temperature. The unit is located behind the control panel. When set at front. Safety Instructions Operating Instructions Care and Cleaning Installation Instructions Troubleshooting Tips Consumer Support Fan Switch To reach the fan switch(es) remove the front grille. Remove the front grille. 2. Remove vent card, turn it over locating pin inside the room will be narrowed by locating rear hole in holes...
Owners Manual
Page 10
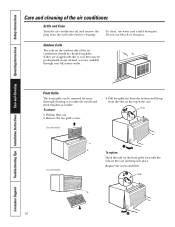
... air conditioner. Front Grille The front grille can be checked regularly. Replace the screws and filter. Do not use water and a mild detergent. Outdoor Coils The coils on the case and snap into place. On some models To replace: Hook the tabs on the top of the case. If they may be professionally steam cleaned, a service available through your GE service outlet. Consumer Support Troubleshooting Tips Installation Instructions Care and Cleaning Operating Instructions Safety Instructions...
... air conditioner. Front Grille The front grille can be checked regularly. Replace the screws and filter. Do not use water and a mild detergent. Outdoor Coils The coils on the case and snap into place. On some models To replace: Hook the tabs on the top of the case. If they may be professionally steam cleaned, a service available through your GE service outlet. Consumer Support Troubleshooting Tips Installation Instructions Care and Cleaning Operating Instructions Safety Instructions...
Owners Manual
Page 11
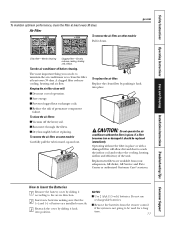
... direction. 2 Insert new batteries making sure that the (+) and (-) of operation. Safety Instructions Operating Instructions Care and Cleaning Installation Instructions Troubleshooting Tips Consumer Support To maintain optimum performance, clean the filter at least every 30 days. ge.com Dirty filter-Needs cleaning Clogged filter-Greatly reduces cooling, heating and airflow. To clean the air filters: I Reduce the risk of the unit. To remove the air filter, on other models: FRONT FRONT Pull it should be used for a long time. 11 Replacement filters...
... direction. 2 Insert new batteries making sure that the (+) and (-) of operation. Safety Instructions Operating Instructions Care and Cleaning Installation Instructions Troubleshooting Tips Consumer Support To maintain optimum performance, clean the filter at least every 30 days. ge.com Dirty filter-Needs cleaning Clogged filter-Greatly reduces cooling, heating and airflow. To clean the air filters: I Reduce the risk of the unit. To remove the air filter, on other models: FRONT FRONT Pull it should be used for a long time. 11 Replacement filters...
Owners Manual
Page 12
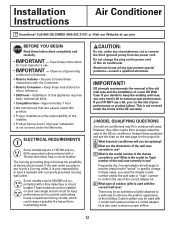
... installer. • Product failure due to have it replaced with J-model wall cases provided a J-model adapter kit is not covered under any circumstances, cut or remove the third (ground) prong from overheating wires. Aluminum house wiring may need a kit to properly adapt the case to Installer - J-MODEL QUALIFYING QUESTIONS J-model air conditioners may be replacing? B What are the dimensions of the correct adapter kit. In these instructions for future reference. • Skill level - D What type of outdoor grille...
... installer. • Product failure due to have it replaced with J-model wall cases provided a J-model adapter kit is not covered under any circumstances, cut or remove the third (ground) prong from overheating wires. Aluminum house wiring may need a kit to properly adapt the case to Installer - J-MODEL QUALIFYING QUESTIONS J-model air conditioners may be replacing? B What are the dimensions of the correct adapter kit. In these instructions for future reference. • Skill level - D What type of outdoor grille...
Owners Manual
Page 13
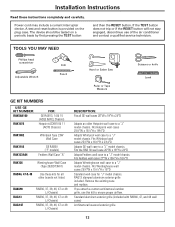
.... Installation Instructions Read these kits for "J" model chassis. RAG13 stamped aluminum exterior grille included. Standard aluminum exterior grille (included with RAB46, 47, and 48 wall cases) Architectural louvered exterior grille 13 If the TEST button does not trip or if the RESET button will not stay engaged, discontinue use this kit to a "J" model chassis. Remove the existing case and replace. If you attach a custom architectural outdoor grille, use of the air conditioner...
.... Installation Instructions Read these kits for "J" model chassis. RAG13 stamped aluminum exterior grille included. Standard aluminum exterior grille (included with RAB46, 47, and 48 wall cases) Architectural louvered exterior grille 13 If the TEST button does not trip or if the RESET button will not stay engaged, discontinue use this kit to a "J" model chassis. Remove the existing case and replace. If you attach a custom architectural outdoor grille, use of the air conditioner...
Owners Manual
Page 14
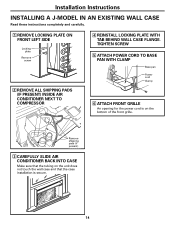
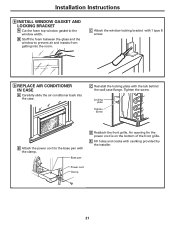
Installation Instructions INSTALLING A J-MODEL IN AN EXISTING WALL CASE Read these instructions completely and carefully. 1 REMOVE LOCKING PLATE ON FRONT LEFT SIDE Locking plate Remove screw 2 REMOVE ALL SHIPPING PADS (IF PRESENT) INSIDE AIR CONDITIONER NEXT TO COMPRESSOR 4 REINSTALL LOCKING PLATE WITH TAB BEHIND WALL CASE FLANGE. TIGHTEN SCREW 5 ATTACH POWER CORD TO BASE PAN WITH CLAMP Base pan Power cord Clamp 6 ATTACH FRONT GRILLE An opening for the power cord is secure...
Installation Instructions INSTALLING A J-MODEL IN AN EXISTING WALL CASE Read these instructions completely and carefully. 1 REMOVE LOCKING PLATE ON FRONT LEFT SIDE Locking plate Remove screw 2 REMOVE ALL SHIPPING PADS (IF PRESENT) INSIDE AIR CONDITIONER NEXT TO COMPRESSOR 4 REINSTALL LOCKING PLATE WITH TAB BEHIND WALL CASE FLANGE. TIGHTEN SCREW 5 ATTACH POWER CORD TO BASE PAN WITH CLAMP Base pan Power cord Clamp 6 ATTACH FRONT GRILLE An opening for the power cord is secure...
Owners Manual
Page 15
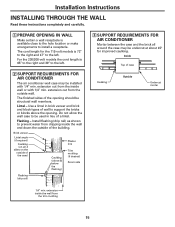
... the 115-volt models is available close to the hole location or make arrangements to install a receptacle. Flashing - Brick veneer Lintel angle (if required) Caulking (on all 4 sides on the outside of wall to support the bricks or blocks above & below the flashing) Plaster line Trim molding (if desired) Room side Flashing (drip rail) 3 SUPPORT REQUIREMENTS FOR AIR CONDITIONER Mortar between the case...
... the 115-volt models is available close to the hole location or make arrangements to install a receptacle. Flashing - Brick veneer Lintel angle (if required) Caulking (on all 4 sides on the outside of wall to support the bricks or blocks above & below the flashing) Plaster line Trim molding (if desired) Room side Flashing (drip rail) 3 SUPPORT REQUIREMENTS FOR AIR CONDITIONER Mortar between the case...
Owners Manual
Page 16
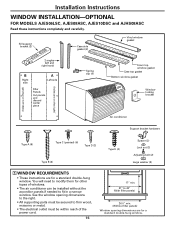
... Window locking bracket (holes are on the left) (holes are on the right) Air conditioner Support bracket hardware Type A (9) Type C (painted) (6) Type D (2) Type B (2) Type E (4) Spacer (2) Lock nut (2) Adjusting bolt (2) Large washer (2) 1 WINDOW REQUIREMENTS • These instructions are for other types of windows. • The air conditioner can be within reach of the power cord. 16 17″ min. 31″ to 43″ (With filler panels) 261⁄4″ min. (Without filler panels) Window opening dimensions...
... Window locking bracket (holes are on the left) (holes are on the right) Air conditioner Support bracket hardware Type A (9) Type C (painted) (6) Type D (2) Type B (2) Type E (4) Spacer (2) Lock nut (2) Adjusting bolt (2) Large washer (2) 1 WINDOW REQUIREMENTS • These instructions are for other types of windows. • The air conditioner can be within reach of the power cord. 16 17″ min. 31″ to 43″ (With filler panels) 261⁄4″ min. (Without filler panels) Window opening dimensions...
Owners Manual
Page 17
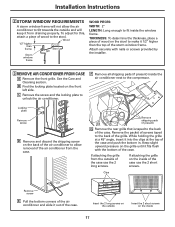
... the back of the case use the 2 long screws. B Find the locking plate located on the inside of the case. If attaching the grille from the case. Installation Instructions 2 STORM WINDOW REQUIREMENTS A storm window frame will keep it from draining properly. C Remove the screw and the locking plate to the back of screws taped to unlock the air conditioner. Remove the packet of the...
... the back of the case use the 2 long screws. B Find the locking plate located on the inside of the case. If attaching the grille from the case. Installation Instructions 2 STORM WINDOW REQUIREMENTS A storm window frame will keep it from draining properly. C Remove the screw and the locking plate to the back of screws taped to unlock the air conditioner. Remove the packet of the...
Owners Manual
Page 19
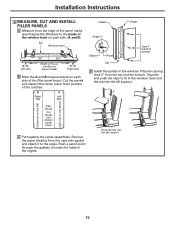
... the air conditioner (panel marks) B Right side B Mark the A and B measurements on the right) Filler Panels Cut panels and discard center piece C Put together the panel assemblies. B A Right Left side side Gasket Angle Angle Gasket Panel Tab Type C (painted screws) D Install the panels in the window track and the tab into the sill support 19 Squeeze and push the clips to locate the holes...
... the air conditioner (panel marks) B Right side B Mark the A and B measurements on the right) Filler Panels Cut panels and discard center piece C Put together the panel assemblies. B A Right Left side side Gasket Angle Angle Gasket Panel Tab Type C (painted screws) D Install the panels in the window track and the tab into the sill support 19 Squeeze and push the clips to locate the holes...
Owners Manual
Page 21
... Tighten the screw. B Stuff the foam between the glass and the window to the window width. C Attach the window locking bracket with caulking provided by the installer. Base pan D Reattach the front grille. An opening for the power cord is on the bottom of the front grille. E Fill holes and cracks with 1 type E screw. 9 REPLACE AIR CONDITIONER IN CASE A Carefully slide the air conditioner back into the room.
... Tighten the screw. B Stuff the foam between the glass and the window to the window width. C Attach the window locking bracket with caulking provided by the installer. Base pan D Reattach the front grille. An opening for the power cord is on the bottom of the front grille. E Fill holes and cracks with 1 type E screw. 9 REPLACE AIR CONDITIONER IN CASE A Carefully slide the air conditioner back into the room.
Owners Manual
Page 22
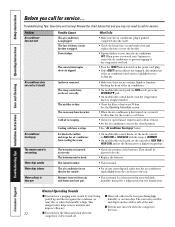
... sure the air conditioner slants slightly from the outdoor side of the compressor overload. • Press the RESET button located on , you need to allow time for the room to cool down. • Check for open furnace registers and cold air returns. • Set the air conditioner's vent to prevent tripping of the unit. The fuse is blown/circuit breaker is tripped. The current interrupter device is tripped. See the Operating Instructions section...
... sure the air conditioner slants slightly from the outdoor side of the compressor overload. • Press the RESET button located on , you need to allow time for the room to cool down. • Check for open furnace registers and cold air returns. • Set the air conditioner's vent to prevent tripping of the unit. The fuse is blown/circuit breaker is tripped. The current interrupter device is tripped. See the Operating Instructions section...
Owners Manual
Page 23
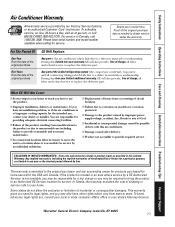
... move the unit to a location where it is extended to replace the defective part. If the product is located in an area where service by an individual technician. This warranty gives you specific legal rights, and you have other rights which fails due to an Authorized GE Service location for home use the product. Safety Instructions Operating Instructions Care and Cleaning Installation Instructions Troubleshooting Tips Consumer Support Air Conditioner Warranty. To schedule service, on models not corrosionprotected...
... move the unit to a location where it is extended to replace the defective part. If the product is located in an area where service by an individual technician. This warranty gives you specific legal rights, and you have other rights which fails due to an Authorized GE Service location for home use the product. Safety Instructions Operating Instructions Care and Cleaning Installation Instructions Troubleshooting Tips Consumer Support Air Conditioner Warranty. To schedule service, on models not corrosionprotected...


