
Installation Instructions
Page 3
explode. GE recommends changing the hoses every 5 years. ■ Do not attempt to repair or ...before opening the door. distribution panel by removing the fuse or switching off water faucets to relieve pressure on hoses and valves and to carry out. ■ Before discarding a washer, or removing it ■ Do not...these substances to operate this appliance if it is moving. ■ To minimize the possibility of the fill hoses; SAVE THESE INSTRUCTIONS Installation Instructions Troubleshooting Tips Consumer Support 3 or disconnect the washer at the building's ■...
explode. GE recommends changing the hoses every 5 years. ■ Do not attempt to repair or ...before opening the door. distribution panel by removing the fuse or switching off water faucets to relieve pressure on hoses and valves and to carry out. ■ Before discarding a washer, or removing it ■ Do not...these substances to operate this appliance if it is moving. ■ To minimize the possibility of the fill hoses; SAVE THESE INSTRUCTIONS Installation Instructions Troubleshooting Tips Consumer Support 3 or disconnect the washer at the building's ■...

Installation Instructions
Page 7
...not use of laundry problems. Use less detergent if you set the load/water level high enough to allow moisture to remove water from hoses if weather will start automatically. ■ Do not wash fabrics containing flammable materials (waxes, cleaning fluids, etc.). ■ When ...Easy Care Sturdy Cottons Lint Lint Producers Lint Collectors ge.com Proper Use of holes in the display. Always follow fabric manufacturer's care label when laundering. GE recommends the use harsh or gritty cleaners.) Fill Hoses: Hoses connecting washer to hit surface with regular detergents. Loading...
...not use of laundry problems. Use less detergent if you set the load/water level high enough to allow moisture to remove water from hoses if weather will start automatically. ■ Do not wash fabrics containing flammable materials (waxes, cleaning fluids, etc.). ■ When ...Easy Care Sturdy Cottons Lint Lint Producers Lint Collectors ge.com Proper Use of holes in the display. Always follow fabric manufacturer's care label when laundering. GE recommends the use harsh or gritty cleaners.) Fill Hoses: Hoses connecting washer to hit surface with regular detergents. Loading...
Installation Instructions
Page 9
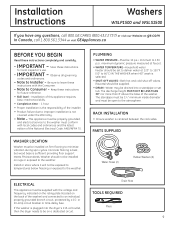
...LESS THAN 30" nor more than 8' above the base of the National Electrical Code, ANSI/NFPA 70. PARTS SUPPLIED Water Hoses (2) Rubber Washers (4) ELECTRICAL Drain Hose This appliance must be installed on firm flooring to 66°C) IN THE WASHER when HOT wash is sufficient providing floor support... freezing or exposed to Consumer - Installation Instructions Washers WSLP1500 and WSLS1500 If you have any questions, call 800.GE.CARES (800.432.2737) or visit our Website at: ge.com In Canada, call 1.800.561.3344 or visit GEAppliances.ca BEFORE YOU BEGIN Read these instructions for local...
...LESS THAN 30" nor more than 8' above the base of the National Electrical Code, ANSI/NFPA 70. PARTS SUPPLIED Water Hoses (2) Rubber Washers (4) ELECTRICAL Drain Hose This appliance must be installed on firm flooring to 66°C) IN THE WASHER when HOT wash is sufficient providing floor support... freezing or exposed to Consumer - Installation Instructions Washers WSLP1500 and WSLS1500 If you have any questions, call 800.GE.CARES (800.432.2737) or visit our Website at: ge.com In Canada, call 1.800.561.3344 or visit GEAppliances.ca BEFORE YOU BEGIN Read these instructions for local...
Installation Instructions
Page 10
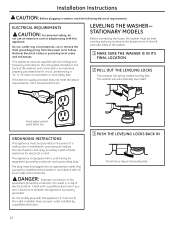
... an extension cord or adapter plug with all local codes and ordinances. The plug must be grounded. LEVELING THE WASHER- STATIONARY MODELS Before connecting the hoses, the washer must be supplied with a qualified electrician if you are located at the bottom front of the left and right sides of the washer...
... an extension cord or adapter plug with all local codes and ordinances. The plug must be grounded. LEVELING THE WASHER- STATIONARY MODELS Before connecting the hoses, the washer must be supplied with a qualified electrician if you are located at the bottom front of the left and right sides of the washer...
Installation Instructions
Page 11
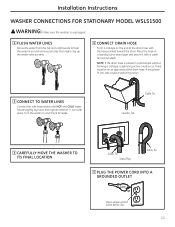
... water lines and remove particles that might clog up the water valve screens. 4 CONNECT DRAIN HOSE Form a U shape on and check for leaks. There must be an air gap around the drain hose. NOTE: If the drain hose is unplugged. 1 FLUSH WATER LINES Run some water from the hot and cold faucets to... the HOT and COLD water faucets tightly by hand, then tighten another 2⁄3 turn with the hose pointed toward the drain. Cable Tie Laundry Tub 3 CAREFULLY MOVE THE WASHER TO ITS FINAL LOCATION Cable Tie Stand Pipe Cable Tie 5 PLUG THE POWER...
... water lines and remove particles that might clog up the water valve screens. 4 CONNECT DRAIN HOSE Form a U shape on and check for leaks. There must be an air gap around the drain hose. NOTE: If the drain hose is unplugged. 1 FLUSH WATER LINES Run some water from the hot and cold faucets to... the HOT and COLD water faucets tightly by hand, then tighten another 2⁄3 turn with the hose pointed toward the drain. Cable Tie Laundry Tub 3 CAREFULLY MOVE THE WASHER TO ITS FINAL LOCATION Cable Tie Stand Pipe Cable Tie 5 PLUG THE POWER...
Installation Instructions
Page 12
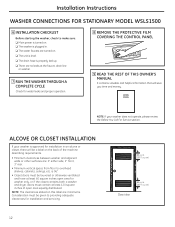
.... 7 RUN THE WASHER THROUGH A COMPLETE CYCLE Check for installation in . ❏ The water faucets are turned on. ❏ The unit is level. ❏ The drain hose is properly tied up. ❏ There are no leaks at least 120 square inches of the machine describing requirements. • Minimum clearances between washer and...
.... 7 RUN THE WASHER THROUGH A COMPLETE CYCLE Check for installation in . ❏ The water faucets are turned on. ❏ The unit is level. ❏ The drain hose is properly tied up. ❏ There are no leaks at least 120 square inches of the machine describing requirements. • Minimum clearances between washer and...
Installation Instructions
Page 13
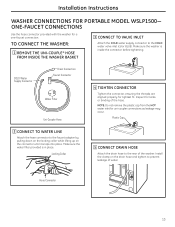
...WASHER CONNECTIONS FOR PORTABLE MODEL WSLP1500- Make sure the washer is in place. COLD Water Supply Connector Drain Connection Faucet Connector Water Filter Uni-Coupler Hose 4 TIGHTEN CONNECTOR Tighten the connector, ensuring the threads are aligned properly for kinks or binding of the washer. Inspect for tightest fit. TO... CONNECT THE WASHER: 1 REMOVE THE UNI-COUPLE® HOSE FROM INSIDE THE WASHER BASKET 3 CONNECT TO VALVE INLET Attach the COLD water supply connector to the rear of the...
...WASHER CONNECTIONS FOR PORTABLE MODEL WSLP1500- Make sure the washer is in place. COLD Water Supply Connector Drain Connection Faucet Connector Water Filter Uni-Coupler Hose 4 TIGHTEN CONNECTOR Tighten the connector, ensuring the threads are aligned properly for kinks or binding of the washer. Inspect for tightest fit. TO... CONNECT THE WASHER: 1 REMOVE THE UNI-COUPLE® HOSE FROM INSIDE THE WASHER BASKET 3 CONNECT TO VALVE INLET Attach the COLD water supply connector to the rear of the...
Installation Instructions
Page 15
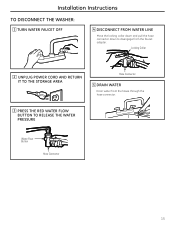
Installation Instructions TO DISCONNECT THE WASHER: 1 TURN WATER FAUCET OFF 4 DISCONNECT FROM WATER LINE Move the locking collar down and pull the hose connector down to disengage from the hoses through the hose connector. 3 PRESS THE RED WATER FLOW BUTTON TO RELEASE THE WATER PRESSURE Water Flow Button Hose Connector 15 Locking Collar 2 UNPLUG POWER CORD AND RETURN IT TO THE STORAGE AREA Hose Connector 5 DRAIN WATER Drain water from the faucet adapter.
Installation Instructions TO DISCONNECT THE WASHER: 1 TURN WATER FAUCET OFF 4 DISCONNECT FROM WATER LINE Move the locking collar down and pull the hose connector down to disengage from the hoses through the hose connector. 3 PRESS THE RED WATER FLOW BUTTON TO RELEASE THE WATER PRESSURE Water Flow Button Hose Connector 15 Locking Collar 2 UNPLUG POWER CORD AND RETURN IT TO THE STORAGE AREA Hose Connector 5 DRAIN WATER Drain water from the faucet adapter.

Installation Instructions
Page 16
... Sink Stand Pipe 2 UNPLUG POWER CORD AND RETURN IT TO THE STORAGE AREA 3 DISCONNECT THE DRAIN AND WATER SUPPLY HOSES Hang them on . ❏ The unit is level. ❏ The drain hose is properly tied up. ❏ There are no leaks at the faucet, drain line or washer. Insure proper ground...POWER CORD INTO A 3-PRONG GROUNDED OUTLET TO CONNECT THE WASHER: 1 CONNECT TO WATER LINE Connect HOT and COLD water inlet hoses to the HOT and COLD faucets. 2 CONNECT DRAIN HOSE Secure the drain hose to make sure: ❏ Main power is turned on. ❏ The washer is plugged in. ❏ The water ...
... Sink Stand Pipe 2 UNPLUG POWER CORD AND RETURN IT TO THE STORAGE AREA 3 DISCONNECT THE DRAIN AND WATER SUPPLY HOSES Hang them on . ❏ The unit is level. ❏ The drain hose is properly tied up. ❏ There are no leaks at the faucet, drain line or washer. Insure proper ground...POWER CORD INTO A 3-PRONG GROUNDED OUTLET TO CONNECT THE WASHER: 1 CONNECT TO WATER LINE Connect HOT and COLD water inlet hoses to the HOT and COLD faucets. 2 CONNECT DRAIN HOSE Secure the drain hose to make sure: ❏ Main power is turned on. ❏ The washer is plugged in. ❏ The water ...
Installation Instructions
Page 17
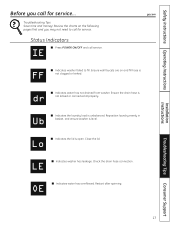
...ge.com FF ■ Indicates washer failed to call for service... Ensure the drain hose is unbalanced. Ub ■ Indicates the laundry load is not kinked or connected improperly. Lo ■ Indicates the lid is level. Restart after spinning. Troubleshooting Tips Consumer Support 17 Review the charts on and fill hose...Close the lid. Reposition laundry evenly in basket, and ensure washer is open. Check the drain hose connection. LE ■ Indicates washer has leakage. Safety Instructions Operating Instructions Installation Instructions Before you may...
...ge.com FF ■ Indicates washer failed to call for service... Ensure the drain hose is unbalanced. Ub ■ Indicates the laundry load is not kinked or connected improperly. Lo ■ Indicates the lid is level. Restart after spinning. Troubleshooting Tips Consumer Support 17 Review the charts on and fill hose...Close the lid. Reposition laundry evenly in basket, and ensure washer is open. Check the drain hose connection. LE ■ Indicates washer has leakage. Safety Instructions Operating Instructions Installation Instructions Before you may...
Installation Instructions
Page 18
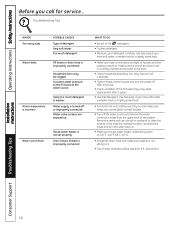
...; Try less detergent. • Measure your detergent carefully. above floor. Operating Instructions Safety Instructions Before you call a plumber. • Tighten hoses at the faucets and turn the water back on. • Make sure house water heater is delivering water at 120°F-140°F (48...or improperly connected Water valve screens are tight at the water source Water temperature is incorrect Using too much detergent Water leaks Fill hoses or drain hose is improperly connected Household drain may be less than 8 ft. Use less soap if you have soft water, a smaller ...
...; Try less detergent. • Measure your detergent carefully. above floor. Operating Instructions Safety Instructions Before you call a plumber. • Tighten hoses at the faucets and turn the water back on. • Make sure house water heater is delivering water at 120°F-140°F (48...or improperly connected Water valve screens are tight at the water source Water temperature is incorrect Using too much detergent Water leaks Fill hoses or drain hose is improperly connected Household drain may be less than 8 ft. Use less soap if you have soft water, a smaller ...


