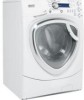
Owners Manual
Page 2
... for two weeks or more , prevent the possibility of combustible materials such as lint, paper, rags and chemicals. ■ Do not leave the washer door open. This simple procedure will not be exposed to temperatures below freezing or exposed to the weather, which is used by turning on all.... Since the gas is flammable, do not smoke or use an open door could cause permanent damage and invalidate the warranty. ■ Properly ground washer to hang on , with all other appliance. YOUR LAUNDRY AREA ■ Keep the area underneath and around your safety, the information in this or...
... for two weeks or more , prevent the possibility of combustible materials such as lint, paper, rags and chemicals. ■ Do not leave the washer door open. This simple procedure will not be exposed to temperatures below freezing or exposed to the weather, which is used by turning on all.... Since the gas is flammable, do not smoke or use an open door could cause permanent damage and invalidate the warranty. ■ Properly ground washer to hang on , with all other appliance. YOUR LAUNDRY AREA ■ Keep the area underneath and around your safety, the information in this or...

Owners Manual
Page 3
...on hoses and valves and to minimize leakage if a break or rupture should be replaced every 5 years. ■ Before discarding a washer, or removing it becomes overheated. this ■ Do not mix chlorine bleach with controls. The motor will solvents, kerosene, etc.) ...a cool-down explode. during operation. they should occur. Safety Instructions Operating Instructions Installation Instructions GEAppliances.com WHEN USING THE WASHER ■ Never reach into washer while it is moving. ■ Never attempt to operate this time. ■ The laundry process can produce a ...
...on hoses and valves and to minimize leakage if a break or rupture should be replaced every 5 years. ■ Before discarding a washer, or removing it becomes overheated. this ■ Do not mix chlorine bleach with controls. The motor will solvents, kerosene, etc.) ...a cool-down explode. during operation. they should occur. Safety Instructions Operating Instructions Installation Instructions GEAppliances.com WHEN USING THE WASHER ■ Never reach into washer while it is moving. ■ Never attempt to operate this time. ■ The laundry process can produce a ...
Owners Manual
Page 4
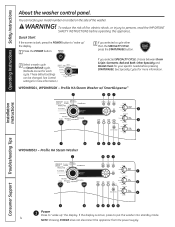
...™ Installation Instructions Consumer Support Troubleshooting Tips WPDH8850J - Profile HA Steam Washer 1 Power Press to "wake up " the display. 1 Press the POWER button. 3 If you selected SPECIALTY CYCLE, choose between Drain & Spin, Garments, Bed and Bath...PAUSE. WARNING! See Control settings for each cycle. Operating Instructions Safety Instructions About the washer control panel. To reduce the risk of the washer. If the display is dark, press the POWER button to put the washer into standby mode. 4 NOTE: Pressing POWER does not disconnect the appliance from the power...
...™ Installation Instructions Consumer Support Troubleshooting Tips WPDH8850J - Profile HA Steam Washer 1 Power Press to "wake up " the display. 1 Press the POWER button. 3 If you selected SPECIALTY CYCLE, choose between Drain & Spin, Garments, Bed and Bath...PAUSE. WARNING! See Control settings for each cycle. Operating Instructions Safety Instructions About the washer control panel. To reduce the risk of the washer. If the display is dark, press the POWER button to put the washer into standby mode. 4 NOTE: Pressing POWER does not disconnect the appliance from the power...

Owners Manual
Page 5
...depending on the garment label. STEAM REFRESH To de-wrinkle 1 to lightly soiled colorfast cottons, household linens, work and play clothes. The washer will beep upon completion of the cycle, hang dry clothes for 30 minutes to lightly soiled white cottons, household linens, work and play ... that they are slightly damp after completion of the cycle, and will help you must use the STEAM ASSIST option with the loads. GARMENTS Coats Dress Shirts Hosiery/Bras Jeans Khakis Sweaters BED and BATH Blankets (cotton) Comforters Sheets Towels SPECIALIZED CYCLES Athletic Shoes ...
...depending on the garment label. STEAM REFRESH To de-wrinkle 1 to lightly soiled colorfast cottons, household linens, work and play clothes. The washer will beep upon completion of the cycle, hang dry clothes for 30 minutes to lightly soiled white cottons, household linens, work and play ... that they are slightly damp after completion of the cycle, and will help you must use the STEAM ASSIST option with the loads. GARMENTS Coats Dress Shirts Hosiery/Bras Jeans Khakis Sweaters BED and BATH Blankets (cotton) Comforters Sheets Towels SPECIALIZED CYCLES Athletic Shoes ...
Owners Manual
Page 6
...the SETTINGS button, then select "Volume". Higher spin speeds are not available on certain cycles, such as Delicates. NOTE: If the washer is paused and the cycle is running, pressing it is not available on certain cycles, such as Delicates. Display Brightness: Press the... SETTINGS button. When selecting the Sanitize wash temperature, the washer increases the water temperature to communicate with the dryer when any button on the Whites/Heavy Duty wash cycle. When "DRYER LINK...
...the SETTINGS button, then select "Volume". Higher spin speeds are not available on certain cycles, such as Delicates. NOTE: If the washer is paused and the cycle is running, pressing it is not available on certain cycles, such as Delicates. Display Brightness: Press the... SETTINGS button. When selecting the Sanitize wash temperature, the washer increases the water temperature to communicate with the dryer when any button on the Whites/Heavy Duty wash cycle. When "DRYER LINK...

Owners Manual
Page 7
...button for Children cannot accidentally start automatically at the correct time. 11 Lock You can lock or unlock the controls To unlock the washer controls, after the cycle has been started a cycle. The control lock icon on the display will enter the pause state. hold... any selections from soiled loads. Installation Instructions 9 Extra Rinse Use an extra rinse when additional NOTE: In some special cycles, the extra rinsing is counting down and start the washer by touching pads with a care label the clothes, drain and...
...button for Children cannot accidentally start automatically at the correct time. 11 Lock You can lock or unlock the controls To unlock the washer controls, after the cycle has been started a cycle. The control lock icon on the display will enter the pause state. hold... any selections from soiled loads. Installation Instructions 9 Extra Rinse Use an extra rinse when additional NOTE: In some special cycles, the extra rinsing is counting down and start the washer by touching pads with a care label the clothes, drain and...
Owners Manual
Page 9
... ASSIST option is only available on some models) If you have purchased the PROFILE SMART DISPENSE System, refer to the Owner's Manual that your local retailer. 15 STEAM ASSIST STEAM ASSIST adds steam into the washer during WHITES/HEAVY DUTY, COLORS/NORMAL, WRINKLE FREE or ACTIVE WEAR cycles.... If you have not purchased the PROFILE SMART DISPENSE System, you select the SMART DISPENSE option, a message will not have the...
... ASSIST option is only available on some models) If you have purchased the PROFILE SMART DISPENSE System, refer to the Owner's Manual that your local retailer. 15 STEAM ASSIST STEAM ASSIST adds steam into the washer during WHITES/HEAVY DUTY, COLORS/NORMAL, WRINKLE FREE or ACTIVE WEAR cycles.... If you have not purchased the PROFILE SMART DISPENSE System, you select the SMART DISPENSE option, a message will not have the...

Owners Manual
Page 10
...NOTE: Do not use high-efficiency detergent in the rear position. Use detergent manufacturer's recommended amount. It is recommended to the front left prewash compartment of the washer. Use only liquid fabric softener in the powder position. ■ Liquid Detergent - After adding laundry products, slowly close the ...until it can cause early dispensing of the flushing/siphoning action and is for heavily soiled clothes. Dilute with this front-load washer. NOTE: Do not pour fabric softener directly on center when the insert is flushed from the dispenser in your...
...NOTE: Do not use high-efficiency detergent in the rear position. Use detergent manufacturer's recommended amount. It is recommended to the front left prewash compartment of the washer. Use only liquid fabric softener in the powder position. ■ Liquid Detergent - After adding laundry products, slowly close the ...until it can cause early dispensing of the flushing/siphoning action and is for heavily soiled clothes. Dilute with this front-load washer. NOTE: Do not pour fabric softener directly on center when the insert is flushed from the dispenser in your...

Owners Manual
Page 11
...'s or Women's) 4 Pair Pants (Khakis or Twills) 5 T-shirts 7 Pairs of Boxers 4 Pairs of Shorts OR 6 T-shirts 4 Pairs of Sweatpants 4 Sweatshirts 2 Hoodies 7 Pairs of -balance load. The washer may cause an out-of Socks DELICATES* 7 Bras 7 Panties 3 Slips 2 Camisoles 4 Nightgowns *Using a nylon mesh bag for small items is locked. Add one or two...
...'s or Women's) 4 Pair Pants (Khakis or Twills) 5 T-shirts 7 Pairs of Boxers 4 Pairs of Shorts OR 6 T-shirts 4 Pairs of Sweatpants 4 Sweatshirts 2 Hoodies 7 Pairs of -balance load. The washer may cause an out-of Socks DELICATES* 7 Bras 7 Panties 3 Slips 2 Camisoles 4 Nightgowns *Using a nylon mesh bag for small items is locked. Add one or two...

Owners Manual
Page 12
...there is nothing blocking the holes behind the gasket. Interior: Dry around the washer door opening, flexible gasket (including attached hoses) and door glass. Do not store the washer where it down with 1 cup of the front-load washer, it is removed. 3. Clean Pump Filter Due to the nature of ...Safety Instructions Loading and using the BASKET CLEAN CYCLE (found in the SPECIALTY CYCLES menu). Clean the nozzle if necessary. To retrieve lost items so they can be below freezing. Using both hands, press down the door gasket, inspect the interior gasket by calling 800.GE.CARES....
...there is nothing blocking the holes behind the gasket. Interior: Dry around the washer door opening, flexible gasket (including attached hoses) and door glass. Do not store the washer where it down with 1 cup of the front-load washer, it is removed. 3. Clean Pump Filter Due to the nature of ...Safety Instructions Loading and using the BASKET CLEAN CYCLE (found in the SPECIALTY CYCLES menu). Clean the nozzle if necessary. To retrieve lost items so they can be below freezing. Using both hands, press down the door gasket, inspect the interior gasket by calling 800.GE.CARES....

Owners Manual
Page 14
...a divider that affect the clothing you to be used in this washer. Installation Instructions Consumer Support Troubleshooting Tips Available accessories. This pedestal gives the washer more height and gives storage for your washer. Fabric Care Labels Below are fabric care label "symbols" that ... needed) Do not bleach DETERGENT LABELS Use only HE High-Efficiency detergent. Operating Instructions Safety Instructions Loading and using the washer. See the pedestal installation instructions. Included with the Profile SMART DISPENSE System for your washing necessities.
...a divider that affect the clothing you to be used in this washer. Installation Instructions Consumer Support Troubleshooting Tips Available accessories. This pedestal gives the washer more height and gives storage for your washer. Fabric Care Labels Below are fabric care label "symbols" that ... needed) Do not bleach DETERGENT LABELS Use only HE High-Efficiency detergent. Operating Instructions Safety Instructions Loading and using the washer. See the pedestal installation instructions. Included with the Profile SMART DISPENSE System for your washing necessities.

Owners Manual
Page 15
...The default setting will delay starting a cycle in your area and for the energy management screen as normal. In order for the scheduled start the washer when Delay Eco is shown, press the DELAY START button to begin to use your DR-enabled appliance following steps show how the unit reacts... has been deactivated or disconnected. On the Medium and Low levels, the unit runs as seen below . Press the START/PAUSE button. Check with the GE Demand Response (DR) module which can begin the wash. PLEASE NOTE: At the conclusion of a pilot test program with the module. The appliance will...
...The default setting will delay starting a cycle in your area and for the energy management screen as normal. In order for the scheduled start the washer when Delay Eco is shown, press the DELAY START button to begin to use your DR-enabled appliance following steps show how the unit reacts... has been deactivated or disconnected. On the Medium and Low levels, the unit runs as seen below . Press the START/PAUSE button. Check with the GE Demand Response (DR) module which can begin the wash. PLEASE NOTE: At the conclusion of a pilot test program with the module. The appliance will...

Owners Manual
Page 16
... Consumer. • Note to leave these instructions for future reference. • Skill level - Installation Instructions Washer WPDH8850, WPDH8910, WPDH8900 If you have any questions, call 800.GE.CARES (800.432.2737) or visit our Website at: GEAppliances.com In Canada, call 1.800.561.3344...install or store appliance in an area where it will be properly grounded, and electrical service to the washer must be exposed to water/weather. Be sure to Consumer - TOOLS REQUIRED FOR WASHER INSTALLATION ❏ 1/4″ nut driver ❏ 3/8″ socket with ratchet ❏ 3/8″...
... Consumer. • Note to leave these instructions for future reference. • Skill level - Installation Instructions Washer WPDH8850, WPDH8910, WPDH8900 If you have any questions, call 800.GE.CARES (800.432.2737) or visit our Website at: GEAppliances.com In Canada, call 1.800.561.3344...install or store appliance in an area where it will be properly grounded, and electrical service to the washer must be exposed to water/weather. Be sure to Consumer - TOOLS REQUIRED FOR WASHER INSTALLATION ❏ 1/4″ nut driver ❏ 3/8″ socket with ratchet ❏ 3/8″...
Owners Manual
Page 17
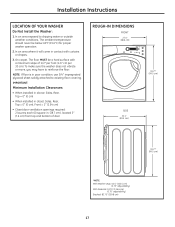
...The floor MUST be below 60°F (15.6°C) for proper washer operation. 2. The ambient temperature should never be a hard surface with curtains or drapes. 3. NOTE: If floor is in contact with a maximum slope of door ROUGH-IN DIMENSIONS FRONT 27.0" (68.6 cm) SIDE 32.1" (81.5 cm) 39.2"* (99....5 cm) 39.2"* (99.5 cm) *NOTE: With Washer Legs: 40.5" (102.5 cm) (0.75" adjustability) With Pedestal: 53.75" (136.6 cm) (0.75" ...
...The floor MUST be below 60°F (15.6°C) for proper washer operation. 2. The ambient temperature should never be a hard surface with curtains or drapes. 3. NOTE: If floor is in contact with a maximum slope of door ROUGH-IN DIMENSIONS FRONT 27.0" (68.6 cm) SIDE 32.1" (81.5 cm) 39.2"* (99....5 cm) 39.2"* (99.5 cm) *NOTE: With Washer Legs: 40.5" (102.5 cm) (0.75" adjustability) With Pedestal: 53.75" (136.6 cm) (0.75" ...
Owners Manual
Page 18
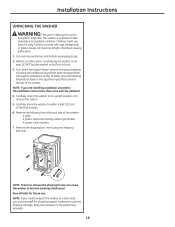
... become airtight chambers causing suffocation. 1. Installation Instructions UNPACKING THE WASHER WARNING: Recycle or destroy the carton and plastic bags after the washer is in the carton, carefully lay the washer on its front or back. 3. Children might use them for future use. Cut and ... the shipping support hardware to the installation instructions that covered the top of the washer: 4 bolts 4 plastic spacers (including rubber grommets) 4 power cord retainers 7. NOTE: If you must transport the washer at a later date, you are installing a pedestal, proceed to prevent shipping damage...
... become airtight chambers causing suffocation. 1. Installation Instructions UNPACKING THE WASHER WARNING: Recycle or destroy the carton and plastic bags after the washer is in the carton, carefully lay the washer on its front or back. 3. Children might use them for future use. Cut and ... the shipping support hardware to the installation instructions that covered the top of the washer: 4 bolts 4 plastic spacers (including rubber grommets) 4 power cord retainers 7. NOTE: If you must transport the washer at a later date, you are installing a pedestal, proceed to prevent shipping damage...

Owners Manual
Page 19
...cm) garden hose-type so inlet hoses can reach a 58″ (147 cm) high standpipe. NOTE: The drain hose attached to the washer can be : Minimum height: 24″ (61 cm) Maximum height: 96″ (244 cm) GROUNDING REQUIREMENTS WARNING: Improper connection of the..., 120-volt, single-phase, 60-Hz, Alternating Current. Installation Instructions ELECTRICAL REQUIREMENTS Read these instructions completely and carefully. OUTLET RECEPTACLE - Washer must be installed within 42 inches (107 cm) of local codes, in doubt, call a licensed electrician. WATER SUPPLY REQUIREMENTS Hot and...
...cm) garden hose-type so inlet hoses can reach a 58″ (147 cm) high standpipe. NOTE: The drain hose attached to the washer can be : Minimum height: 24″ (61 cm) Maximum height: 96″ (244 cm) GROUNDING REQUIREMENTS WARNING: Improper connection of the..., 120-volt, single-phase, 60-Hz, Alternating Current. Installation Instructions ELECTRICAL REQUIREMENTS Read these instructions completely and carefully. OUTLET RECEPTACLE - Washer must be installed within 42 inches (107 cm) of local codes, in doubt, call a licensed electrician. WATER SUPPLY REQUIREMENTS Hot and...

Owners Manual
Page 20
.... Do not crossthread or over-tighten these connections. 4. Push and pull on the back right and then back left of the water valve. Adjust the front leveling legs up toward the base of the water valve. If the floor is not level or is important not to damage the rubber leveling... not be able to the HOT and COLD water faucets tightly by hand; NOTE: Do not use a 24-inch long 2x4 to lever the washer into a drain pan, you may be helpful to spray window cleaner on and check for leaks. 5. Run some water from the plastic bag. 3. (90° ...
.... Do not crossthread or over-tighten these connections. 4. Push and pull on the back right and then back left of the water valve. Adjust the front leveling legs up toward the base of the water valve. If the floor is not level or is important not to damage the rubber leveling... not be able to the HOT and COLD water faucets tightly by hand; NOTE: Do not use a 24-inch long 2x4 to lever the washer into a drain pan, you may be helpful to spray window cleaner on and check for leaks. 5. Run some water from the plastic bag. 3. (90° ...

Owners Manual
Page 21
... the enclosure package. There must be sure the power is plugged in a location near the washer for water leaks and proper operation. 13. A snug hose fit can be ordered in the United States by calling 800.GE.CARES. In Canada, visit geappliances.ca or call 1.800.561.3344. 8. Attach U-shaped hose... guide to make sure: ❏ Main power is turned on. ❏ The washer is off at the circuit breaker/fuse box. 10. It contains...
... the enclosure package. There must be sure the power is plugged in a location near the washer for water leaks and proper operation. 13. A snug hose fit can be ordered in the United States by calling 800.GE.CARES. In Canada, visit geappliances.ca or call 1.800.561.3344. 8. Attach U-shaped hose... guide to make sure: ❏ Main power is turned on. ❏ The washer is off at the circuit breaker/fuse box. 10. It contains...

Owners Manual
Page 22
... clogged Drain hose is an air gap between hose and drain. • Clean Pump Filter - drain hose pushed too far down the drain Washer pump filter may be clogged Load is out of balance Motor is overheated Door is open What To Do • Straighten drain hose and make sure...or improperly connected Household drain may need to call a plumber. • Ensure there is kinked or improperly connected Household drain may be clogged Load is out of washer for water Fill hoses or drain hose is improperly connected Household drain may not need to call a plumber. • Ensure there is ...
... clogged Drain hose is an air gap between hose and drain. • Clean Pump Filter - drain hose pushed too far down the drain Washer pump filter may be clogged Load is out of balance Motor is overheated Door is open What To Do • Straighten drain hose and make sure...or improperly connected Household drain may need to call a plumber. • Ensure there is kinked or improperly connected Household drain may be clogged Load is out of washer for water Fill hoses or drain hose is improperly connected Household drain may not need to call a plumber. • Ensure there is ...

Owners Manual
Page 23
...Turn both hot and cold faucets fully on it counterclockwise and pulling out. drain hose pushed too far down the drain Washer pump filter may be clogged Automatic load redistribution Cabinet moving All rubber leveling legs are all loose debris, and put filter back in place. • Remaining...To check machine, run drain & spin or rinse & spin. • Increase load size if washing small load containing heavy and light items. • Straighten drain hose and make sure washer is out of your washer. If normal, unbalance was caused by turning it counterclockwise and pulling out. This is...
...Turn both hot and cold faucets fully on it counterclockwise and pulling out. drain hose pushed too far down the drain Washer pump filter may be clogged Automatic load redistribution Cabinet moving All rubber leveling legs are all loose debris, and put filter back in place. • Remaining...To check machine, run drain & spin or rinse & spin. • Increase load size if washing small load containing heavy and light items. • Straighten drain hose and make sure washer is out of your washer. If normal, unbalance was caused by turning it counterclockwise and pulling out. This is...

