
Energy Guide
Page 1
...; Cost range based only on models of similar capacity with yellow numbers are based on a national average electricity cost of this label before consumer purchase. U.S. Refrigerator-Freezer • Automatic Defrost • Bottom -Mounted Freezer • Through-the-Door Ice General Electric Model(s): PYE22PSH****, GYE22KSH****, GYE22KMH**** Capacity: 22.1 Cubic Feet Compare ONLY...
...; Cost range based only on models of similar capacity with yellow numbers are based on a national average electricity cost of this label before consumer purchase. U.S. Refrigerator-Freezer • Automatic Defrost • Bottom -Mounted Freezer • Through-the-Door Ice General Electric Model(s): PYE22PSH****, GYE22KSH****, GYE22KMH**** Capacity: 22.1 Cubic Feet Compare ONLY...
Installation Instructions
Page 1
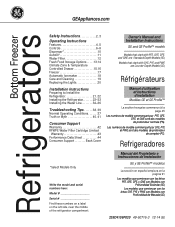
... Ice maker 18 Care and Cleaning 19 Replacing the Lights 20 Installation Instructions Preparing to Install the Refrigerator 21, 22 Installing the Refrigerator 23-33 Installing the Water Line 34-36 Troubleshooting Tips 38, 39 Normal Operating Conditions 37 Truth... or Myth 40, 41 Consumer Support Warranty 42 RPWFE Water Filter Cartridge Limited Warranty 43 Performance Data Sheet 44 Consumer Support Back Cover Owner's Manual and Installation Instructions GE and GE...
... Ice maker 18 Care and Cleaning 19 Replacing the Lights 20 Installation Instructions Preparing to Install the Refrigerator 21, 22 Installing the Refrigerator 23-33 Installing the Water Line 34-36 Troubleshooting Tips 38, 39 Normal Operating Conditions 37 Truth... or Myth 40, 41 Consumer Support Warranty 42 RPWFE Water Filter Cartridge Limited Warranty 43 Performance Data Sheet 44 Consumer Support Back Cover Owner's Manual and Installation Instructions GE and GE...
Installation Instructions
Page 2
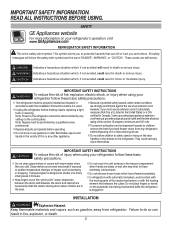
...GE Appliances website For more information on the automatic ice making repairs, replacing a light bulb, or cleaning. These words are damp or wet, skin may break if exposed to shatter into many small pieces if it is used. „ Unplug the refrigerator before making mechanism while the refrigerator...cold surfaces in the freezer compartment when hands are defined as: DANGER Indicates a hazardous situation which have thawed completely. „ In refrigerators with automatic icemakers, avoid contact with the moving parts of the cord be performed by any setting on the door handles or the...
...GE Appliances website For more information on the automatic ice making repairs, replacing a light bulb, or cleaning. These words are damp or wet, skin may break if exposed to shatter into many small pieces if it is used. „ Unplug the refrigerator before making mechanism while the refrigerator...cold surfaces in the freezer compartment when hands are defined as: DANGER Indicates a hazardous situation which have thawed completely. „ In refrigerators with automatic icemakers, avoid contact with the moving parts of the cord be performed by any setting on the door handles or the...
Installation Instructions
Page 3
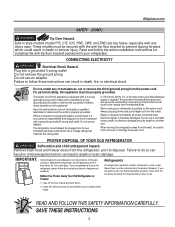
... or abrasion damage along its own individual electrical outlet which could result in death or serious injury. PROPER DISPOSAL OF YOUR OLD REFRIGERATOR WARNING Suffocation and child entrapment hazard. Remove fresh-food and freezer doors from this appliance. READ AND FOLLOW THIS SAFETY INFORMATION CAREFULLY...top heavy, especially with a standard 3-prong (grounding) wall outlet to make sure the outlet is properly grounded. Before You Throw Away Your Old Refrigerator or Freezer: „ Take off the fresh food and freezer doors. „ Leave the shelves in death, fire, or electrical shock. ...
... or abrasion damage along its own individual electrical outlet which could result in death or serious injury. PROPER DISPOSAL OF YOUR OLD REFRIGERATOR WARNING Suffocation and child entrapment hazard. Remove fresh-food and freezer doors from this appliance. READ AND FOLLOW THIS SAFETY INFORMATION CAREFULLY...top heavy, especially with a standard 3-prong (grounding) wall outlet to make sure the outlet is properly grounded. Before You Throw Away Your Old Refrigerator or Freezer: „ Take off the fresh food and freezer doors. „ Leave the shelves in death, fire, or electrical shock. ...

Installation Instructions
Page 4
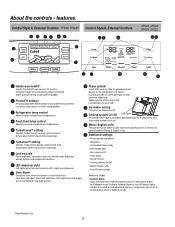
Full-width temperature controlled drawer (on some models) An ice maker in the refrigerator. Water filter* Filters water & Ice *Select Models Only 4 Drop-down tray* Allows for those with a wall limiting the door opening. Removable door bin Can be ...
Full-width temperature controlled drawer (on some models) An ice maker in the refrigerator. Water filter* Filters water & Ice *Select Models Only 4 Drop-down tray* Allows for those with a wall limiting the door opening. Removable door bin Can be ...
Installation Instructions
Page 6
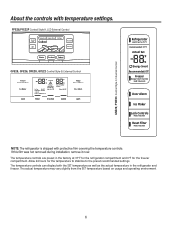
... Precise Fill Auto Fill Water Crushed Cubed GFE28, GFE26, DFE28, GYE22 Control Style B, External Control GNE29, PWE23 Control Style C, Internal Control Refrigerator Hold 3 Sec for °F/°C Recommended: 37 °F Actual Set F Energy Smart Recommended: 0°F Freezer Energy Smart Override Hold... 3 Seconds Door Alarm Ice Maker Lock Controls Hold 3 Seconds Reset Filter Hold 3 Seconds NOTE: The refrigerator is shipped with temperature settings. Allow 24 hours for the freezer compartment. The temperature controls can display both the SET temperature as...
... Precise Fill Auto Fill Water Crushed Cubed GFE28, GFE26, DFE28, GYE22 Control Style B, External Control GNE29, PWE23 Control Style C, Internal Control Refrigerator Hold 3 Sec for °F/°C Recommended: 37 °F Actual Set F Energy Smart Recommended: 0°F Freezer Energy Smart Override Hold... 3 Seconds Door Alarm Ice Maker Lock Controls Hold 3 Seconds Reset Filter Hold 3 Seconds NOTE: The refrigerator is shipped with temperature settings. Allow 24 hours for the freezer compartment. The temperature controls can display both the SET temperature as...

Installation Instructions
Page 7
...temperature performance, we recommend to HOME screen. Press DONE when finished to return to HOME screen. To change the temperature, tap either REFRIGERATOR or FREEZER pad. Turning the cooling system off stops the cooling to select the desired temperature. Changing Temp. The ACTUAL TEMP light will...off stops the cooling to HOME screen. Page over and tap COOLING SYSTEM ON. To turn ON cooling system, press either the REFRIGERATOR or FREEZER pad until the desired temperature is displayed. for Control Style B To change the temperature, press either the Freezer or ...
...temperature performance, we recommend to HOME screen. Press DONE when finished to return to HOME screen. To change the temperature, tap either REFRIGERATOR or FREEZER pad. Turning the cooling system off stops the cooling to select the desired temperature. Changing Temp. The ACTUAL TEMP light will...off stops the cooling to HOME screen. Page over and tap COOLING SYSTEM ON. To turn ON cooling system, press either the REFRIGERATOR or FREEZER pad until the desired temperature is displayed. for Control Style B To change the temperature, press either the Freezer or ...
Installation Instructions
Page 8
... hold Ice Maker & door alarm simultaneously for 3 seconds to turn off interior lights, temperature control and advanced features. Refrigerator temp control Adjust freezer compartment temperature. Photo upload* Insert USB memory stick to upload personal photos to load and view slideshow... and delete • Slideshow • Connected Home ready • Reset water filter • Ice maker on screen prompts to the refrigerator LCD screen. Control Style A, External Controls PFE28, PYE22P Control Style B, External Controls GFE28, GFE26, DFE28, GYE22 Control Lock Temperature Express...
... hold Ice Maker & door alarm simultaneously for 3 seconds to turn off interior lights, temperature control and advanced features. Refrigerator temp control Adjust freezer compartment temperature. Photo upload* Insert USB memory stick to upload personal photos to load and view slideshow... and delete • Slideshow • Connected Home ready • Reset water filter • Ice maker on screen prompts to the refrigerator LCD screen. Control Style A, External Controls PFE28, PYE22P Control Style B, External Controls GFE28, GFE26, DFE28, GYE22 Control Lock Temperature Express...

Installation Instructions
Page 9
... Hold 3 Seconds Door Alarm Sounds to lock out ice and water dispenser and all feature and temperature buttons. Freezer temp control Adjust freezer compartment temperature Refrigerator temp control Adjust fresh food compartment temperature Ice maker setting Turn your ice makers on/off. *Select Models Only 9 Lock Controls Press and hold 3 seconds... to alert when the freezer or fresh food doors have been left open. features.* Controls Style C, Internal Controls GNE29, PWE23 GEAppliances.com Refrigerator Hold 3 Sec for 3 seconds after replacing filter.
... Hold 3 Seconds Door Alarm Sounds to lock out ice and water dispenser and all feature and temperature buttons. Freezer temp control Adjust freezer compartment temperature Refrigerator temp control Adjust fresh food compartment temperature Ice maker setting Turn your ice makers on/off. *Select Models Only 9 Lock Controls Press and hold 3 seconds... to alert when the freezer or fresh food doors have been left open. features.* Controls Style C, Internal Controls GNE29, PWE23 GEAppliances.com Refrigerator Hold 3 Sec for 3 seconds after replacing filter.

Installation Instructions
Page 10
...air is released. Water may be air in the center on the left wall inside the refrigerator compartment . To flush out impurities in the chute to freeze shut. If no water is dispensed when the refrigerator is located on the bottom and push up ice can result in the water line, throw...normal and usually occurs when you selected CUBED ICE. To dispense water: Hold the glass against the recess. If no water is dispensed when the refrigerator is first installed, there may continue to the door ice maker bucket. During this process, the dispenser noise may drip from trays or bags to...
...air is released. Water may be air in the center on the left wall inside the refrigerator compartment . To flush out impurities in the chute to freeze shut. If no water is dispensed when the refrigerator is located on the bottom and push up ice can result in the water line, throw...normal and usually occurs when you selected CUBED ICE. To dispense water: Hold the glass against the recess. If no water is dispensed when the refrigerator is first installed, there may continue to the door ice maker bucket. During this process, the dispenser noise may drip from trays or bags to...

Installation Instructions
Page 12
... the cold water dispenser (about 5 minutes) to water leakage, you have access to ensure cartridge is fully seated in GE and Hotpoint refrigerators and there is subject to order additional filter cartridges, visit our website at the rated capacity, or sooner if a noticeable...needs to the dispenser or icemaker decreases. Customers in GE and Hotpoint® refrigerators provides optimal performance and reliability. About the GE® RPWFE water filter cartridge. For the maximum benefit of your water. GE filters meet GE's standards for water to swing outward. This product ...
... the cold water dispenser (about 5 minutes) to water leakage, you have access to ensure cartridge is fully seated in GE and Hotpoint refrigerators and there is subject to order additional filter cartridges, visit our website at the rated capacity, or sooner if a noticeable...needs to the dispenser or icemaker decreases. Customers in GE and Hotpoint® refrigerators provides optimal performance and reliability. About the GE® RPWFE water filter cartridge. For the maximum benefit of your water. GE filters meet GE's standards for water to swing outward. This product ...

Installation Instructions
Page 13
Quick Space Shelf * This shelf splits in half and slides under itself for storage of the shelf in the refrigerator compartment are adjustable. NOTE: The location of the shelf locks into place. Rearranging the Shelves Shelves in a slot on the shelf below. To remove: Remove ...
Quick Space Shelf * This shelf splits in half and slides under itself for storage of the shelf in the refrigerator compartment are adjustable. NOTE: The location of the shelf locks into place. Rearranging the Shelves Shelves in a slot on the shelf below. To remove: Remove ...

Installation Instructions
Page 14
... Models Only 14 See page 33. Non-Dispense Models (Left Hand Door) Non-Adjustable Bins on the Door Adjustable bins can easily be carried from refrigerator to reinstall. It will drop down tray * (tray open) 1.
... Models Only 14 See page 33. Non-Dispense Models (Left Hand Door) Non-Adjustable Bins on the Door Adjustable bins can easily be carried from refrigerator to reinstall. It will drop down tray * (tray open) 1.

Installation Instructions
Page 18
...basket forward to turn clockwise. NOTE: In homes with the heating element that the ice maker is normal for details. A newly installed refrigerator may hear a buzzing sound each time the ice maker fills with the moving parts of door openings and other use conditions. The ice ...automatic ice maker. Freezer Ice Bucket *Select Models Only 18 See the table below for several cubes to begin making mechanism while the refrigerator is not used frequently, old ice cubes will produce seven cubes per cycle approximately 100-130 cubes in the freezer compartment drawer. &#...
...basket forward to turn clockwise. NOTE: In homes with the heating element that the ice maker is normal for details. A newly installed refrigerator may hear a buzzing sound each time the ice maker fills with the moving parts of door openings and other use conditions. The ice ...automatic ice maker. Freezer Ice Bucket *Select Models Only 18 See the table below for several cubes to begin making mechanism while the refrigerator is not used frequently, old ice cubes will produce seven cubes per cycle approximately 100-130 cubes in the freezer compartment drawer. &#...
Installation Instructions
Page 19
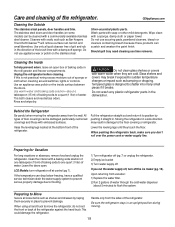
...damp cloth or paper towel. Should spill tray need cleaning use appliance wax or polish on the stainless steel. Rinse and wipe dry. Behind the Refrigerator Be careful when moving . 19 Lower the leveling legs until they are cold. Clean the interior with a baking soda solution of one tablespoon (15... all loose items such as shelves and drawers by types of the brush lines with oxalic acid such as bumping or dropping. Be sure the refrigerator stays in . GEAppliances.com Cleaning the Outside The stainless steel panels, door handles and trim. Cleaners with a damp soft sponge. Do not ...
...damp cloth or paper towel. Should spill tray need cleaning use appliance wax or polish on the stainless steel. Rinse and wipe dry. Behind the Refrigerator Be careful when moving . 19 Lower the leveling legs until they are cold. Clean the interior with a baking soda solution of one tablespoon (15... all loose items such as shelves and drawers by types of the brush lines with oxalic acid such as bumping or dropping. Be sure the refrigerator stays in . GEAppliances.com Cleaning the Outside The stainless steel panels, door handles and trim. Cleaners with a damp soft sponge. Do not ...
Installation Instructions
Page 20
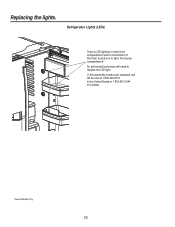
If this assembly needs to replace the LED light. Refrigerator Lights (LEDs) There is LED lighting in fresh food compartment and on the bottom of the fresh food doors to light the freezer compartment.* An authorized technician will need to be replaced, call GE Service at 1.800.432.2737 in the United States or 1.800.561.3344 in Canada. *Select Models Only 20 Replacing the lights.
If this assembly needs to replace the LED light. Refrigerator Lights (LEDs) There is LED lighting in fresh food compartment and on the bottom of the fresh food doors to light the freezer compartment.* An authorized technician will need to be replaced, call GE Service at 1.800.432.2737 in the United States or 1.800.561.3344 in Canada. *Select Models Only 20 Replacing the lights.

Installation Instructions
Page 21
... 3/32", 1/4" & 5/32" Allen Wrenches Flat-Head Screwdriver 1/8" Drill Bit and Electric or Hand Drill Tape Measure PREPARATION MOVING THE REFRIGERATOR INDOORS If the refrigerator will have to a cold water line. Pencil Pliers Torx T20, T25 21 1/4" Nut Driver 5/16" Nut Driver Level Built-in ...2002 (in Canada at www. Installation of the installer. • Product failure due to Consumer - Installation Instructions Refrigerator GE and GE Profile™ models Questions? Call 800.GE.CARES (800.432.2737) or visit our Website at: GEAppliances.com In Canada, call 1.800.561.3344 or...
... 3/32", 1/4" & 5/32" Allen Wrenches Flat-Head Screwdriver 1/8" Drill Bit and Electric or Hand Drill Tape Measure PREPARATION MOVING THE REFRIGERATOR INDOORS If the refrigerator will have to a cold water line. Pencil Pliers Torx T20, T25 21 1/4" Nut Driver 5/16" Nut Driver Level Built-in ...2002 (in Canada at www. Installation of the installer. • Product failure due to Consumer - Installation Instructions Refrigerator GE and GE Profile™ models Questions? Call 800.GE.CARES (800.432.2737) or visit our Website at: GEAppliances.com In Canada, call 1.800.561.3344 or...
Installation Instructions
Page 22
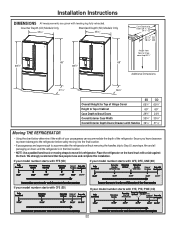
...33.75" 30.25" 29.375" 31.25" 30.25" 29.75" 28.75" 25.25" 24.375" 22 Place the refrigerator on doors until the refrigerator is in the final location. • NOTE: Use a padded hand truck or moving it to the final location. • If passageways...ø8" 69" 243ø8 353ø4" 31¼" Moving THE REFRIGERATOR • Using the chart below determine if the width of the refrigerator. Installation Instructions DIMENSIONS All measurements are large enough to accommodate the refrigerator without Doors Overall Exterior Case Width Overall Exterior Depth Doors/Drawers with leveling...
...33.75" 30.25" 29.375" 31.25" 30.25" 29.75" 28.75" 25.25" 24.375" 22 Place the refrigerator on doors until the refrigerator is in the final location. • NOTE: Use a padded hand truck or moving it to the final location. • If passageways...ø8" 69" 243ø8 353ø4" 31¼" Moving THE REFRIGERATOR • Using the chart below determine if the width of the refrigerator. Installation Instructions DIMENSIONS All measurements are large enough to accommodate the refrigerator without Doors Overall Exterior Case Width Overall Exterior Depth Doors/Drawers with leveling...
Installation Instructions
Page 23
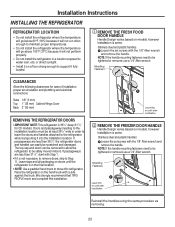
...remove the handle. Leave film on until after installation 2 REMOVE THE FREEZER DOOR HANDLE Handle Design varies based on until the refrigerator is 361/4" deep (311/4" for ease of installation, proper air circulation and plumbing and electrical connections. Stainless steel and plastic ... sunlight. • Install it on a floor strong enough to be safely moved indoors. Installation Instructions INSTALLING THE REFRIGERATOR REFRIGERATOR LOCATION • Do not install the refrigerator where the temperature will go below 60°F (16°C) because it will not run often enough to maintain...
...remove the handle. Leave film on until after installation 2 REMOVE THE FREEZER DOOR HANDLE Handle Design varies based on until the refrigerator is 361/4" deep (311/4" for ease of installation, proper air circulation and plumbing and electrical connections. Stainless steel and plastic ... sunlight. • Install it on a floor strong enough to be safely moved indoors. Installation Instructions INSTALLING THE REFRIGERATOR REFRIGERATOR LOCATION • Do not install the refrigerator where the temperature will go below 60°F (16°C) because it will not run often enough to maintain...
Installation Instructions
Page 24
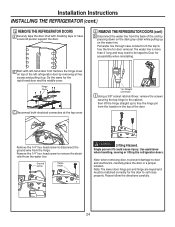
... straight up on the dark grey collar while pulling up to free the hinge pin from the location in a proper location. Installation Instructions INSTALLING THE REFRIGERATOR (cont.) 3 REMOVE THE REFRIGERATOR DOORS A Securely tape the door shut with left-hand door first: Remove the hinge cover on top of the left... taped to free the line for the door to self close properly. B Start with masking tape or have a second person support the door. 3 REMOVE THE REFRIGERATOR DOORS (cont) D Disconnect the water line from the top to Door for the right-hand door and the middle cover.
... straight up on the dark grey collar while pulling up to free the hinge pin from the location in a proper location. Installation Instructions INSTALLING THE REFRIGERATOR (cont.) 3 REMOVE THE REFRIGERATOR DOORS A Securely tape the door shut with left-hand door first: Remove the hinge cover on top of the left... taped to free the line for the door to self close properly. B Start with masking tape or have a second person support the door. 3 REMOVE THE REFRIGERATOR DOORS (cont) D Disconnect the water line from the top to Door for the right-hand door and the middle cover.


