Use and Care Manual
Page 1
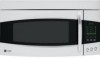
Spacemaker Microwave Oven ge.com Safety Instructions 2-7 Operating Instructions Care and Cleaning 37-40 Cooking Features 12-18 Defrosting Features 21-27 Easy Guide™ Menu System . . . . . .9 Help Features ... Levels 11 Reheating Features 19-20 Troubleshooting Tips 41 Consumer Support Consumer Support . . . DE68-03454A 49-40568-1 11-08 JR Back Cover Warranty 42 Owner's Manual PVM2070 Write the model and serial numbers here: Model Serial Find these numbers on a label on the left front when the door is open.
Spacemaker Microwave Oven ge.com Safety Instructions 2-7 Operating Instructions Care and Cleaning 37-40 Cooking Features 12-18 Defrosting Features 21-27 Easy Guide™ Menu System . . . . . .9 Help Features ... Levels 11 Reheating Features 19-20 Troubleshooting Tips 41 Consumer Support Consumer Support . . . DE68-03454A 49-40568-1 11-08 JR Back Cover Warranty 42 Owner's Manual PVM2070 Write the model and serial numbers here: Model Serial Find these numbers on a label on the left front when the door is open.
Use and Care Manual
Page 3
... laboratory or industrial use the Sensor Features twice in the oven. - If the door is undercooked after the first countdown, use this Owner's Manual. Do not use . - Remove wire twist-ties and metal handles from paper or plastic containers before placing them in succession on page 2....nearest authorized service facility for its intended purpose as described in the Care and Cleaning of the microwave oven section of fire in this manual. If the power cord is damaged, it is not intended for additional cooking time. • See door surface cleaning instructions in...
... laboratory or industrial use the Sensor Features twice in the oven. - If the door is undercooked after the first countdown, use this Owner's Manual. Do not use . - Remove wire twist-ties and metal handles from paper or plastic containers before placing them in succession on page 2....nearest authorized service facility for its intended purpose as described in the Care and Cleaning of the microwave oven section of fire in this manual. If the power cord is damaged, it is not intended for additional cooking time. • See door surface cleaning instructions in...
Use and Care Manual
Page 6
... directed in the oven both the dish you are not, plastic could ignite. When using foil in injury. safe, use this test: Place in this manual. SAVE THESE INSTRUCTIONS 6 Some cookware is labeled "suitable for microwaving." • If you use a meat thermometer while cooking, make sure it should be as tolerant...
... directed in the oven both the dish you are not, plastic could ignite. When using foil in injury. safe, use this test: Place in this manual. SAVE THESE INSTRUCTIONS 6 Some cookware is labeled "suitable for microwaving." • If you use a meat thermometer while cooking, make sure it should be as tolerant...

Use and Care Manual
Page 8
Microwave Oven Features ge.com Throughout this manual, features and appearance may be removed for the microwave to operate. 2 Door Latches. 3 Window with Metal Shield. Features of the microwave oven. 8 Press the graphics ...
Microwave Oven Features ge.com Throughout this manual, features and appearance may be removed for the microwave to operate. 2 Door Latches. 3 Window with Metal Shield. Features of the microwave oven. 8 Press the graphics ...

Use and Care Manual
Page 44
... expires. Get on -line. Or call 800.TDD.GEAC (800.833.4322). Extended Warranties ge.com Purchase a GE extended warranty and learn about special discounts that can now download Owner's Manuals, order parts or even schedule service on -line and schedule your service at your convenience any... day of the year! Real Life Design Studio ge.com GE supports the Universal Design concept-products, services, and environments ...
... expires. Get on -line. Or call 800.TDD.GEAC (800.833.4322). Extended Warranties ge.com Purchase a GE extended warranty and learn about special discounts that can now download Owner's Manuals, order parts or even schedule service on -line and schedule your service at your convenience any... day of the year! Real Life Design Studio ge.com GE supports the Universal Design concept-products, services, and environments ...

Installation Instructions
Page 1
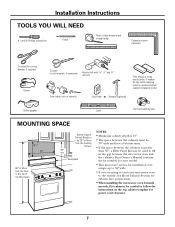
...governing codes and ordinances. • Note to leave these instructions for future reference. • Skill level - Installation of this manual, visit our Website at : ge.com BEFORE YOU BEGIN Read these instructions for local inspector's use. • IMPORTANT - READ CAREFULLY. Save these instructions with the... the Warranty. Be sure to Installer - Para consultar una version en español de este manual de instrucciones, visite nuestro sitio de internet ge.com. KEEP THESE INSTRUCTIONS. Keep these instructions completely and carefully. • IMPORTANT - Call 800...
...governing codes and ordinances. • Note to leave these instructions for future reference. • Skill level - Installation of this manual, visit our Website at : ge.com BEFORE YOU BEGIN Read these instructions for local inspector's use. • IMPORTANT - READ CAREFULLY. Save these instructions with the... the Warranty. Be sure to Installer - Para consultar una version en español de este manual de instrucciones, visite nuestro sitio de internet ge.com. KEEP THESE INSTRUCTIONS. Keep these instructions completely and carefully. • IMPORTANT - Call 800...
Installation Instructions
Page 7
... depth is 13″. • The space between the cabinets must be 30″ or More from the Cooking Surface 30″ min. Your Owner's Manual contains the kit number for your model. • This microwave oven is greater than 30″, a Filler Panel Kit may be used on the top...
... depth is 13″. • The space between the cabinets must be 30″ or More from the Cooking Surface 30″ min. Your Owner's Manual contains the kit number for your model. • This microwave oven is greater than 30″, a Filler Panel Kit may be used on the top...
Installation Instructions
Page 11
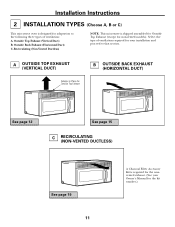
... Ductless) NOTE: This microwave is shipped assembled for Outside Top Exhaust (except for the kit number.) Select the type of ventilation required for your Owner's Manual for non-vented models). A OUTSIDE TOP EXHAUST (VERTICAL DUCT) Adaptor in Place for Outside Top Exhaust B OUTSIDE BACK EXHAUST (HORIZONTAL DUCT) See page 12 See...
... Ductless) NOTE: This microwave is shipped assembled for Outside Top Exhaust (except for the kit number.) Select the type of ventilation required for your Owner's Manual for non-vented models). A OUTSIDE TOP EXHAUST (VERTICAL DUCT) Adaptor in Place for Outside Top Exhaust B OUTSIDE BACK EXHAUST (HORIZONTAL DUCT) See page 12 See...
Installation Instructions
Page 14
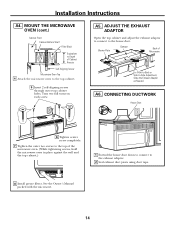
... microwave oven in place against the wall and the top cabinet.) 1 Extend the house duct down to connect to the house duct. See the Owner's Manual packed with the microwave. 14 Installation Instructions A4. ADJUST THE EXHAUST ADAPTOR Open the top cabinet and adjust the exhaust adaptor to connect to the...
... microwave oven in place against the wall and the top cabinet.) 1 Extend the house duct down to connect to the house duct. See the Owner's Manual packed with the microwave. 14 Installation Instructions A4. ADJUST THE EXHAUST ADAPTOR Open the top cabinet and adjust the exhaust adaptor to connect to the...
Installation Instructions
Page 18
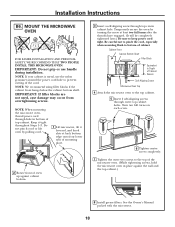
... outer two screws to the top of the microwave oven. (While tightening screws, hold the microwave oven in bottom of the cord. See the Owner's Manual packed with the microwave. 18 IMPORTANT: If filler blocks are not used, case damage may occur from overtightening screws. MOUNT THE MICROWAVE OVEN FOR EASIER...
... outer two screws to the top of the microwave oven. (While tightening screws, hold the microwave oven in bottom of the cord. See the Owner's Manual packed with the microwave. 18 IMPORTANT: If filler blocks are not used, case damage may occur from overtightening screws. MOUNT THE MICROWAVE OVEN FOR EASIER...
Installation Instructions
Page 22
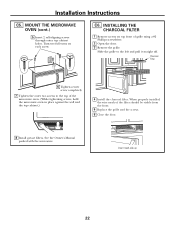
... microwave oven. (While tightening screws, hold the microwave oven in place against the wall and the top cabinet.) 4 Install the charcoal filter. See the Owner's Manual packed with the microwave. When properly installed, the wire mesh of grille using a #2 Phillips screwdriver. 2 Open the door. 3 Remove the grille.
... microwave oven. (While tightening screws, hold the microwave oven in place against the wall and the top cabinet.) 4 Install the charcoal filter. See the Owner's Manual packed with the microwave. When properly installed, the wire mesh of grille using a #2 Phillips screwdriver. 2 Open the door. 3 Remove the grille.

Installation Instructions
Page 23
Install turntable and ring in cavity. 4. Plug power cord into a dedicated 15- to instructions. 6. Ensure proper ground exists before use 23 Read the Owner's Manual. 2. Remove all packing material from the microwave oven. 3. Replace house fuse or turn breaker back on. 7. KEEP INSTALLATION INSTRUCTIONS FOR THE LOCAL INSPECTOR'S USE. 5. Make sure the microwave oven has been installed according to 20-amp electrical outlet. Installation Instructions BEFORE YOU USE YOUR MICROWAVE 1.
Install turntable and ring in cavity. 4. Plug power cord into a dedicated 15- to instructions. 6. Ensure proper ground exists before use 23 Read the Owner's Manual. 2. Remove all packing material from the microwave oven. 3. Replace house fuse or turn breaker back on. 7. KEEP INSTALLATION INSTRUCTIONS FOR THE LOCAL INSPECTOR'S USE. 5. Make sure the microwave oven has been installed according to 20-amp electrical outlet. Installation Instructions BEFORE YOU USE YOUR MICROWAVE 1.


