Use and Care Manual
Page 4
... automatically under the microwave, turn the fan on surface units only when necessary. Do not allow grease to build up on the microwave or the fan filters. • In the event of a grease fire on the surface units below the microwave oven, smother a flaming pan on the surface unit...8226; Foil not molded to prevent the starting and spreading of the microwave often. Boilovers cause smoking and greasy spillovers that may damage the filters. • When preparing flaming foods under certain conditions (see arcing, press the OFF pad and correct the problem. Corrosive cleaning agents, such...
... automatically under the microwave, turn the fan on surface units only when necessary. Do not allow grease to build up on the microwave or the fan filters. • In the event of a grease fire on the surface units below the microwave oven, smother a flaming pan on the surface unit...8226; Foil not molded to prevent the starting and spreading of the microwave often. Boilovers cause smoking and greasy spillovers that may damage the filters. • When preparing flaming foods under certain conditions (see arcing, press the OFF pad and correct the problem. Corrosive cleaning agents, such...

Use and Care Manual
Page 8
...placed directly on the inside the oven cavity. 6 Touchscreen Display. If the Touchscreen is open the door to access the menu. 7 Cooktop Light. 8 Grease Filters. 9 Removable Turntable. Helps circulate microwaves throughout the oven cavity for cleaning. 10 Side Stirrer. NOTE: Rating plate is located on more than one level.... the door. Lets you microwave several foods at once. The door must be in the oven. 4 Active Vent. Microwave Oven Features ge.com Throughout this manual, features and appearance may be removed for consistent heating and defrosting. Only use the oven features.
...placed directly on the inside the oven cavity. 6 Touchscreen Display. If the Touchscreen is open the door to access the menu. 7 Cooktop Light. 8 Grease Filters. 9 Removable Turntable. Helps circulate microwaves throughout the oven cavity for cleaning. 10 Side Stirrer. NOTE: Rating plate is located on more than one level.... the door. Lets you microwave several foods at once. The door must be in the oven. 4 Active Vent. Microwave Oven Features ge.com Throughout this manual, features and appearance may be removed for consistent heating and defrosting. Only use the oven features.
Use and Care Manual
Page 38
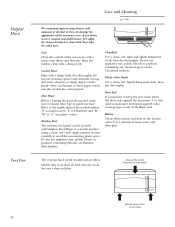
... "C" are plastic colors. CleanSteel Use a clean, soft, light and lightly dampened cloth, then dry thoroughly. The vent fan has 2 metal reusable grease filters. Apply stainless cleaner carefully to keep the area clean where the door seals against using a clean, soft cloth. Door Seal It's important to avoid...Bottom Clean off the grease and dust on all models) 38 Models that recirculate air back into the room also use appliance wax, polish, bleach or products containing chlorine on Stainless Steel finishes. Helpful Hints Vent Fan Care and Cleaning ge.com We recommend ...
... "C" are plastic colors. CleanSteel Use a clean, soft, light and lightly dampened cloth, then dry thoroughly. The vent fan has 2 metal reusable grease filters. Apply stainless cleaner carefully to keep the area clean where the door seals against using a clean, soft cloth. Door Seal It's important to avoid...Bottom Clean off the grease and dust on all models) 38 Models that recirculate air back into the room also use appliance wax, polish, bleach or products containing chlorine on Stainless Steel finishes. Helpful Hints Vent Fan Care and Cleaning ge.com We recommend ...
Use and Care Manual
Page 39
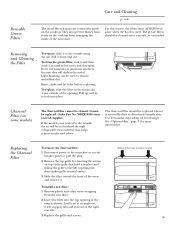
... embedded dirt. If the model is used to the outside of the opening of the microwave. The grease filters should be recirculated through a disposable charcoal filter that hold it . WB2X10956 from the new filter. 2 Insert the filter into place. Reusable Grease Filters Care and Cleaning ge.com The metal filters trap grease released by removing the screws on the cooktop.
... embedded dirt. If the model is used to the outside of the opening of the microwave. The grease filters should be recirculated through a disposable charcoal filter that hold it . WB2X10956 from the new filter. 2 Insert the filter into place. Reusable Grease Filters Care and Cleaning ge.com The metal filters trap grease released by removing the screws on the cooktop.

Installation Instructions
Page 6
.... • If the unit is damaged in a packet with the unit. ADDITIONAL PARTS PART Top Cabinet Template QUANTITY 1 Rear Wall 1 Template Installation 1 Instructions Separately 2 Packed Grease Filters 6
.... • If the unit is damaged in a packet with the unit. ADDITIONAL PARTS PART Top Cabinet Template QUANTITY 1 Rear Wall 1 Template Installation 1 Instructions Separately 2 Packed Grease Filters 6
Installation Instructions
Page 14
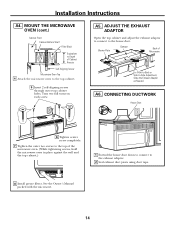
... two screws to the top of Microwave For Front-to-Back or Side-to the exhaust adaptor. 2 Seal exhaust duct joints using duct tape. 8 Install grease filters. Blower Plate Damper Back of the microwave oven. (While tightening screws, hold the microwave oven in place against the wall and the top cabinet.) 1 Extend...
... two screws to the top of Microwave For Front-to-Back or Side-to the exhaust adaptor. 2 Seal exhaust duct joints using duct tape. 8 Install grease filters. Blower Plate Damper Back of the microwave oven. (While tightening screws, hold the microwave oven in place against the wall and the top cabinet.) 1 Extend...
Installation Instructions
Page 18
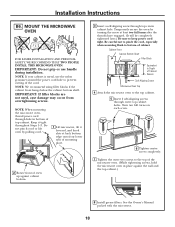
... oven in place against cabinet bottom. 3 Insert a self-aligning screw through hole in bottom of oven up against the wall and the top cabinet.) 8 Install grease filters. IMPORTANT: If filler blocks are not used, case damage may occur from overtightening screws. Be careful not to pinch the cord, especially when mounting flush...
... oven in place against cabinet bottom. 3 Insert a self-aligning screw through hole in bottom of oven up against the wall and the top cabinet.) 8 Install grease filters. IMPORTANT: If filler blocks are not used, case damage may occur from overtightening screws. Be careful not to pinch the cord, especially when mounting flush...
Installation Instructions
Page 22
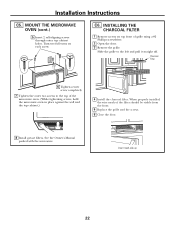
... be visible from the front. 5 Replace the grille and the screws. 6 Close the door. 8 Install grease filters. See the Owner's Manual packed with the microwave. Charcoal Filter 6 Tighten center screw completely. 7 Tighten the outer two screws to the left and pull it straight off. Turn two full turns on top front of ... wire mesh of the microwave oven. (While tightening screws, hold the microwave oven in place against the wall and the top cabinet.) 4 Install the charcoal filter.
... be visible from the front. 5 Replace the grille and the screws. 6 Close the door. 8 Install grease filters. See the Owner's Manual packed with the microwave. Charcoal Filter 6 Tighten center screw completely. 7 Tighten the outer two screws to the left and pull it straight off. Turn two full turns on top front of ... wire mesh of the microwave oven. (While tightening screws, hold the microwave oven in place against the wall and the top cabinet.) 4 Install the charcoal filter.


