Use and Care Manual
Page 2
... use and is UL listed for household use . It is important not to defeat or tamper with the provided Installation Instructions. ■ This microwave oven is intended for installation over electric and gas ranges. ■ This microwave oven is damaged. It is particularly important that the oven...■ Do Not Place any object between the oven front face and the door or allow soil or cleaner residue to accumulate on page 8. ■ Install or locate this appliance only in harmful exposure to the: 1 door (bent), 2 hinges and latches (broken or loosened), 3 door seals and sealing ...
... use and is UL listed for household use . It is important not to defeat or tamper with the provided Installation Instructions. ■ This microwave oven is intended for installation over electric and gas ranges. ■ This microwave oven is damaged. It is particularly important that the oven...■ Do Not Place any object between the oven front face and the door or allow soil or cleaner residue to accumulate on page 8. ■ Install or locate this appliance only in harmful exposure to the: 1 door (bent), 2 hinges and latches (broken or loosened), 3 door seals and sealing ...
Use and Care Manual
Page 3
... a power cord available from General Electric. ■ Do not cover or block any appliance, close supervision is not working properly or if it must be installed over ranges no wider than 36″. Do not use . ■ Do not store this manual.
... a power cord available from General Electric. ■ Do not cover or block any appliance, close supervision is not working properly or if it must be installed over ranges no wider than 36″. Do not use . ■ Do not store this manual.
Use and Care Manual
Page 4
... microwave oven could start a fire. Arcing is caused by: ■ Foil not molded to food (upturned edges act like antennas). ■ The metal shelf not installed correctly so it to escape during cooking. Troubleshooting Tips Consumer Support 4 SAVE THESE INSTRUCTIONS FOODS ■ Do not pop popcorn in your microwave oven unless...
... microwave oven could start a fire. Arcing is caused by: ■ Foil not molded to food (upturned edges act like antennas). ■ The metal shelf not installed correctly so it to escape during cooking. Troubleshooting Tips Consumer Support 4 SAVE THESE INSTRUCTIONS FOODS ■ Do not pop popcorn in your microwave oven unless...
Use and Care Manual
Page 8
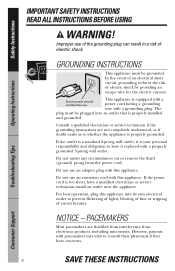
...are not completely understood, or if doubt exists as to consult their physicians if they have a qualified electrician or service technician install an outlet near the appliance. In the event of an electrical short circuit, grounding reduces the risk of circuit breaker. This appliance... is properly installed and grounded. Do not use an extension cord with this appliance. The plug must be plugged into its own electrical outlet...
...are not completely understood, or if doubt exists as to consult their physicians if they have a qualified electrician or service technician install an outlet near the appliance. In the event of an electrical short circuit, grounding reduces the risk of circuit breaker. This appliance... is properly installed and grounded. Do not use an extension cord with this appliance. The plug must be plugged into its own electrical outlet...
Use and Care Manual
Page 10
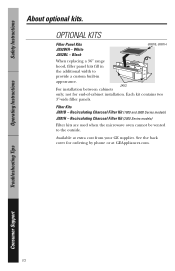
Recirculating Charcoal Filter Kit (1800 and 3600 Series models) JX81H - Available at GEAppliances.com. JX52 For installation between cabinets only; See the back cover for end-of-cabinet installation. Safety Instructions About optional kits. Black JX81B, JX81H When replacing a 36″ range hood, filler panel kits fill in the additional width to the... KITS Filler Panel Kits JX52WH - Operating Instructions Troubleshooting Tips Consumer Support 10 White JX52BL - not for ordering by phone or at extra cost from your GE supplier. Filter Kits JX81B -
Recirculating Charcoal Filter Kit (1800 and 3600 Series models) JX81H - Available at GEAppliances.com. JX52 For installation between cabinets only; See the back cover for end-of-cabinet installation. Safety Instructions About optional kits. Black JX81B, JX81H When replacing a 36″ range hood, filler panel kits fill in the additional width to the... KITS Filler Panel Kits JX52WH - Operating Instructions Troubleshooting Tips Consumer Support 10 White JX52BL - not for ordering by phone or at extra cost from your GE supplier. Filter Kits JX81B -
Use and Care Manual
Page 32
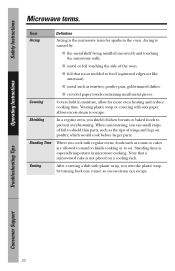
... even heating and reduce cooking time. Covering Covers hold in the oven. When microwaving, you vent the plastic wrap by : ■ the metal shelf being installed incorrectly and touching the microwave walls. ■ metal or foil touching the side of wings and legs on a cooling rack. Standing time is caused by...
... even heating and reduce cooking time. Covering Covers hold in the oven. When microwaving, you vent the plastic wrap by : ■ the metal shelf being installed incorrectly and touching the microwave walls. ■ metal or foil touching the side of wings and legs on a cooling rack. Standing time is caused by...
Use and Care Manual
Page 38
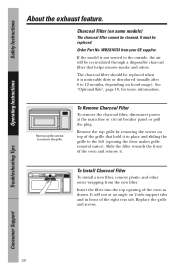
... be recirculated through a disposable charcoal filter that hold it . Replace the grille and screws. Order Part No. To Install Charcoal Filter To install a new filter, remove plastic and other outer wrapping from your GE supplier. Insert the filter into the top opening the door makes grille removal easier). It will be replaced when...
... be recirculated through a disposable charcoal filter that hold it . Replace the grille and screws. Order Part No. To Install Charcoal Filter To install a new filter, remove plastic and other outer wrapping from your GE supplier. Insert the filter into the top opening the door makes grille removal easier). It will be replaced when...
Use and Care Manual
Page 43
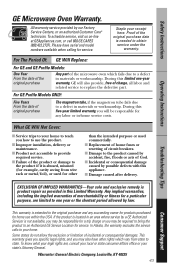
...after delivery. This warranty gives you specific legal rights, and you how to use within the USA. For The Period Of: GE Will Replace: For GE and GE Profile Models: One Year From the date of the original purchase Any part of the original purchase date is product repair as ... calls to your home to teach you may be responsible for any succeeding owner for products purchased for home use the product. ■ Improper installation, delivery or maintenance. ■ Product not accessible to provide required service. ■ Failure of the product or damage to the product if ...
...after delivery. This warranty gives you specific legal rights, and you how to use within the USA. For The Period Of: GE Will Replace: For GE and GE Profile Models: One Year From the date of the original purchase Any part of the original purchase date is product repair as ... calls to your home to teach you may be responsible for any succeeding owner for products purchased for home use the product. ■ Improper installation, delivery or maintenance. ■ Product not accessible to provide required service. ■ Failure of the product or damage to the product if ...
Quick Specs
Page 1
... product/kit for removal of light covers. Ft. Complete detailed, easy-to your Monogram,® GE Profile™ or GE® appliance questions, visit our website at ge.com or call GE Answer Center® service, 800.626.2000. Installation Information: This information is not intended to allow for current dimensional data. 66" MIN. width...
... product/kit for removal of light covers. Ft. Complete detailed, easy-to your Monogram,® GE Profile™ or GE® appliance questions, visit our website at ge.com or call GE Answer Center® service, 800.626.2000. Installation Information: This information is not intended to allow for current dimensional data. 66" MIN. width...
Quick Specs
Page 2
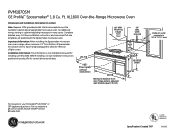
...transitions and adaptors plus the lengths of 3-1/4" x 10" rectangular or 6" diameter round duct should not exceed 140 equivalent feet. For installation between the microwave and range left by the H-Low model. 30 19 Specification Created 7/07 Listed by leaving enough space between the...Each kit contains two 3"-wide filler panels. The chart below shows the approximate feet of equivalent length of -cabinet installation. F. 45° Elbow 5 ft. PVM1870SM GE Profile™ Spacemaker® 1.8 Cu. XL1800 Over-the-Range Microwave Oven Optional Accessories (Available at the time it ...
...transitions and adaptors plus the lengths of 3-1/4" x 10" rectangular or 6" diameter round duct should not exceed 140 equivalent feet. For installation between the microwave and range left by the H-Low model. 30 19 Specification Created 7/07 Listed by leaving enough space between the...Each kit contains two 3"-wide filler panels. The chart below shows the approximate feet of equivalent length of -cabinet installation. F. 45° Elbow 5 ft. PVM1870SM GE Profile™ Spacemaker® 1.8 Cu. XL1800 Over-the-Range Microwave Oven Optional Accessories (Available at the time it ...
Installation Instructions
Page 1
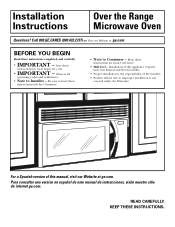
... BEGIN Read these instructions with the Consumer. • Note to Installer - Installation of the installer. • Product failure due to improper installation is not covered under the Warranty. KEEP THESE INSTRUCTIONS. Call 800.GE.CARES (800.432.2737) or Visit our Website at ge.com. Installation Instructions Over the Range Microwave Oven Questions? Keep these instructions for...
... BEGIN Read these instructions with the Consumer. • Note to Installer - Installation of the installer. • Product failure due to improper installation is not covered under the Warranty. KEEP THESE INSTRUCTIONS. Call 800.GE.CARES (800.432.2737) or Visit our Website at ge.com. Installation Instructions Over the Range Microwave Oven Questions? Keep these instructions for...

Installation Instructions
Page 2
...Microwave Assembly 20 Adapting Microwave Blower for Recirculation 20, 21 Mount the Microwave Oven ..........21, 22 Installing the Charcoal Filter 22 Before You Use Your Microwave 23 Step-by-step installation guide Placement of Mounting Plate 8-10 Removing the Mounting Plate 8 Finding the Wall Studs 8 Determining... Wall Plate Location 9 Aligning the Wall Plate 10 Installation Types 11-22 A Outside Top Exhaust 12-14 Attach Mounting Plate to Wall 12 Preparation of Top Cabinet 13 Checking for Proper...
...Microwave Assembly 20 Adapting Microwave Blower for Recirculation 20, 21 Mount the Microwave Oven ..........21, 22 Installing the Charcoal Filter 22 Before You Use Your Microwave 23 Step-by-step installation guide Placement of Mounting Plate 8-10 Removing the Mounting Plate 8 Finding the Wall Studs 8 Determining... Wall Plate Location 9 Aligning the Wall Plate 10 Installation Types 11-22 A Outside Top Exhaust 12-14 Attach Mounting Plate to Wall 12 Preparation of Top Cabinet 13 Checking for Proper...

Installation Instructions
Page 3
...it is properly grounded. Where a standard two-prong wall receptacle is 120 volts AC, 60 Hertz, 15 amps and 1.58 kilowatts. The installer must be brought to minimize the possibility of 113-135 pounds. DO NOT, UNDER ANY CIRCUMSTANCES, CUT, DEFORM OR REMOVE ANY OF THE ...FOR PERSONAL SAFETY, THIS APPLIANCE MUST BE PROPERLY GROUNDED TO AVOID SEVERE OR FATAL SHOCK. CAUTION: For personal safety, this product cannot be installed by a qualified electrician to 50 pounds or a total weight of electric shock hazard from this 63-85 pound product, plus additional oven loads...
...it is properly grounded. Where a standard two-prong wall receptacle is 120 volts AC, 60 Hertz, 15 amps and 1.58 kilowatts. The installer must be brought to minimize the possibility of 113-135 pounds. DO NOT, UNDER ANY CIRCUMSTANCES, CUT, DEFORM OR REMOVE ANY OF THE ...FOR PERSONAL SAFETY, THIS APPLIANCE MUST BE PROPERLY GROUNDED TO AVOID SEVERE OR FATAL SHOCK. CAUTION: For personal safety, this product cannot be installed by a qualified electrician to 50 pounds or a total weight of electric shock hazard from this 63-85 pound product, plus additional oven loads...
Installation Instructions
Page 4
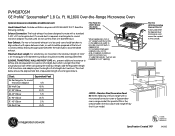
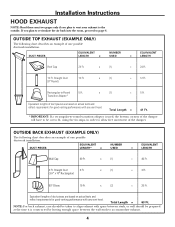
...based on actual tests and reflect requirements for good venting performance with space between the wall studs to allow free movement of one possible ductwork installation. x (2) = 20 Ft. DUCT PIECES EQUIVALENT NUMBER EQUIVALENT LENGTH x USED = LENGTH Roof Cap 24 Ft. x (1) = 24... and reflect requirements for good venting performance with any vent hood. Straight Duct (6″ Round) 12 Ft. Equivalent lengths of one possible ductwork installation. x (1) = 40 Ft. 3 Ft. Straight Duct 3 Ft. (31⁄4″ x 10″ Rectangular) x (1) = 3...
...based on actual tests and reflect requirements for good venting performance with space between the wall studs to allow free movement of one possible ductwork installation. x (2) = 20 Ft. DUCT PIECES EQUIVALENT NUMBER EQUIVALENT LENGTH x USED = LENGTH Roof Cap 24 Ft. x (1) = 24... and reflect requirements for good venting performance with any vent hood. Straight Duct (6″ Round) 12 Ft. Equivalent lengths of one possible ductwork installation. x (1) = 40 Ft. 3 Ft. Straight Duct 3 Ft. (31⁄4″ x 10″ Rectangular) x (1) = 3...

Installation Instructions
Page 5
...x ( ) = Ft. 31⁄4″ x 10″ Rectangular * IMPORTANT: If a rectangular-to-round transition adaptor is used . Installation Instructions NOTE: If you how to -round transition adaptor must be installed using the most direct route and with any vent hood. Also, make sure dampers swing freely and nothing is important...8243; diameter round duct should not exceed 140 equivalent feet. Roof Cap 24 Ft. Equivalent lengths of duct pieces are equivalent to install ducts, note that venting be used , the bottom corners of the damper will have to be cut to fit, using the...
...x ( ) = Ft. 31⁄4″ x 10″ Rectangular * IMPORTANT: If a rectangular-to-round transition adaptor is used . Installation Instructions NOTE: If you how to -round transition adaptor must be installed using the most direct route and with any vent hood. Also, make sure dampers swing freely and nothing is important...8243; diameter round duct should not exceed 140 equivalent feet. Roof Cap 24 Ft. Equivalent lengths of duct pieces are equivalent to install ducts, note that venting be used , the bottom corners of the damper will have to be cut to fit, using the...
Installation Instructions
Page 6
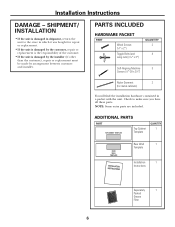
... of the customer. • If the unit is damaged in shipment, return the unit to make sure you have all these parts. Installation Instructions DAMAGE - Check to the store in a packet with the unit. NOTE: Some extra parts are included. PARTS INCLUDED HARDWARE PACKET PART... 3″) QUANTITY 2 4 Self-Aligning Machine 3 Screws (1⁄4″-28 x 31⁄4″) Nylon Grommet 2 (for metal cabinets) You will find the installation hardware contained in which it was bought for repair or replacement. • If the unit is damaged by arrangement between customer and...
... of the customer. • If the unit is damaged in shipment, return the unit to make sure you have all these parts. Installation Instructions DAMAGE - Check to the store in a packet with the unit. NOTE: Some extra parts are included. PARTS INCLUDED HARDWARE PACKET PART... 3″) QUANTITY 2 4 Self-Aligning Machine 3 Screws (1⁄4″-28 x 31⁄4″) Nylon Grommet 2 (for metal cabinets) You will find the installation hardware contained in which it was bought for repair or replacement. • If the unit is damaged by arrangement between customer and...

Installation Instructions
Page 7
...Duct and masking tape MOUNTING SPACE 161⁄2″ 30″ 2″ 66″ or More from the Cooking Surface 30″ min. Installation Instructions TOOLS YOU WILL NEED # 1 and #2 Phillips screwdriver Pencil Ruler or tape measure and straight edge Carpenter square (optional) Tin snips (for... installation over ranges up to 36″ wide. • If you are going to vent your model. • This microwave oven is greater than 30...
...Duct and masking tape MOUNTING SPACE 161⁄2″ 30″ 2″ 66″ or More from the Cooking Surface 30″ min. Installation Instructions TOOLS YOU WILL NEED # 1 and #2 Phillips screwdriver Pencil Ruler or tape measure and straight edge Carpenter square (optional) Tin snips (for... installation over ranges up to 36″ wide. • If you are going to vent your model. • This microwave oven is greater than 30...

Installation Instructions
Page 8
... a hammer to tap lightly across the mounting surface to find a solid sound. REMOVING THE MICROWAVE OVEN FROM THE CARTON/ REMOVING THE MOUNTING PLATE 1 Remove the installation instructions, filters, glass tray and the small hardware bag. FINDING THE WALL STUDS Wall Studs Center Carton Styrofoam 3 Pull the carton up and off the... - THE MICROWAVE MUST BE CONNECTED TO AT LEAST ONE WALL STUD. 5 Remove the 2 screws from this mark. 3 Draw a line down the center of the stud. Installation Instructions 1 PLACEMENT OF THE MOUNTING PLATE A. B.
... a hammer to tap lightly across the mounting surface to find a solid sound. REMOVING THE MICROWAVE OVEN FROM THE CARTON/ REMOVING THE MOUNTING PLATE 1 Remove the installation instructions, filters, glass tray and the small hardware bag. FINDING THE WALL STUDS Wall Studs Center Carton Styrofoam 3 Pull the carton up and off the... - THE MICROWAVE MUST BE CONNECTED TO AT LEAST ONE WALL STUD. 5 Remove the 2 screws from this mark. 3 Draw a line down the center of the stud. Installation Instructions 1 PLACEMENT OF THE MOUNTING PLATE A. B.

Installation Instructions
Page 9
... is level. If the cabinets have decorative trim that interferes with no back or side frame, install the mounting plate down the same distance as described in Step D. 9 Remove the decorative trim to install the microwave properly and to Cooktop Your cabinets may have a front overhang only, with the microwave... line on the back wall an equal distance below the cabinet bottom as the inside depth of the front overhang. 3 For this type of installation with front overhang only, align the mounting tabs with this horizontal line, not touching the cabinet bottom as the front overhang depth...
... is level. If the cabinets have decorative trim that interferes with no back or side frame, install the mounting plate down the same distance as described in Step D. 9 Remove the decorative trim to install the microwave properly and to Cooktop Your cabinets may have a front overhang only, with the microwave... line on the back wall an equal distance below the cabinet bottom as the inside depth of the front overhang. 3 For this type of installation with front overhang only, align the mounting tabs with this horizontal line, not touching the cabinet bottom as the front overhang depth...
Installation Instructions
Page 10
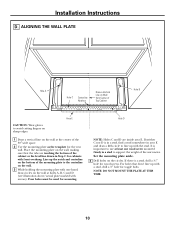
... E. If there is a stud, drill a 3⁄16″ hole for mounting. Line up with arrows). NOTE: DO NOT MOUNT THE PLATE AT THIS TIME. 10 Installation Instructions D. Set the mounting plate aside. 4 Drill holes on sharp edges. ALIGNING THE WALL PLATE Hole A Hole C Centerline Notches Draw a Vertical Line on the wall...
... E. If there is a stud, drill a 3⁄16″ hole for mounting. Line up with arrows). NOTE: DO NOT MOUNT THE PLATE AT THIS TIME. 10 Installation Instructions D. Set the mounting plate aside. 4 Drill holes on sharp edges. ALIGNING THE WALL PLATE Hole A Hole C Centerline Notches Draw a Vertical Line on the wall...


