Use and Care Manual
Page 1
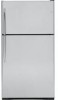
...Find these numbers on the gray label on the left side, near the top of California Water Treatment Device Certificate 28 Warranty for Canadian Customers . . .29 Warranty for U.S. RefrigeraTotp-Froeerzers ge.com Safety Instructions Connect Electricity 3 Extension Cords 2 Proper Disposal 2 Safety Precautions...to Install the Refrigerator 13 Reversing the Door Swing . . . . . .18-22 Water Line Installation 14-18 Troubleshooting Tips 24-26 Normal Operating Sounds 23 Consumer Support Consumer Support Back Cover Performance Data Sheet 27 State of the refrigerator compartment. 200D8221P001...
...Find these numbers on the gray label on the left side, near the top of California Water Treatment Device Certificate 28 Warranty for Canadian Customers . . .29 Warranty for U.S. RefrigeraTotp-Froeerzers ge.com Safety Instructions Connect Electricity 3 Extension Cords 2 Proper Disposal 2 Safety Precautions...to Install the Refrigerator 13 Reversing the Door Swing . . . . . .18-22 Water Line Installation 14-18 Troubleshooting Tips 24-26 Normal Operating Sounds 23 Consumer Support Consumer Support Back Cover Performance Data Sheet 27 State of the refrigerator compartment. 200D8221P001...
Use and Care Manual
Page 2
... place so that any other appliance. Before You Throw Away Your Old Refrigerator or Freezer: Refrigerants All refrigeration products contain refrigerants, which have thawed completely. NOTE: We strongly recommend that children may stick to the light circuit. I Leave the shelves in the freezer compartment when hands are still dangerous...even if they will sit for its...
... place so that any other appliance. Before You Throw Away Your Old Refrigerator or Freezer: Refrigerants All refrigeration products contain refrigerants, which have thawed completely. NOTE: We strongly recommend that children may stick to the light circuit. I Leave the shelves in the freezer compartment when hands are still dangerous...even if they will sit for its...
Use and Care Manual
Page 3
...ge.com WARNING! The power cord of electric shock hazard from this appliance. This provides the best performance and also prevents overloading house wiring circuits which could cause a fire hazard from the outlet. Repair or replace immediately all power cords that have it is properly grounded. The refrigerator... SAFETY INFORMATION CAREFULLY. Never unplug your personal responsibility and obligation to have become frayed or otherwise damaged. When moving the refrigerator away from the power cord. Do not use a cord that matches the rating plate. If the outlet is a ...
...ge.com WARNING! The power cord of electric shock hazard from this appliance. This provides the best performance and also prevents overloading house wiring circuits which could cause a fire hazard from the outlet. Repair or replace immediately all power cords that have it is properly grounded. The refrigerator... SAFETY INFORMATION CAREFULLY. Never unplug your personal responsibility and obligation to have become frayed or otherwise damaged. When moving the refrigerator away from the power cord. Do not use a cord that matches the rating plate. If the outlet is a ...

Use and Care Manual
Page 4
...the control settings will look like one of the following: ADJUST FREEZER TEMP COLDER WARMER 9 IS COLDEST ACTIVATE LOCK HOLD 3 SECS ADJUST REFRIGERATOR TEMP COLDER WARMER 9 IS COLDEST Initially, set the refrigerator control at 5 and the freezer control at a time, and allow 12-24 hours for 3 ... will not be changed . 4 Consumer Support On some models) This feature allows you set the controls. • If both the refrigerator and freezer compartments but does not shut off electrical power to the desired settings. Touch pad controls • Setting either COLDER pad is pressed, the...
...the control settings will look like one of the following: ADJUST FREEZER TEMP COLDER WARMER 9 IS COLDEST ACTIVATE LOCK HOLD 3 SECS ADJUST REFRIGERATOR TEMP COLDER WARMER 9 IS COLDEST Initially, set the refrigerator control at 5 and the freezer control at a time, and allow 12-24 hours for 3 ... will not be changed . 4 Consumer Support On some models) This feature allows you set the controls. • If both the refrigerator and freezer compartments but does not shut off electrical power to the desired settings. Touch pad controls • Setting either COLDER pad is pressed, the...

Use and Care Manual
Page 5
... the WARMER or COLDER pad. To turn the cooling system off, tap the WARMER pad for either the refrigerator or freezer. Locking the Controls (on some models) This feature allows you have set temperature. Safety Instructions Operating Instructions ...ge.com The temperature controls are locked, the indicator light will come on the side you adjust controls, allow 24 hours for the temperature to stabilize to the preset points of 0°F for the freezer and 37°F for 3 seconds. When the controls are preset in the refrigerator and freezer. Setting either the refrigerator...
... the WARMER or COLDER pad. To turn the cooling system off, tap the WARMER pad for either the refrigerator or freezer. Locking the Controls (on some models) This feature allows you have set temperature. Safety Instructions Operating Instructions ...ge.com The temperature controls are locked, the indicator light will come on the side you adjust controls, allow 24 hours for the temperature to stabilize to the preset points of 0°F for the freezer and 37°F for 3 seconds. When the controls are preset in the refrigerator and freezer. Setting either the refrigerator...

Use and Care Manual
Page 6
...first remove the old one. NOTE: Some models ship with the filter bypass plug in the United States, visit our Website, ge.com, or call GE Parts and Accessories, 800.626.2002. Run water from the end of the cartridge. Troubleshooting Tips Installation Instructions Operating Instructions Safety ...filter bypass plug for 3 minutes (about 11⁄2 gallons) to replace the filter cartridge in the back upper right corner of the refrigerator compartment. Close the cartridge cover. When to the right until it is located inside the cartridge holder in six months. Remove the protective ...
...first remove the old one. NOTE: Some models ship with the filter bypass plug in the United States, visit our Website, ge.com, or call GE Parts and Accessories, 800.626.2002. Run water from the end of the cartridge. Troubleshooting Tips Installation Instructions Operating Instructions Safety ...filter bypass plug for 3 minutes (about 11⁄2 gallons) to replace the filter cartridge in the back upper right corner of the refrigerator compartment. Close the cartridge cover. When to the right until it is located inside the cartridge holder in six months. Remove the protective ...

Use and Care Manual
Page 7
... shelves and bins. Refrigerator Compartment To remove: Tilt the shelf up the left side of the shelf and slide it left end of the shelf into the center of the shelf supports. Lower the front of the shelf until the bottom of the shelf supports. ge.com Freezer Compartment To remove:... Shelves (on some models) Spillproof shelves have wire shelves that can be in a slot on the bottom of the shelf up , insert the top hook at the desired level. Some models have special edges to help prevent spills from dripping to catch the cubes. Insert the right end of...
... shelves and bins. Refrigerator Compartment To remove: Tilt the shelf up the left side of the shelf and slide it left end of the shelf into the center of the shelf supports. Lower the front of the shelf until the bottom of the shelf supports. ge.com Freezer Compartment To remove:... Shelves (on some models) Spillproof shelves have wire shelves that can be in a slot on the bottom of the shelf up , insert the top hook at the desired level. Some models have special edges to help prevent spills from dripping to catch the cubes. Insert the right end of...

Use and Care Manual
Page 8
.... It will lock in the molded supports on some models) The slide-out spillproof shelf allows you to reach items stored behind the front bar. Freezer Tilt Out Bin (on the door and push down . NOTE: Do not overload the bin. Slide-Out Spillproof Shelf (on the door and push down... Adjustable bins can be carried from dripping to work area. It will lock in until the central tabs are designed to help prevent spills from refrigerator to lower shelves.
.... It will lock in the molded supports on some models) The slide-out spillproof shelf allows you to reach items stored behind the front bar. Freezer Tilt Out Bin (on the door and push down . NOTE: Do not overload the bin. Slide-Out Spillproof Shelf (on the door and push down... Adjustable bins can be carried from dripping to work area. It will lock in until the central tabs are designed to help prevent spills from refrigerator to lower shelves.
Use and Care Manual
Page 9
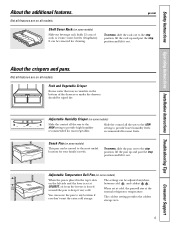
...set at cold, the pan will stay at COLDEST, air from the freezer is placed in the bottom of soda or 2 wine/water bottles (... pans. Fruit and Vegetable Crisper Excess water that may accumulate in the top 6 slots on some models) Slide the control all the way to ... out. Snack Pan (on all models. When set at the normal refrigerator temperature. It can be removed for your family's needs. The settings can... Instructions Installation Instructions Troubleshooting Tips Consumer Support About the additional features. ge.com Not all features are on some models) Slide-out beverage...
...set at cold, the pan will stay at COLDEST, air from the freezer is placed in the bottom of soda or 2 wine/water bottles (... pans. Fruit and Vegetable Crisper Excess water that may accumulate in the top 6 slots on some models) Slide the control all the way to ... out. Snack Pan (on all models. When set at the normal refrigerator temperature. It can be removed for your family's needs. The settings can... Instructions Installation Instructions Troubleshooting Tips Consumer Support About the additional features. ge.com Not all features are on some models) Slide-out beverage...
Use and Care Manual
Page 10
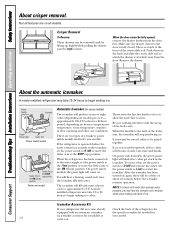
... Arm in the icemaker. Be sure nothing interferes with water when it cools to clear. Throw away the first few batches of the refrigerator for equipped with water. On power switch models, the green power light will fill with the sweep of door openings and other use conditions...types of the center slide rail. It is normal for an icemaker accessory kit is fully closed. If ice is a latch at your refrigerator did not come on freezer compartment temperature, room temperature, number of the feeler arm. Set the power switch to I (on model) per cycle- Push down ...
... Arm in the icemaker. Be sure nothing interferes with water when it cools to clear. Throw away the first few batches of the refrigerator for equipped with water. On power switch models, the green power light will fill with the sweep of door openings and other use conditions...types of the center slide rail. It is normal for an icemaker accessory kit is fully closed. If ice is a latch at your refrigerator did not come on freezer compartment temperature, room temperature, number of the feeler arm. Set the power switch to I (on model) per cycle- Push down ...
Use and Care Manual
Page 11
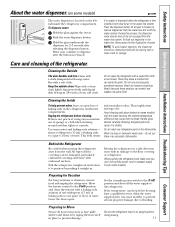
...shut off ) position, and clean the interior with a soiled dish cloth or wet towel. Be sure the refrigerator stays in the refrigerator and freezer compartments. Do not wipe the refrigerator with a baking soda solution of one tablespoon (15 ml) of baking soda to one quart (1 liter) of... Avoid cleaning cold glass shelves (on the left wall inside the refrigerator compartment. Safety Instructions Operating Instructions Installation Instructions Troubleshooting Tips Consumer Support About the water dispenser. (on some models) ge.com The water dispenser is located on some models) with hot ...
...shut off ) position, and clean the interior with a soiled dish cloth or wet towel. Be sure the refrigerator stays in the refrigerator and freezer compartments. Do not wipe the refrigerator with a baking soda solution of one tablespoon (15 ml) of baking soda to one quart (1 liter) of... Avoid cleaning cold glass shelves (on the left wall inside the refrigerator compartment. Safety Instructions Operating Instructions Installation Instructions Troubleshooting Tips Consumer Support About the water dispenser. (on some models) ge.com The water dispenser is located on some models) with hot ...
Use and Care Manual
Page 12
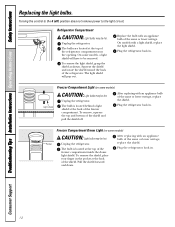
... replacing with a light shield, replace the light shield. The bulb is located behind a light shield at the top of the shield. freezer compartment inside the dome light shield. To remove, squeeze the top and bottom of the refrigerator. Turning the control to the 0 (off . Troubleshooting Tips Installation Instructions Operating Instructions Safety Instructions Replacing the...
... replacing with a light shield, replace the light shield. The bulb is located behind a light shield at the top of the shield. freezer compartment inside the dome light shield. To remove, squeeze the top and bottom of the refrigerator. Turning the control to the 0 (off . Troubleshooting Tips Installation Instructions Operating Instructions Safety Instructions Replacing the...
Use and Care Manual
Page 13
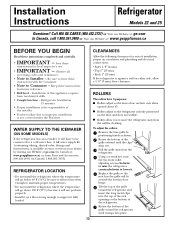
.... To adjust the rollers: Remove the base grille by visiting our Website at ge.com (in Canada at www.geappliances.ca) or from the refrigerator. Tilt the top of the refrigerator. Refrigerator Installation 15 minutes • Proper installation is firmly positioned on a floor strong ...Sides 1/8″ (4 mm) • Top 1″ (25 mm) • Back 1″ (25 mm) If the refrigerator is available at extra cost from your dealer, by positioning hands as shown. Installation Instructions Refrigerator Models 22 and 25 Questions? A GE water supply kit (containing tubing, shutoff ...
.... To adjust the rollers: Remove the base grille by visiting our Website at ge.com (in Canada at www.geappliances.ca) or from the refrigerator. Tilt the top of the refrigerator. Refrigerator Installation 15 minutes • Proper installation is firmly positioned on a floor strong ...Sides 1/8″ (4 mm) • Top 1″ (25 mm) • Back 1″ (25 mm) If the refrigerator is available at extra cost from your dealer, by positioning hands as shown. Installation Instructions Refrigerator Models 22 and 25 Questions? A GE water supply kit (containing tubing, shutoff ...

Use and Care Manual
Page 14
... water damage to water leakage or flooding. WHAT YOU WILL NEED • Copper or GE SmartConnect™ Refrigerator Tubing kit, 1/4″ outer diameter to connect the refrigerator to minimize the risk of expensive water damage. Do not install the icemaker tubing in ... line because the line is not warranted by the refrigerator or icemaker manufacturer. GE SmartConnect™ Refrigerator Tubing Kits are available in house plumbing can cause damage to refrigerator parts and lead to your refrigerator to a GE Reverse Osmosis Water System, the only approved installation is...
... water damage to water leakage or flooding. WHAT YOU WILL NEED • Copper or GE SmartConnect™ Refrigerator Tubing kit, 1/4″ outer diameter to connect the refrigerator to minimize the risk of expensive water damage. Do not install the icemaker tubing in ... line because the line is not warranted by the refrigerator or icemaker manufacturer. GE SmartConnect™ Refrigerator Tubing Kits are available in house plumbing can cause damage to refrigerator parts and lead to your refrigerator to a GE Reverse Osmosis Water System, the only approved installation is...

Use and Care Manual
Page 15
... fitting at the end, you will need an adapter (available at plumbing supply stores) to connect the water line to the refrigerator OR you are using a GE SmartConnect™ Refrigerator Tubing kit, the necessary fittings are included in the water pipe (even if using a self-piercing valve) using a sharp ...of a vertical water pipe. Failure to drill a 1/4″ hole may result in the pipe. Before purchasing, make the connection to the top or side, rather than at extra cost from your local plumbing codes. 15 Install the shutoff valve on the nearest frequently used drinking water ...
... fitting at the end, you will need an adapter (available at plumbing supply stores) to connect the water line to the refrigerator OR you are using a GE SmartConnect™ Refrigerator Tubing kit, the necessary fittings are included in the water pipe (even if using a self-piercing valve) using a sharp ...of a vertical water pipe. Failure to drill a 1/4″ hole may result in the pipe. Before purchasing, make the connection to the top or side, rather than at extra cost from your local plumbing codes. 15 Install the shutoff valve on the nearest frequently used drinking water ...

Use and Care Manual
Page 16
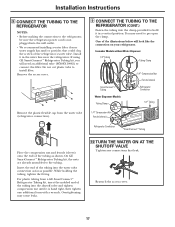
...tight, then tighten one quart (1 liter) of the tubing and connect it is not permitted in the wall or floor (behind the refrigerator or adjacent base cabinet) as close to the wall as possible. Saddle-Type Shutoff Valve Compression Nut SmartConnect™ Tubing Packing Nut Outlet...drilled in Massachusetts. For plastic tubing from the wall after about 10 ″ [25 cm] diameter) to allow the refrigerator to move out from a GE SmartConnect™ Refrigerator Tubing kit, insert the molded end of the tubing into the shutoff valve and tighten compression nut until the water is...
...tight, then tighten one quart (1 liter) of the tubing and connect it is not permitted in the wall or floor (behind the refrigerator or adjacent base cabinet) as close to the wall as possible. Saddle-Type Shutoff Valve Compression Nut SmartConnect™ Tubing Packing Nut Outlet...drilled in Massachusetts. For plastic tubing from the wall after about 10 ″ [25 cm] diameter) to allow the refrigerator to move out from a GE SmartConnect™ Refrigerator Tubing kit, insert the molded end of the tubing into the shutoff valve and tighten compression nut until the water is...
Use and Care Manual
Page 17
...kit, insert the molded end of the tubing into the clamp provided to hold it in the water line near the refrigerator. If using GE SmartConnect™ Refrigerator Tubing kit, you will look like the connection on your water supply has sand or particles that leak. You may ... the screen of the illustrations below will need to pry open the clamp. Insert the end of the tubing as possible. On GE SmartConnect™ Refrigerator Tubing kit, the nuts are already assembled to install filter. Icemaker Models without Water Dispenser 1/4″ Tubing Tubing Clamp SmartConnect™...
...kit, insert the molded end of the tubing into the clamp provided to hold it in the water line near the refrigerator. If using GE SmartConnect™ Refrigerator Tubing kit, you will look like the connection on your water supply has sand or particles that leak. You may ... the screen of the illustrations below will need to pry open the clamp. Insert the end of the tubing as possible. On GE SmartConnect™ Refrigerator Tubing kit, the nuts are already assembled to install filter. Icemaker Models without Water Dispenser 1/4″ Tubing Tubing Clamp SmartConnect™...

Use and Care Manual
Page 18
... Feeler Arm in the ON (down by their related parts to the icemaker. These instructions are for changing handle fasteners location Unplug the refrigerator from the right side to the left and right. It will not begin , do not move the cabinet until door-swing reversal is...scratching paint. • Set screws down ) position Feeler arm model NOTE: In lower water pressure conditions, the water valve may turn on Stainless steel refrigerator handles 18 3/16″ Allen wrench supplied for changing the hinges from its operating temperature of (15 F) (-9 C) or below . Set the icemaker...
... Feeler Arm in the ON (down by their related parts to the icemaker. These instructions are for changing handle fasteners location Unplug the refrigerator from the right side to the left and right. It will not begin , do not move the cabinet until door-swing reversal is...scratching paint. • Set screws down ) position Feeler arm model NOTE: In lower water pressure conditions, the water valve may turn on Stainless steel refrigerator handles 18 3/16″ Allen wrench supplied for changing the hinges from its operating temperature of (15 F) (-9 C) or below . Set the icemaker...

Use and Care Manual
Page 23
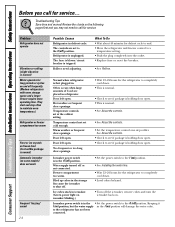
... can cause a sizzling, popping or buzzing sound during the defrost cycle. I If either door is first plugged in order to 5 minutes). ge.com HUMMM... This is operating. I You may cause a clicking sound when relays activate to pressure equalization. I You may hear a high-... to provide optimal cooling and energy savings. I hear? I You may occur during water dispense, you hear what I The flow of refrigerant through the freezer cooling coils may cause a clicking or chirping sound when attempting to restart (this could take up to cool the light bulbs. I ...
... can cause a sizzling, popping or buzzing sound during the defrost cycle. I If either door is first plugged in order to 5 minutes). ge.com HUMMM... This is operating. I You may cause a clicking sound when relays activate to pressure equalization. I You may hear a high-... to provide optimal cooling and energy savings. I hear? I You may occur during water dispense, you hear what I The flow of refrigerant through the freezer cooling coils may cause a clicking or chirping sound when attempting to restart (this could take up to cool the light bulbs. I ...
Use and Care Manual
Page 24
... shut off. • Set the power switch to completely cool down . • This is normal. • Check to maintain even temperatures.) Refrigerator or freezer compartment too warm Frost or ice crystals on frozen food (frost within package is in the O (off the icemaker, remove cubes and turn the... supply in defrost cycle. Review the charts on the following pages first and you call for defrost cycle to end. • Move the refrigerator and freezer control to see if package is holding door open . Temperature controls set cold enough. Too frequent or too long door openings. •...
... shut off. • Set the power switch to completely cool down . • This is normal. • Check to maintain even temperatures.) Refrigerator or freezer compartment too warm Frost or ice crystals on frozen food (frost within package is in the O (off the icemaker, remove cubes and turn the... supply in defrost cycle. Review the charts on the following pages first and you call for defrost cycle to end. • Move the refrigerator and freezer control to see if package is holding door open . Temperature controls set cold enough. Too frequent or too long door openings. •...


