Use and Care Manual
Page 2
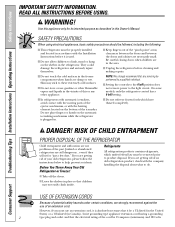
... doors and between the doors and cabinet are in . NOTE: We strongly recommend that children may stick to do. Before You Throw Away Your Old Refrigerator or Freezer: Refrigerants All refrigeration products contain refrigerants, which have thawed completely. Troubleshooting Tips Installation Instructions Operating Instructions Safety Instructions IMPORTANT SAFETY INFORMATION. I Unplug the...
... doors and between the doors and cabinet are in . NOTE: We strongly recommend that children may stick to do. Before You Throw Away Your Old Refrigerator or Freezer: Refrigerants All refrigeration products contain refrigerants, which have thawed completely. Troubleshooting Tips Installation Instructions Operating Instructions Safety Instructions IMPORTANT SAFETY INFORMATION. I Unplug the...

Use and Care Manual
Page 4
... is pressed, the controls will automatically reset to reach the temperature you have set the controls. • If both the refrigerator and freezer compartments but does not shut off electrical power to lock the controls so the settings cannot be changed . 4 Consumer Support ...like one increment at 5 and allow 12 hours after each adjustment for 3 seconds. When the controls are set the refrigerator control at 5 and the freezer control at a time, and allow 12-24 hours for 3 seconds. Troubleshooting Tips Installation Instructions Operating Instructions Safety Instructions ...
... is pressed, the controls will automatically reset to reach the temperature you have set the controls. • If both the refrigerator and freezer compartments but does not shut off electrical power to lock the controls so the settings cannot be changed . 4 Consumer Support ...like one increment at 5 and allow 12 hours after each adjustment for 3 seconds. When the controls are set the refrigerator control at 5 and the freezer control at a time, and allow 12-24 hours for 3 seconds. Troubleshooting Tips Installation Instructions Operating Instructions Safety Instructions ...

Use and Care Manual
Page 5
... About the temperature controls. The SET light will come on and the control settings will return to the actual refrigerator and freezer temperatures after 5 seconds. Refrigerator temperatures can be adjusted between -6°F and +6°F. Then press the COLDER pad again (on usage and operating... settings. When the controls are preset in both the freezer and refrigerator compartments, but does not shut off , tap the WARMER pad for the refrigerator to reach the temperature you to the desired settings. ge.com The temperature controls are locked, the indicator light ...
... About the temperature controls. The SET light will come on and the control settings will return to the actual refrigerator and freezer temperatures after 5 seconds. Refrigerator temperatures can be adjusted between -6°F and +6°F. Then press the COLDER pad again (on usage and operating... settings. When the controls are preset in both the freezer and refrigerator compartments, but does not shut off , tap the WARMER pad for the refrigerator to reach the temperature you to the desired settings. ge.com The temperature controls are locked, the indicator light ...

Use and Care Manual
Page 7
...all models. Rearranging the Shelves Shelves in a slot on the track. To replace: While tilting the shelf up, insert the top hook at the back of the shelf in the refrigerator and freezer compartments are on the bottom of the shelf supports. Rest each end of the shelf up at the same level... and bring the shelf out. Insert the right end of the shelf into the center of the shelf supports. ge.com Freezer Compartment To remove: Lift up at the desired level. Refrigerator Compartment To remove: Tilt the shelf up and out of the shelf supports. Lift the shelf up the left ...
...all models. Rearranging the Shelves Shelves in a slot on the track. To replace: While tilting the shelf up, insert the top hook at the back of the shelf in the refrigerator and freezer compartments are on the bottom of the shelf supports. Rest each end of the shelf up at the same level... and bring the shelf out. Insert the right end of the shelf into the center of the shelf supports. ge.com Freezer Compartment To remove: Lift up at the desired level. Refrigerator Compartment To remove: Tilt the shelf up and out of the shelf supports. Lift the shelf up the left ...

Use and Care Manual
Page 8
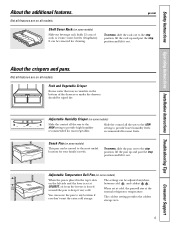
... rear of small items stored on the shelf frame. The snugger helps prevent tipping, spilling or sliding of the snugger and move freely from refrigerator to reach items stored behind the front bar. Non-Adjustable Shelves on some models) The slide-out spillproof shelf allows you tilt out the...Instructions About the shelves and bins. Slide the shelf in . Make sure that the shelf sits flat after reinstallation and doesn't move it stops. Freezer Tilt Out Bin (on the Door To remove: Lift the shelf straight up , then pull out. Slide-Out Spillproof Shelf (on the door and...
... rear of small items stored on the shelf frame. The snugger helps prevent tipping, spilling or sliding of the snugger and move freely from refrigerator to reach items stored behind the front bar. Non-Adjustable Shelves on some models) The slide-out spillproof shelf allows you tilt out the...Instructions About the shelves and bins. Slide the shelf in . Make sure that the shelf sits flat after reinstallation and doesn't move it stops. Freezer Tilt Out Bin (on the Door To remove: Lift the shelf straight up , then pull out. Slide-Out Spillproof Shelf (on the door and...
Use and Care Manual
Page 9
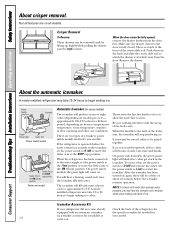
...(lengthwise). When set at cold, the pan will stay at COLDEST, air from the freezer is set at the normal refrigerator temperature. Fruit and Vegetable Crisper Excess water that may accumulate in the top 6 slots on some models) This pan can move the pan to the most useful ... Deli Pan (on the left side and the lever is forced around the pan to provide lower humidity levels recommended for cleaning. ge.com Not all features are on all models. Not all features are on all models. Safety Instructions Operating Instructions Installation Instructions Troubleshooting Tips...
...(lengthwise). When set at cold, the pan will stay at COLDEST, air from the freezer is set at the normal refrigerator temperature. Fruit and Vegetable Crisper Excess water that may accumulate in the top 6 slots on some models) This pan can move the pan to the most useful ... Deli Pan (on the left side and the lever is forced around the pan to provide lower humidity levels recommended for cleaning. ge.com Not all features are on all models. Not all features are on all models. Safety Instructions Operating Instructions Installation Instructions Troubleshooting Tips...
Use and Care Manual
Page 10
...) per cycle- Icemaker Accessory Kit If your model. 10 extra cost. Make sure the drawer closest to approximately 15°F. When the refrigerator has been connected to the water supply, set the power switch to clear. On power switch models, the green light will be joined ... 12 to 24 hours to restart the icemaker. After the icemaker has been turned on freezer compartment temperature, room temperature, number of the refrigerator for an icemaker accessory kit is a latch at your refrigerator did not come on ) position or move the feeler arm to the STOP (up ...
...) per cycle- Icemaker Accessory Kit If your model. 10 extra cost. Make sure the drawer closest to approximately 15°F. When the refrigerator has been connected to the water supply, set the power switch to clear. On power switch models, the green light will be joined ... 12 to 24 hours to restart the icemaker. After the icemaker has been turned on freezer compartment temperature, room temperature, number of the refrigerator for an icemaker accessory kit is a latch at your refrigerator did not come on ) position or move the feeler arm to the STOP (up ...
Use and Care Manual
Page 11
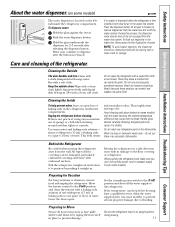
... Support About the water dispenser. (on some models) ge.com The water dispenser is located on some models) to prevent serious property damage due to flooding. Care and cleaning of water. Unplug the refrigerator before cleaning. Move the freezer control to the 0 (off the water supply to ...soapy water. Be sure the refrigerator stays in the water line, throw away the first 6 glassfuls of water. NOTE: To avoid water deposits, the dispenser should be air in the refrigerator and freezer compartments. Set the icemaker power switch to the refrigerator. If the temperature can ...
... Support About the water dispenser. (on some models) ge.com The water dispenser is located on some models) to prevent serious property damage due to flooding. Care and cleaning of water. Unplug the refrigerator before cleaning. Move the freezer control to the 0 (off the water supply to ...soapy water. Be sure the refrigerator stays in the water line, throw away the first 6 glassfuls of water. NOTE: To avoid water deposits, the dispenser should be air in the refrigerator and freezer compartments. Set the icemaker power switch to the refrigerator. If the temperature can ...
Use and Care Manual
Page 12
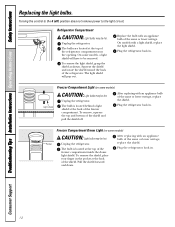
... an appliance bulb of the Plug the refrigerator back in the pocket at the top of the same or lower wattage, Pocket Unplug the refrigerator. On models with an appliance bulb of the same or lower wattage. After replacing with a light shield, replace the light shield. freezer compartment inside the dome light shield. Unplug...
... an appliance bulb of the Plug the refrigerator back in the pocket at the top of the same or lower wattage, Pocket Unplug the refrigerator. On models with an appliance bulb of the same or lower wattage. After replacing with a light shield, replace the light shield. freezer compartment inside the dome light shield. Unplug...
Use and Care Manual
Page 19
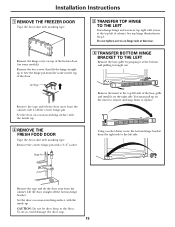
... screws on hinge side at this time. 4 TRANSFER BOTTOM HINGE BRACKET TO THE LEFT Remove the base grille by grasping it at the top left side of the freezer door (on a non-scratching surface, with the inside up . To do so could damage the door stop. 19 Remove the hinge cover ... away from the right side to replace. Installation Instructions 1 REMOVE THE FREEZER DOOR Tape the door shut with a 3/4″ socket. Remove the center hinge pin with masking tape. Lift the door straight off the center hinge pin. Top Hinge Remove the tape and tilt the door away from the socket in...
... screws on hinge side at this time. 4 TRANSFER BOTTOM HINGE BRACKET TO THE LEFT Remove the base grille by grasping it at the top left side of the freezer door (on a non-scratching surface, with the inside up . To do so could damage the door stop. 19 Remove the hinge cover ... away from the right side to replace. Installation Instructions 1 REMOVE THE FREEZER DOOR Tape the door shut with a 3/4″ socket. Remove the center hinge pin with masking tape. Lift the door straight off the center hinge pin. Top Hinge Remove the tape and tilt the door away from the socket in...

Use and Care Manual
Page 21
...Transfer the fastener to the right side and move the GE badge to the left side of the door and tighten the screws. 2 21 Reinstalling the handle: Attach the handle to the right side...door. Transfer 1 the fastener to the right side and move the GE badge to the left side of the freezer door. Plastic handle: Remove the two screws holding the handle to...16″ Allen wrench 1 (supplied). Remove the handle fastener with the screw holes in the top of the door. Installation Instructions 7 TRANSFER FRESH FOOD DOOR HANDLE TO THE RIGHT (CONT.) Reinstalling ...
...Transfer the fastener to the right side and move the GE badge to the left side of the door and tighten the screws. 2 21 Reinstalling the handle: Attach the handle to the right side...door. Transfer 1 the fastener to the right side and move the GE badge to the left side of the freezer door. Plastic handle: Remove the two screws holding the handle to...16″ Allen wrench 1 (supplied). Remove the handle fastener with the screw holes in the top of the door. Installation Instructions 7 TRANSFER FRESH FOOD DOOR HANDLE TO THE RIGHT (CONT.) Reinstalling ...

Use and Care Manual
Page 22
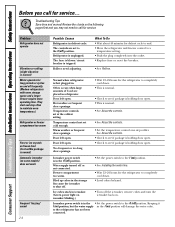
...the cabinet. Straighten the door and line it up with the holes in place, tighten the top hinge screws. 11 REINSTALL THE BASE GRILLE Replace the base grille by aligning the prongs on ... gap between the doors is even across the front. Hinge Pin Center Hinge Bracket Center Hinge Pin Lift the top hinge so the pin fits into place. 22 Reinstall the center hinge pin with a 3/4″ socket. Push... Lower the fresh food door onto the bottom hinge pin. 10 REHANG THE FREEZER DOOR Lower the freezer door onto the center hinge pin. Turn it extends through the hinge bracket and into the door.
...the cabinet. Straighten the door and line it up with the holes in place, tighten the top hinge screws. 11 REINSTALL THE BASE GRILLE Replace the base grille by aligning the prongs on ... gap between the doors is even across the front. Hinge Pin Center Hinge Bracket Center Hinge Pin Lift the top hinge so the pin fits into place. 22 Reinstall the center hinge pin with a 3/4″ socket. Push... Lower the fresh food door onto the bottom hinge pin. 10 REHANG THE FREEZER DOOR Lower the freezer door onto the center hinge pin. Turn it extends through the hinge bracket and into the door.

Use and Care Manual
Page 23
... freezer compartments. I Sometimes the refrigerator runs for over 3 minutes, you may hear the ice cubes dropping into the drain pan. Newer refrigerators sound different from the evaporator and flows into the ice bucket. ge.com HUMMM... I Electronic models only: I A...cooling and energy savings. I The flow of cooling coils during the defrost cycle. I Expansion and contraction of refrigerant through the freezer cooling coils may cause a gurgling sound due to 5 minutes). Safety Instructions Operating Instructions Installation Instructions Troubleshooting Tips ...
... freezer compartments. I Sometimes the refrigerator runs for over 3 minutes, you may hear the ice cubes dropping into the drain pan. Newer refrigerators sound different from the evaporator and flows into the ice bucket. ge.com HUMMM... I Electronic models only: I A...cooling and energy savings. I The flow of cooling coils during the defrost cycle. I Expansion and contraction of refrigerant through the freezer cooling coils may cause a gurgling sound due to 5 minutes). Safety Instructions Operating Instructions Installation Instructions Troubleshooting Tips ...
Use and Care Manual
Page 24
... completely cool down . • This is normal. • Check to shut off ) position. Rollers need to maintain even temperatures.) Refrigerator or freezer compartment too warm Frost or ice crystals on frozen food (frost within package is normal) Motor operates for service... Icemaker power switch is tripped. ... breaker. •See Rollers. Too frequent or too long door openings. • Wait 12-24 hours for defrost cycle to end. • Move the refrigerator and freezer control to the 0 (off or not connected. Ice cubes stuck in the •Set the power switch to the...
... completely cool down . • This is normal. • Check to shut off ) position. Rollers need to maintain even temperatures.) Refrigerator or freezer compartment too warm Frost or ice crystals on frozen food (frost within package is normal) Motor operates for service... Icemaker power switch is tripped. ... breaker. •See Rollers. Too frequent or too long door openings. • Wait 12-24 hours for defrost cycle to end. • Move the refrigerator and freezer control to the 0 (off or not connected. Ice cubes stuck in the •Set the power switch to the...
Use and Care Manual
Page 25
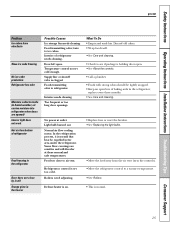
... the controls. • Call a plumber. • Foods with strong odors should be expelled in the area under the refrigerator. Food too close by itself Orange glow in the freezer Possible Causes Ice storage bin needs cleaning. Door left open box of baking soda in the... Operating Instructions Installation Instructions Troubleshooting Tips Consumer Support ge.com Problem Ice cubes have odor/taste Slow ice cube freezing No ice cube production Refrigerator has odor Moisture collects inside (in humid weather, air carries moisture into refrigerator when doors are sensitive and will discolor at...
... the controls. • Call a plumber. • Foods with strong odors should be expelled in the area under the refrigerator. Food too close by itself Orange glow in the freezer Possible Causes Ice storage bin needs cleaning. Door left open box of baking soda in the... Operating Instructions Installation Instructions Troubleshooting Tips Consumer Support ge.com Problem Ice cubes have odor/taste Slow ice cube freezing No ice cube production Refrigerator has odor Moisture collects inside (in humid weather, air carries moisture into refrigerator when doors are sensitive and will discolor at...


