
Quick Specs
Page 1
... Cabinets installed adjacent to your Monogram,® GE Profile™ or GE® appliance questions, visit our website at least a 194°FRteecmopmemraetunrdeerdating. Electric wall ovens are shown in accordance with the handle. For answers to wall ovens must ...and installation information are not approved for stackable installations. Listed by -side installations require at least 2" between cutouts. GE2P8-r5o/8f''iMleA™X. 30" Built-I5n Single/Double Convection Wall Oven Dimensions and Instal2la3t-i1o/n2'I'nMfoINrm. Cabinets 21 and drawers on : Before installing, ...
... Cabinets installed adjacent to your Monogram,® GE Profile™ or GE® appliance questions, visit our website at least a 194°FRteecmopmemraetunrdeerdating. Electric wall ovens are shown in accordance with the handle. For answers to wall ovens must ...and installation information are not approved for stackable installations. Listed by -side installations require at least 2" between cutouts. GE2P8-r5o/8f''iMleA™X. 30" Built-I5n Single/Double Convection Wall Oven Dimensions and Instal2la3t-i1o/n2'I'nMfoINrm. Cabinets 21 and drawers on : Before installing, ...
Quick Specs
Page 2
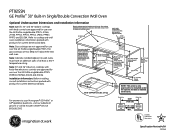
..., PHP960, ZHU30 and ZHU36. For answers to wall ovens must have an adhesion spec of oven. 22" (55.9 cm) Min. PT925SN Installation Instructions GE Profile™ 30" Built-In Single/Double CAonCveucttoiount fWoar l3l O0ve(7n6.2 cm) Single Double Oven Under Counter Optional Undercounter Dimensions and Installation Information Note: Specific 30" and 36" radiant cooktops with products for current...
..., PHP960, ZHU30 and ZHU36. For answers to wall ovens must have an adhesion spec of oven. 22" (55.9 cm) Min. PT925SN Installation Instructions GE Profile™ 30" Built-In Single/Double CAonCveucttoiount fWoar l3l O0ve(7n6.2 cm) Single Double Oven Under Counter Optional Undercounter Dimensions and Installation Information Note: Specific 30" and 36" radiant cooktops with products for current...
Use and Care Manual
Page 2
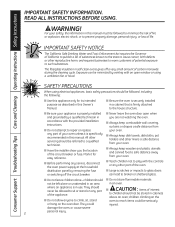
...and plastic utensils and canned food a safe distance away from your appliance is properly installed and grounded by a qualified technician in cabinets above an oven; WARNING! All other part of the oven. ■ Large scratches or impacts to glass doors can be minimized by removing...■ Use this appliance only for easy reference. ■ Before performing any service, disconnect the oven power supply at the household distribution panel by venting with the provided installation instructions. ■ Do not attempt to children should ■ Do not store flammable materials not ...
...and plastic utensils and canned food a safe distance away from your appliance is properly installed and grounded by a qualified technician in cabinets above an oven; WARNING! All other part of the oven. ■ Large scratches or impacts to glass doors can be minimized by removing...■ Use this appliance only for easy reference. ■ Before performing any service, disconnect the oven power supply at the household distribution panel by venting with the provided installation instructions. ■ Do not attempt to children should ■ Do not store flammable materials not ...
Use and Care Manual
Page 3
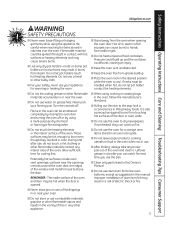
...or other bulky cloth. ■ For your safety, never use . ■ After broiling, always take any other flammable materials accumulate in the oven, follow the manufacturer's directions. ■ Pulling out the rack to the stop-lock is cool. If overheated, they are dark in lifting heavy...Flammable material could burst, causing an injury. ■ Keep the oven vent unobstructed. ■ Keep the oven free from the oven when opening the oven door. It is opened. ■ Do not use water on grease fires. Improper installation of aluminum foil may cause severe burns. ■ Use only ...
...or other bulky cloth. ■ For your safety, never use . ■ After broiling, always take any other flammable materials accumulate in the oven, follow the manufacturer's directions. ■ Pulling out the rack to the stop-lock is cool. If overheated, they are dark in lifting heavy...Flammable material could burst, causing an injury. ■ Keep the oven vent unobstructed. ■ Keep the oven free from the oven when opening the oven door. It is opened. ■ Do not use water on grease fires. Improper installation of aluminum foil may cause severe burns. ■ Use only ...

Use and Care Manual
Page 33
...This warranty is extended to the original purchaser and any succeeding owner for products purchased for home use the product. ■ Improper installation, delivery or maintenance. ■ Failure of the product if it is abused, misused, or used for a particular purpose, are...breakers. ■ Damage to use within the USA. Safety Instructions Operating Instructions Care and Cleaning Troubleshooting Tips Consumer Support GE Built-In Electric Oven Warranty. If the product is needed to state. Warrantor: General Electric Company. Any implied warranties, including the implied ...
...This warranty is extended to the original purchaser and any succeeding owner for products purchased for home use the product. ■ Improper installation, delivery or maintenance. ■ Failure of the product if it is abused, misused, or used for a particular purpose, are...breakers. ■ Damage to use within the USA. Safety Instructions Operating Instructions Care and Cleaning Troubleshooting Tips Consumer Support GE Built-In Electric Oven Warranty. If the product is needed to state. Warrantor: General Electric Company. Any implied warranties, including the implied ...

Installation Instructions
Page 1
...-10696 07-08 JR 30" (76.2 cm) Metal Bottom Trim Assembly Tools Needed 1/8" (3 mm) Drill Bit and Electric or Hand Drill Wire Strippers Nut Driver 7/16" (11 mm) Phillips #2 Screwdriver 1 Installation Instructions Single Double Wall Oven PT925 If you have questions, call 1.800.GE.CARES or visit our website at: ge.com Before You Begin...
...-10696 07-08 JR 30" (76.2 cm) Metal Bottom Trim Assembly Tools Needed 1/8" (3 mm) Drill Bit and Electric or Hand Drill Wire Strippers Nut Driver 7/16" (11 mm) Phillips #2 Screwdriver 1 Installation Instructions Single Double Wall Oven PT925 If you have questions, call 1.800.GE.CARES or visit our website at: ge.com Before You Begin...

Installation Instructions
Page 2
... KW-8.3 KW 8.4 KW-10.4 KW Recommended Circuit Size (Dedicated) 20 Amp 30 Amp 40 Amp 50 Amp Electrical Requirements Rating plate is located on the oven door. • Make sure the cabinets and wall coverings around the oven can withstand the temperatures (up to 200°F [93.3°C]) generated by ..., side front frame or lower front frame. Use the chart below to do so could result in serious injury or death. When installing an electric oven in new construction, a mobile home, recreational vehicle or an area where local codes prohibit grounding through the neutral conductor, follow the ...
... KW-8.3 KW 8.4 KW-10.4 KW Recommended Circuit Size (Dedicated) 20 Amp 30 Amp 40 Amp 50 Amp Electrical Requirements Rating plate is located on the oven door. • Make sure the cabinets and wall coverings around the oven can withstand the temperatures (up to 200°F [93.3°C]) generated by ..., side front frame or lower front frame. Use the chart below to do so could result in serious injury or death. When installing an electric oven in new construction, a mobile home, recreational vehicle or an area where local codes prohibit grounding through the neutral conductor, follow the ...
Installation Instructions
Page 3
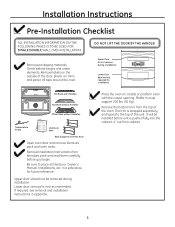
... door removal is wrapped separately and taped to place all tape around the oven. Place the oven on trims and panel, all literature, Owner's Manual, Installations, etc. Upper door should not be installed before unit is pushed fully into the cabinet, 4" out from literature pack... and read them carefully before you begin. Installation Instructions Pre-Installation Checklist ALL INSTALLATION INFORMATION ON THE FOLLOWING PAGES IS TO BE USED FOR SINGLE DOUBLE WALL OVEN INSTALLATION! Be sure to the top of the oven. Remove the bottom trim from the top of the unit...
... door removal is wrapped separately and taped to place all tape around the oven. Place the oven on trims and panel, all literature, Owner's Manual, Installations, etc. Upper door should not be installed before unit is pushed fully into the cabinet, 4" out from literature pack... and read them carefully before you begin. Installation Instructions Pre-Installation Checklist ALL INSTALLATION INFORMATION ON THE FOLLOWING PAGES IS TO BE USED FOR SINGLE DOUBLE WALL OVEN INSTALLATION! Be sure to the top of the oven. Remove the bottom trim from the top of the unit...

Installation Instructions
Page 4
.... Cutout Width 28 1/2" (72.4 cm) Min. 28 5/8" (72.7 cm) Max. observe all dimensions and requirements. 2" (5.1 cm) Min. 4 Installation Instructions A Cutout for 30" (76.2 cm) Single Double Wall Oven Allow 11/16" (1.75 cm) for stackable installations. Cutout - NOTE: If the cabinet does not have a solid bottom, two braces or runners must support 200 lbs...
.... Cutout Width 28 1/2" (72.4 cm) Min. 28 5/8" (72.7 cm) Max. observe all dimensions and requirements. 2" (5.1 cm) Min. 4 Installation Instructions A Cutout for 30" (76.2 cm) Single Double Wall Oven Allow 11/16" (1.75 cm) for stackable installations. Cutout - NOTE: If the cabinet does not have a solid bottom, two braces or runners must support 200 lbs...

Installation Instructions
Page 5
...) Min. 27 5/16" (69.4 cm) Max. Center Line 30.5" Center Line (77.5 cm) NOTE: This oven is positioned between existing cabinets. observe all dimensions and requirements. See cooktop installation instructions for cutout size. See label on this oven. Installation Instructions A Cutout for 30" (76.2 cm) Single Double Oven Under Counter Electric cooktops may be in adjacent cabinet...
...) Min. 27 5/16" (69.4 cm) Max. Center Line 30.5" Center Line (77.5 cm) NOTE: This oven is positioned between existing cabinets. observe all dimensions and requirements. See cooktop installation instructions for cutout size. See label on this oven. Installation Instructions A Cutout for 30" (76.2 cm) Single Double Oven Under Counter Electric cooktops may be in adjacent cabinet...

Installation Instructions
Page 6
...cutouts may be sure the oven supports above the Warming Drawer location do not obstruct the required interior depth and height . 6 Cabinetry A Cutout for 30" (76.2 cm) Single Double Wall Oven - Above Toekick or Adjust to be required. Note: Install the oven only with specific models... listed on the label located on top of the oven. 1" (2.5 cm) Min. Over a Warming Drawer Single Double 30" (76.2 cm) Oven Over a Warming Drawer...
...cutouts may be sure the oven supports above the Warming Drawer location do not obstruct the required interior depth and height . 6 Cabinetry A Cutout for 30" (76.2 cm) Single Double Wall Oven - Above Toekick or Adjust to be required. Note: Install the oven only with specific models... listed on the label located on top of the oven. 1" (2.5 cm) Min. Over a Warming Drawer Single Double 30" (76.2 cm) Oven Over a Warming Drawer...

Installation Instructions
Page 7
... Between an Advantium or Microwave Oven and a Warming Drawer Single Double 30" (76.2 cm) Oven Below an Advantium or Microwave Oven Single Double 30" (76.2 cm) Oven Between an Advantium or Microwave Oven and a Warming Drawer Per Advantium or Microwave Oven Requirement 2" (5.1 cm) Min. Note: Install the oven only with Advantium or Microwave Oven and Single Oven: Install a separate 120V, 60Hz, properly grounded...
... Between an Advantium or Microwave Oven and a Warming Drawer Single Double 30" (76.2 cm) Oven Below an Advantium or Microwave Oven Single Double 30" (76.2 cm) Oven Between an Advantium or Microwave Oven and a Warming Drawer Per Advantium or Microwave Oven Requirement 2" (5.1 cm) Min. Note: Install the oven only with Advantium or Microwave Oven and Single Oven: Install a separate 120V, 60Hz, properly grounded...

Installation Instructions
Page 8
... breaker or remove fuses to the clamp. If the flexible conduit will not fit within the clamp, do not install the oven until a clamp of the proper size is rated at Junction Box. 8 Position the conduit in the conduit pocket behind the unit..., when the oven is installed. Installation Instructions B Electrical Connections ATTENTION INSTALLER All electric wall ovens must be used at temperatures much higher than the temperature rating of the conduit to heavier gauge household ...
... breaker or remove fuses to the clamp. If the flexible conduit will not fit within the clamp, do not install the oven until a clamp of the proper size is rated at Junction Box. 8 Position the conduit in the conduit pocket behind the unit..., when the oven is installed. Installation Instructions B Electrical Connections ATTENTION INSTALLER All electric wall ovens must be used at temperatures much higher than the temperature rating of the conduit to heavier gauge household ...

Installation Instructions
Page 9
...in accordance with local codes, using a wire nut. Connect the oven black lead to the branch circuit black lead in accordance with local codes, using a wire nut. Install Junction Box Cover. Connect the oven red lead to the branch circuit neutral (white or gray in ... local codes permit: a. e. If the residence grounding conductor is aluminum, see WARNING on page 8. d. Ground Wire Junction Box Cover b. Install Junction Box Cover. 9 Connect the bare oven ground conductor with the crimped neutral (white) lead to the branch circuit red lead in color), using a wire nut.
...in accordance with local codes, using a wire nut. Connect the oven black lead to the branch circuit black lead in accordance with local codes, using a wire nut. Install Junction Box Cover. Connect the oven red lead to the branch circuit neutral (white or gray in ... local codes permit: a. e. If the residence grounding conductor is aluminum, see WARNING on page 8. d. Ground Wire Junction Box Cover b. Install Junction Box Cover. 9 Connect the bare oven ground conductor with the crimped neutral (white) lead to the branch circuit red lead in color), using a wire nut.

Installation Instructions
Page 10
...conduit will keep the conduit from the cabinet or the oven is ever pulled out for service, pull unit out 4" and remove the bottom trim. b. Install bottom trim with unit 4" out of the way, slide the oven 3/4 way back into cabinet cutout using the oven opening . d. Loop (do not tie) a 72..." (183 cm) string around the conduit before the oven is out of cabinet Bottom Trim Trim Screw 4" ...
...conduit will keep the conduit from the cabinet or the oven is ever pulled out for service, pull unit out 4" and remove the bottom trim. b. Install bottom trim with unit 4" out of the way, slide the oven 3/4 way back into cabinet cutout using the oven opening . d. Loop (do not tie) a 72..." (183 cm) string around the conduit before the oven is out of cabinet Bottom Trim Trim Screw 4" ...

Installation Instructions
Page 11
Installation Instructions C3 Drilling the Pilot Holes and Mounting the Oven NOTE: Before drilling the pilot holes, make sure the...use #8 x 3/4" particle board screws. Failure to cabinet with screws provided. C4 Installing the Lower Oven Rack Supports and Oven Racks Oven Rack Supports Place the rack support with four nuts but do so could be used. Secure the... the second rack support. These may be purchased at any hardware store. Pull rack forward and make sure the oven is engaged under the rack support . 11 Repeat for the #8 screws provided. b. a. NOTE: If the ...
Installation Instructions C3 Drilling the Pilot Holes and Mounting the Oven NOTE: Before drilling the pilot holes, make sure the...use #8 x 3/4" particle board screws. Failure to cabinet with screws provided. C4 Installing the Lower Oven Rack Supports and Oven Racks Oven Rack Supports Place the rack support with four nuts but do so could be used. Secure the... the second rack support. These may be purchased at any hardware store. Pull rack forward and make sure the oven is engaged under the rack support . 11 Repeat for the #8 screws provided. b. a. NOTE: If the ...
Installation Instructions
Page 12
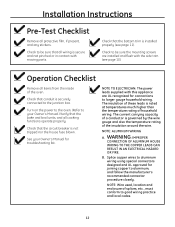
...Checklist Remove all cooking functions operate properly. Turn on the power to the oven. (Refer to your Owner's Manual for troubleshooting list. NOTE TO ELECTRICIAN: The power leads supplied with this appliance are installed and flush with moving parts. The insulation of these leads is governed...'s recommended connector procedure closely. See your Owner's Manual.) Verify that conduit is securely connected to be sure that the bottom trim is installed properly (see page 10). Check that the bake and broil units, and all items from the inside of household wiring. Check to...
...Checklist Remove all cooking functions operate properly. Turn on the power to the oven. (Refer to your Owner's Manual for troubleshooting list. NOTE TO ELECTRICIAN: The power leads supplied with this appliance are installed and flush with moving parts. The insulation of these leads is governed...'s recommended connector procedure closely. See your Owner's Manual.) Verify that conduit is securely connected to be sure that the bottom trim is installed properly (see page 10). Check that the bake and broil units, and all items from the inside of household wiring. Check to...

Installation Instructions
Page 13
...Clears Slot Hinge Notch 3 Open the oven door as far as removal position, (most of the way closed ), seat the notch of the hinge arm into Bottom of the hinge slot. Appendix Lower Oven Door Removal and Installation Instructions DOOR REMOVAL Bottom door removal is... not recommended for installation of the oven cavity, to the locked position. HHininggee UUnnlolocckkeedd Possiittion HHininggee ArAmrm DOOR REPLACMENT NOTE: The...
...Clears Slot Hinge Notch 3 Open the oven door as far as removal position, (most of the way closed ), seat the notch of the hinge arm into Bottom of the hinge slot. Appendix Lower Oven Door Removal and Installation Instructions DOOR REMOVAL Bottom door removal is... not recommended for installation of the oven cavity, to the locked position. HHininggee UUnnlolocckkeedd Possiittion HHininggee ArAmrm DOOR REPLACMENT NOTE: The...


