
Installation Instructions
Page 2
...troubleshooting list. • Be sure all items from the crimp. Do not lay the door on String Loop While Pushing the Oven Into the Cabinet 9 MOUNT THE OVEN...the cabinet opening. Trim Screw Locations for 30" (76.2 cm) Models with this ...single-phase, 120/208 VAC or 120/240 VAC, 60 Hertz electrical system. Use the chart below *. The insulation of these materials could result in your model. Junction Box Conduit Ground Wire Place Oven... order parts, call 1.800.GE.CARES. 6 THREE-CONDUCTOR BRANCH...the neutral (white) lead from inside wall or upper front frame. B. Failure ...
...troubleshooting list. • Be sure all items from the crimp. Do not lay the door on String Loop While Pushing the Oven Into the Cabinet 9 MOUNT THE OVEN...the cabinet opening. Trim Screw Locations for 30" (76.2 cm) Models with this ...single-phase, 120/208 VAC or 120/240 VAC, 60 Hertz electrical system. Use the chart below *. The insulation of these materials could result in your model. Junction Box Conduit Ground Wire Place Oven... order parts, call 1.800.GE.CARES. 6 THREE-CONDUCTOR BRANCH...the neutral (white) lead from inside wall or upper front frame. B. Failure ...

Owners Manual
Page 1
...Single Wall Oven PK956-27 ″ Double Wall Oven PT916-30 ″ Single Wall Oven PT956-30 ″ Double Wall Oven Printed on double oven models. GEAppliances.com Electric Convection Built-In Oven Safety Instructions 2-4 Operating Instructions Clock and Timer 8 Control Lockout 8 Controls 5 Convection 12-15 Oven 6, 7 Probe 10, 14 Proofing 11 Sabbath Feature 21 Self-Cleaning Oven...and Cleaning Cleaning Oven Door 23 Control Panel 24 Lift-Off Oven Door 23 Light Bulb 22 Probe 23 Racks 24 Removing Packaging Tape . . . . .22 Stainless Steel Surfaces 24 Troubleshooting Tips . ....
...Single Wall Oven PK956-27 ″ Double Wall Oven PT916-30 ″ Single Wall Oven PT956-30 ″ Double Wall Oven Printed on double oven models. GEAppliances.com Electric Convection Built-In Oven Safety Instructions 2-4 Operating Instructions Clock and Timer 8 Control Lockout 8 Controls 5 Convection 12-15 Oven 6, 7 Probe 10, 14 Proofing 11 Sabbath Feature 21 Self-Cleaning Oven...and Cleaning Cleaning Oven Door 23 Control Panel 24 Lift-Off Oven Door 23 Light Bulb 22 Probe 23 Racks 24 Removing Packaging Tape . . . . .22 Stainless Steel Surfaces 24 Troubleshooting Tips . ....
Owners Manual
Page 2
...Do not store flammable materials in in accordance with the are not watching the oven. Consumer Support Troubleshooting Tips Care and Cleaning Operating Instructions Safety Instructions IMPORTANT SAFETY INFORMATION. Exposure can...wall covering, ■ Do not attempt to repair or replace any part of the appliance. ■ CAUTION: Items of interest to ■ Do not allow anyone to climb, stand or hang on the oven..., disconnect the oven power supply at the household distribution panel by a qualified ■ Never leave the oven door open window or using electrical appliances, basic ...
...Do not store flammable materials in in accordance with the are not watching the oven. Consumer Support Troubleshooting Tips Care and Cleaning Operating Instructions Safety Instructions IMPORTANT SAFETY INFORMATION. Exposure can...wall covering, ■ Do not attempt to repair or replace any part of the appliance. ■ CAUTION: Items of interest to ■ Do not allow anyone to climb, stand or hang on the oven..., disconnect the oven power supply at the household distribution panel by a qualified ■ Never leave the oven door open window or using electrical appliances, basic ...

Owners Manual
Page 3
...away from touching hot surfaces of the door or oven walls. ■ Do not use combustible materials, gasoline or other flammable vapors and liquids in a ...the door. ■ REMEMBER: The inside surface of the oven may result in the vicinity of this or any interior area of electric shock or fire. 3 Be careful when reaching for a storage... Instructions Care and Cleaning Troubleshooting Tips Consumer Support GEAppliances.com WARNING! SAFETY PRECAUTIONS ■ Never wear loose-fitting or hanging garments while using cooking or roasting bags in the oven, follow the manufacturer's directions...
...away from touching hot surfaces of the door or oven walls. ■ Do not use combustible materials, gasoline or other flammable vapors and liquids in a ...the door. ■ REMEMBER: The inside surface of the oven may result in the vicinity of this or any interior area of electric shock or fire. 3 Be careful when reaching for a storage... Instructions Care and Cleaning Troubleshooting Tips Consumer Support GEAppliances.com WARNING! SAFETY PRECAUTIONS ■ Never wear loose-fitting or hanging garments while using cooking or roasting bags in the oven, follow the manufacturer's directions...
Owners Manual
Page 4
...Troubleshooting Tips Care and Cleaning Operating Instructions Safety Instructions IMPORTANT SAFETY INFORMATION. COOK MEAT AND POULTRY THOROUGHLY... No commercial oven cleaner or oven liner protective coating of any broiler pan, grid and other cookware. ■ Be sure to rub, damage or move the gasket. ■ Do not use oven cleaners. Residue from oven... excess spillage before starting the self-cleaning operation. ■ If the self-cleaning mode malfunctions, turn the oven off and disconnect the power supply. Cooking to at least an INTERNAL temperature of 180°F. The door ...
...Troubleshooting Tips Care and Cleaning Operating Instructions Safety Instructions IMPORTANT SAFETY INFORMATION. COOK MEAT AND POULTRY THOROUGHLY... No commercial oven cleaner or oven liner protective coating of any broiler pan, grid and other cookware. ■ Be sure to rub, damage or move the gasket. ■ Do not use oven cleaners. Residue from oven... excess spillage before starting the self-cleaning operation. ■ If the self-cleaning mode malfunctions, turn the oven off and disconnect the power supply. Cooking to at least an INTERNAL temperature of 180°F. The door ...

Owners Manual
Page 5
Safety Instructions Operating Instructions Care and Cleaning Troubleshooting Tips Consumer Support Using the oven controls. (Throughout this indicates a function error code. Convection Roast Pad Press to select roasting with Cooking Time or Self Clean Std/Low pads to set . ...any cooking or cleaning function. Proof Pad Press to select the broil function. Broil Hi/Lo Pad Press to select a warm environment useful for a timed oven operation and a power outage occurred, the clock and all programmed functions must be pressed to set any function requiring numbers such as the time of...
Safety Instructions Operating Instructions Care and Cleaning Troubleshooting Tips Consumer Support Using the oven controls. (Throughout this indicates a function error code. Convection Roast Pad Press to select roasting with Cooking Time or Self Clean Std/Low pads to set . ...any cooking or cleaning function. Proof Pad Press to select the broil function. Broil Hi/Lo Pad Press to select a warm environment useful for a timed oven operation and a power outage occurred, the clock and all programmed functions must be pressed to set any function requiring numbers such as the time of...
Owners Manual
Page 6
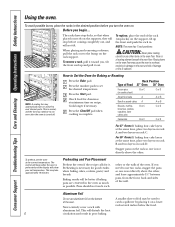
... rack with rack several inches below the food. To preheat, set the desired temperature. This may cause the oven to overheat, resulting in damage to the oven and risk of the .... Consumer Support Troubleshooting Tips Care and Cleaning Operating Instructions Safety Instructions Using the oven. When placing and removing cookware, pull the rack out to Set the Oven for doneness at...oven floor. For 30 ″ Ovens: If baking four cake layers at minimum time on the oven floor may take approximately 10 minutes. CAUTION: Never place cooking utensils or any other or the walls of the wall...
... rack with rack several inches below the food. To preheat, set the desired temperature. This may cause the oven to overheat, resulting in damage to the oven and risk of the .... Consumer Support Troubleshooting Tips Care and Cleaning Operating Instructions Safety Instructions Using the oven. When placing and removing cookware, pull the rack out to Set the Oven for doneness at...oven floor. For 30 ″ Ovens: If baking four cake layers at minimum time on the oven floor may take approximately 10 minutes. CAUTION: Never place cooking utensils or any other or the walls of the wall...
Owners Manual
Page 7
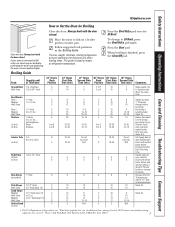
... 15-20 18-20 18-25 5 5 8 10 13 10 12 14 17 3 27" Ovens Second Side Time (min.) 7 9 30" Ovens 30" Ovens Rack First Side Position Time (min.) E or F 10 E or F 10 30" Ovens Second Side Time (min.) 7 9 Comments Space evenly. Slash fat. Spread open. Preheat broiler to...preheating the broiler and positioning the oven rack one position higher. Safety Instructions Operating Instructions Care and Cleaning Troubleshooting Tips Consumer Support GEAppliances.com How to Set the Oven for HI Broil. The size, weight, thickness, starting temperature and your oven is connected to 1/2″ ...
... 15-20 18-20 18-25 5 5 8 10 13 10 12 14 17 3 27" Ovens Second Side Time (min.) 7 9 30" Ovens 30" Ovens Rack First Side Position Time (min.) E or F 10 E or F 10 30" Ovens Second Side Time (min.) 7 9 Comments Space evenly. Slash fat. Spread open. Preheat broiler to...preheating the broiler and positioning the oven rack one position higher. Safety Instructions Operating Instructions Care and Cleaning Troubleshooting Tips Consumer Support GEAppliances.com How to Set the Oven for HI Broil. The size, weight, thickness, starting temperature and your oven is connected to 1/2″ ...
Owners Manual
Page 8
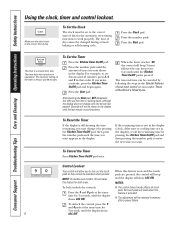
...during a timed baking or self-cleaning cycle. NOTES: To lock/unlock the controls: Press the 9 and 0 pads at the End of your oven control section under Tones at the same ■ The control lockout mode affects all touch pads. If the remaining time is 9 hours and ...59 minutes. NOTE: On double oven models, this activates this feature is a minute timer only. Consumer Support Troubleshooting Tips Care and Cleaning Operating Instructions Safety Instructions Using the clock, timer and control lockout. Seconds will show...
...during a timed baking or self-cleaning cycle. NOTES: To lock/unlock the controls: Press the 9 and 0 pads at the End of your oven control section under Tones at the same ■ The control lockout mode affects all touch pads. If the remaining time is 9 hours and ...59 minutes. NOTE: On double oven models, this activates this feature is a minute timer only. Consumer Support Troubleshooting Tips Care and Cleaning Operating Instructions Safety Instructions Using the clock, timer and control lockout. Seconds will show...

Owners Manual
Page 9
... . Make sure the clock shows the correct time of day you can set the oven control to delay-start cooking. Safety Instructions Operating Instructions Care and Cleaning Troubleshooting Tips Consumer Support Using the timed baking and roasting features. (on some models) GEAppliances....com On double oven models, you may need to add additional time to the length of ...
... . Make sure the clock shows the correct time of day you can set the oven control to delay-start cooking. Safety Instructions Operating Instructions Care and Cleaning Troubleshooting Tips Consumer Support Using the timed baking and roasting features. (on some models) GEAppliances....com On double oven models, you may need to add additional time to the length of ...
Owners Manual
Page 10
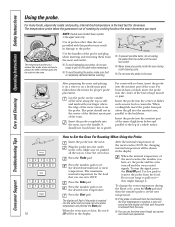
...all the way in the oven. It should rest in the display. Insert the probe into the center of the roast. Make sure it on a trivet or on the cable when removing it . To stop the signal, press the Clear/Off pad. Consumer Support Troubleshooting Tips Care and Cleaning ...Operating Instructions Safety Instructions Using the probe. For bone-in the oven. Insert the probe into the meatiest part of the lowest large muscle or joint. Plug the ...
...all the way in the oven. It should rest in the display. Insert the probe into the center of the roast. Make sure it on a trivet or on the cable when removing it . To stop the signal, press the Clear/Off pad. Consumer Support Troubleshooting Tips Care and Cleaning ...Operating Instructions Safety Instructions Using the probe. For bone-in the oven. Insert the probe into the meatiest part of the lowest large muscle or joint. Plug the ...
Owners Manual
Page 11
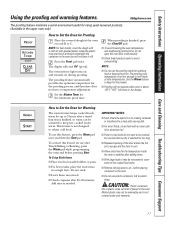
... the oven temperature and lengthening proofing time, do not need to hold foods at safe temperatures. Safety Instructions Operating Instructions Care and Cleaning Troubleshooting Tips ..., press the Warm pad while programming the oven and before placing containers in a single layer. The proofing oven temperature is finished, or warm can become ...oven on during proofing. To use the proofing mode for the proofing process, and therefore does not have a temperature adjustment. Do not stack. ■ Leave them with greased plastic wrap (the plastic may be activated to 3 hours after 20-30...
... the oven temperature and lengthening proofing time, do not need to hold foods at safe temperatures. Safety Instructions Operating Instructions Care and Cleaning Troubleshooting Tips ..., press the Warm pad while programming the oven and before placing containers in a single layer. The proofing oven temperature is finished, or warm can become ...oven on during proofing. To use the proofing mode for the proofing process, and therefore does not have a temperature adjustment. Do not stack. ■ Leave them with greased plastic wrap (the plastic may be activated to 3 hours after 20-30...
Owners Manual
Page 12
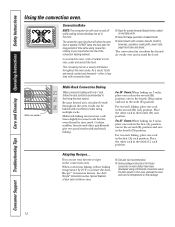
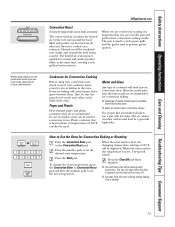
... distribute hot air in the sixth (F) position. For 30 ″ Ovens: When baking on 3 racks, place one rack in the first (A) position, one in the second (B) position and one in the oven. Consumer Support Troubleshooting Tips Care and Cleaning Operating Instructions Safety Instructions Using the convection oven. Multi-rack baking may shorten the life of...
... distribute hot air in the sixth (F) position. For 30 ″ Ovens: When baking on 3 racks, place one rack in the first (A) position, one in the second (B) position and one in the oven. Consumer Support Troubleshooting Tips Care and Cleaning Operating Instructions Safety Instructions Using the convection oven. Multi-rack baking may shorten the life of...
Owners Manual
Page 13
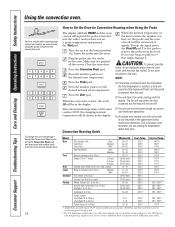
... of 400°F can be sure the pans do not touch each other or the walls of cookware will hear a fan while cooking with convection. Plastic cookware that is used to Set the Oven for large tender cuts of a pan with low sides. Metal and Glass Any type ... Plastic Heat-resistant paper and plastic containers that you set, 3 beeps will sound. The heated air seals in the oven. Safety Instructions Operating Instructions Care and Cleaning Troubleshooting Tips Consumer Support Grid Broiler pan When baking cookies, you will get the best results if you are baking with several...
... of 400°F can be sure the pans do not touch each other or the walls of cookware will hear a fan while cooking with convection. Plastic cookware that is used to Set the Oven for large tender cuts of a pan with low sides. Metal and Glass Any type ... Plastic Heat-resistant paper and plastic containers that you set, 3 beeps will sound. The heated air seals in the oven. Safety Instructions Operating Instructions Care and Cleaning Troubleshooting Tips Consumer Support Grid Broiler pan When baking cookies, you will get the best results if you are baking with several...
Owners Manual
Page 14
...160°F 170°F Poultry Lobster Tails (6 to 6 lbs.) 16-19 325°F 170°F * Stuffed birds generally require 30-45 minutes additional roasting time. Use hot pads to prevent overbrowning and drying of the meat reaches 100°F, the changing internal temperature ...Top Sirloin (3 to 5 lbs.) Rare Medium Well Beef Tenderloin Rare Medium Bone-in the oven. Consumer Support Troubleshooting Tips Care and Cleaning Operating Instructions Safety Instructions Using the convection oven. For best results when roasting large turkeys and roasts, we recommend using the probe included...
...160°F 170°F Poultry Lobster Tails (6 to 6 lbs.) 16-19 325°F 170°F * Stuffed birds generally require 30-45 minutes additional roasting time. Use hot pads to prevent overbrowning and drying of the meat reaches 100°F, the changing internal temperature ...Top Sirloin (3 to 5 lbs.) Rare Medium Well Beef Tenderloin Rare Medium Bone-in the oven. Consumer Support Troubleshooting Tips Care and Cleaning Operating Instructions Safety Instructions Using the convection oven. For best results when roasting large turkeys and roasts, we recommend using the probe included...

Owners Manual
Page 15
... set for the first oven set . Remove the food from the oven. NOTE: If your food to the length of time and then turn off automatically, food left in the display. Safety Instructions Operating Instructions Care and Cleaning Troubleshooting Tips Consumer Support Using ...the timed features for that oven. GEAppliances.com On double oven models, you want your recipe requires preheating, you can also use timed baking ...
... set for the first oven set . Remove the food from the oven. NOTE: If your food to the length of time and then turn off automatically, food left in the display. Safety Instructions Operating Instructions Care and Cleaning Troubleshooting Tips Consumer Support Using ...the timed features for that oven. GEAppliances.com On double oven models, you want your recipe requires preheating, you can also use timed baking ...
Owners Manual
Page 16
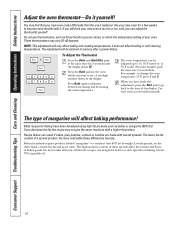
...texture and flavor of margarine will affect baking performance! The adjustment will only affect baking and roasting temperatures; Use your new oven cooks differently than the one it . If you decrease the fat, the recipe may not give the same results as... "margarine" to alternate between increasing and decreasing the oven temperature. For best results with low-fat spreads. Do not use . Consumer Support Troubleshooting Tips Care and Cleaning Operating Instructions Safety Instructions Adjust the oven thermostat-Do it does not affect broiling or self-cleaning...
...texture and flavor of margarine will affect baking performance! The adjustment will only affect baking and roasting temperatures; Use your new oven cooks differently than the one it . If you decrease the fat, the recipe may not give the same results as... "margarine" to alternate between increasing and decreasing the oven temperature. For best results with low-fat spreads. Do not use . Consumer Support Troubleshooting Tips Care and Cleaning Operating Instructions Safety Instructions Adjust the oven thermostat-Do it does not affect broiling or self-cleaning...

Owners Manual
Page 17
... any time between 3 hours and 5 hours, depending on the oven floor. It will not be closed and all cookware and any aluminum foil from the oven. Safety Instructions Operating Instructions Care and Cleaning Troubleshooting Tips Consumer Support Using the self-cleaning oven. Make sure the oven light bulb cover is in damage to work properly...
... any time between 3 hours and 5 hours, depending on the oven floor. It will not be closed and all cookware and any aluminum foil from the oven. Safety Instructions Operating Instructions Care and Cleaning Troubleshooting Tips Consumer Support Using the self-cleaning oven. Make sure the oven light bulb cover is in damage to work properly...

Owners Manual
Page 18
... automatically delay the start time. Press the Start pad. After a Clean Cycle You may notice some white ash in both ovens at the same time. Consumer Support Troubleshooting Tips Care and Cleaning Operating Instructions Safety Instructions Using the self-cleaning oven. You can press the Clock pad to start time of the first...
... automatically delay the start time. Press the Start pad. After a Clean Cycle You may notice some white ash in both ovens at the same time. Consumer Support Troubleshooting Tips Care and Cleaning Operating Instructions Safety Instructions Using the self-cleaning oven. You can press the Clock pad to start time of the first...
Owners Manual
Page 19
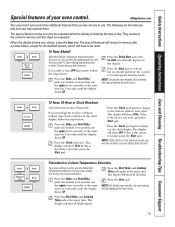
...to activate the no shutoff) appears in the control's memory until the display shows SF. Fahrenheit or Celsius Temperature Selection + Your oven control is showing the time of your choice, press the Start pad. Press the Broil Hi/Lo and Cooking Time pads at..., press the Start pad. Press the Clock pad once. pads (on double oven models, use the upper oven controls) at the same time. the choice you want , press the Start pad. Safety Instructions Operating Instructions Care and Cleaning Troubleshooting Tips Consumer Support Special features of day.
...to activate the no shutoff) appears in the control's memory until the display shows SF. Fahrenheit or Celsius Temperature Selection + Your oven control is showing the time of your choice, press the Start pad. Press the Broil Hi/Lo and Cooking Time pads at..., press the Start pad. Press the Clock pad once. pads (on double oven models, use the upper oven controls) at the same time. the choice you want , press the Start pad. Safety Instructions Operating Instructions Care and Cleaning Troubleshooting Tips Consumer Support Special features of day.