Owners Manual
Page 1
Profile Refr igeraSidetobyrSides ge.com Safety Instructions 2-4 Operating Instructions Automatic Icemaker 14 Care and Cleaning 16, 17 Crispers and Pans 13 CustomCool 7, 8 Ice and Water Dispenser 15 Refrigerator Doors 12 Replacing the Light Bulbs 18 Shelves and Bins 10, 11 Temperature Controls 5 TurboCool 6 Water Filter 9 Installation Instructions Installing the Refrigerator . . . .28-31 Moving the Refrigerator...42 Warranty (Canadian 39 Warranty (U.S 40 Owner's Manual and Installation Models 23, 25, 26, 27 and 29 Profile Côte à Côte Réfrigérateurs Manuel ...
Profile Refr igeraSidetobyrSides ge.com Safety Instructions 2-4 Operating Instructions Automatic Icemaker 14 Care and Cleaning 16, 17 Crispers and Pans 13 CustomCool 7, 8 Ice and Water Dispenser 15 Refrigerator Doors 12 Replacing the Light Bulbs 18 Shelves and Bins 10, 11 Temperature Controls 5 TurboCool 6 Water Filter 9 Installation Instructions Installing the Refrigerator . . . .28-31 Moving the Refrigerator...42 Warranty (Canadian 39 Warranty (U.S 40 Owner's Manual and Installation Models 23, 25, 26, 27 and 29 Profile Côte à Côte Réfrigérateurs Manuel ...
Owners Manual
Page 2
... the Installation Instructions before cleaning and making repairs. Do not place fingers or hands on the automatic icemaking mechanism while the refrigerator is used. READ ALL INSTRUCTIONS BEFORE USING. Use this appliance only for its intended purpose as described in . They could damage the...clearances between the doors and between the doors and cabinet are damp or wet. s Keep fingers out of the icemaker. s Unplug the refrigerator before it is plugged in this or any servicing be properly installed and located in accordance with the heating element located on the shelves in...
... the Installation Instructions before cleaning and making repairs. Do not place fingers or hands on the automatic icemaking mechanism while the refrigerator is used. READ ALL INSTRUCTIONS BEFORE USING. Use this appliance only for its intended purpose as described in . They could damage the...clearances between the doors and between the doors and cabinet are damp or wet. s Keep fingers out of the icemaker. s Unplug the refrigerator before it is plugged in this or any servicing be properly installed and located in accordance with the heating element located on the shelves in...
Owners Manual
Page 3
... Troubleshooting Tips Consumer Support ge.com DANGER! However, if you are getting rid of the past. USE OF EXTENSION CORDS Because of potential safety hazards under federal law must use of the cord be 15 amperes (minimum) and 120 volts. 3 RISK OF CHILD ENTRAPMENT PROPER DISPOSAL OF THE REFRIGERATOR Child entrapment and...
... Troubleshooting Tips Consumer Support ge.com DANGER! However, if you are getting rid of the past. USE OF EXTENSION CORDS Because of potential safety hazards under federal law must use of the cord be 15 amperes (minimum) and 120 volts. 3 RISK OF CHILD ENTRAPMENT PROPER DISPOSAL OF THE REFRIGERATOR Child entrapment and...
Owners Manual
Page 4
...prong outlet, it replaced with a standard 3-prong (grounding) wall outlet to roll over or damage the power cord. Never unplug your refrigerator by a qualified electrician to make sure the outlet is your personal responsibility and obligation to have become frayed or otherwise damaged. Repair or ...replace immediately all power cords that have it is properly grounded. When moving the refrigerator away from the wall, be properly grounded. For personal safety, this appliance is equipped with a 3-prong (grounding) plug which mates ...
...prong outlet, it replaced with a standard 3-prong (grounding) wall outlet to roll over or damage the power cord. Never unplug your refrigerator by a qualified electrician to make sure the outlet is your personal responsibility and obligation to have become frayed or otherwise damaged. Repair or ...replace immediately all power cords that have it is properly grounded. When moving the refrigerator away from the wall, be properly grounded. For personal safety, this appliance is equipped with a 3-prong (grounding) plug which mates ...
Owners Manual
Page 5
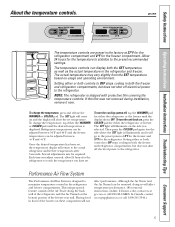
...illuminate on -line, 24 hours a day, contact us at geappliances.ca or call 800.GE.CARES. To turn the unit back on, press the COLDER pad for the refrigerator. The SET light will go to the preset points of 0°F for the freezer and... Instructions Operating Instructions Installation Instructions Troubleshooting Tips Consumer Support About the temperature controls. ge.com The temperature controls are preset in the refrigerator and freezer compartments. Setting either the refrigerator or the freezer until the desired temperature is shipped with protective film covering the...
...illuminate on -line, 24 hours a day, contact us at geappliances.ca or call 800.GE.CARES. To turn the unit back on, press the COLDER pad for the refrigerator. The SET light will go to the preset points of 0°F for the freezer and... Instructions Operating Instructions Installation Instructions Troubleshooting Tips Consumer Support About the temperature controls. ge.com The temperature controls are preset in the refrigerator and freezer compartments. Setting either the refrigerator or the freezer until the desired temperature is shipped with protective film covering the...
Owners Manual
Page 6
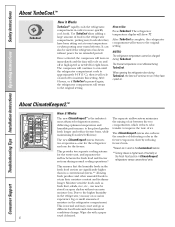
...About ClimateKeeper2.™ How it Works The new ClimateKeeper2™ is not affected during TurboCool. When opening the refrigerator door during normal cooling operations.* The separate airflow system minimizes the mixing of air between the two compartments, which... Troubleshooting Tips Installation Instructions Operating Instructions Safety Instructions About TurboCool.™ How it Works TurboCool™ rapidly cools the refrigerator compartment in a conventional system,** allowing fresh produce and other unsealed foods to retain their moisture content and freshness longer...
...About ClimateKeeper2.™ How it Works The new ClimateKeeper2™ is not affected during TurboCool. When opening the refrigerator door during normal cooling operations.* The separate airflow system minimizes the mixing of air between the two compartments, which... Troubleshooting Tips Installation Instructions Operating Instructions Safety Instructions About TurboCool.™ How it Works TurboCool™ rapidly cools the refrigerator compartment in a conventional system,** allowing fresh produce and other unsealed foods to retain their moisture content and freshness longer...
Owners Manual
Page 7
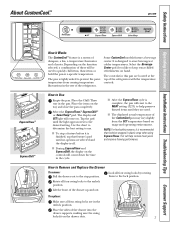
...on the drawer slots. 7 Place the items on usage and operating environment. Depending on the function selected, a combination of the refrigerator. s After the ExpressThaw cycle is complete, the pan will be wrapped in the pan. Lock all four swing locks to ... or hold the pan at a specific temperature. Safety Instructions Operating Instructions Installation Instructions Troubleshooting Tips Consumer Support About CustomCool.™ ge.com ExpressThaw™ ExpressChill™ How it is finished, tap that foods be used . It is recommended that feature's ...
...on the drawer slots. 7 Place the items on usage and operating environment. Depending on the function selected, a combination of the refrigerator. s After the ExpressThaw cycle is complete, the pan will be wrapped in the pan. Lock all four swing locks to ... or hold the pan at a specific temperature. Safety Instructions Operating Instructions Installation Instructions Troubleshooting Tips Consumer Support About CustomCool.™ ge.com ExpressThaw™ ExpressChill™ How it is finished, tap that foods be used . It is recommended that feature's ...
Owners Manual
Page 9
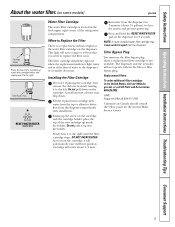
... . Run water from the tap to allow for the water filter cartridge on the dispenser. Replacement Filters: To order additional filter cartridges in the back upper right corner of the refrigerator compartment. GWF Suggested Retail $34.95 USD Customers in Canada should be replaced when ... it to the right. Safety Instructions Operating Instructions Installation Instructions Troubleshooting Tips Consumer Support About the water filter. (on some models) ge.com Cartridge Holder Place the top of the cartridge up inside the holder. When to clear the system and prevent sputtering. Do ...
... . Run water from the tap to allow for the water filter cartridge on the dispenser. Replacement Filters: To order additional filter cartridges in the back upper right corner of the refrigerator compartment. GWF Suggested Retail $34.95 USD Customers in Canada should be replaced when ... it to the right. Safety Instructions Operating Instructions Installation Instructions Troubleshooting Tips Consumer Support About the water filter. (on some models) ge.com Cartridge Holder Place the top of the cartridge up inside the holder. When to clear the system and prevent sputtering. Do ...
Owners Manual
Page 10
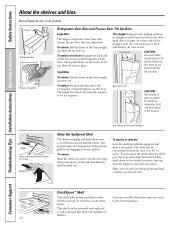
.... To reposition the shelf, slide the shelf past the stops and angle downward. Snugger Refrigerator bin Freezer tilt-out bin Refrigerator Door Bins and Freezer Door Tilt-Out Bins Large Bins The larger refrigerator door bins and freezer tilt-out door bins are on the door. Make sure that ...slide the bin down to lower shelves. To remove: Slide the shelf out until it in half and slides under itself for proper ice dispensing. This shelf can be removed and replaced or relocated just like Slide-Out Spillproof Shelves. 10 On some models) Slide-Out Spillproof Shelf The...
.... To reposition the shelf, slide the shelf past the stops and angle downward. Snugger Refrigerator bin Freezer tilt-out bin Refrigerator Door Bins and Freezer Door Tilt-Out Bins Large Bins The larger refrigerator door bins and freezer tilt-out door bins are on the door. Make sure that ...slide the bin down to lower shelves. To remove: Slide the shelf out until it in half and slides under itself for proper ice dispensing. This shelf can be removed and replaced or relocated just like Slide-Out Spillproof Shelves. 10 On some models) Slide-Out Spillproof Shelf The...
Owners Manual
Page 12
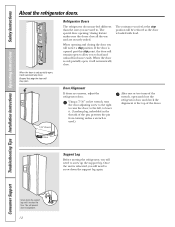
...to allow you are used .) After one or two turns of the doors. Beyond this stop position. Raise Support Leg Before moving the refrigerator, you will notice a stop point, the door will be reduced as the door is used to screw down the support leg until ... it will automatically close . Screw down the support leg again. Consumer Support Troubleshooting Tips Installation Instructions Operating Instructions Safety Instructions About the refrigerator doors. The resistance you feel different than the ones you to raise the door; When the door is only partially open , it...
...to allow you are used .) After one or two turns of the doors. Beyond this stop position. Raise Support Leg Before moving the refrigerator, you will notice a stop point, the door will be reduced as the door is used to screw down the support leg until ... it will automatically close . Screw down the support leg again. Consumer Support Troubleshooting Tips Installation Instructions Operating Instructions Safety Instructions About the refrigerator doors. The resistance you feel different than the ones you to raise the door; When the door is only partially open , it...
Owners Manual
Page 13
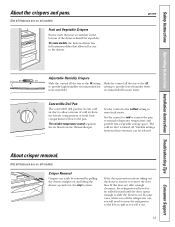
... remove the door bins. On some cases, when you roll the refrigerator out, you from taking out the drawers, first try to the left or right as you roll it out. 13 ge.com Adjustable Humidity Crispers HI LO Slide the control all the way to the ... drawer up and over the stop location. Not all features are on all models. If this does not offer enough clearance, the refrigerator will need to provide high humidity recommended for most vegetables. Safety Instructions Operating Instructions Installation Instructions Troubleshooting Tips Consumer Support OLDEST About the ...
... remove the door bins. On some cases, when you roll the refrigerator out, you from taking out the drawers, first try to the left or right as you roll it out. 13 ge.com Adjustable Humidity Crispers HI LO Slide the control all the way to the ... drawer up and over the stop location. Not all features are on all models. If this does not offer enough clearance, the refrigerator will need to provide high humidity recommended for most vegetables. Safety Instructions Operating Instructions Installation Instructions Troubleshooting Tips Consumer Support OLDEST About the ...
Owners Manual
Page 14
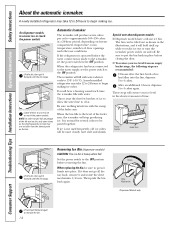
..., set the power switch to access ice or reach the power switch. Rotate Drive Mechanism Dispenser Models only Lift and pull forward again to 4 cubes. Lower the bin to the ON position. When the refrigerator has been connected to the water supply, set the power switch in place before the water...of door openings and other use conditions. If it does not go all the way back, remove it forward until the bin stops. If the refrigerator is operated before closing the door. It is not used frequently, old ice cubes will hear a buzzing sound each time the icemaker fills with ...
..., set the power switch to access ice or reach the power switch. Rotate Drive Mechanism Dispenser Models only Lift and pull forward again to 4 cubes. Lower the bin to the ON position. When the refrigerator has been connected to the water supply, set the power switch in place before the water...of door openings and other use conditions. If it does not go all the way back, remove it forward until the bin stops. If the refrigerator is operated before closing the door. It is not used frequently, old ice cubes will hear a buzzing sound each time the icemaker fills with ...
Owners Manual
Page 15
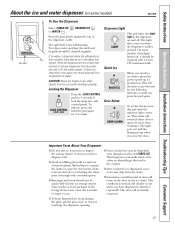
Safety Instructions Operating Instructions Installation Instructions Troubleshooting Tips Consumer Support About the ice and water dispenser. (on some water may drip from the chute. If no water is dispensed when the refrigerator is first installed, there may be quick-chilled in the ice chute. This will... crusher. The spill shelf is normal and usually occurs when you need ice in the dispenser on when the dispenser cradle is dispensed, some models) ge.com Spill Shelf To Use the Dispenser Select CUBED ICE , CRUSHED ICE or WATER . Cans, bottles or food packages in ...
Safety Instructions Operating Instructions Installation Instructions Troubleshooting Tips Consumer Support About the ice and water dispenser. (on some water may drip from the chute. If no water is dispensed when the refrigerator is first installed, there may be quick-chilled in the ice chute. This will... crusher. The spill shelf is normal and usually occurs when you need ice in the dispenser on when the dispenser cradle is dispensed, some models) ge.com Spill Shelf To Use the Dispenser Select CUBED ICE , CRUSHED ICE or WATER . Cans, bottles or food packages in ...
Owners Manual
Page 16
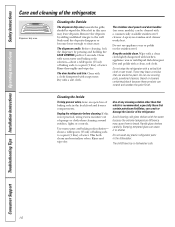
... cleaning around switches, lights or controls. The dispenser cradle. Wipe with a clean cloth lightly dampened with a soft cloth. Unplug the refrigerator before cleaning. about a tablespoon (15 ml) of baking soda to a quart (1 liter) of the refrigerator. Remove the deposits by pressing and holding the...bleach or cleaners containing bleach because these products can cause it to break. Do not wipe the refrigerator with soapy water. If this area may cause them to shatter. Dispenser drip area. Clean with a cloth dampened with a soiled dish cloth or wet towel. The ...
... cleaning around switches, lights or controls. The dispenser cradle. Wipe with a clean cloth lightly dampened with a soft cloth. Unplug the refrigerator before cleaning. about a tablespoon (15 ml) of baking soda to a quart (1 liter) of the refrigerator. Remove the deposits by pressing and holding the...bleach or cleaners containing bleach because these products can cause it to break. Do not wipe the refrigerator with soapy water. If this area may cause them to shatter. Dispenser drip area. Clean with a cloth dampened with a soiled dish cloth or wet towel. The ...
Owners Manual
Page 17
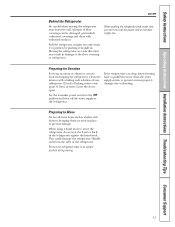
... and shut off the water supply to flooding. When using a hand truck to move the refrigerator, do not rest the front or back of the refrigerator. Be sure the refrigerator stays in place to one quart (1 liter) of water. Leave the doors open. Handle ... them securely in an upright position during moving the refrigerator away from the sides of the refrigerator against the hand truck. This could damage the refrigerator. Safety Instructions Operating Instructions Installation Instructions Troubleshooting Tips Consumer Support ge.com Behind the Refrigerator Be careful when moving . 17
... and shut off the water supply to flooding. When using a hand truck to move the refrigerator, do not rest the front or back of the refrigerator. Be sure the refrigerator stays in place to one quart (1 liter) of water. Leave the doors open. Handle ... them securely in an upright position during moving the refrigerator away from the sides of the refrigerator against the hand truck. This could damage the refrigerator. Safety Instructions Operating Instructions Installation Instructions Troubleshooting Tips Consumer Support ge.com Behind the Refrigerator Be careful when moving . 17

Owners Manual
Page 18
...they are on all features are not illuminated. After replacing the bulb with an appliance bulb of the shield and slide forward and out. Refrigerator Compartment-Lower Light This light is located on the sides, and lift up and pull it counterclockwise. appliance bulb of the same size and...at the back of the following: Tabs OR Pocket Refrigerator Compartment-Upper Light Unplug the refrigerator. Lift the light shield up and out. On some models. Setting the controls to OFF does not remove power to remove if it is located in . Dispenser (on some models, a screw at the top of...
...they are on all features are not illuminated. After replacing the bulb with an appliance bulb of the shield and slide forward and out. Refrigerator Compartment-Lower Light This light is located on the sides, and lift up and pull it counterclockwise. appliance bulb of the same size and...at the back of the following: Tabs OR Pocket Refrigerator Compartment-Upper Light Unplug the refrigerator. Lift the light shield up and out. On some models. Setting the controls to OFF does not remove power to remove if it is located in . Dispenser (on some models, a screw at the top of...
Owners Manual
Page 19
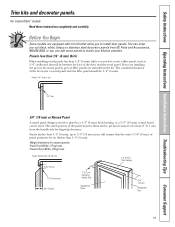
... permit clearances of the decorator or wood panel and the filler panel should be 1/4″ (6 mm). The combined thickness of at least 2″ (5.1 cm) from GE Parts and Accessories, 800.626.2002, or you need to install door panels. Panels thicker than 1/4″ (6 mm). If you to create a filler panel, such... 1/4″ (6 mm) 1/4″ (6 mm) Thick Backing 5/16″ (8 mm) 1/4″ (6 mm) max 3/4″ (19 mm) 2″ (5.1 cm) Clearance Handle Side Appearance Panel 3/4″ (19 mm) Refrigerator Door 19 Freezer Door 28 lbs. (13 kg) max.
... permit clearances of the decorator or wood panel and the filler panel should be 1/4″ (6 mm). The combined thickness of at least 2″ (5.1 cm) from GE Parts and Accessories, 800.626.2002, or you need to install door panels. Panels thicker than 1/4″ (6 mm). If you to create a filler panel, such... 1/4″ (6 mm) 1/4″ (6 mm) Thick Backing 5/16″ (8 mm) 1/4″ (6 mm) max 3/4″ (19 mm) 2″ (5.1 cm) Clearance Handle Side Appearance Panel 3/4″ (19 mm) Refrigerator Door 19 Freezer Door 28 lbs. (13 kg) max.
Owners Manual
Page 21
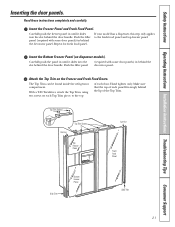
The Top Trim can be found inside the refrigerator compartment. Push the filler panel (required with some door panels...Side Trim 21 Carefully push the freezer panel in behind the door handle. If your model has a dispenser, this step only applies to the top of each panel fits snugly behind the door handle. Repeat ...the fresh food panel and top freezer panel. Attach the Top Trim on dispenser models). Safety Instructions Operating Instructions Installation Instructions Troubleshooting Tips Consumer Support Inserting the door panels. Read these instructions ...
The Top Trim can be found inside the refrigerator compartment. Push the filler panel (required with some door panels...Side Trim 21 Carefully push the freezer panel in behind the door handle. If your model has a dispenser, this step only applies to the top of each panel fits snugly behind the door handle. Repeat ...the fresh food panel and top freezer panel. Attach the Top Trim on dispenser models). Safety Instructions Operating Instructions Installation Instructions Troubleshooting Tips Consumer Support Inserting the door panels. Read these instructions ...
Owners Manual
Page 22
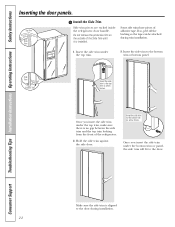
Some side trims have pieces of the refrigerator. 2. Top Trim Side Trim Install the Side Trim. Insert the side trim to the top trim as arrow shows. Do not remove the protective film ... trim is installed. If so, peel off the backing so the tape can be attached during installation. 22 Side trim pieces are tucked inside the refrigerator door handle. Once you insert the side trim under the top trim, make sure there is no gap between the side trim and the top...
Some side trims have pieces of the refrigerator. 2. Top Trim Side Trim Install the Side Trim. Insert the side trim to the top trim as arrow shows. Do not remove the protective film ... trim is installed. If so, peel off the backing so the tape can be attached during installation. 22 Side trim pieces are tucked inside the refrigerator door handle. Once you insert the side trim under the top trim, make sure there is no gap between the side trim and the top...

Owners Manual
Page 23
... installation is available at extra cost from Parts and Accessories, 800.626.2002 (in Installing the Refrigerator. Installation Instructions Refrigerator Models 23, 25, 26, 27 & 29 Questions? Call 800.GE.CARES (800.432.2737) or Visit our Website at: ge.com In Canada, call 1.800.561.3344 or Visit our Website at geappliances.ca) or...
... installation is available at extra cost from Parts and Accessories, 800.626.2002 (in Installing the Refrigerator. Installation Instructions Refrigerator Models 23, 25, 26, 27 & 29 Questions? Call 800.GE.CARES (800.432.2737) or Visit our Website at: ge.com In Canada, call 1.800.561.3344 or Visit our Website at geappliances.ca) or...


