
Owners Manual
Page 1
...ge.com Safety Instructions 2-3 Operating Instructions Automatic Icemaker 11 Care and Cleaning 13, 14 Crispers and Pans 10 ExpressChill 5 Ice and Water Dispenser 12, 13 Refrigerator Doors 9 Replacing the Light Bulbs 15 Shelves and Bins 7, 8 Temperature Controls 4 TurboCool 4 Water Filter 6 Installation Instructions Installing the Refrigerator 21-24 Moving the Refrigerator...Water Treatment Device Certificate 37 Warranty (Canadian 38 Warranty (U.S 39 Owner's Manual and Installation Models 22, 23, 25 and 27 Côte à Côte Réfrigérateurs Manuel d'utilisation et...
...ge.com Safety Instructions 2-3 Operating Instructions Automatic Icemaker 11 Care and Cleaning 13, 14 Crispers and Pans 10 ExpressChill 5 Ice and Water Dispenser 12, 13 Refrigerator Doors 9 Replacing the Light Bulbs 15 Shelves and Bins 7, 8 Temperature Controls 4 TurboCool 4 Water Filter 6 Installation Instructions Installing the Refrigerator 21-24 Moving the Refrigerator...Water Treatment Device Certificate 37 Warranty (Canadian 38 Warranty (U.S 39 Owner's Manual and Installation Models 22, 23, 25 and 27 Côte à Côte Réfrigérateurs Manuel d'utilisation et...
Owners Manual
Page 2
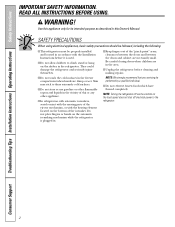
...IMPORTANT SAFETY INFORMATION. WARNING! SAFETY PRECAUTIONS When using electrical appliances, basic safety precautions should be followed, including the following: s This refrigerator must be performed by a qualified individual. NOTE: We strongly recommend that any other flammable vapors and liquids in this Owner's Manual.... s Do not refreeze frozen foods which have thawed completely. Skin may stick to the refrigerator. 2 s Do not store or use gasoline or other appliance. Use this appliance only for its intended purpose as described in...
...IMPORTANT SAFETY INFORMATION. WARNING! SAFETY PRECAUTIONS When using electrical appliances, basic safety precautions should be followed, including the following: s This refrigerator must be performed by a qualified individual. NOTE: We strongly recommend that any other flammable vapors and liquids in this Owner's Manual.... s Do not refreeze frozen foods which have thawed completely. Skin may stick to the refrigerator. 2 s Do not store or use gasoline or other appliance. Use this appliance only for its intended purpose as described in...
Owners Manual
Page 3
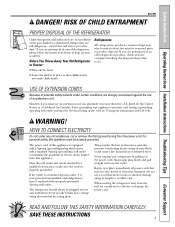
... 2-prong outlet, it replaced with the company handling the disposal about what to minimize the possibility of the past. Refrigerants All refrigeration products contain refrigerants, which mates with a 3-prong (grounding) plug which under federal law must be a UL-listed (in the United...and outlet and that have it is properly grounded. Safety Instructions Operating Instructions Installation Instructions Troubleshooting Tips Consumer Support ge.com DANGER! This provides the best performance and also prevents overloading house wiring circuits which has a voltage rating...
... 2-prong outlet, it replaced with the company handling the disposal about what to minimize the possibility of the past. Refrigerants All refrigeration products contain refrigerants, which mates with a 3-prong (grounding) plug which under federal law must be a UL-listed (in the United...and outlet and that have it is properly grounded. Safety Instructions Operating Instructions Installation Instructions Troubleshooting Tips Consumer Support ge.com DANGER! This provides the best performance and also prevents overloading house wiring circuits which has a voltage rating...
Owners Manual
Page 4
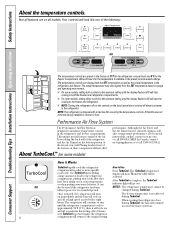
... be activated. The compressor will continue to run until the display flashes (off at high speed as the actual temperature in the factory at ge.com or call 1.800.561.3344.) OR 4 How it Works TurboCool rapidly cools the refrigerator compartment in both controls to the original setting. After TurboCool is complete, the...
... be activated. The compressor will continue to run until the display flashes (off at high speed as the actual temperature in the factory at ge.com or call 1.800.561.3344.) OR 4 How it Works TurboCool rapidly cools the refrigerator compartment in both controls to the original setting. After TurboCool is complete, the...

Owners Manual
Page 5
... 6 Small Juice Boxes (6-8 oz each) s 3 Foil Juice Packets s Wine (750 ml bottle) 45 Minutes s 2 Liters of Beverage s 1/2 Gallon of the refrigerator or on the dispenser with multiple settings, tap the pad until no options are in the pan. Place the items on packaging, starting temperature and...Minutes s 2 to 6 Beverage Cans (12 oz each) s 2 Plastic 20 oz Bottles of Beverage s 4 to Use Empty the pan. On some models) ge.com ExpressChill™ How it is finished, tap that feature's pad until the light appears next to prevent the pan's temperature from causing temperature fluctuations...
... 6 Small Juice Boxes (6-8 oz each) s 3 Foil Juice Packets s Wine (750 ml bottle) 45 Minutes s 2 Liters of Beverage s 1/2 Gallon of the refrigerator or on the dispenser with multiple settings, tap the pad until no options are in the pan. Place the items on packaging, starting temperature and...Minutes s 2 to 6 Beverage Cans (12 oz each) s 2 Plastic 20 oz Bottles of Beverage s 4 to Use Empty the pan. On some models) ge.com ExpressChill™ How it is finished, tap that feature's pad until the light appears next to prevent the pan's temperature from causing temperature fluctuations...
Owners Manual
Page 6
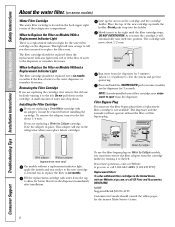
... Bypass Plug SmartWater Filter Bypass Plug Water by Culligan cartridge, leave the adapter in the United States, visit our Website at ge.com, or call GE Parts and Accessories, 800.626.2002. When to the left about 1/2 turn . If you turn it to Replace the Filter... Cartridge If you are replacing a Water by Culligan With adapter Without adapter (appearance may cause water to replace the filter in the refrigerator when you to spurt from the cartridge holder by slowly turning it up inside the holder. Fill the replacement cartridge with an adapter...
... Bypass Plug SmartWater Filter Bypass Plug Water by Culligan cartridge, leave the adapter in the United States, visit our Website at ge.com, or call GE Parts and Accessories, 800.626.2002. When to the left about 1/2 turn . If you turn it to Replace the Filter... Cartridge If you are replacing a Water by Culligan With adapter Without adapter (appearance may cause water to replace the filter in the refrigerator when you to spurt from the cartridge holder by slowly turning it up inside the holder. Fill the replacement cartridge with an adapter...

Owners Manual
Page 7
ge.com Not all features are on all the way back in the bin. Bin will lock in place. To replace: Position the bin above the rectangular molded supports on the tab and slide the shelf straight out. To remove: Slide the shelf out until it into place. Snugger Refrigerator bin ...Freezer bin Refrigerator Door Bins and Freezer Door Tilt-Out Bins Large Bins The larger refrigerator door bins and freezer tilt-out door bins are designed to help prevent spills from dripping to ...
ge.com Not all features are on all the way back in the bin. Bin will lock in place. To replace: Position the bin above the rectangular molded supports on the tab and slide the shelf straight out. To remove: Slide the shelf out until it into place. Snugger Refrigerator bin ...Freezer bin Refrigerator Door Bins and Freezer Door Tilt-Out Bins Large Bins The larger refrigerator door bins and freezer tilt-out door bins are designed to help prevent spills from dripping to ...

Owners Manual
Page 9
... food more easily. This will automatically close . Safety Instructions Operating Instructions Installation Instructions Troubleshooting Tips Consumer Support About the refrigerator doors. Beyond this stop the door will automatically close . ge.com Refrigerator Doors The refrigerator doors may feel at the top of the wrench, open . The special door opening and closing feature makes sure...
... food more easily. This will automatically close . Safety Instructions Operating Instructions Installation Instructions Troubleshooting Tips Consumer Support About the refrigerator doors. Beyond this stop the door will automatically close . ge.com Refrigerator Doors The refrigerator doors may feel at the top of the wrench, open . The special door opening and closing feature makes sure...

Owners Manual
Page 10
... you roll the refrigerator out, you will need to move the refrigerator to remove the door bins. Adjustable Humidity Crispers HI LO Slide the control all the way to the HI setting Slide the control all the way to the LO to provide high humidity recommended for ... features are on all models. Variable settings between these extremes can easily be wiped dry. the freezer compartment or refrigerator compartment to flow to normal refrigerator temperature and The variable temperature control regulates provide extra vegetable storage space. Set the control to cold to convert the...
... you roll the refrigerator out, you will need to move the refrigerator to remove the door bins. Adjustable Humidity Crispers HI LO Slide the control all the way to the HI setting Slide the control all the way to the LO to provide high humidity recommended for ... features are on all models. Variable settings between these extremes can easily be wiped dry. the freezer compartment or refrigerator compartment to flow to normal refrigerator temperature and The variable temperature control regulates provide extra vegetable storage space. Set the control to cold to convert the...
Owners Manual
Page 11
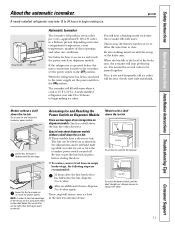
...power switch: Lift the bin, then pull it cools to 15°F (-10°C). If the refrigerator is operated before closing the door. When the refrigerator has been connected to begin making ice. When the bin fills to begin making ice cubes. Accessing ...Instructions Installation Instructions Troubleshooting Tips Consumer Support About the automatic icemaker. A newly installed refrigerator may take full advantage of ice storage bins on dispenser models. Lower the bin to 4 cubes. ge.com Power Switch Icemaker Feeler Arm Automatic Icemaker The icemaker will stop producing ice...
...power switch: Lift the bin, then pull it cools to 15°F (-10°C). If the refrigerator is operated before closing the door. When the refrigerator has been connected to begin making ice. When the bin fills to begin making ice cubes. Accessing ...Instructions Installation Instructions Troubleshooting Tips Consumer Support About the automatic icemaker. A newly installed refrigerator may take full advantage of ice storage bins on dispenser models. Lower the bin to 4 cubes. ge.com Power Switch Icemaker Feeler Arm Automatic Icemaker The icemaker will stop producing ice...

Owners Manual
Page 12
... narrow glasses. s After crushed ice is first installed, there may be air in the chute to freeze shut. If no water is dispensed when the refrigerator is dispensed, some water may drip from the water line and to fill the water system. Important Facts About Your Dispenser s Do not add ice...
... narrow glasses. s After crushed ice is first installed, there may be air in the chute to freeze shut. If no water is dispensed when the refrigerator is dispensed, some water may drip from the water line and to fill the water system. Important Facts About Your Dispenser s Do not add ice...
Owners Manual
Page 13
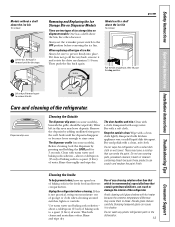
...push the bin back again. Remove the deposits by pressing and holding the LOCK pad for 3 seconds. Do not wipe the refrigerator with a soft cloth. ge.com Lift and pull forward again to the well. Before cleaning, lock the dispenser by adding undiluted vinegar to remove the ...does not. One has a shelf above the bin, the other than that which is not practical, wring excess moisture out of the refrigerator. Dispenser drip area. Safety Instructions Operating Instructions Installation Instructions Troubleshooting Tips Consumer Support Models without a shelf above the ice bin To remove:...
...push the bin back again. Remove the deposits by pressing and holding the LOCK pad for 3 seconds. Do not wipe the refrigerator with a soft cloth. ge.com Lift and pull forward again to the well. Before cleaning, lock the dispenser by adding undiluted vinegar to remove the ...does not. One has a shelf above the bin, the other than that which is not practical, wring excess moisture out of the refrigerator. Dispenser drip area. Safety Instructions Operating Instructions Installation Instructions Troubleshooting Tips Consumer Support Models without a shelf above the ice bin To remove:...

Owners Manual
Page 14
... Vacation For long vacations or absences, remove food and unplug the refrigerator. This could damage the refrigerator. Handle only from the wall. Be sure the refrigerator stays in damage to prevent damage. When pushing the refrigerator back, make sure you don't roll over the power cord or...If the temperature can be damaged, particularly cushioned coverings and those with a baking soda solution of one tablespoon (15 ml) of the refrigerator against the hand truck. All types of floor coverings can drop below freezing, have a qualified servicer drain the water supply system (...
... Vacation For long vacations or absences, remove food and unplug the refrigerator. This could damage the refrigerator. Handle only from the wall. Be sure the refrigerator stays in damage to prevent damage. When pushing the refrigerator back, make sure you don't roll over the power cord or...If the temperature can be damaged, particularly cushioned coverings and those with a baking soda solution of one tablespoon (15 ml) of the refrigerator against the hand truck. All types of floor coverings can drop below freezing, have a qualified servicer drain the water supply system (...

Owners Manual
Page 15
... wattage. Dispenser Unplug the refrigerator. After replacing the bulb with a bulb of the shield. Remove the shelf just above the top drawer. On other models, the screw is located above the light shield. (The shelf will look like one of the shield and slide forward and out. ge.com NOTE: Turning the... refrigerator off via the controls on the dispenser under the control panel.
... wattage. Dispenser Unplug the refrigerator. After replacing the bulb with a bulb of the shield. Remove the shelf just above the top drawer. On other models, the screw is located above the light shield. (The shelf will look like one of the shield and slide forward and out. ge.com NOTE: Turning the... refrigerator off via the controls on the dispenser under the control panel.
Owners Manual
Page 16
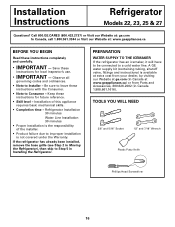
...or Visit our Website at www.geappliances.ca) or from your dealer, by visiting our Website at ge.com (in Moving the Refrigerator), then skip to Installer - If the refrigerator has already been installed, remove the base grille (see Step 2 in Canada at : www.geappliances....ca BEFORE YOU BEGIN Read these instructions for local inspector's use. • IMPORTANT - Installation Instructions Refrigerator Models 22, 23, 25 & 27 Questions? TOOLS YOU WILL NEED 3/8″ and 5/16″ Socket 1/2″ and 7/16″ Wrench Plastic Putty Knife...
...or Visit our Website at www.geappliances.ca) or from your dealer, by visiting our Website at ge.com (in Moving the Refrigerator), then skip to Installer - If the refrigerator has already been installed, remove the base grille (see Step 2 in Canada at : www.geappliances....ca BEFORE YOU BEGIN Read these instructions for local inspector's use. • IMPORTANT - Installation Instructions Refrigerator Models 22, 23, 25 & 27 Questions? TOOLS YOU WILL NEED 3/8″ and 5/16″ Socket 1/2″ and 7/16″ Wrench Plastic Putty Knife...

Owners Manual
Page 17
... the white collar of the coupling and pull out the tubing. Bottom freezer hinge 17 To move the refrigerator, use a padded hand truck. Installation Instructions MOVING THE REFRIGERATOR 1 LOADING THE REFRIGERATOR ONTO A HAND TRUCK Leave all entrances are more than 38″ wide, the doors must be disconnected. DO NOT OVERTIGHTEN THE STRAP... the handles. If all tape and door pads on the freezer door that is in on the hand truck and secure the strap around the refrigerator. White collar 2 REMOVE THE BASE GRILLE Remove the grille by removing the two Phillips head screws.
... the white collar of the coupling and pull out the tubing. Bottom freezer hinge 17 To move the refrigerator, use a padded hand truck. Installation Instructions MOVING THE REFRIGERATOR 1 LOADING THE REFRIGERATOR ONTO A HAND TRUCK Leave all entrances are more than 38″ wide, the doors must be disconnected. DO NOT OVERTIGHTEN THE STRAP... the handles. If all tape and door pads on the freezer door that is in on the hand truck and secure the strap around the refrigerator. White collar 2 REMOVE THE BASE GRILLE Remove the grille by removing the two Phillips head screws.
Owners Manual
Page 18
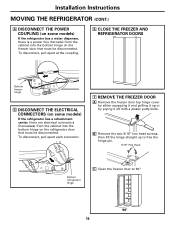
...freezer door that must be disconnected. To disconnect, pull apart at the coupling. 6 CLOSE THE FREEZER AND REFRIGERATOR DOORS Bottom freezer hinge 5 DISCONNECT THE ELECTRICAL CONNECTORS (on some models) If the refrigerator has a water dispenser, there is a power line (harness) from the cabinet into the bottom hinge on...7 REMOVE THE FREEZER DOOR A Remove the freezer door top hinge cover by prying it up to free the hinge pin. 5/16" Hex Head Bottom refrigerator hinge C Open the freezer door to 90.° 90° 18 B Remove the two 5/16" hex head screws, then lift the hinge straight...
...freezer door that must be disconnected. To disconnect, pull apart at the coupling. 6 CLOSE THE FREEZER AND REFRIGERATOR DOORS Bottom freezer hinge 5 DISCONNECT THE ELECTRICAL CONNECTORS (on some models) If the refrigerator has a water dispenser, there is a power line (harness) from the cabinet into the bottom hinge on...7 REMOVE THE FREEZER DOOR A Remove the freezer door top hinge cover by prying it up to free the hinge pin. 5/16" Hex Head Bottom refrigerator hinge C Open the freezer door to 90.° 90° 18 B Remove the two 5/16" hex head screws, then lift the hinge straight...

Owners Manual
Page 19
... up and off the bottom hinge, the second person should carefully guide the water line and power line (harness) through the bottom hinge. 8 REMOVE THE REFRIGERATOR DOOR (cont.) B Remove the two 5/16" hex head screws, then lift the hinge straight up to free the hinge pin. 5/16" Hex Head C Open ...the refrigerator door to 90.° 90° E Set the door on a non-scratching surface with the inside up. 8 REMOVE THE 90° REFRIGERATOR DOOR A Remove the refrigerator door top hinge cover by either squeezing it and pulling it up or...
... up and off the bottom hinge, the second person should carefully guide the water line and power line (harness) through the bottom hinge. 8 REMOVE THE REFRIGERATOR DOOR (cont.) B Remove the two 5/16" hex head screws, then lift the hinge straight up to free the hinge pin. 5/16" Hex Head C Open ...the refrigerator door to 90.° 90° E Set the door on a non-scratching surface with the inside up. 8 REMOVE THE 90° REFRIGERATOR DOOR A Remove the refrigerator door top hinge cover by either squeezing it and pulling it up or...
Owners Manual
Page 20
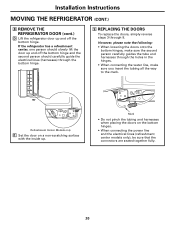
...8226; When lowering the doors onto the bottom hinges, make sure the second person carefully guides the tube and harnesses through 8. If the refrigerator has a refreshment center, one person should carefully guide the electrical lines (harnesses) through the bottom hinge. 9 REPLACING THE DOORS To replace...on a non-scratching surface with the inside up and off the bottom hinge. Installation Instructions MOVING THE REFRIGERATOR (CONT.) 8 REMOVE THE REFRIGERATOR DOOR (cont.) D Lift the refrigerator door up and off the bottom hinge and the second person should slowly lift the door up .
...8226; When lowering the doors onto the bottom hinges, make sure the second person carefully guides the tube and harnesses through 8. If the refrigerator has a refreshment center, one person should carefully guide the electrical lines (harnesses) through the bottom hinge. 9 REPLACING THE DOORS To replace...on a non-scratching surface with the inside up and off the bottom hinge. Installation Instructions MOVING THE REFRIGERATOR (CONT.) 8 REMOVE THE REFRIGERATOR DOOR (cont.) D Lift the refrigerator door up and off the bottom hinge and the second person should slowly lift the door up .

Owners Manual
Page 21
...: Sides 1/8″ (4 mm) Top 1″ (25 mm) Back 1″ (25 mm) 21 Installation Instructions INSTALLING THE REFRIGERATOR REFRIGERATOR LOCATION • Do not install the refrigerator where the temperature will go below 60°F (16°C) because it will not run often enough to maintain proper temperatures. ...• Do not install the refrigerator where the temperature will go above 100°F (37°C) because it will not perform properly. • Install it on a floor...
...: Sides 1/8″ (4 mm) Top 1″ (25 mm) Back 1″ (25 mm) 21 Installation Instructions INSTALLING THE REFRIGERATOR REFRIGERATOR LOCATION • Do not install the refrigerator where the temperature will go below 60°F (16°C) because it will not run often enough to maintain proper temperatures. ...• Do not install the refrigerator where the temperature will go above 100°F (37°C) because it will not perform properly. • Install it on a floor...


