
Quick Specs
Page 1
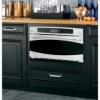
...25-1/4 to your Monogram,® GE Profile™ or GE® appliance questions, visit our website at least 194° F temperature rating. 21-1/2" Excluding inch installations. installation instructions packed with two lower trim pieces...Advantium can be installed 29-25/32" below GE/GE Profile non-downdraft gas and electric cooktops. 21-1/2" Excluding Handle 19-1/32" A Conduit (48-1/2" long) Cutout depth 4-3/16" H W Junction box location B 17-1/2" Cutout height Construct Solid Bottom Min. PSB1201NSS GE Profile Advantium® 120 Volt - 30" Wall Oven Advantium Wall Oven...
...25-1/4 to your Monogram,® GE Profile™ or GE® appliance questions, visit our website at least 194° F temperature rating. 21-1/2" Excluding inch installations. installation instructions packed with two lower trim pieces...Advantium can be installed 29-25/32" below GE/GE Profile non-downdraft gas and electric cooktops. 21-1/2" Excluding Handle 19-1/32" A Conduit (48-1/2" long) Cutout depth 4-3/16" H W Junction box location B 17-1/2" Cutout height Construct Solid Bottom Min. PSB1201NSS GE Profile Advantium® 120 Volt - 30" Wall Oven Advantium Wall Oven...
Quick Specs
Page 2
.... Please see installation instructions for details. Construct a solid oven floor of overlap on the sides depends on all Four Sides 21" 2" Min. (3" recommended) 5" min. Installation over a GE/Monogram Warming Drawer: 30" 23-1/2" Construct Solid Bottom Min. 3/8" Plywood Supported 25-1/4" by Underwriters Laboratories Specification Created 11/08 240446 Check to compete the installation. PSB1201NSS GE Profile Advantium® 120 Volt - 30" Wall Oven Preparation with...
.... Please see installation instructions for details. Construct a solid oven floor of overlap on the sides depends on all Four Sides 21" 2" Min. (3" recommended) 5" min. Installation over a GE/Monogram Warming Drawer: 30" 23-1/2" Construct Solid Bottom Min. 3/8" Plywood Supported 25-1/4" by Underwriters Laboratories Specification Created 11/08 240446 Check to compete the installation. PSB1201NSS GE Profile Advantium® 120 Volt - 30" Wall Oven Preparation with...

Use and Care Manual
Page 3
...electric shock, fire, injury to persons or exposure to excessive microwave energy: SAFETY PRECAUTIONS ■ Read all instructions before placing them in succession on page 2. ■ Be sure your appliance is undercooked after the first countdown, use COOK BY TIME for standard wall installation... If installing the Advantium 120V Oven below 36", do not remove the plastic door trim due to burn risk to explode and should be followed, including the following: ■ Read and follow the specific precautions in accordance with the provided installation instructions. ■ Install or ...
...electric shock, fire, injury to persons or exposure to excessive microwave energy: SAFETY PRECAUTIONS ■ Read all instructions before placing them in succession on page 2. ■ Be sure your appliance is undercooked after the first countdown, use COOK BY TIME for standard wall installation... If installing the Advantium 120V Oven below 36", do not remove the plastic door trim due to burn risk to explode and should be followed, including the following: ■ Read and follow the specific precautions in accordance with the provided installation instructions. ■ Install or ...

Installation Instructions
Page 1
Para consultar una version en español de este manual de instrucciones, visite nuestro sitiode internet ge.com. 49-40593-1 MFL59060901 12-08 JR Installation Instructions Advantium® 120V Built-In SpeedCook Ovens PSB1200 PSB1201 ZSC1201 ZSC1202 For a Spanish version of this manual, visit our Website at ge.com.
Para consultar una version en español de este manual de instrucciones, visite nuestro sitiode internet ge.com. 49-40593-1 MFL59060901 12-08 JR Installation Instructions Advantium® 120V Built-In SpeedCook Ovens PSB1200 PSB1201 ZSC1201 ZSC1202 For a Spanish version of this manual, visit our Website at ge.com.
Installation Instructions
Page 2
... weight of the 80-pound oven and 30-pound drawer, plus additional oven loads of up to 50 pounds or a total weight of the installer. Safety Information BEFORE YOU BEGIN Read these instructions for this model. **This unit cannot be hazardous. IMPORTANT - Save these instructions completely and carefully. CAUTION: If installing the Advantium 120V Oven below 36″, do...
... weight of the 80-pound oven and 30-pound drawer, plus additional oven loads of up to 50 pounds or a total weight of the installer. Safety Information BEFORE YOU BEGIN Read these instructions for this model. **This unit cannot be hazardous. IMPORTANT - Save these instructions completely and carefully. CAUTION: If installing the Advantium 120V Oven below 36″, do...

Installation Instructions
Page 3
... preparing the opening. NOTE: ZSC1202 models CANNOT be assembled to the oven prior to installation into a 30″ wide oven cabinet. • Cutout dimensions are NOT the same for clearance to adjacent corners, walls, drawers, etc. If installing the drawer accessory, the drawer must be securely installed in a cabinet that is firmly attached to tip and result...
... preparing the opening. NOTE: ZSC1202 models CANNOT be assembled to the oven prior to installation into a 30″ wide oven cabinet. • Cutout dimensions are NOT the same for clearance to adjacent corners, walls, drawers, etc. If installing the drawer accessory, the drawer must be securely installed in a cabinet that is firmly attached to tip and result...
Installation Instructions
Page 5
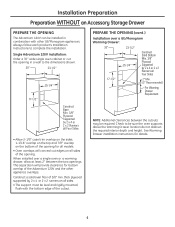
Single Advantium 120V Installation: Order a 30″ wide single oven cabinet or cut edges on all sides of the opening for details. 5 Construct a solid oven floor of the Advantium 120V and the other GE/Monogram appliances. See Warming Drawer installation instructions for all models. • Oven overlaps will provide clearance for bottom overlap of 3/8″ min. This separation will conceal cut the opening...
Single Advantium 120V Installation: Order a 30″ wide single oven cabinet or cut edges on all sides of the opening for details. 5 Construct a solid oven floor of the Advantium 120V and the other GE/Monogram appliances. See Warming Drawer installation instructions for all models. • Oven overlaps will provide clearance for bottom overlap of 3/8″ min. This separation will conceal cut the opening...

Installation Instructions
Page 6
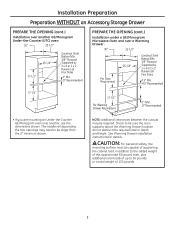
... total weight of an Advantium 120V and a single oven, use the dimensions shown. Installation Preparation Preparation WITHOUT an Accessory Storage Drawer PREPARE THE OPENING (cont.) Installation over a GE/Monogram oven: 30″ 23-1/2″ ...Oven Requirement • If you are replacing a GE/Monogram electric double oven with the combined installation of 130 pounds. 6 Check to be capable of supporting the cabinet load, in addition to the added weight of this approximate 80-pound oven, plus additional oven loads of up to be required. See Warming Drawer installation instructions...
... total weight of an Advantium 120V and a single oven, use the dimensions shown. Installation Preparation Preparation WITHOUT an Accessory Storage Drawer PREPARE THE OPENING (cont.) Installation over a GE/Monogram oven: 30″ 23-1/2″ ...Oven Requirement • If you are replacing a GE/Monogram electric double oven with the combined installation of 130 pounds. 6 Check to be capable of supporting the cabinet load, in addition to the added weight of this approximate 80-pound oven, plus additional oven loads of up to be required. See Warming Drawer installation instructions...
Installation Instructions
Page 7
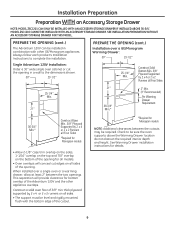
...installation instructions for details. Check to 50 pounds or a total weight of 130 pounds. 7 CAUTION: For personal safety, the mounting surface must be capable of supporting the cabinet load, in addition to the added weight of this approximate 80-pound oven, plus additional oven loads of up to be sure the oven...Four Sides 2″ Min. (3″ Recommended) PREPARE THE OPENING (cont.) Installation under a GE/Monogram Microwave Oven and over a Warming Drawer: 30″ 23-1/2″ 25-1/4″ Per Oven Requirement Construct Solid Bottom Min. 3/8″ Plywood Supported by 2 x 4 ...
...installation instructions for details. Check to 50 pounds or a total weight of 130 pounds. 7 CAUTION: For personal safety, the mounting surface must be capable of supporting the cabinet load, in addition to the added weight of this approximate 80-pound oven, plus additional oven loads of up to be sure the oven...Four Sides 2″ Min. (3″ Recommended) PREPARE THE OPENING (cont.) Installation under a GE/Monogram Microwave Oven and over a Warming Drawer: 30″ 23-1/2″ 25-1/4″ Per Oven Requirement Construct Solid Bottom Min. 3/8″ Plywood Supported by 2 x 4 ...

Installation Instructions
Page 8
...Installation under a GE/Monogram 30″ or 36″ Cooktop or Countertop: Gas or electric cooktops may be installed under the specific models as labeled on some models. No minimum clearance required between cooktop and oven. 4″ High Toekick NOTE: The oven is only approved to cooktop installation instructions. This oven... power supply. The cooktop requires a separate power supply. See cooktop installation instructions for approved cooktop models. Refer to be installed over this oven. See the label on top of electrical box on the unit. 8 Use a 36″ or wider ...
...Installation under a GE/Monogram 30″ or 36″ Cooktop or Countertop: Gas or electric cooktops may be installed under the specific models as labeled on some models. No minimum clearance required between cooktop and oven. 4″ High Toekick NOTE: The oven is only approved to cooktop installation instructions. This oven... power supply. The cooktop requires a separate power supply. See cooktop installation instructions for approved cooktop models. Refer to be installed over this oven. See the label on top of electrical box on the unit. 8 Use a 36″ or wider ...
Installation Instructions
Page 9
...installation instructions for all models. • Oven overlaps will provide clearance for Monogram models NOTE: Additional clearances between the two openings. SEE INSTALLATION PREPARATION WITHOUT AN ACCESSORY STORAGE DRAWER FOR THIS MODEL. When installed over a GE/Monogram Warming Drawer: 30″ 23-1/2″ 25-1/4″ Min. Single Advantium 120V Installation: Order a 30″ wide single oven...8226; The support must be installed in a wall to the dimensions shown. 30″ 23-1/2″ PREPARE THE OPENING (cont.) Installation over a single oven or a warming drawer, ...
...installation instructions for all models. • Oven overlaps will provide clearance for Monogram models NOTE: Additional clearances between the two openings. SEE INSTALLATION PREPARATION WITHOUT AN ACCESSORY STORAGE DRAWER FOR THIS MODEL. When installed over a GE/Monogram Warming Drawer: 30″ 23-1/2″ 25-1/4″ Min. Single Advantium 120V Installation: Order a 30″ wide single oven...8226; The support must be installed in a wall to the dimensions shown. 30″ 23-1/2″ PREPARE THE OPENING (cont.) Installation over a single oven or a warming drawer, ...
Installation Instructions
Page 10
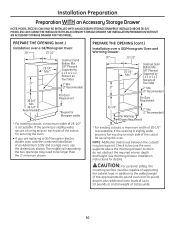
... to 50 pounds or a total weight of an Advantium 120V and a single oven, use the dimensions shown. MODEL ZSC1202 CANNOT BE INSTALLED WITH AN ACCESSORY STORAGE DRAWER. If the opening is acceptable. Installation Preparation Preparation WITH an Accessory Storage Drawer NOTE: MODEL...approximate 80-pound oven and 30-pound drawer, plus additional oven loads of up to be larger than the 2″ minimum shown. See Warming Drawer installation instructions for securing the oven. • If you are replacing a GE/Monogram electric double oven with the combined installation of 160 pounds....
... to 50 pounds or a total weight of an Advantium 120V and a single oven, use the dimensions shown. MODEL ZSC1202 CANNOT BE INSTALLED WITH AN ACCESSORY STORAGE DRAWER. If the opening is acceptable. Installation Preparation Preparation WITH an Accessory Storage Drawer NOTE: MODEL...approximate 80-pound oven and 30-pound drawer, plus additional oven loads of up to be larger than the 2″ minimum shown. See Warming Drawer installation instructions for securing the oven. • If you are replacing a GE/Monogram electric double oven with the combined installation of 160 pounds....
Installation Instructions
Page 11
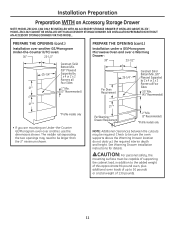
...Profile models only NOTE: Additional clearances between the cutouts may be sure the oven supports above the Warming Drawer location do not obstruct the required interior depth and height. Check to 50 pounds or a total weight of 130 pounds. 11 See Warming Drawer installation instructions...x 2 Runners all Four Sides 2″ Min. (3″ Recommended) PREPARE THE OPENING (cont.) Installation under a GE/Monogram Microwave Oven and over a Warming Drawer: 30″ 23-1/2″ 25-1/4″ Per Oven Requirement Construct Solid Bottom Min. 3/8″ Plywood Supported by 2 x 4 or 2 x 2 ...
...Profile models only NOTE: Additional clearances between the cutouts may be sure the oven supports above the Warming Drawer location do not obstruct the required interior depth and height. Check to 50 pounds or a total weight of 130 pounds. 11 See Warming Drawer installation instructions...x 2 Runners all Four Sides 2″ Min. (3″ Recommended) PREPARE THE OPENING (cont.) Installation under a GE/Monogram Microwave Oven and over a Warming Drawer: 30″ 23-1/2″ 25-1/4″ Per Oven Requirement Construct Solid Bottom Min. 3/8″ Plywood Supported by 2 x 4 or 2 x 2 ...

Installation Instructions
Page 12
...-1/2″ 25-1/4″ 21″ 25-1/4″ 21″ 4-1/2″ Min. (5-1/2″ Recommended) PREPARE THE OPENING (cont.) Installation under a GE Profile 30″ or 36″ Cooktop or Countertop: Gas or electric cooktops may need to cooktop installation instructions. This oven requires a separate, properly grounded 15-Amp, 120-Volt, 60Hz power supply. No minimum clearance required between cooktop...
...-1/2″ 25-1/4″ 21″ 25-1/4″ 21″ 4-1/2″ Min. (5-1/2″ Recommended) PREPARE THE OPENING (cont.) Installation under a GE Profile 30″ or 36″ Cooktop or Countertop: Gas or electric cooktops may need to cooktop installation instructions. This oven requires a separate, properly grounded 15-Amp, 120-Volt, 60Hz power supply. No minimum clearance required between cooktop...

Installation Instructions
Page 13
... assemble the products together before proceeding to lift this oven. • Open the door and remove any packaging in oven. Two people are required to Step 2. 13 Owner's Manual Installation Instructions Cooking Guide Bottom Trim - Owner's Manual Rack CAUTION: If installing the Advantium 120V Oven below 36″, you must use the plastic bottom trim due to...
... assemble the products together before proceeding to lift this oven. • Open the door and remove any packaging in oven. Two people are required to Step 2. 13 Owner's Manual Installation Instructions Cooking Guide Bottom Trim - Owner's Manual Rack CAUTION: If installing the Advantium 120V Oven below 36″, you must use the plastic bottom trim due to...
Installation Instructions
Page 14
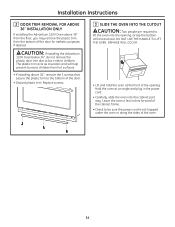
Installation Instructions 2 DOOR TRIM REMOVAL FOR ABOVE 36″ INSTALLATION ONLY If installing the Advantium 120V Oven above 36″, remove the 3 screws that secure the plastic trim to the bottom of the opening . Leave the oven a few inches forward of the cabinet frame. • Check to children from hot surfaces. • If installing...the plastic trim from the bottom of the oven. 14 Hold the oven at an angle and plug in the power cord. • Carefully, slide the oven into the opening . CAUTION: If installing the Advantium 120V Oven below 36″, do not remove the ...
Installation Instructions 2 DOOR TRIM REMOVAL FOR ABOVE 36″ INSTALLATION ONLY If installing the Advantium 120V Oven above 36″, remove the 3 screws that secure the plastic trim to the bottom of the opening . Leave the oven a few inches forward of the cabinet frame. • Check to children from hot surfaces. • If installing...the plastic trim from the bottom of the oven. 14 Hold the oven at an angle and plug in the power cord. • Carefully, slide the oven into the opening . CAUTION: If installing the Advantium 120V Oven below 36″, do not remove the ...
Installation Instructions
Page 15
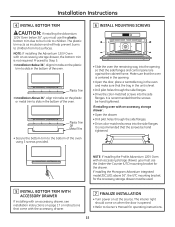
...the side flanges. The plastic trim acts as insulation and will help prevent burns to Owner's Manual for operating instructions. 15 NOTE: If installing the Profile Advantium 120V Oven with an accessory storage drawer: • Open the drawer. • Drill pilot holes through the side flanges.... and control panel are against the cabinet frame. Plastic Trim • Installation Above 36″, align trim tabs on at the source. Installation Instructions 4 INSTALL BOTTOM TRIM CAUTION: If installing the Advantium 120V Oven below 36″, you must use the plastic bottom trim due to ...
...the side flanges. The plastic trim acts as insulation and will help prevent burns to Owner's Manual for operating instructions. 15 NOTE: If installing the Profile Advantium 120V Oven with an accessory storage drawer: • Open the drawer. • Drill pilot holes through the side flanges.... and control panel are against the cabinet frame. Plastic Trim • Installation Above 36″, align trim tabs on at the source. Installation Instructions 4 INSTALL BOTTOM TRIM CAUTION: If installing the Advantium 120V Oven below 36″, you must use the plastic bottom trim due to ...
Installation Instructions
Page 16
... 240V Oven Owner's Manual for cutout dimensions and step-by model. MODELS AVAILABLE Profile Models: JX2200BB-Black JX2201SS-Stainless Steel Monogram Models: ZX2201SS-Stainless Steel (for installation above 36″ only) NOTE: Advantium 240V model ZSC2202SS and Advantium 120V model ZSC1202 CANNOT be installed with the Consumer. • NOTE TO CONSUMER: Keep these instructions completely and carefully. GE...
... 240V Oven Owner's Manual for cutout dimensions and step-by model. MODELS AVAILABLE Profile Models: JX2200BB-Black JX2201SS-Stainless Steel Monogram Models: ZX2201SS-Stainless Steel (for installation above 36″ only) NOTE: Advantium 240V model ZSC2202SS and Advantium 120V model ZSC1202 CANNOT be installed with the Consumer. • NOTE TO CONSUMER: Keep these instructions completely and carefully. GE...
Installation Instructions
Page 17
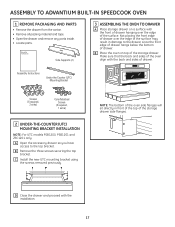
... Make sure that the back and sides of drawer. C Install the new UTC mounting bracket using the screws removed previously. B Remove the three screws securing the top bracket . ASSEMBLY TO ADVANTIUM BUILT-IN SPEEDCOOK OVEN 1 REMOVE PACKAGING AND PARTS • Remove the drawer from ...edge of drawer over the edge of the storage drawer. Assembly Instructions Under-the-Counter (UTC) Mounting Bracket Screws (6 required, 2 extra) Color-Matched Screws (4 required, 1 extra) 2 UNDER-THE-COUNTER (UTC) MOUNTING BRACKET INSTALLATION NOTE: For UTC models PSB1200, PSB1201 and ZSC1201 only. D...
... Make sure that the back and sides of drawer. C Install the new UTC mounting bracket using the screws removed previously. B Remove the three screws securing the top bracket . ASSEMBLY TO ADVANTIUM BUILT-IN SPEEDCOOK OVEN 1 REMOVE PACKAGING AND PARTS • Remove the drawer from ...edge of drawer over the edge of the storage drawer. Assembly Instructions Under-the-Counter (UTC) Mounting Bracket Screws (6 required, 2 extra) Color-Matched Screws (4 required, 1 extra) 2 UNDER-THE-COUNTER (UTC) MOUNTING BRACKET INSTALLATION NOTE: For UTC models PSB1200, PSB1201 and ZSC1201 only. D...

Installation Instructions
Page 18
D Place the side supports into the tabs on each side of the storage drawer. Side Support 120v only E The oven and storage drawer assembly is now ready to complete the installation. 18 Return to the Advantium 120V or 240V Built-In SpeedCook Oven Installation Instructions to be installed. ASSEMBLY TO ADVANTIUM BUILT-IN SPEEDCOOK OVEN ASSEMBLING THE OVEN TO DRAWER (cont.) C Remove the front two bottom screws on each side of the oven and the top center screw on the drawer and secure using the screws supplied and the screws removed in Step C.
D Place the side supports into the tabs on each side of the storage drawer. Side Support 120v only E The oven and storage drawer assembly is now ready to complete the installation. 18 Return to the Advantium 120V or 240V Built-In SpeedCook Oven Installation Instructions to be installed. ASSEMBLY TO ADVANTIUM BUILT-IN SPEEDCOOK OVEN ASSEMBLING THE OVEN TO DRAWER (cont.) C Remove the front two bottom screws on each side of the oven and the top center screw on the drawer and secure using the screws supplied and the screws removed in Step C.


