
Installation Instructions
Page 2
... Attach Mounting Plate to Wall 19 Preparation of Top Cabinet 19 Adapting Blower for Recirculation 20, 21 Mount the Oven 21, 22 Installing the Charcoal Filter 22 Before You Use Your Oven 23 Sección en Español 25-47 Step-by-step installation guide Placement of Mounting Plate 8-10...
... Attach Mounting Plate to Wall 19 Preparation of Top Cabinet 19 Adapting Blower for Recirculation 20, 21 Mount the Oven 21, 22 Installing the Charcoal Filter 22 Before You Use Your Oven 23 Sección en Español 25-47 Step-by-step installation guide Placement of Mounting Plate 8-10...
Installation Instructions
Page 6
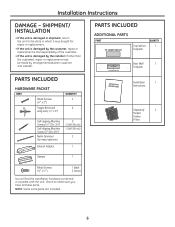
... to make sure you have all these parts. CUT OUT FOR HORIZONTAL OUTSIDE EXHAUST REAR WALL TEMPLATE Rear Wall 1 Template Installation 1 Instructions Separately 2 Packed Grease Filters Damper 1 Metal Screws (1⁄8″ x 1⁄2″) 1 black 2 bronze You will find the installation hardware contained in which it was bought for metal cabinets) Exhaust...
... to make sure you have all these parts. CUT OUT FOR HORIZONTAL OUTSIDE EXHAUST REAR WALL TEMPLATE Rear Wall 1 Template Installation 1 Instructions Separately 2 Packed Grease Filters Damper 1 Metal Screws (1⁄8″ x 1⁄2″) 1 black 2 bronze You will find the installation hardware contained in which it was bought for metal cabinets) Exhaust...

Installation Instructions
Page 8
... edges. Installation Instructions 1 PLACEMENT OF THE MOUNTING PLATE A REMOVING THE OVEN FROM THE CARTON/REMOVING THE MOUNTING PLATE 1 Remove the box containing the installation instructions, filters, exhaust adaptor, damper and the small hardware bag. Do not remove the Styrofoam protecting the front of the following methods: A. B FINDING THE WALL STUDS Wall...
... edges. Installation Instructions 1 PLACEMENT OF THE MOUNTING PLATE A REMOVING THE OVEN FROM THE CARTON/REMOVING THE MOUNTING PLATE 1 Remove the box containing the installation instructions, filters, exhaust adaptor, damper and the small hardware bag. Do not remove the Styrofoam protecting the front of the following methods: A. B FINDING THE WALL STUDS Wall...

Installation Instructions
Page 11
... Place for Outside Top Exhaust B OUTSIDE BACK EXHAUST (HORIZONTAL DUCT) See page 12 See page 15 C RECIRCULATING (NON-VENTED DUCTLESS) See page 19 11 A Charcoal Filter Accessory Kit is shipped assembled for Outside Top Exhaust. Installation Instructions 2 INSTALLATION TYPES (Choose A, B or C) This oven is designed for adaptation to that section. Outside...
... Place for Outside Top Exhaust B OUTSIDE BACK EXHAUST (HORIZONTAL DUCT) See page 12 See page 15 C RECIRCULATING (NON-VENTED DUCTLESS) See page 19 11 A Charcoal Filter Accessory Kit is shipped assembled for Outside Top Exhaust. Installation Instructions 2 INSTALLATION TYPES (Choose A, B or C) This oven is designed for adaptation to that section. Outside...
Installation Instructions
Page 14
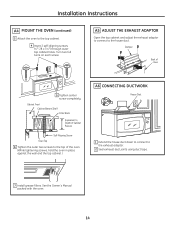
... Cabinet Recess Self-Aligning Screw Oven Top 6 Tighten the outer two screws to the exhaust adaptor. 2 Seal exhaust duct joints using duct tape. 7 Install grease filters. A5 ADJUST THE EXHAUST ADAPTOR Open the top cabinet and adjust the exhaust adaptor to connect to the top cabinet. 4 Insert 2 self-aligning screws (1⁄...
... Cabinet Recess Self-Aligning Screw Oven Top 6 Tighten the outer two screws to the exhaust adaptor. 2 Seal exhaust duct joints using duct tape. 7 Install grease filters. A5 ADJUST THE EXHAUST ADAPTOR Open the top cabinet and adjust the exhaust adaptor to connect to the top cabinet. 4 Insert 2 self-aligning screws (1⁄...
Installation Instructions
Page 18
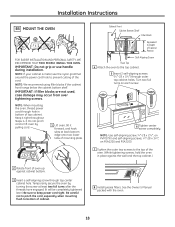
... below the cabinet bottom shelf. Turn two full turns on PSA1200 and PSA2200. 7 Tighten the outer two screws to prevent cutting of cabinet. 8 Install grease filters. Installation Instructions B5 MOUNT THE OVEN FOR EASIER INSTALLATION AND PERSONAL SAFETY, WE RECOMMEND THAT TWO PEOPLE INSTALL THIS OVEN. IMPORTANT: If filler blocks are...
... below the cabinet bottom shelf. Turn two full turns on PSA1200 and PSA2200. 7 Tighten the outer two screws to prevent cutting of cabinet. 8 Install grease filters. Installation Instructions B5 MOUNT THE OVEN FOR EASIER INSTALLATION AND PERSONAL SAFETY, WE RECOMMEND THAT TWO PEOPLE INSTALL THIS OVEN. IMPORTANT: If filler blocks are...

Installation Instructions
Page 19
... into the mounting plate through . Pull the plate away from the bolts. 2 Insert the bolts into the holes in the cabinet bottom. 19 Install Charcoal Filter (not supplied) C1 ATTACH THE MOUNTING PLATE TO THE WALL 3 Place the mounting plate against the wall and that the plate is properly centered under...
... into the mounting plate through . Pull the plate away from the bolts. 2 Insert the bolts into the holes in the cabinet bottom. 19 Install Charcoal Filter (not supplied) C1 ATTACH THE MOUNTING PLATE TO THE WALL 3 Place the mounting plate against the wall and that the plate is properly centered under...
Installation Instructions
Page 22
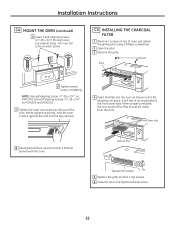
... above the grille panel, using a Phillips screwdriver. 2 Open the door. 3 Remove the grille. It will rest at an angle behind the front lower tabs. Charcoal filter Charcoal filter installed 5 Replace the grille and the 2 top screws. 6 Close the door and replace left side screw. 22 C5 INSTALLING THE CHARCOAL... 2 screws on top of the oven. (While tightening screws, hold the oven in place against the wall and the top cabinet.) 4 Insert the filter into the oven as shown until it fits squarely into place. NOTE: Use self-aligning screw, 1⁄4″-28 x 25⁄8″, on PVM1790 and ...
... above the grille panel, using a Phillips screwdriver. 2 Open the door. 3 Remove the grille. It will rest at an angle behind the front lower tabs. Charcoal filter Charcoal filter installed 5 Replace the grille and the 2 top screws. 6 Close the door and replace left side screw. 22 C5 INSTALLING THE CHARCOAL... 2 screws on top of the oven. (While tightening screws, hold the oven in place against the wall and the top cabinet.) 4 Insert the filter into the oven as shown until it fits squarely into place. NOTE: Use self-aligning screw, 1⁄4″-28 x 25⁄8″, on PVM1790 and ...

Use and Care Manual
Page 8
... with a properly grounded 3-prong wall outlet. If the power cord is operating. For best operation, plug this appliance into an outlet that may damage the filters. n Never leave surface units beneath your personal responsibility and obligation to have a qualified electrician or service technician install an outlet near the appliance. This appliance... appliance. Improper use . Ensure proper ground exists before use of the grounding plug can result in use high heat on the Advantium or the fan filters. n Use care when cleaning the vent fan...
... with a properly grounded 3-prong wall outlet. If the power cord is operating. For best operation, plug this appliance into an outlet that may damage the filters. n Never leave surface units beneath your personal responsibility and obligation to have a qualified electrician or service technician install an outlet near the appliance. This appliance... appliance. Improper use . Ensure proper ground exists before use of the grounding plug can result in use high heat on the Advantium or the fan filters. n Use care when cleaning the vent fan...
Use and Care Manual
Page 9
...INFORMATION CAREFULLY. For installation between cabinets only; n JX81D-Recirculating Charcoal Filter Kit Filter kits are shielded from interference from your GE supplier. However, patients with pacemakers may wish to the outside. Filler Panel Kits Filter Kits n JX52WH-White n JX52BL-Black When replacing a 36"...to provide a custom built-in appearance. not for end-of-cabinet installation. SAVE THESE INSTRUCTIONS Optional kits Available at ge.com. 9 IMPORTANT SAFETY INSTRUCTIONS READ ALL INSTRUCTIONS BEFORE USING Advantium Oven WARNING PACEMAKERS Most pacemakers are used when the ...
...INFORMATION CAREFULLY. For installation between cabinets only; n JX81D-Recirculating Charcoal Filter Kit Filter kits are shielded from interference from your GE supplier. However, patients with pacemakers may wish to the outside. Filler Panel Kits Filter Kits n JX52WH-White n JX52BL-Black When replacing a 36"...to provide a custom built-in appearance. not for end-of-cabinet installation. SAVE THESE INSTRUCTIONS Optional kits Available at ge.com. 9 IMPORTANT SAFETY INSTRUCTIONS READ ALL INSTRUCTIONS BEFORE USING Advantium Oven WARNING PACEMAKERS Most pacemakers are used when the ...

Use and Care Manual
Page 35
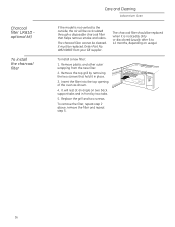
... in place. 5. Remove the top grill by foods on the cooktop from your GE supplier. 4. Order WB25X10019 from damaging the inside of the oven. 2. Replacing the surface light Removing and cleaning the filters Replacing the oven cavity lamp Care and Cleaning Advantium Oven 1. To replace the surface... cleaned once a month, or as needed. 3. Rinse, shake and let dry before removing. To replace, slide the filters into place. 1. Remove charcoal filter if present. NOTE: Charcoal filter is used to the oven. Pull the light bulb out and replace with a 130 volt, 50-watt halogen bulb. ...
... in place. 5. Remove the top grill by foods on the cooktop from your GE supplier. 4. Order WB25X10019 from damaging the inside of the oven. 2. Replacing the surface light Removing and cleaning the filters Replacing the oven cavity lamp Care and Cleaning Advantium Oven 1. To replace the surface... cleaned once a month, or as needed. 3. Rinse, shake and let dry before removing. To replace, slide the filters into place. 1. Remove charcoal filter if present. NOTE: Charcoal filter is used to the oven. Pull the light bulb out and replace with a 130 volt, 50-watt halogen bulb. ...
Use and Care Manual
Page 36
Remove plastic and other outer wrapping from your GE supplier. It will be cleaned. Replace the grill and two screws. To install a new filter: 1. Remove the top grill by two tabs. 5. It must be replaced when it is not vented to 12 months, depending on ... the two screws that helps remove smoke and odors. The charcoal filter should be replaced. To remove the filter, repeat step 2 above, remove the filter and repeat step 5. 36 Charcoal filter (JX81D optional kit) To install the charcoal filter Care and Cleaning Advantium Oven If the model is noticeably dirty or...
Remove plastic and other outer wrapping from your GE supplier. It will be cleaned. Replace the grill and two screws. To install a new filter: 1. Remove the top grill by two tabs. 5. It must be replaced when it is not vented to 12 months, depending on ... the two screws that helps remove smoke and odors. The charcoal filter should be replaced. To remove the filter, repeat step 2 above, remove the filter and repeat step 5. 36 Charcoal filter (JX81D optional kit) To install the charcoal filter Care and Cleaning Advantium Oven If the model is noticeably dirty or...

Quick Specs
Page 2
...: The hood exhaust has been designed to mate with the space between the wall studs to be used. Filter Kit Accessory Grille Filter Kit JX81D-Recirculating Charcoal Filter Kit To be used , care should not exceed 140 equivalent feet. When calculating the total duct length, ...add the equivalent length of all transitions and adaptors plus the length of some typical ducts. Listed by leaving enough space between studs, or wall should be prepared at geappliances.com or call GE...
...: The hood exhaust has been designed to mate with the space between the wall studs to be used. Filter Kit Accessory Grille Filter Kit JX81D-Recirculating Charcoal Filter Kit To be used , care should not exceed 140 equivalent feet. When calculating the total duct length, ...add the equivalent length of all transitions and adaptors plus the length of some typical ducts. Listed by leaving enough space between studs, or wall should be prepared at geappliances.com or call GE...


