
Installation Instructions
Page 2
... General information Important Safety Instructions 3 Electrical Requirements 3 Hood Exhaust 4, 5 Damage - Shipment/Installation 6 Parts Included 6 Tools You Will Need 7 Mounting Space 7 C Recirculating 19-22 Attach Mounting Plate to Wall 19 Preparation of Top Cabinet 19 Adapting Blower for Recirculation 20, 21 Mount the Oven 21, 22 Installing the Charcoal Filter 22 Before You Use Your Oven 23 Sección en Español 25-47 Step-by-step installation guide Placement of Mounting Plate 8-10 Removing...
... General information Important Safety Instructions 3 Electrical Requirements 3 Hood Exhaust 4, 5 Damage - Shipment/Installation 6 Parts Included 6 Tools You Will Need 7 Mounting Space 7 C Recirculating 19-22 Attach Mounting Plate to Wall 19 Preparation of Top Cabinet 19 Adapting Blower for Recirculation 20, 21 Mount the Oven 21, 22 Installing the Charcoal Filter 22 Before You Use Your Oven 23 Sección en Español 25-47 Step-by-step installation guide Placement of Mounting Plate 8-10 Removing...
Installation Instructions
Page 3
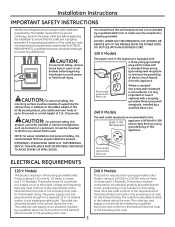
... oven loads of up to 50 pounds or a total weight of 113-135 pounds. The outlet box and supply circuit should be installed by a qualified electrician and conform to the National Electrical Code or the prevailing local code. 3 CAUTION: For personal safety, remove house fuse or open circuit breaker before beginning the installation to BOTH a top cabinet AND a wall. CAUTION: For personal safety, the mounting...
... oven loads of up to 50 pounds or a total weight of 113-135 pounds. The outlet box and supply circuit should be installed by a qualified electrician and conform to the National Electrical Code or the prevailing local code. 3 CAUTION: For personal safety, remove house fuse or open circuit breaker before beginning the installation to BOTH a top cabinet AND a wall. CAUTION: For personal safety, the mounting...
Installation Instructions
Page 7
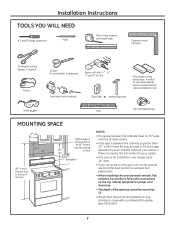
Backsplash 66″ or more from the cooking 30″ surface min. Your Owner's Manual contains the kit number for your oven to the outside, see Hood Exhaust Section for exhaust duct preparation. • When installing the oven beneath smooth, flat cabinets, be careful to follow the instructions on the top cabinet template for top cabinet spacing (used to cut template, if necessary) Saw (saber, hole or keyhole) Electric drill with 3⁄16″...
Backsplash 66″ or more from the cooking 30″ surface min. Your Owner's Manual contains the kit number for your oven to the outside, see Hood Exhaust Section for exhaust duct preparation. • When installing the oven beneath smooth, flat cabinets, be careful to follow the instructions on the top cabinet template for top cabinet spacing (used to cut template, if necessary) Saw (saber, hole or keyhole) Electric drill with 3⁄16″...

Installation Instructions
Page 8
... will be 16″ or 24″ from inside the oven. Then place a mark halfway between the edges. Installation Instructions 1 PLACEMENT OF THE MOUNTING PLATE A REMOVING THE OVEN FROM THE CARTON/REMOVING THE MOUNTING PLATE 1 Remove the box containing the installation instructions, filters, exhaust adaptor, damper and the small hardware bag. The oven should be used as the rear wall template and for mounting the oven to the back of the following methods: A. OR...
... will be 16″ or 24″ from inside the oven. Then place a mark halfway between the edges. Installation Instructions 1 PLACEMENT OF THE MOUNTING PLATE A REMOVING THE OVEN FROM THE CARTON/REMOVING THE MOUNTING PLATE 1 Remove the box containing the installation instructions, filters, exhaust adaptor, damper and the small hardware bag. The oven should be used as the rear wall template and for mounting the oven to the back of the following methods: A. OR...
Installation Instructions
Page 14
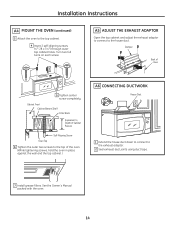
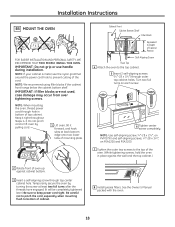
... EXHAUST ADAPTOR Open the top cabinet and adjust the exhaust adaptor to connect to the exhaust adaptor. 2 Seal exhaust duct joints using duct tape. 7 Install grease filters. Cabinet Front Cabinet Bottom Shelf Filler Block Equivalent to Depth of Cabinet Recess Self-Aligning Screw Oven Top 6 Tighten the outer two screws to the top of Oven 5 Tighten center screw completely. Damper Back of the oven. (While tightening screws, hold the oven in place against the wall...
... EXHAUST ADAPTOR Open the top cabinet and adjust the exhaust adaptor to connect to the exhaust adaptor. 2 Seal exhaust duct joints using duct tape. 7 Install grease filters. Cabinet Front Cabinet Bottom Shelf Filler Block Equivalent to Depth of Cabinet Recess Self-Aligning Screw Oven Top 6 Tighten the outer two screws to the top of Oven 5 Tighten center screw completely. Damper Back of the oven. (While tightening screws, hold the oven in place against the wall...
Installation Instructions
Page 18
... wall and the top cabinet.) 2 Rotate front of mounting plate. Turn two full turns on PSA1200 and PSA2200. 7 Tighten the outer two screws to keep power cord tight. IMPORTANT: If filler blocks are not used, case damage may occur from over tightening screws. NOTE: We recommend using filler blocks if the cabinet front hangs below the cabinet bottom shelf. See the Owner's Manual packed with the oven...
... wall and the top cabinet.) 2 Rotate front of mounting plate. Turn two full turns on PSA1200 and PSA2200. 7 Tighten the outer two screws to keep power cord tight. IMPORTANT: If filler blocks are not used, case damage may occur from over tightening screws. NOTE: We recommend using filler blocks if the cabinet front hangs below the cabinet bottom shelf. See the Owner's Manual packed with the oven...
Installation Instructions
Page 22
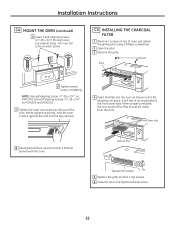
... wall and the top cabinet.) 4 Insert the filter into the oven as shown until it fits squarely into place. Charcoal filter Charcoal filter installed 5 Replace the grille and the 2 top screws. 6 Close the door and replace left side screw. 22 Screws Grille 6 Tighten center screw completely. Installation Instructions C4 MOUNT THE OVEN (continued) 5 Insert 2 self-aligning screws (1⁄ 4″-28 x 31⁄ 4″) through outer top cabinet holes. See the Owner's Manual packed with the oven. NOTE: Use...
... wall and the top cabinet.) 4 Insert the filter into the oven as shown until it fits squarely into place. Charcoal filter Charcoal filter installed 5 Replace the grille and the 2 top screws. 6 Close the door and replace left side screw. 22 Screws Grille 6 Tighten center screw completely. Installation Instructions C4 MOUNT THE OVEN (continued) 5 Insert 2 self-aligning screws (1⁄ 4″-28 x 31⁄ 4″) through outer top cabinet holes. See the Owner's Manual packed with the oven. NOTE: Use...
Use and Care Manual
Page 1
... Display ON/OFF 29 Help 31 Reminder 29 Repeat last 28 Resume feature 29 Surface Light 32 Temperature Units 30 Timer 31 Turntable On/Off 30 Vent Fan 32 Owner's Manual PSA1200 PSA1201 CSA1201 Care and Cleaning Cleaning the inside 32 Cleaning the outside 34 Cooking trays and wire oven rack 33 Removable turntable 33 Replacing the cavity light 35 Replacing the surface light 35 Troubleshooting Problem Solver 37, 38 Consumer Support Consumer Support Back Cover Warranty 39 Write the model and serial numbers...
... Display ON/OFF 29 Help 31 Reminder 29 Repeat last 28 Resume feature 29 Surface Light 32 Temperature Units 30 Timer 31 Turntable On/Off 30 Vent Fan 32 Owner's Manual PSA1200 PSA1201 CSA1201 Care and Cleaning Cleaning the inside 32 Cleaning the outside 34 Cooking trays and wire oven rack 33 Removable turntable 33 Replacing the cavity light 35 Replacing the surface light 35 Troubleshooting Problem Solver 37, 38 Consumer Support Consumer Support Back Cover Warranty 39 Write the model and serial numbers...
Use and Care Manual
Page 2
... adjusted or repaired by General Electric Service or an authorized service agent using a power cord available from paper or plastic containers before using this oven with the door open since open-door operation can result in harmful exposure to dry newspaper. If materials inside the oven while cooking. - It is UL listed for storage purposes. n This appliance must be replaced by anyone except properly qualified service personnel. If the power cord is damaged...
... adjusted or repaired by General Electric Service or an authorized service agent using a power cord available from paper or plastic containers before using this oven with the door open since open-door operation can result in harmful exposure to dry newspaper. If materials inside the oven while cooking. - It is UL listed for storage purposes. n This appliance must be replaced by anyone except properly qualified service personnel. If the power cord is damaged...

Use and Care Manual
Page 3
... electric shock. n The wire oven rack should not be serviced by a qualified technician in accordance with the provided installation instructions. This will cause overheating of this oven. Do not use . n Use this manual. n Oversized foods or oversized metal utensils should not be heated in this appliance only for example, in a wet basement, near a swimming pool, near water- n Do not mount this appliance only in modes...
... electric shock. n The wire oven rack should not be serviced by a qualified technician in accordance with the provided installation instructions. This will cause overheating of this oven. Do not use . n Use this manual. n Oversized foods or oversized metal utensils should not be heated in this appliance only for example, in a wet basement, near a swimming pool, near water- n Do not mount this appliance only in modes...

Use and Care Manual
Page 4
... gold-rimmed dishes, in the oven. n Do not let cord hang over edge of electric shock. n Do not operate the oven without the turntable in microwave. n During and after use, do not touch, or let clothing or other flammable materials contact any materials, other than our recommended accessories, in operation. n Potentially hot surfaces include the oven door, floor, walls, oven rack and turntable. n Keep the oven free from heated surfaces. Rack is...
... gold-rimmed dishes, in the oven. n Do not let cord hang over edge of electric shock. n Do not operate the oven without the turntable in microwave. n During and after use, do not touch, or let clothing or other flammable materials contact any materials, other than our recommended accessories, in operation. n Potentially hot surfaces include the oven door, floor, walls, oven rack and turntable. n Keep the oven free from heated surfaces. Rack is...

Use and Care Manual
Page 8
... cut or remove the third (ground) prong from the power cord. n In the event of electric shock by covering the pan completely with a grounding plug. Corrosive cleaning agents, such as to whether the appliance is in a risk of the Advantium often. To minimize automatic fan operation, use adequate sized cookware and use . SAVE THESE INSTRUCTIONS 8 Improper use an adapter plug with a properly grounded 3-prong wall...
... cut or remove the third (ground) prong from the power cord. n In the event of electric shock by covering the pan completely with a grounding plug. Corrosive cleaning agents, such as to whether the appliance is in a risk of the Advantium often. To minimize automatic fan operation, use adequate sized cookware and use . SAVE THESE INSTRUCTIONS 8 Improper use an adapter plug with a properly grounded 3-prong wall...
Use and Care Manual
Page 13
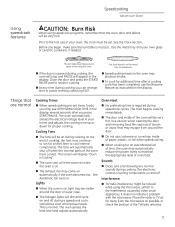
... a fan blowing are normal Cooking Times n When speedcooking pre-set . Things that are normal sounds during cooking, the oven will stop and PAUSE will be very hot! See Automatic fan section. n The door and inside of the oven will appear in the display several seconds after a cooking cycle has been completed, use cookware or coverings made of cooking, the fans may escape from the microwave as instructed on the display. n The oven vent will...
... a fan blowing are normal Cooking Times n When speedcooking pre-set . Things that are normal sounds during cooking, the oven will stop and PAUSE will be very hot! See Automatic fan section. n The door and inside of the oven will appear in the display several seconds after a cooking cycle has been completed, use cookware or coverings made of cooking, the fans may escape from the microwave as instructed on the display. n The oven vent will...
Use and Care Manual
Page 23
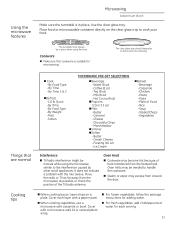
... using the microwave, similar to cook your food. Cover with a microwave-safe lid or vented plastic wrap. n For frozen vegetables, follow the package instructions for each layer with the microwave. Oven Heat n Cookware may escape from around the door. n When cooking vegetables, use a microwave-safe casserole or bowl. Use the clear glass tray. Place food or microwavable container directly on a plate. Things that cookware is in place. n Steam or vapor may become hot...
... using the microwave, similar to cook your food. Cover with a microwave-safe lid or vented plastic wrap. n For frozen vegetables, follow the package instructions for each layer with the microwave. Oven Heat n Cookware may escape from around the door. n When cooking vegetables, use a microwave-safe casserole or bowl. Use the clear glass tray. Place food or microwavable container directly on a plate. Things that cookware is in place. n Steam or vapor may become hot...
Use and Care Manual
Page 25
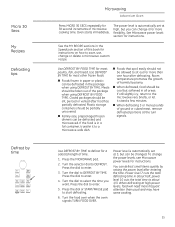
... of harmful bacteria. power level 10 cuts the total time to a microwave-safe dish. Press the dial to start defrosting. 6. Use DEFROST BY FOOD TYPE for a selected length of microwave cooking time. The power level is automatically set at 3, but can change it stand a few minutes. See the MY RECIPE sections in about 1/3. n Family-size, prepackaged frozen dinners can defrost small items quickly by time Microwaving Advantium Oven Press MICRO 30 SECS repeatedly for...
... of harmful bacteria. power level 10 cuts the total time to a microwave-safe dish. Press the dial to start defrosting. 6. Use DEFROST BY FOOD TYPE for a selected length of microwave cooking time. The power level is automatically set at 3, but can change it stand a few minutes. See the MY RECIPE sections in about 1/3. n Family-size, prepackaged frozen dinners can defrost small items quickly by time Microwaving Advantium Oven Press MICRO 30 SECS repeatedly for...
Use and Care Manual
Page 29
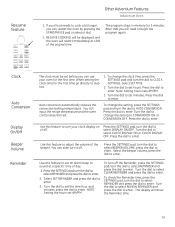
... to enter. Use this feature to set the time hour and minutes, press the dial to sound at 10% of the original time. Turn the dial to set an alarm beep to enter. Turn the dial to select REVIEW REMINDER and press the dial to enter. RESUME COOKING will need to enter. 2. When setting the clock time for 5 minutes. Auto conversion automatically reduces the convection baking temperature...
... to enter. Use this feature to set the time hour and minutes, press the dial to sound at 10% of the original time. Turn the dial to set an alarm beep to enter. Turn the dial to select REVIEW REMINDER and press the dial to enter. RESUME COOKING will need to enter. 2. When setting the clock time for 5 minutes. Auto conversion automatically reduces the convection baking temperature...

Use and Care Manual
Page 32
... warm or cool to the touch before cleaning any part of the oven Care and Cleaning Advantium Oven Use to light your oven. Press the VENT FAN pad to change from surface cooking. Fan will display: "Normal Operation. This should loosen the dirt in the unit on any part of this oven. If you normally do not come on due to high heat. You can be removed with a warm sudsy cloth...
... warm or cool to the touch before cleaning any part of the oven Care and Cleaning Advantium Oven Use to light your oven. Press the VENT FAN pad to change from surface cooking. Fan will display: "Normal Operation. This should loosen the dirt in the unit on any part of this oven. If you normally do not come on due to high heat. You can be removed with a warm sudsy cloth...

Use and Care Manual
Page 35
... circuit breaker panel. 2. Replace with the 120V-130V, 20-watt halogen bulb. Connect electrical power to remove. Rinse, shake and let dry before removing. Replacing the surface light Removing and cleaning the filters Replacing the oven cavity lamp Care and Cleaning Advantium Oven 1. Be sure the bulb to lock into the frame slots on the cooktop. The metal filters trap grease released by removing the two screws that hold it stops. 3. The vent filters should be used . NOTE: Charcoal filter is used to the oven...
... circuit breaker panel. 2. Replace with the 120V-130V, 20-watt halogen bulb. Connect electrical power to remove. Rinse, shake and let dry before removing. Replacing the surface light Removing and cleaning the filters Replacing the oven cavity lamp Care and Cleaning Advantium Oven 1. Be sure the bulb to lock into the frame slots on the cooktop. The metal filters trap grease released by removing the two screws that hold it stops. 3. The vent filters should be used . NOTE: Charcoal filter is used to the oven...
Use and Care Manual
Page 38
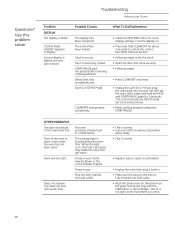
Use this problem solver Troubleshooting Advantium Oven Problem DISPLAY The display is normal. 38 Control display is not set . Clock is lighted yet oven will not start . The control should exit DEMO mode. When the light is fully inserted into the wall DO NOT set the oven clock, press and hold CLEAR/OFF for clock display settings. Power surge. Questions? See Other Features Section. • Follow prompts to remove food when when ready. • This is normal. • Replace fuse or...
Use this problem solver Troubleshooting Advantium Oven Problem DISPLAY The display is normal. 38 Control display is not set . Clock is lighted yet oven will not start . The control should exit DEMO mode. When the light is fully inserted into the wall DO NOT set the oven clock, press and hold CLEAR/OFF for clock display settings. Power surge. Questions? See Other Features Section. • Follow prompts to remove food when when ready. • This is normal. • Replace fuse or...
Use and Care Manual
Page 39
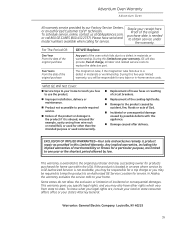
... cooktop light bulbs. n Replacement of the product or damage to state. n Incidental or consequential damage caused by possible defects with this five-year limited warranty, you how to an Authorized GE Service Location for home use the product. EXCLUSION OF IMPLIED WARRANTIES-Your sole and exclusive remedy is needed to replace the defective part. What GE Will Not Cover: n Service trips to provide required service. To schedule service, online...
... cooktop light bulbs. n Replacement of the product or damage to state. n Incidental or consequential damage caused by possible defects with this five-year limited warranty, you how to an Authorized GE Service Location for home use the product. EXCLUSION OF IMPLIED WARRANTIES-Your sole and exclusive remedy is needed to replace the defective part. What GE Will Not Cover: n Service trips to provide required service. To schedule service, online...


