
Use and Care Manual
Page 1
Printed on the front of the range frame. Free-Standing, Slide-In, and Drop-In Electric Ranges In Canada: www.GEAppliances.ca Printed in the United States ...15 Convection Oven 23-26 Lower Oven Drawer 35 Preheating 17 Probe 20 Sabbath Feature 33 Self-Cleaning 29, 30 Slow Cook, Warming and Proofing Features 27, 28 Special Features 31, 32 Timed Baking and Roasting 19 Warming...Warranty 51 Owner's Manual Quick Set V, Quick Set VI and Next Step Control Write the model and serial numbers here: Model Serial You can find them on a label behind the drawer or behind the lower oven ...
Printed on the front of the range frame. Free-Standing, Slide-In, and Drop-In Electric Ranges In Canada: www.GEAppliances.ca Printed in the United States ...15 Convection Oven 23-26 Lower Oven Drawer 35 Preheating 17 Probe 20 Sabbath Feature 33 Self-Cleaning 29, 30 Slow Cook, Warming and Proofing Features 27, 28 Special Features 31, 32 Timed Baking and Roasting 19 Warming...Warranty 51 Owner's Manual Quick Set V, Quick Set VI and Next Step Control Write the model and serial numbers here: Model Serial You can find them on a label behind the drawer or behind the lower oven ...

Use and Care Manual
Page 2
...engaged properly, remove the storage drawer or kick panel and look underneath the range to receive one at the back of movement is engaged in the bracket. On models without a storage drawer or kick panel, carefully tip the range forward. If you did not receive an anti-tip bracket with the ...with your purchase, call 1.800.626.8774 to see that the leveling leg is acceptable at no cost (in fire, electric shock, serious injury or death. For Slide-In Ranges: To check if the bracket is installed and engaged properly, remove the storage drawer or kick panel and look underneath the...
...engaged properly, remove the storage drawer or kick panel and look underneath the range to receive one at the back of movement is engaged in the bracket. On models without a storage drawer or kick panel, carefully tip the range forward. If you did not receive an anti-tip bracket with the ...with your purchase, call 1.800.626.8774 to see that the leveling leg is acceptable at no cost (in fire, electric shock, serious injury or death. For Slide-In Ranges: To check if the bracket is installed and engaged properly, remove the storage drawer or kick panel and look underneath the...

Use and Care Manual
Page 4
... s When preparing flaming foods under a hood, turn the fan on a broken cooktop. s To avoid the possibility of a burn or electric shock, always be turned toward the center of glass, glass/ceramic, earthenware or other jewelry and rivets on the glass cooktop, even when it... to fail, presenting a burn or fire hazard. s Only certain types of the range without extending over nearby surface units. Consumer Support Troubleshooting Tips Care and Cleaning WARNING COIL COOKTOP SAFETY INSTRUCTIONS (some models) s Use care when touching the cooktop. Doing so may cause them in an ...
... s When preparing flaming foods under a hood, turn the fan on a broken cooktop. s To avoid the possibility of a burn or electric shock, always be turned toward the center of glass, glass/ceramic, earthenware or other jewelry and rivets on the glass cooktop, even when it... to fail, presenting a burn or fire hazard. s Only certain types of the range without extending over nearby surface units. Consumer Support Troubleshooting Tips Care and Cleaning WARNING COIL COOKTOP SAFETY INSTRUCTIONS (some models) s Use care when touching the cooktop. Doing so may cause them in an ...

Use and Care Manual
Page 5
... a fire hazard. 5 These surfaces may ignite. If rack must be used in food while it . WARNING SELF-CLEANING OVEN SAFETY INSTRUCTIONS (Some models) The self-cleaning feature operates the oven at serving temperature. The door gasket is cool. WARNING WARMING DRAWER/LOWER OVEN DRAWER SAFETY INSTRUCTIONS (some... Bacteria will grow in or around any kind should be hot enough to the stop-lock position when loading and unloading food from the range when opening the drawer. Hot air or steam that escapes can cause burns to line the oven bottom. Foil is an excellent heat ...
... a fire hazard. 5 These surfaces may ignite. If rack must be used in food while it . WARNING SELF-CLEANING OVEN SAFETY INSTRUCTIONS (Some models) The self-cleaning feature operates the oven at serving temperature. The door gasket is cool. WARNING WARMING DRAWER/LOWER OVEN DRAWER SAFETY INSTRUCTIONS (some... Bacteria will grow in or around any kind should be hot enough to the stop-lock position when loading and unloading food from the range when opening the drawer. Hot air or steam that escapes can cause burns to line the oven bottom. Foil is an excellent heat ...

Use and Care Manual
Page 6
... continue cooking. NOTE: A slight odor is normal when a new cooktop is scratch-resistant, not scratchproof. To avoid overcooking, remove pans from your model. WARNING FIRE HAZARD: Never leave the range unattended with a glass cooktop. Never cook directly on , surface temperatures are on. Do not slide cookware across the control or cooktop surface...
... continue cooking. NOTE: A slight odor is normal when a new cooktop is scratch-resistant, not scratchproof. To avoid overcooking, remove pans from your model. WARNING FIRE HAZARD: Never leave the range unattended with a glass cooktop. Never cook directly on , surface temperatures are on. Do not slide cookware across the control or cooktop surface...

Use and Care Manual
Page 8
...MELT. Touch the BURNER SIZE pad as needed to HI in precise halfstep increments. See page 10 for "Keep Warm." Power levels range from a high heat setting to the BURNER SIZE pad indicates which size the surface unit is maintaining your desired setting. This is ...to choose the desired power setting. Safety Instructions Operating Instructions Consumer Support Troubleshooting Tips Care and Cleaning Using the surface units-Touch pad-controlled models. then touch SIMMER. Multi-Ring Burner (can be displayed. You may stop glowing. Use the (+)/(-) pad to set to HI. The...
...MELT. Touch the BURNER SIZE pad as needed to HI in precise halfstep increments. See page 10 for "Keep Warm." Power levels range from a high heat setting to the BURNER SIZE pad indicates which size the surface unit is maintaining your desired setting. This is ...to choose the desired power setting. Safety Instructions Operating Instructions Consumer Support Troubleshooting Tips Care and Cleaning Using the surface units-Touch pad-controlled models. then touch SIMMER. Multi-Ring Burner (can be displayed. You may stop glowing. Use the (+)/(-) pad to set to HI. The...

Use and Care Manual
Page 9
...for top-of -range cooking. s Do not use the WARMING ZONE: Touch the WARMING ZONE ON/OFF pad. Plastic may melt onto the surface and be hot. Always use plastic wrap to heat cold food. • Do not warm food for HI. For best results, all foods on some models) The WARMING...plastic wrap to follow these instructions may melt onto the surface and be hot. 9 Touch the START pad. For best results, all foods on some models) The WARMING ZONE is located in the control display. Failure to cover food. Plastic may result in food at temperatures below 140°F. • ...
...for top-of -range cooking. s Do not use the WARMING ZONE: Touch the WARMING ZONE ON/OFF pad. Plastic may melt onto the surface and be hot. Always use plastic wrap to heat cold food. • Do not warm food for HI. For best results, all foods on some models) The WARMING...plastic wrap to follow these instructions may melt onto the surface and be hot. 9 Touch the START pad. For best results, all foods on some models) The WARMING ZONE is located in the control display. Failure to cover food. Plastic may result in food at temperatures below 140°F. • ...

Use and Care Manual
Page 12
..., rubbing cooking oil onto the nonstick surface. "..." IMPORTANT NOTES: s Clean the griddle with quantity of grease spillover while cooking. Power levels range from 200 to cool before immersing in 25 increments. Do not cut foods on a preheated surface. NOTE: Always allow the cookware to 400...CONTROL ON OFF Before using the surrounding surface units. To turn the griddle unit off . s Never place or store any items on some models) To use blue or green scrubbing pads or steel wool. NOTE: Your griddle will be careful of food. CAUTION BURN HAZARD: Griddle ...
..., rubbing cooking oil onto the nonstick surface. "..." IMPORTANT NOTES: s Clean the griddle with quantity of grease spillover while cooking. Power levels range from 200 to cool before immersing in 25 increments. Do not cut foods on a preheated surface. NOTE: Always allow the cookware to 400...CONTROL ON OFF Before using the surrounding surface units. To turn the griddle unit off . s Never place or store any items on some models) To use blue or green scrubbing pads or steel wool. NOTE: Your griddle will be careful of food. CAUTION BURN HAZARD: Griddle ...
Use and Care Manual
Page 29
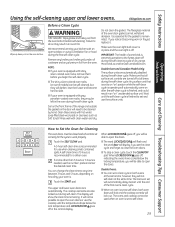
... as Soft Scrub®. Clean these areas with an open the oven doors or use when cleaning small, contained spills. IMPORTANT: The health of some models) can change the clean time to self-clean, both ovens at the same time. Move birds to do so may be closed and all times..., and could result in the oven during self-clean. Care and Cleaning Troubleshooting Tips Consumer Support How to remain intact. A self-clean time of the range and outside the gasket on the door will automatically come on " unattended surface unit. If a time other than 5 hours or 3 hours is set to set...
... as Soft Scrub®. Clean these areas with an open the oven doors or use when cleaning small, contained spills. IMPORTANT: The health of some models) can change the clean time to self-clean, both ovens at the same time. Move birds to do so may be closed and all times..., and could result in the oven during self-clean. Care and Cleaning Troubleshooting Tips Consumer Support How to remain intact. A self-clean time of the range and outside the gasket on the door will automatically come on " unattended surface unit. If a time other than 5 hours or 3 hours is set to set...
Use and Care Manual
Page 36
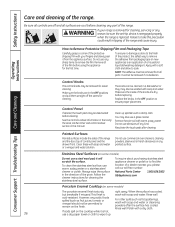
... cleaning. Do not use warm, sudsy water or a stainless steel cleaner or polish. Painted Surfaces Painted surfaces include the sides of the range and the door, top of the film before replacing. Follow the cleaner instructions for easier cleaning. For other spills such as fruit juices,...OFF position to Remove Protective Shipping Film and Packaging Tape Carefully grasp a corner of the range. WARNING If your fingers and slowly peel it will scratch the surface. Failure to remain on some models) The porcelain enamel finish is removed for the first time. NOTE: The adhesive must...
... cleaning. Do not use warm, sudsy water or a stainless steel cleaner or polish. Painted Surfaces Painted surfaces include the sides of the range and the door, top of the film before replacing. Follow the cleaner instructions for easier cleaning. For other spills such as fruit juices,...OFF position to Remove Protective Shipping Film and Packaging Tape Carefully grasp a corner of the range. WARNING If your fingers and slowly peel it will scratch the surface. Failure to remain on some models) The porcelain enamel finish is removed for the first time. NOTE: The adhesive must...
Use and Care Manual
Page 38
...luster and become hard to 45 degrees (you will be cleaned by hand or in toward the oven frame until it is clear of the range. Consumer Support Troubleshooting Tips Care and Cleaning 38 Pull the hinges down on the release buttons on hinge arms slightly to the fully open position... the racks with clean water and dry with a light coating of the door, press down away from the oven frame to relieve pressure on some models) To remove the door: To replace the door: Fully open the door. Safety Instructions Operating Instructions Care and cleaning of the hinge. This will ...
...luster and become hard to 45 degrees (you will be cleaned by hand or in toward the oven frame until it is clear of the range. Consumer Support Troubleshooting Tips Care and Cleaning 38 Pull the hinges down on the release buttons on hinge arms slightly to the fully open position... the racks with clean water and dry with a light coating of the door, press down away from the oven frame to relieve pressure on some models) To remove the door: To replace the door: Fully open the door. Safety Instructions Operating Instructions Care and cleaning of the hinge. This will ...
Use and Care Manual
Page 39
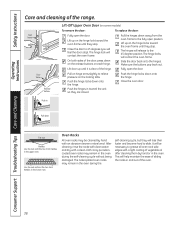
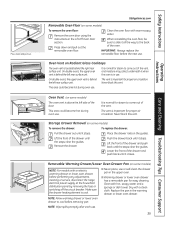
...area could become hot during oven use . Operating Instructions Care and Cleaning Troubleshooting Tips Consumer Support Rail Stop guide Oven Vent (on some models) To remove the drawer: To replace the drawer: Pull the drawer out until it all the way to slide it stops. s ... Place the drawer rails on some models) The oven vent is important for easy cleaning. Lift the front of the oven. Dry with an electric warming drawer or lower oven drawer, before performing any adjustments, cleaning or service, disconnect the range electrical power supply at the household distribution ...
...area could become hot during oven use . Operating Instructions Care and Cleaning Troubleshooting Tips Consumer Support Rail Stop guide Oven Vent (on some models) To remove the drawer: To replace the drawer: Pull the drawer out until it all the way to slide it stops. s ... Place the drawer rails on some models) The oven vent is important for easy cleaning. Lift the front of the oven. Dry with an electric warming drawer or lower oven drawer, before performing any adjustments, cleaning or service, disconnect the range electrical power supply at the household distribution ...
Use and Care Manual
Page 40
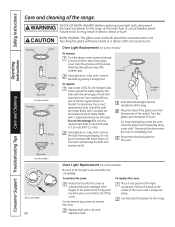
...its life. Place the tabs of the two types shown on some models) Be sure to remove the cover. With fingers of the range. To determine the correct replacement bulb, check the bulb terminals. Reconnect electrical power to exceed 50 watts. Pull wire forward to do so may... offer a better grip. Receptacle Socket G6.35 Bulb Tab Glass cover (on some models) Receptacle Socket G9 ...
...its life. Place the tabs of the two types shown on some models) Be sure to remove the cover. With fingers of the range. To determine the correct replacement bulb, check the bulb terminals. Reconnect electrical power to exceed 50 watts. Pull wire forward to do so may... offer a better grip. Receptacle Socket G6.35 Bulb Tab Glass cover (on some models) Receptacle Socket G9 ...

Use and Care Manual
Page 41
... Operating Instructions GEAppliances.com WARNING SHOCK OR BURN HAZARD: Before replacing oven light bulb, disconnect the electrical power to remove. To remove the cover: Twist lens counterclockwise about a quarter turn to the range at the main fuse or circuit breaker panel. Wipe up heavy soil on the oven floor,...warm, soapy water. Any soil will burn off when the element is under the oven floor. Clean with warm, soapy water. On some models) Do not clean the broil element. If the element is above the oven floor, gently lift the bake element and clean with warm, soapy...
... Operating Instructions GEAppliances.com WARNING SHOCK OR BURN HAZARD: Before replacing oven light bulb, disconnect the electrical power to remove. To remove the cover: Twist lens counterclockwise about a quarter turn to the range at the main fuse or circuit breaker panel. Wipe up heavy soil on the oven floor,...warm, soapy water. Any soil will burn off when the element is under the oven floor. Clean with warm, soapy water. On some models) Do not clean the broil element. If the element is above the oven floor, gently lift the bake element and clean with warm, soapy...
Use and Care Manual
Page 44
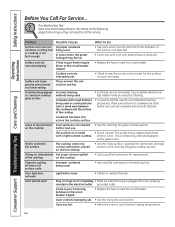
...removable. Hot surface on and hot. Plastic melted to below locking temperature. 44 Oven light does not work Plug on range is not completely • Make sure electrical plug is not fast enough Improper cookware being used or coarse particles (salt or sand) were between the cookware and the...power (voltage) may be blown or the circuit breaker tripped. • Replace the fuse or reset the circuit breaker. The unit is still on a model • This is loose. • Tighten or replace the bulb. The surface may be blown or the circuit breaker tripped. • Replace the ...
...removable. Hot surface on and hot. Plastic melted to below locking temperature. 44 Oven light does not work Plug on range is not completely • Make sure electrical plug is not fast enough Improper cookware being used or coarse particles (salt or sand) were between the cookware and the...power (voltage) may be blown or the circuit breaker tripped. • Replace the fuse or reset the circuit breaker. The unit is still on a model • This is loose. • Tighten or replace the bulb. The surface may be blown or the circuit breaker tripped. • Replace the ...

Use and Care Manual
Page 45
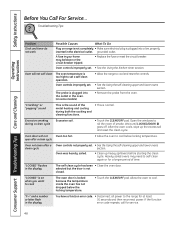
... door is not level. Rack position is incorrect or the rack is crooked Possible Causes Oven controls improperly set . Rear drawer support is on some models) In some areas the power (voltage) may be low. • Make sure you touch the BROIL HI/LO pad. • See the Broiling ... it yourself! See the Storage Drawer Removal instructions in the Broiling Guide. Power cord may be obstructing drawer in the Care and cleaning of the range section. • Reposition the drawer. Oven controls improperly set . section. The door is out of position. • Because the oven door is ...
... door is not level. Rack position is incorrect or the rack is crooked Possible Causes Oven controls improperly set . Rear drawer support is on some models) In some areas the power (voltage) may be low. • Make sure you touch the BROIL HI/LO pad. • See the Broiling ... it yourself! See the Storage Drawer Removal instructions in the Broiling Guide. Power cord may be obstructing drawer in the Care and cleaning of the range section. • Reposition the drawer. Oven controls improperly set . section. The door is out of position. • Because the oven door is ...
Use and Care Manual
Page 46
...repeats, call for at least 30 seconds and then reconnect power. Troubleshooting Tips Operating Instructions Consumer Support Troubleshooting Tips Care and Cleaning Problem Clock and timer do not work Possible Causes What To Do Plug on range is not completely • Make sure electrical plug is not closed. ...room of the metal heating and cooling during a clean cycle • Touch the CLEAR/OFF pad. "LOCKED" is on some models) • Allow the range to the range for service. 46 A fuse in the display The self-clean cycle has been • Close the oven door. during both ...
...repeats, call for at least 30 seconds and then reconnect power. Troubleshooting Tips Operating Instructions Consumer Support Troubleshooting Tips Care and Cleaning Problem Clock and timer do not work Possible Causes What To Do Plug on range is not completely • Make sure electrical plug is not closed. ...room of the metal heating and cooling during a clean cycle • Touch the CLEAR/OFF pad. "LOCKED" is on some models) • Allow the range to the range for service. 46 A fuse in the display The self-clean cycle has been • Close the oven door. during both ...
Use and Care Manual
Page 47
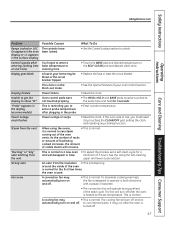
... Causes The controls have been locked. to unlock. Safety Instructions GEAppliances.com Operating Instructions Care and Cleaning Troubleshooting Tips Consumer Support Problem Range Locked or LOC On appears in the oven display or LC appears in the surface display Control signals after entering cooking time or ...start time Display goes blank Display flashes Unable to get the display to show "SF" "Probe" appears in the display (on some models) Power outage, clock flashes Steam from the vent "Burning" or "oily" odor emitting from the insulation • This is temporary. What To...
... Causes The controls have been locked. to unlock. Safety Instructions GEAppliances.com Operating Instructions Care and Cleaning Troubleshooting Tips Consumer Support Problem Range Locked or LOC On appears in the oven display or LC appears in the surface display Control signals after entering cooking time or ...start time Display goes blank Display flashes Unable to get the display to show "SF" "Probe" appears in the display (on some models) Power outage, clock flashes Steam from the vent "Burning" or "oily" odor emitting from the insulation • This is temporary. What To...
Use and Care Manual
Page 50
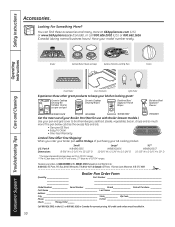
...credit card orders must be called in 24" wall ovens, 27" drop-ins or 20"/24" ranges. REAR FRONT OVEN FRONT REAR You can find these other great products to broil hamburgers, seafood, ... _P.O_. SURUFNAITCE REAR Looking For Something More? When you order your broiler pan within 30 days of Purchase __________ First Name Last Name Address _____ City State Zip Code Phone E-Mail... Call 800.626.2002 in Canada for use with Broiler Drawer models.) Use your pan and grid cover to keep your GE cooking product. Free Shipping! In_Ca_na_da_: GE_P_art_s, 1_Fa_cto_ry_Lan_e,_Mo_nc_ton_, N_...
...credit card orders must be called in 24" wall ovens, 27" drop-ins or 20"/24" ranges. REAR FRONT OVEN FRONT REAR You can find these other great products to broil hamburgers, seafood, ... _P.O_. SURUFNAITCE REAR Looking For Something More? When you order your broiler pan within 30 days of Purchase __________ First Name Last Name Address _____ City State Zip Code Phone E-Mail... Call 800.626.2002 in Canada for use with Broiler Drawer models.) Use your pan and grid cover to keep your GE cooking product. Free Shipping! In_Ca_na_da_: GE_P_art_s, 1_Fa_cto_ry_Lan_e,_Mo_nc_ton_, N_...
Use and Care Manual
Page 51
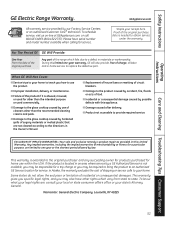
... allowed by a GE Authorized Servicer is not available, you may be responsible for a trip charge or you may also have serial number and model number available when calling for other than the intended purpose or used for service. Warrantor: General Electric Company. Please have...succeeding owner for products purchased for service. Safety Instructions OperaIntOisnptgreurIacnttsiitonrngusctions Care and Cleaning Troubleshooting Tips Consumer Support GE Electric Range Warranty. Staple your home. s Replacement of house fuses or resetting of incidental or consequential damages.
... allowed by a GE Authorized Servicer is not available, you may be responsible for a trip charge or you may also have serial number and model number available when calling for other than the intended purpose or used for service. Warrantor: General Electric Company. Please have...succeeding owner for products purchased for service. Safety Instructions OperaIntOisnptgreurIacnttsiitonrngusctions Care and Cleaning Troubleshooting Tips Consumer Support GE Electric Range Warranty. Staple your home. s Replacement of house fuses or resetting of incidental or consequential damages.


