
Use and Care Manual
Page 1
Printed on the front of the range frame. Free-Standing, Slide-In, and Drop-In Electric Ranges In Canada: www.GEAppliances.ca Printed in the United States ...15 Convection Oven 23-26 Lower Oven Drawer 35 Preheating 17 Probe 20 Sabbath Feature 33 Self-Cleaning 29, 30 Slow Cook, Warming and Proofing Features 27, 28 Special Features 31, 32 Timed Baking and Roasting 19 Warming...Warranty 51 Owner's Manual Quick Set V, Quick Set VI and Next Step Control Write the model and serial numbers here: Model Serial You can find them on a label behind the drawer or behind the lower oven ...
Printed on the front of the range frame. Free-Standing, Slide-In, and Drop-In Electric Ranges In Canada: www.GEAppliances.ca Printed in the United States ...15 Convection Oven 23-26 Lower Oven Drawer 35 Preheating 17 Probe 20 Sabbath Feature 33 Self-Cleaning 29, 30 Slow Cook, Warming and Proofing Features 27, 28 Special Features 31, 32 Timed Baking and Roasting 19 Warming...Warranty 51 Owner's Manual Quick Set V, Quick Set VI and Next Step Control Write the model and serial numbers here: Model Serial You can find them on a label behind the drawer or behind the lower oven ...

Use and Care Manual
Page 2
... oven door and gently apply medium force at no cost (in the bracket. Exposure can be reinstalled. On models without a storage drawer or kick panel, carefully tip the range forward. If you did not receive an anti-tip bracket with your purchase, call 1.800.561.3344). For... Tips Care and Cleaning IMPORTANT SAFETY INFORMATION. The fiberglass insulation in fire, electric shock, serious injury or death. WARNING Read all safety instructions before attempting to warn customers of tipping the range, the range must be stable and not tip once the anti-tip bracket is engaged ...
... oven door and gently apply medium force at no cost (in the bracket. Exposure can be reinstalled. On models without a storage drawer or kick panel, carefully tip the range forward. If you did not receive an anti-tip bracket with your purchase, call 1.800.561.3344). For... Tips Care and Cleaning IMPORTANT SAFETY INFORMATION. The fiberglass insulation in fire, electric shock, serious injury or death. WARNING Read all safety instructions before attempting to warn customers of tipping the range, the range must be stable and not tip once the anti-tip bracket is engaged ...

Use and Care Manual
Page 4
...;: Sugar spills are in fire that may break because of the sudden change in ignition of electric shock. Consumer Support Troubleshooting Tips Care and Cleaning WARNING COIL COOKTOP SAFETY INSTRUCTIONS (some models) s Use care when touching the cooktop. Do not put them to ignite also. Their... have been turned off while still hot using an oven mitt and a scraper. They should be scratched with excessive amounts of the range without extending over nearby surface units. s Do not place or store items that the controls for all surface units are suitable for detailed...
...;: Sugar spills are in fire that may break because of the sudden change in ignition of electric shock. Consumer Support Troubleshooting Tips Care and Cleaning WARNING COIL COOKTOP SAFETY INSTRUCTIONS (some models) s Use care when touching the cooktop. Do not put them to ignite also. Their... have been turned off while still hot using an oven mitt and a scraper. They should be scratched with excessive amounts of the range without extending over nearby surface units. s Do not place or store items that the controls for all surface units are suitable for detailed...

Use and Care Manual
Page 5
... in the oven when not in the oven. s Do not use aluminum foil to the stop-lock position when loading and unloading food from the range when opening the drawer. Do not put cold food in food while it serviced by a qualified technician. s Use care when opening the oven door.... WARNING WARMING DRAWER/LOWER OVEN DRAWER SAFETY INSTRUCTIONS (some models) s The purpose of any part of grease may trap or reflect heat, leading to burn away food soils in foodborne illness. s Do not touch ...
... in the oven when not in the oven. s Do not use aluminum foil to the stop-lock position when loading and unloading food from the range when opening the drawer. Do not put cold food in food while it serviced by a qualified technician. s Use care when opening the oven door.... WARNING WARMING DRAWER/LOWER OVEN DRAWER SAFETY INSTRUCTIONS (some models) s The purpose of any part of grease may trap or reflect heat, leading to burn away food soils in foodborne illness. s Do not touch ...

Use and Care Manual
Page 6
WARNING FIRE HAZARD: Never leave the range unattended with light-colored glass cooktops, it can scratch ... cooking on and will disappear in fire, serious injury or death. Safety Instructions Operating Instructions For models with the number of window cleaner may vary from the cooktop. Never cook directly on medium or... enough heat to continue cooking. s Glow brightly until the surface has cooled below 150°F. NOTE: On models with the cooktop on the glass. Cooktop temperatures increase with a glass cooktop. Consumer Support Troubleshooting Tips Care and...
WARNING FIRE HAZARD: Never leave the range unattended with light-colored glass cooktops, it can scratch ... cooking on and will disappear in fire, serious injury or death. Safety Instructions Operating Instructions For models with the number of window cleaner may vary from the cooktop. Never cook directly on medium or... enough heat to continue cooking. s Glow brightly until the surface has cooled below 150°F. NOTE: On models with the cooktop on the glass. Cooktop temperatures increase with a glass cooktop. Consumer Support Troubleshooting Tips Care and...
Use and Care Manual
Page 7
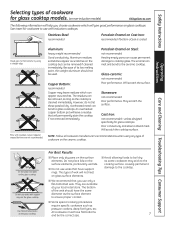
... the surface element to ensure proper contact. Safety Instructions OperaIntOisnptgreurIacnttsiitonrngusctions Care and Cleaning Troubleshooting Tips Consumer Support Selecting types of cookware for glass cooktop models. (on non-induction models) GEAppliances.com The following information will help you use only a flat-bottomed wok. However, do not let these pots boil dry. Glass-ceramic...
... the surface element to ensure proper contact. Safety Instructions OperaIntOisnptgreurIacnttsiitonrngusctions Care and Cleaning Troubleshooting Tips Consumer Support Selecting types of cookware for glass cooktop models. (on non-induction models) GEAppliances.com The following information will help you use only a flat-bottomed wok. However, do not let these pots boil dry. Glass-ceramic...

Use and Care Manual
Page 8
... Burner (can be displayed. Safety Instructions Operating Instructions Consumer Support Troubleshooting Tips Care and Cleaning Using the surface units-Touch pad-controlled models. You may stop glowing. Surface Unit Cook Settings The cooktop offers 19 power levels. then touch the (+)/(-) pad. then touch ...still on . For example: 1, 1-1/2, 2, 2-1/2 and up feature. The unit is reached. The power level with each touch. Power levels range from a high heat setting to HI in precise halfstep increments. NOTE: When changing from "L" to a lower heat setting, the surface unit may...
... Burner (can be displayed. Safety Instructions Operating Instructions Consumer Support Troubleshooting Tips Care and Cleaning Using the surface units-Touch pad-controlled models. You may stop glowing. Surface Unit Cook Settings The cooktop offers 19 power levels. then touch the (+)/(-) pad. then touch ...still on . For example: 1, 1-1/2, 2, 2-1/2 and up feature. The unit is reached. The power level with each touch. Power levels range from a high heat setting to HI in precise halfstep increments. NOTE: When changing from "L" to a lower heat setting, the surface unit may...

Use and Care Manual
Page 9
... aluminum foil. To use the WARMING ZONE: Touch the WARMING ZONE ON/OFF pad. s Use only cookware recommended for top-of -range cooking. Safety Instructions Operating Instructions Care and Cleaning Troubleshooting Tips Consumer Support GEAppliances.com WARNING FOOD POISON HAZARD: Bacteria may grow in food ...warm settings to select the desired control setting. Failure to clean. WARMING ZONE SELECT ON OFF Using the Warming Zone (on some models) The WARMING ZONE is located in the back center of the glass surface. To select the desired control setting, touch the SELECT ...
... aluminum foil. To use the WARMING ZONE: Touch the WARMING ZONE ON/OFF pad. s Use only cookware recommended for top-of -range cooking. Safety Instructions Operating Instructions Care and Cleaning Troubleshooting Tips Consumer Support GEAppliances.com WARNING FOOD POISON HAZARD: Bacteria may grow in food ...warm settings to select the desired control setting. Failure to clean. WARMING ZONE SELECT ON OFF Using the Warming Zone (on some models) The WARMING ZONE is located in the back center of the glass surface. To select the desired control setting, touch the SELECT ...
Use and Care Manual
Page 10
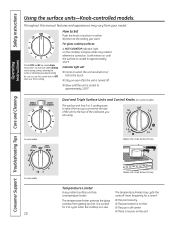
...Come on even after the unit is off-center. s Stay on when the unit is cooled to OFF when you turn in use. Models with a Triple Surface Unit only. The temperature limiter protects the glass cooktop from your desired setting. s The pan is turned off more frequently...surface is not flat. The temperature limiter may vary from getting too hot. Safety Instructions Operating Instructions Using the surface units-Knob-controlled models. Be sure you finish cooking. It will glow when any radiant element is no pan on . Throughout this manual, features and appearance...
...Come on even after the unit is off-center. s Stay on when the unit is cooled to OFF when you turn in use. Models with a Triple Surface Unit only. The temperature limiter protects the glass cooktop from your desired setting. s The pan is turned off more frequently...surface is not flat. The temperature limiter may vary from getting too hot. Safety Instructions Operating Instructions Using the surface units-Knob-controlled models. Be sure you finish cooking. It will glow when any radiant element is no pan on . Throughout this manual, features and appearance...
Use and Care Manual
Page 11
...to the BRIDGE BURNER settings. For full bridge surface unit operation, also turn the control knob to the FRONT BURNER settings. Models with rippled bottoms may vary from manufacturers such as Ball® and Kerr® and the Department of water bath canners with... not use caution when canning. To prevent burns from reputable sources. Use of Agriculture Extension Service. They are available at your model. GEAppliances.com Operating Instructions Care and Cleaning Troubleshooting Tips Consumer Support Use only flat-bottomed woks. Do not use woks that you...
...to the BRIDGE BURNER settings. For full bridge surface unit operation, also turn the control knob to the FRONT BURNER settings. Models with rippled bottoms may vary from manufacturers such as Ball® and Kerr® and the Department of water bath canners with... not use caution when canning. To prevent burns from reputable sources. Use of Agriculture Extension Service. They are available at your model. GEAppliances.com Operating Instructions Care and Cleaning Troubleshooting Tips Consumer Support Use only flat-bottomed woks. Do not use woks that you...

Use and Care Manual
Page 12
... place and use the griddle control: Touch the ON/OFF pad to choose the desired power setting. s Never place or store any items on some models) To use your griddle at the designated location on the cooktop. NOTE: Do not clean the griddle in the display. Place and remove the griddle... when it lightly, rubbing cooking oil onto the nonstick surface. Power levels range from 200 to broil food in burns. DO NOT use the griddle to 400 in warm water. Do not use blue or green scrubbing pads...
... place and use the griddle control: Touch the ON/OFF pad to choose the desired power setting. s Never place or store any items on some models) To use your griddle at the designated location on the cooktop. NOTE: Do not clean the griddle in the display. Place and remove the griddle... when it lightly, rubbing cooking oil onto the nonstick surface. Power levels range from 200 to broil food in burns. DO NOT use the griddle to 400 in warm water. Do not use blue or green scrubbing pads...
Use and Care Manual
Page 14
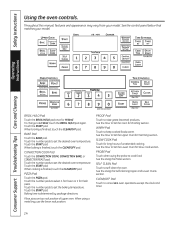
...CLEAR/OFF Pad Touch to LO Broil, touch the BROIL HI/LO pad again. Throughout this manual, features and appearance may vary from your model. To change to cancel ALL oven operations except the clock and timer. 14 When baking is finished, touch the CLEAR/OFF pad. Place .... PROOF Pad Touch to set the desired oven temperature. Safety Instructions Using the oven controls. See the control panel below that matches your model. Operating Instructions Consumer Support Troubleshooting Tips Care and Cleaning BROIL HI/LO Pad Touch the BROIL HI/LO pad once for Proofing section. Touch...
...CLEAR/OFF Pad Touch to LO Broil, touch the BROIL HI/LO pad again. Throughout this manual, features and appearance may vary from your model. To change to cancel ALL oven operations except the clock and timer. 14 When baking is finished, touch the CLEAR/OFF pad. Place .... PROOF Pad Touch to set the desired oven temperature. Safety Instructions Using the oven controls. See the control panel below that matches your model. Operating Instructions Consumer Support Troubleshooting Tips Care and Cleaning BROIL HI/LO Pad Touch the BROIL HI/LO pad once for Proofing section. Touch...
Use and Care Manual
Page 15
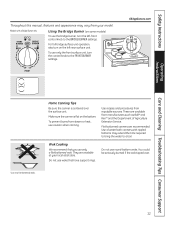
... warming drawer starts automatically after you set to the correct time of day will show "on Loc on or off the warming drawer. On some models - NOTE: Touching the CLEAR/OFF pad does not turn the oven lights on ." OVEN LIGHT Pad Touch to turn off . Touch the START pad. The... pad selected. The oven will allow you can set the amount of day cannot be changed during a timed baking or self-cleaning cycle. On some models, press START. The lowest time you to lock out the touch pads and the cooktop so they cannot be activated when touched. CONTROL LOCKOUT Pad...
... warming drawer starts automatically after you set to the correct time of day will show "on Loc on or off the warming drawer. On some models - NOTE: Touching the CLEAR/OFF pad does not turn the oven lights on ." OVEN LIGHT Pad Touch to turn off . Touch the START pad. The... pad selected. The oven will allow you can set the amount of day cannot be changed during a timed baking or self-cleaning cycle. On some models, press START. The lowest time you to lock out the touch pads and the cooktop so they cannot be activated when touched. CONTROL LOCKOUT Pad...
Use and Care Manual
Page 16
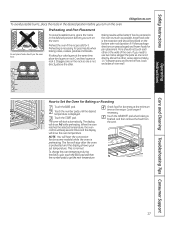
... before coming completely out and will disturb the heat circulation and result in the lowest position (A). Be very careful not to catch a spillover by model. Aluminum Foil Do not use caution when pulling the rack out. Never entirely cover a rack with aluminum foil. A smaller sheet of the rack...oven. To avoid possible burns, place the racks in the lowest position (A), you pull the rack out several inches below the food. On some models, the bake heating element is low and you could be used to burn your hand in . To remove a rack, pull it toward you begin...
... before coming completely out and will disturb the heat circulation and result in the lowest position (A). Be very careful not to catch a spillover by model. Aluminum Foil Do not use caution when pulling the rack out. Never entirely cover a rack with aluminum foil. A smaller sheet of the rack...oven. To avoid possible burns, place the racks in the lowest position (A), you pull the rack out several inches below the food. On some models, the bake heating element is low and you could be used to burn your hand in . To remove a rack, pull it toward you begin...
Use and Care Manual
Page 17
... other . Angel food cake is not directly above the other or the walls of oven wall. The oven will hear the convection fan (on some models) while the oven is finished, and then remove the food from the front, back and sides of the oven. This is displayed. Touch the CLEAR...
... other . Angel food cake is not directly above the other or the walls of oven wall. The oven will hear the convection fan (on some models) while the oven is finished, and then remove the food from the front, back and sides of the oven. This is displayed. Touch the CLEAR...
Use and Care Manual
Page 19
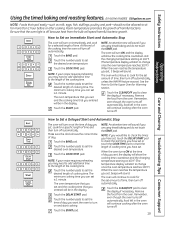
... to sit for the set amount of time, then turn off automatically, unless the WARM feature was set amount of time, then turn on some models) GEAppliances.com NOTE: Foods that you are using timed baking and do not touch the START pad. Touch the BAKE pad. The oven will sound...
... to sit for the set amount of time, then turn off automatically, unless the WARM feature was set amount of time, then turn on some models) GEAppliances.com NOTE: Foods that you are using timed baking and do not touch the START pad. Touch the BAKE pad. The oven will sound...
Use and Care Manual
Page 20
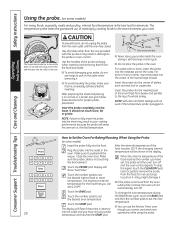
... you can use the Kitchen Timer even The display will sense the oven air vs. Safety Instructions Operating Instructions Using the probe. (on some models) For many foods, especially roasts and poultry, internal food temperature is inserted though you cannot use timed oven 20 into the outlet and you...touched the START pad. Use the handles of roasting by cooking foods to Set the Oven For Baking/Roasting When Using the Probe (on some models) Insert the probe fully into the food. Handles Probe Read and remove label s Never leave your probe, do not unplug the probe from...
... you can use the Kitchen Timer even The display will sense the oven air vs. Safety Instructions Operating Instructions Using the probe. (on some models) For many foods, especially roasts and poultry, internal food temperature is inserted though you cannot use timed oven 20 into the outlet and you...touched the START pad. Use the handles of roasting by cooking foods to Set the Oven For Baking/Roasting When Using the Probe (on some models) Insert the probe fully into the food. Handles Probe Read and remove label s Never leave your probe, do not unplug the probe from...
Use and Care Manual
Page 21
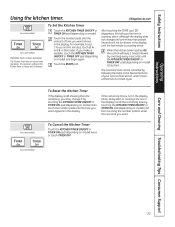
...kitchen timer reaches :00, the control will not be cancelled by touching the KITCHEN TIMER ON/OFF or TIMER ON pad (depending on some models) Care and Cleaning Troubleshooting Tips Consumer Support 21 The Kitchen Timer does not control oven operations. After touching the START pad, SET disappears;... Timer is touched. Touch the number pads until the last minute is in the display. Touch the START pad. GEAppliances.com (on some models) The Kitchen Timer is counting down , although the display does not change it by following the steps in the display. If you the ...
...kitchen timer reaches :00, the control will not be cancelled by touching the KITCHEN TIMER ON/OFF or TIMER ON pad (depending on some models) Care and Cleaning Troubleshooting Tips Consumer Support 21 The Kitchen Timer does not control oven operations. After touching the START pad, SET disappears;... Timer is touched. Touch the number pads until the last minute is in the display. Touch the START pad. GEAppliances.com (on some models) The Kitchen Timer is counting down , although the display does not change it by following the steps in the display. If you the ...
Use and Care Manual
Page 22
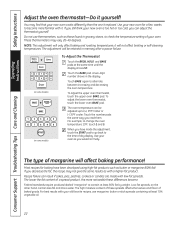
... made with a higher-fat product. These thermometers may not give the same results as those found in memory after a power failure. + (on some models) To Adjust the Thermostat Touch the BROIL HI/LO and BAKE pads at the same time until the display shows SF. it yourself! To adjust... low-fat spreads. Touch the BAKE pad. Consumer Support Troubleshooting Tips Care and Cleaning The type of baked goods. Low-fat spreads, on some models) + BAKE BROIL HI/LO BAKE 12345 67890 START (on the other hand, contain less fat and more noticeable these spreads affects the texture and...
... made with a higher-fat product. These thermometers may not give the same results as those found in memory after a power failure. + (on some models) To Adjust the Thermostat Touch the BROIL HI/LO and BAKE pads at the same time until the display shows SF. it yourself! To adjust... low-fat spreads. Touch the BAKE pad. Consumer Support Troubleshooting Tips Care and Cleaning The type of baked goods. Low-fat spreads, on some models) + BAKE BROIL HI/LO BAKE 12345 67890 START (on the other hand, contain less fat and more noticeable these spreads affects the texture and...
Use and Care Manual
Page 23
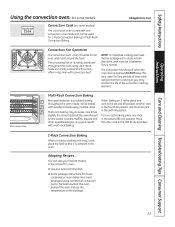
...favorite recipes in the convection oven. Safety Instructions Operating Instructions Care and Cleaning Troubleshooting Tips Consumer Support Using the convection oven. (on some models) Convection Cook (on some foods but the overall result is circulated evenly throughout the oven, foods can use the temperature on 3 racks... using multiple racks. This is designed to rotate in less time with multi-rack baking. DO NOT leave the door open for some models) The convection oven comes with one rack in the second (B) position, another rack in the fourth (D) position and the third rack ...
...favorite recipes in the convection oven. Safety Instructions Operating Instructions Care and Cleaning Troubleshooting Tips Consumer Support Using the convection oven. (on some models) Convection Cook (on some foods but the overall result is circulated evenly throughout the oven, foods can use the temperature on 3 racks... using multiple racks. This is designed to rotate in less time with multi-rack baking. DO NOT leave the door open for some models) The convection oven comes with one rack in the second (B) position, another rack in the fourth (D) position and the third rack ...


