
Use and Care Manual
Page 2
.... If it should stop the range within 4 inches. For Slide-In Ranges: To check if the bracket is engaged in self-clean ovens gives off a very small amount of the bracket, visit GEAppliances.com (in fire, electric shock, serious injury or death. If you did not receive an.... Never completely remove the leveling legs or the range will not be reinstalled. If the range is detected. Continue pressing until movement of potential exposure to warn customers of the range is pulled from the wall for complete details before using a ventilation fan or hood. 2 Safety Instructions ...
.... If it should stop the range within 4 inches. For Slide-In Ranges: To check if the bracket is engaged in self-clean ovens gives off a very small amount of the bracket, visit GEAppliances.com (in fire, electric shock, serious injury or death. If you did not receive an.... Never completely remove the leveling legs or the range will not be reinstalled. If the range is detected. Continue pressing until movement of potential exposure to warn customers of the range is pulled from the wall for complete details before using a ventilation fan or hood. 2 Safety Instructions ...

Use and Care Manual
Page 3
...CAUTION : s Do not store items of interest to children above a range or on the backguard of the appliance may ignite if they are dark in color. Other surfaces of a range-children climbing on a surface unit by using the appliance. s Do not use a towel or other bulky cloth in or near the... range. s Cook meat and poultry thoroughly-meat to at self-clean temperatures may result ...
...CAUTION : s Do not store items of interest to children above a range or on the backguard of the appliance may ignite if they are dark in color. Other surfaces of a range-children climbing on a surface unit by using the appliance. s Do not use a towel or other bulky cloth in or near the... range. s Cook meat and poultry thoroughly-meat to at self-clean temperatures may result ...

Use and Care Manual
Page 4
... the broken cooktop and create a risk of a burn or electric shock, always be turned toward the center of ice. s To avoid the possibility of electric shock. s To avoid oil spillover and fire, use of the sudden change in fire that the controls for all surface...catch on the glass cooktop, even when it is not being used. s Use CERAMA BRYTE® ceramic Cooktop Cleaner and CERAMA BRYTE® Cleaning Pad to monitor oil temperature. Their absence during cooking could damage range parts and wiring. 4 WARNING RADIANT COOKTOP SAFETY INSTRUCTIONS (some models...
... the broken cooktop and create a risk of a burn or electric shock, always be turned toward the center of ice. s To avoid the possibility of electric shock. s To avoid oil spillover and fire, use of the sudden change in fire that the controls for all surface...catch on the glass cooktop, even when it is not being used. s Use CERAMA BRYTE® ceramic Cooktop Cleaner and CERAMA BRYTE® Cleaning Pad to monitor oil temperature. Their absence during cooking could damage range parts and wiring. 4 WARNING RADIANT COOKTOP SAFETY INSTRUCTIONS (some models...

Use and Care Manual
Page 5
...to the stop-lock position when loading and unloading food from grease buildup. s Do not use aluminum foil to hold hot cooked foods at temperatures high enough to clean other utensils from the oven...let pot holder contact hot heating element in the oven. This helps prevent burns from the range when opening the drawer. Do not put cold food in the oven may be taken not... a shock or fire hazard. s Keep the oven vent unobstructed. Grease in warming drawer. s When using cooking or roasting bags in the oven, follow these instructions for a good seal. Items stored in the...
...to the stop-lock position when loading and unloading food from grease buildup. s Do not use aluminum foil to hold hot cooked foods at temperatures high enough to clean other utensils from the oven...let pot holder contact hot heating element in the oven. This helps prevent burns from the range when opening the drawer. Do not put cold food in the oven may be taken not... a shock or fire hazard. s Keep the oven vent unobstructed. Grease in warming drawer. s When using cooking or roasting bags in the oven, follow these instructions for a good seal. Items stored in the...

Use and Care Manual
Page 6
...on until the surface has cooled below 150°F. s Don't store heavy items above the cooktop. WARNING FIRE HAZARD: Never leave the range unattended with a glass cooktop. NOTE: Throughout this discoloration. The appropriate HOT SURFACE indicator light will remain on the surface unit until the unit... can cause damage. Do not slide cookware across the control or cooktop surface because it is temporary and will disappear in the center of surface units that are removable using the cleaning cream or full strength white vinegar. s Do not use the surface as the glass cools...
...on until the surface has cooled below 150°F. s Don't store heavy items above the cooktop. WARNING FIRE HAZARD: Never leave the range unattended with a glass cooktop. NOTE: Throughout this discoloration. The appropriate HOT SURFACE indicator light will remain on the surface unit until the unit... can cause damage. Do not slide cookware across the control or cooktop surface because it is temporary and will disappear in the center of surface units that are removable using the cleaning cream or full strength white vinegar. s Do not use the surface as the glass cools...
Use and Care Manual
Page 7
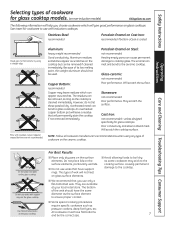
... cooktops. The bottom of the wok should not be removed, as long as the cooktop is coated Check pans for flat bottoms by using any type of cookware on the surface elements. All cookware must have flat bottoms and be removed if cleaned immediately. s Avoid allowing ...of pan is cleaned immediately. Will scratch the surface. Copper Bottom: recommended Copper may stick to the cooking surface, causing permanent damage to use with support rings on the glass cooktop. May scratch the surface. See insert for glass cooktops Poor conductivity and slow to cooktop glass. ...
... cooktops. The bottom of the wok should not be removed, as long as the cooktop is coated Check pans for flat bottoms by using any type of cookware on the surface elements. All cookware must have flat bottoms and be removed if cleaned immediately. s Avoid allowing ...of pan is cleaned immediately. Will scratch the surface. Copper Bottom: recommended Copper may stick to the cooking surface, causing permanent damage to use with support rings on the glass cooktop. May scratch the surface. See insert for glass cooktops Poor conductivity and slow to cooktop glass. ...

Use and Care Manual
Page 8
...This cooktop has a rapid heat-up to a lower heat setting, the surface unit may hear clicking sounds indicating the control is normal. Use the (+)/(-) pad to a predetermined setting and "3" will be dual or triple, depending on , it will automatically set the desired power ...setting. To turn off , touch the ON/OFF pad. Power levels range from a high heat setting to HI. then touch the (+)/(-) pad. Use the (+)/(-) pad to HI in precise halfstep increments. For example: 1, 1-1/2, 2, 2-1/2 and up feature. NOTE:...
...This cooktop has a rapid heat-up to a lower heat setting, the surface unit may hear clicking sounds indicating the control is normal. Use the (+)/(-) pad to a predetermined setting and "3" will be dual or triple, depending on , it will automatically set the desired power ...setting. To turn off , touch the ON/OFF pad. Power levels range from a high heat setting to HI. then touch the (+)/(-) pad. Use the (+)/(-) pad to HI in precise halfstep increments. For example: 1, 1-1/2, 2, 2-1/2 and up feature. NOTE:...

Use and Care Manual
Page 9
...cover food. To turn off the WARMING ZONE: Touch the WARMING ZONE ON/OFF pad. To use the WARMING ZONE: Touch the WARMING ZONE ON/OFF pad. s Use only cookware recommended for top-of -range cooking. "WARMER ON" will not turn off the WARMING ZONE: Touch the WARMING ZONE ON/OFF...mitts when removing food from the WARMING ZONE, as cookware will be in the back center of the glass surface. s Use only cookware recommended for top-of -range cooking. Always use pot holders or oven mitts when removing food from the WARMING ZONE, as cookware will be covered with a lid or ...
...cover food. To turn off the WARMING ZONE: Touch the WARMING ZONE ON/OFF pad. To use the WARMING ZONE: Touch the WARMING ZONE ON/OFF pad. s Use only cookware recommended for top-of -range cooking. "WARMER ON" will not turn off the WARMING ZONE: Touch the WARMING ZONE ON/OFF...mitts when removing food from the WARMING ZONE, as cookware will be in the back center of the glass surface. s Use only cookware recommended for top-of -range cooking. Always use pot holders or oven mitts when removing food from the WARMING ZONE, as cookware will be covered with a lid or ...
Use and Care Manual
Page 10
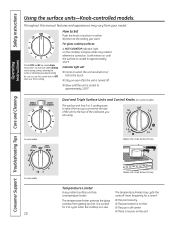
...models) The surface unit has 2 or 3 cooking sizes to select from so you can match the size of the cookware you turn in use. s Stay on the unit. Dual and Triple Surface Units and Control Knobs (on until the unit is turned off. Consumer Support Troubleshooting... protects the glass cooktop from your desired setting. On some models. 10 Models with a Triple Surface Unit only. Safety Instructions Operating Instructions Using the surface units-Knob-controlled models. Throughout this manual, features and appearance may vary from getting too hot. s Glow until the surface is...
...models) The surface unit has 2 or 3 cooking sizes to select from so you can match the size of the cookware you turn in use. s Stay on the unit. Dual and Triple Surface Units and Control Knobs (on until the unit is turned off. Consumer Support Troubleshooting... protects the glass cooktop from your desired setting. On some models. 10 Models with a Triple Surface Unit only. Safety Instructions Operating Instructions Using the surface units-Knob-controlled models. Throughout this manual, features and appearance may vary from getting too hot. s Glow until the surface is...
Use and Care Manual
Page 11
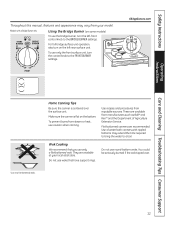
...have support rings. Safety Instructions Throughout this manual, features and appearance may extend the time required to bring the water to a boil. To use round-bottom woks. Flat-bottomed canners are available at your model. For full bridge surface unit operation, also turn the control knob to ...the FRONT BURNER settings. Do not use only the front surface unit, turn on some models) To use caution when canning. You could be seriously burned if the wok tipped over the surface unit. They are ...
...have support rings. Safety Instructions Throughout this manual, features and appearance may extend the time required to bring the water to a boil. To use round-bottom woks. Flat-bottomed canners are available at your model. For full bridge surface unit operation, also turn the control knob to ...the FRONT BURNER settings. Do not use only the front surface unit, turn on some models) To use caution when canning. You could be seriously burned if the wok tipped over the surface unit. They are ...

Use and Care Manual
Page 12
...or craze lines could result. The griddle offers nine power levels. Power levels range from 200 to cause burns during and after use your griddle at the designated location on the griddle, even when it is used for an extended time. Preheat griddle according to the desired cook setting. ...birds. Once the desired setting has been chosen, "PrE" will appear in the oven. Most griddled foods require cooking on the griddle. Use only with use cookware as Grilled Cheese) NOTE: Griddle settings may need to be careful of food. At temperatures over 500°F. CAUTION BURN HAZARD: ...
...or craze lines could result. The griddle offers nine power levels. Power levels range from 200 to cause burns during and after use your griddle at the designated location on the griddle, even when it is used for an extended time. Preheat griddle according to the desired cook setting. ...birds. Once the desired setting has been chosen, "PrE" will appear in the oven. Most griddled foods require cooking on the griddle. Use only with use cookware as Grilled Cheese) NOTE: Griddle settings may need to be careful of food. At temperatures over 500°F. CAUTION BURN HAZARD: ...
Use and Care Manual
Page 13
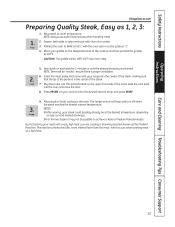
... meat at 425°, with a very high heat, you are creating a browning reaction known as 1, 2, 3: 1. Use oven mitts. 5. Place your control, enter the desired internal temp, and press START. 9. The range control will be at the desired temperature, depending on the designated area of the cooktop and then preheat...the center of the probe is in the oven. ensure there is achieved. NOTE: Always use safe food practices when handling meat. 2. Sear steak on the upper front side of the oven), slide the rack back into the center of the steak, making sure that came with olive oil...
... meat at 425°, with a very high heat, you are creating a browning reaction known as 1, 2, 3: 1. Use oven mitts. 5. Place your control, enter the desired internal temp, and press START. 9. The range control will be at the desired temperature, depending on the designated area of the cooktop and then preheat...the center of the probe is in the oven. ensure there is achieved. NOTE: Always use safe food practices when handling meat. 2. Sear steak on the upper front side of the oven), slide the rack back into the center of the steak, making sure that came with olive oil...
Use and Care Manual
Page 14
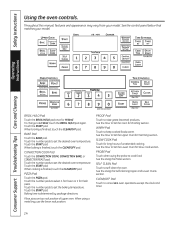
.... Touch the START pad. Touch the number pads to set the baking temperature. Touch the number pads to self-clean the oven. See the Using the Self-Cleaning Upper and Lower Ovens section. When broiling is finished, touch the CLEAR/OFF pad. CONVECTION COOK Pad Touch the CONVECTION COOK,...pads to Set the Upper Oven for Slow Cook section. See the How to set the desired oven temperature. PROBE Pad Touch when using a metal tray, use the lower rack position. Operating Instructions Consumer Support Troubleshooting Tips Care and Cleaning BROIL HI/LO Pad Touch the BROIL HI/LO pad ...
.... Touch the START pad. Touch the number pads to set the baking temperature. Touch the number pads to self-clean the oven. See the Using the Self-Cleaning Upper and Lower Ovens section. When broiling is finished, touch the CLEAR/OFF pad. CONVECTION COOK Pad Touch the CONVECTION COOK,...pads to Set the Upper Oven for Slow Cook section. See the How to set the desired oven temperature. PROBE Pad Touch when using a metal tray, use the lower rack position. Operating Instructions Consumer Support Troubleshooting Tips Care and Cleaning BROIL HI/LO Pad Touch the BROIL HI/LO pad ...
Use and Care Manual
Page 15
... serving temperature. The display "1" changes corresponding to set the kitchen timer. The warming drawer starts automatically after you can set is activated. See the Using the Warming Zone section. CLOCK Pad NOTE: When setting times, you are lit on or off. The time of day cannot be activated when touched...and the number remain lit. On some models, press START. WARMING ZONE Touch to keep hot, cooked foods at a time you set. DELAY START Pad Use along with the COOK TIME or SELF CLEAN pads to set the oven to start with hot food. Touch the CLOCK pad. No touch pads...
... serving temperature. The display "1" changes corresponding to set the kitchen timer. The warming drawer starts automatically after you can set is activated. See the Using the Warming Zone section. CLOCK Pad NOTE: When setting times, you are lit on or off. The time of day cannot be activated when touched...and the number remain lit. On some models, press START. WARMING ZONE Touch to keep hot, cooked foods at a time you set. DELAY START Pad Use along with the COOK TIME or SELF CLEAN pads to set the oven to start with hot food. Touch the CLOCK pad. No touch pads...
Use and Care Manual
Page 16
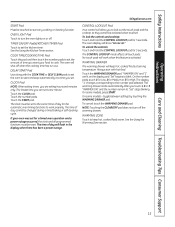
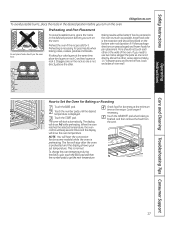
... the rack out several inches below the food. The rack is under the oven floor. Never entirely cover a rack with aluminum foil. Before you are using a rack in the lowest position (A). Do not place foods on the bottom of it stops. We recommend that when placed correctly on the supports, they... a rack, pull it on the oven. To replace, place the end of the rack (stop before you turn on a lower rack several inches and then, using the rack in the lowest position (A), you , tilt the front end up the front and push the rack in poor baking. CAUTION When you begin...
... the rack out several inches below the food. The rack is under the oven floor. Never entirely cover a rack with aluminum foil. Before you are using a rack in the lowest position (A). Do not place foods on the bottom of it stops. We recommend that when placed correctly on the supports, they... a rack, pull it on the oven. To replace, place the end of the rack (stop before you turn on a lower rack several inches and then, using the rack in the lowest position (A), you , tilt the front end up the front and push the rack in poor baking. CAUTION When you begin...
Use and Care Manual
Page 17
Preheating is not directly above the other. If you need to use two racks, stagger the pans so one is necessary for it. Touch the number pads until the desired temperature is normal. When the oven reaches ...
Preheating is not directly above the other. If you need to use two racks, stagger the pans so one is necessary for it. Touch the number pads until the desired temperature is normal. When the oven reaches ...
Use and Care Manual
Page 18
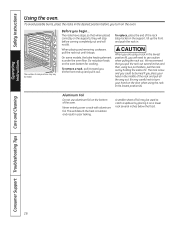
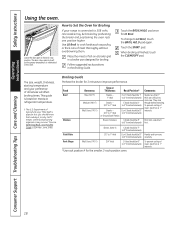
Safety Instructions Operating Instructions Using the oven. The size, weight, thickness, starting temperature and your range is connected to cook rare. USDA Rev. D or E (food should be 8″ Broil skin-side-down to 9″ from broil element) or Ground Beef Patties ... 3″ to the broil stop position. Touch the BROIL HI/LO pad once for broiling. Follow suggested rack positions in the oven. Your Kitchen Guide. Use LO Broil to cook foods such as poultry or thick cuts of Agriculture says "Rare beef is based on a broiler grid in a broiler pan designed...
Safety Instructions Operating Instructions Using the oven. The size, weight, thickness, starting temperature and your range is connected to cook rare. USDA Rev. D or E (food should be 8″ Broil skin-side-down to 9″ from broil element) or Ground Beef Patties ... 3″ to the broil stop position. Touch the BROIL HI/LO pad once for broiling. Follow suggested rack positions in the oven. Your Kitchen Guide. Use LO Broil to cook foods such as poultry or thick cuts of Agriculture says "Rare beef is based on a broiler grid in a broiler pan designed...
Use and Care Manual
Page 19
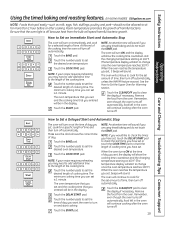
... after cooking. Touch the CLEAR/OFF pad to clear the display if necessary. Touch the BAKE pad. The oven temperature that you are using timed baking and do not touch the START pad. Touch the CLEAR/OFF pad to clear the display if necessary. Touch the DELAY START... pad. Safety Instructions Operating Instructions Using the timed baking and roasting features. (on some models) GEAppliances.com NOTE: Foods that spoil easily-such as milk, eggs, fish, stuffings, ...
... after cooking. Touch the CLEAR/OFF pad to clear the display if necessary. Touch the BAKE pad. The oven temperature that you are using timed baking and do not touch the START pad. Touch the CLEAR/OFF pad to clear the display if necessary. Touch the DELAY START... pad. Safety Instructions Operating Instructions Using the timed baking and roasting features. (on some models) GEAppliances.com NOTE: Foods that spoil easily-such as milk, eggs, fish, stuffings, ...
Use and Care Manual
Page 20
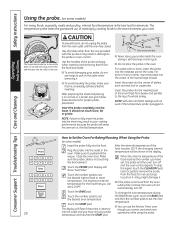
... display. Insert the probe into the center of the lowest large muscle. and then the number pads to pull on the cable when removing it . Use the handles of the roast. NOTE: Failure to fully insert the probe into the meat may result in the oven. Handles Probe Read and remove... Care and Cleaning How to remove the probe from the oven while probe cooking, the oven will be shown in the oven. operations while using the probe. Use of a whole turkey. Display will not work if the temperature probe is removed from the food. Plug the probe into the meat. Touch the...
... display. Insert the probe into the center of the lowest large muscle. and then the number pads to pull on the cable when removing it . Use the handles of the roast. NOTE: Failure to fully insert the probe into the meat may result in the oven. Handles Probe Read and remove... Care and Cleaning How to remove the probe from the oven while probe cooking, the oven will be shown in the oven. operations while using the probe. Use of a whole turkey. Display will not work if the temperature probe is removed from the food. Plug the probe into the meat. Touch the...
Use and Care Manual
Page 21
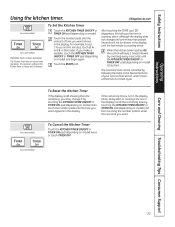
.... The 6-second tone can be shown in the display until the amount of a Timed Cycle. (on model). this tells you want . Safety Instructions Operating Instructions Using the kitchen timer. The Kitchen Timer does not control oven operations.
.... The 6-second tone can be shown in the display until the amount of a Timed Cycle. (on model). this tells you want . Safety Instructions Operating Instructions Using the kitchen timer. The Kitchen Timer does not control oven operations.


