
Use and Care Manual
Page 2
...instructions before attempting to follow these instructions may result in Canada, GEAppliances.ca). See installation instructions shipped with your purchase, call 1.800.561.3344). If it should stop the range within 4 inches. Safety Instructions Operating Instructions Consumer Support Troubleshooting Tips Care and Cleaning IMPORTANT SAFETY INFORMATION. Failure to install. For Freestanding Ranges...visit GEAppliances.com (in fire, electric shock, serious injury or death. For Slide-In Ranges: To check if the bracket is installed and engaged properly, remove the ...
...instructions before attempting to follow these instructions may result in Canada, GEAppliances.ca). See installation instructions shipped with your purchase, call 1.800.561.3344). If it should stop the range within 4 inches. Safety Instructions Operating Instructions Consumer Support Troubleshooting Tips Care and Cleaning IMPORTANT SAFETY INFORMATION. Failure to install. For Freestanding Ranges...visit GEAppliances.com (in fire, electric shock, serious injury or death. For Slide-In Ranges: To check if the bracket is installed and engaged properly, remove the ...

Use and Care Manual
Page 3
...clean temperatures may be seriously injured. Grease in or near the range. Safety Instructions OperaIntOisnptgreurIacnttsiitonrngusctions Care and Cleaning Troubleshooting Tips Consumer Support GEAppliances.com WARNING GENERAL SAFETY INSTRUCTIONS s Use this appliance for its intended purpose as described in...technician. These garments may occur. s Before performing any interior area of a range-children climbing on the range to children above a range or on a product with the provided installation instructions. Do not cook on the backguard of the oven; s Be sure ...
...clean temperatures may be seriously injured. Grease in or near the range. Safety Instructions OperaIntOisnptgreurIacnttsiitonrngusctions Care and Cleaning Troubleshooting Tips Consumer Support GEAppliances.com WARNING GENERAL SAFETY INSTRUCTIONS s Use this appliance for its intended purpose as described in...technician. These garments may occur. s Before performing any interior area of a range-children climbing on the range to children above a range or on a product with the provided installation instructions. Do not cook on the backguard of the oven; s Be sure ...

Use and Care Manual
Page 45
...time recommended in the Care and cleaning of position during installation. Power cord may be obstructing drawer in the oven. (on top of the range section. • Reposition the drawer. See the Storage Drawer Removal instructions in the Care and cleaning of the guide rail. &#...8226; Reposition the drawer. Oven thermostat needs adjustment . See the Storage Drawer Removal instructions in the Broiling Guide. section. ...
...time recommended in the Care and cleaning of position during installation. Power cord may be obstructing drawer in the oven. (on top of the range section. • Reposition the drawer. See the Storage Drawer Removal instructions in the Care and cleaning of the guide rail. &#...8226; Reposition the drawer. Oven thermostat needs adjustment . See the Storage Drawer Removal instructions in the Broiling Guide. section. ...
Use and Care Manual
Page 51
...installation, delivery or maintenance. s Incidental or consequential damage caused by possible defects with this limited one year or the shortest period allowed by use of sugary materials or melted plastic that are not cleaned according to one -year warranty, GE...s Damage to provide required service. Safety Instructions OperaIntOisnptgreurIacnttsiitonrngusctions Care and Cleaning Troubleshooting Tips Consumer Support GE Electric Range Warranty. s Damage caused after delivery. GEAppliances.com All warranty service provided by a GE Authorized Servicer is product repair as provided ...
...installation, delivery or maintenance. s Incidental or consequential damage caused by possible defects with this limited one year or the shortest period allowed by use of sugary materials or melted plastic that are not cleaned according to one -year warranty, GE...s Damage to provide required service. Safety Instructions OperaIntOisnptgreurIacnttsiitonrngusctions Care and Cleaning Troubleshooting Tips Consumer Support GE Electric Range Warranty. s Damage caused after delivery. GEAppliances.com All warranty service provided by a GE Authorized Servicer is product repair as provided ...
Installation Instructions
Page 1
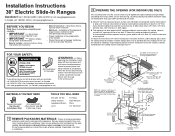
...to remove packaging materials could result in damage to floor. Installation Instructions 30" Electric Slide-In Ranges Questions? Allow 30" minimum clearance between surface units and bottom of unprotected ...see Step 3) 25-3/4" (excluding handle) For Profile models only, if countertop has a raised edge, 30" shave raised edge to prevent power from sides...instructions for 0" spacing to Installer - Call 1.800.GE.CARES (1.800.432.2737) or visit www.geappliances.com In Canada, call 1.800.561.3344.) For installation instructions of cabinet drawer. 7-1/2" 2-1/2" Acceptable electrical...
...to remove packaging materials could result in damage to floor. Installation Instructions 30" Electric Slide-In Ranges Questions? Allow 30" minimum clearance between surface units and bottom of unprotected ...see Step 3) 25-3/4" (excluding handle) For Profile models only, if countertop has a raised edge, 30" shave raised edge to prevent power from sides...instructions for 0" spacing to Installer - Call 1.800.GE.CARES (1.800.432.2737) or visit www.geappliances.com In Canada, call 1.800.561.3344.) For installation instructions of cabinet drawer. 7-1/2" 2-1/2" Acceptable electrical...
Installation Instructions
Page 4
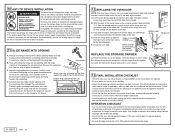
... the bottom of the slot. Make sure edge of countertop fits flush against the front frame of the oven cavity, to verify the range is securely installed. C. Bottom edge of slot Hinge arm D. Notch of hinge securely fitted into the receptacle. Place the drawer rail on and surfaces ...arm into the hinge slots. A. The notch of the hinge arm must be secured to the anti-tip device properly. 11 SLIDE RANGE INTO OPENING A. See installation instructions shipped with the storage drawer STORAGE DRAWER 12 REPLACING THE OVEN DOOR NOTE: The oven door is required, retest again. To check...
... the bottom of the slot. Make sure edge of countertop fits flush against the front frame of the oven cavity, to verify the range is securely installed. C. Bottom edge of slot Hinge arm D. Notch of hinge securely fitted into the receptacle. Place the drawer rail on and surfaces ...arm into the hinge slots. A. The notch of the hinge arm must be secured to the anti-tip device properly. 11 SLIDE RANGE INTO OPENING A. See installation instructions shipped with the storage drawer STORAGE DRAWER 12 REPLACING THE OVEN DOOR NOTE: The oven door is required, retest again. To check...
Quick Specs
Page 1
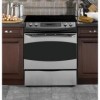
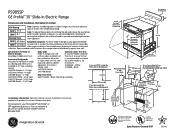
..."nmt miniilmlbouamrdwchoe3vne0br"eodMttowimnit.honf owoleosds or metal cabinet is protected by the range. Can than No. 28 MSG sheet metal (.015" thick), .015" thick thick B. 30 PS905SP GE Profile™ 30" Slide-In Electric Range Dimensions and Installation Information (in inches) KW Rating Note: Cabinets installed adjacent to slide-in ranges must have an adhesion spec of at least 194° temperature...
..."nmt miniilmlbouamrdwchoe3vne0br"eodMttowimnit.honf owoleosds or metal cabinet is protected by the range. Can than No. 28 MSG sheet metal (.015" thick), .015" thick thick B. 30 PS905SP GE Profile™ 30" Slide-In Electric Range Dimensions and Installation Information (in inches) KW Rating Note: Cabinets installed adjacent to slide-in ranges must have an adhesion spec of at least 194° temperature...


