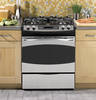

Quick Specs
Page 1
... All GE ranges aOre ueqtuleiptpeAd rweitah countertop 3 an Anti-Tip device. d-e1p/th4o*f 30 28" on model JSP34. Optional Kits for Slide-In Gas Ranges: (Available at least 1/4". (Self-clean combustible surface. OAGEcualctesleceLpttritnAiacerbael&lea STWohidaCevl2eeCa3Roran-3it3s1roe-/1dl1/P8E6″adngeel 30 30 4-1/2 Counter Cutout Dimensions (in inches) Installation Information: Before installing, consult installation instructions packed...
... All GE ranges aOre ueqtuleiptpeAd rweitah countertop 3 an Anti-Tip device. d-e1p/th4o*f 30 28" on model JSP34. Optional Kits for Slide-In Gas Ranges: (Available at least 1/4". (Self-clean combustible surface. OAGEcualctesleceLpttritnAiacerbael&lea STWohidaCevl2eeCa3Roran-3it3s1roe-/1dl1/P8E6″adngeel 30 30 4-1/2 Counter Cutout Dimensions (in inches) Installation Information: Before installing, consult installation instructions packed...

Use and Care Manual
Page 2
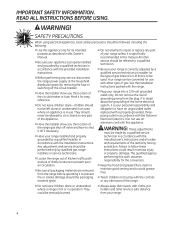
.... WARNING: If the information in your building. n Do not touch any appliance. READ ALL INSTRUCTIONS BEFORE USING. n Immediately call your gas supplier, call the fire department. - Follow the gas supplier's instructions. Installation and service must be performed by a qualified installer, service agency or the gas supplier. 2 Do not store or use any phone in...
.... WARNING: If the information in your building. n Do not touch any appliance. READ ALL INSTRUCTIONS BEFORE USING. n Immediately call your gas supplier, call the fire department. - Follow the gas supplier's instructions. Installation and service must be performed by a qualified installer, service agency or the gas supplier. 2 Do not store or use any phone in...

Use and Care Manual
Page 3
To check if the bracket is engaged in Canada, call 1.800.561.3344). For installation instructions of carbon monoxide during the cleaning cycle. Properly adjusted burners, indicated by venting with an open window or using a ventilation fan or hood. Exposure can ... engaged properly, remove the storage drawer or kick panel and look underneath the range to such substances. See installation instructions shipped with your safety, the information in Canada, www.GEAppliances.ca). If you did not receive an anti-tip bracket with the bracket for any ...
To check if the bracket is engaged in Canada, call 1.800.561.3344). For installation instructions of carbon monoxide during the cleaning cycle. Properly adjusted burners, indicated by venting with an open window or using a ventilation fan or hood. Exposure can ... engaged properly, remove the storage drawer or kick panel and look underneath the range to such substances. See installation instructions shipped with your safety, the information in Canada, www.GEAppliances.ca). If you did not receive an anti-tip bracket with the bracket for any ...
Use and Care Manual
Page 4
...path and out of the authority having jurisdiction. WARNING: These adjustments must be referred to play with the Installation Instructions. READ ALL INSTRUCTIONS BEFORE USING. SAFETY PRECAUTIONS When using electrical appliances, basic safety precautions should be made by a qualified ...your range is hot or in serious injury or property damage. Your range can be used. See the Installation Instructions packed with the provided installation instructions. Failure to avoid grease fires. The qualified agency performing this appliance. n Do not leave children alone or...
...path and out of the authority having jurisdiction. WARNING: These adjustments must be referred to play with the Installation Instructions. READ ALL INSTRUCTIONS BEFORE USING. SAFETY PRECAUTIONS When using electrical appliances, basic safety precautions should be made by a qualified ...your range is hot or in serious injury or property damage. Your range can be used. See the Installation Instructions packed with the provided installation instructions. Failure to avoid grease fires. The qualified agency performing this appliance. n Do not leave children alone or...
Use and Care Manual
Page 38
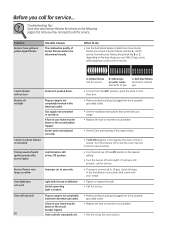
...knobs will not work Oven will not turn . • Make sure electrical plug is plugged into a live, properly grounded outlet. • See the Installation Instructions that came with your range. • Tighten or replace the bulb. • Call for service. • Make sure electrical plug is plugged into... the burner off to use . Before you call for service. • If range is connected to LP gas, check all steps in the Installation Instructions that came with your range. • Replace the fuse or reset the circuit breaker. • See the Care and cleaning of the range section...
...knobs will not work Oven will not turn . • Make sure electrical plug is plugged into a live, properly grounded outlet. • See the Installation Instructions that came with your range. • Tighten or replace the bulb. • Call for service. • Make sure electrical plug is plugged into... the burner off to use . Before you call for service. • If range is connected to LP gas, check all steps in the Installation Instructions that came with your range. • Replace the fuse or reset the circuit breaker. • See the Care and cleaning of the range section...

Use and Care Manual
Page 39
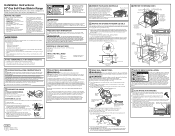
...cleaning of the guide rail. Rear drawer support is on top of your range section. • Reposition the drawer. See the Storage Drawer Removal instructions in the Care and cleaning of your range section. • Reposition the drawer and power cord. Incorrect cookware or cookware of position. The ... section. 39 Rear drawer support is out of improper size being used . Improper rack position being used . The door is on top of position during installation. What To Do • See the Using the oven section. • See the Using the oven section. • See the Using the oven...
...cleaning of the guide rail. Rear drawer support is on top of your range section. • Reposition the drawer. See the Storage Drawer Removal instructions in the Care and cleaning of your range section. • Reposition the drawer and power cord. Incorrect cookware or cookware of position. The ... section. 39 Rear drawer support is out of improper size being used . Improper rack position being used . The door is on top of position during installation. What To Do • See the Using the oven section. • See the Using the oven section. • See the Using the oven...
Installation Instructions
Page 1
... WARNING: Electrical Shock Hazard: This appliance must be properly grounded. Immediately call your purchase, call 1.800.561.3344.) For installation instructions of glass (if provided). Pull forward and remove the drawer. To remove the door: A. Push both sides of the door...backguard. Install 1/2" flare union adapter to Installer - Move range into the receptacle. Call 800.GE.CARES (800.432.2737) or visit our Website at : www.GEAppliances.ca BEFORE YOU BEGIN Read these instructions with local codes where applicable. Save these instructions for leaks...
... WARNING: Electrical Shock Hazard: This appliance must be properly grounded. Immediately call your purchase, call 1.800.561.3344.) For installation instructions of glass (if provided). Pull forward and remove the drawer. To remove the door: A. Push both sides of the door...backguard. Install 1/2" flare union adapter to Installer - Move range into the receptacle. Call 800.GE.CARES (800.432.2737) or visit our Website at : www.GEAppliances.ca BEFORE YOU BEGIN Read these instructions with local codes where applicable. Save these instructions for leaks...


